为什么80%的码农都做不了架构师?>>> 
一、LVS-DR介绍
director分配请求到不同的real server。real server 处理请求后直接回应给用户,这样director负载均衡器仅处理客户机与服务器的一半连接。负载均衡器仅处理一半的连接,避免了新的性能瓶颈,同样增加了系统的可伸缩性。Director Routing采用的是物理层(修改MAC地址)技术,因此,所以服务器都必须在同一个物理网段。
·这种模式,需要一个公共的IP配置在分发器和所有的rs上,也就是vip
·跟TUN模式不同的是,它会把数据包的MAC地址修改为rs的MAC地址
·rs接收到数据包后,会还原原始数据包,这样目标ip为vip,因为所有的rs都配置了这个vip,所以它会认为是它自己
LVS-DR模式工作原理:MAC地址转换
假设每台机子的ip与mac信息如下:

MAC地址转换过程:
(1)客户端(ip:192.168.10.201)向目标vip发出请求, Director接收。此时IP包头部及数据帧头信息如下:

(2)Director根据负载均衡算法选择一台active的RS(假设是192.168.10.101),并将此RIP所在网卡的mac地址作为目标mac地址,发送到局域网里。此时IP包头部及数据帧头信息如下:

(3)real server(192.168.10.101)在局域网中收到这个帧,拆开后发现目标IP(VIP)与本地匹配,于是处理这个报文,随后重新封装报文,发送到局域网。此时IP包及数据帧头信息如下:

(4)如果client与LVS在同一网段,那么clinet(192.168.10.201)将收到这个回复报文。如果跨了网段,那么这个报文通过gateway/路由通过Internet返回给用户。 以上就是LVS-DR模式的原理。
二、LVS-DR模式搭建
lvs-dr模式网络拓扑图:
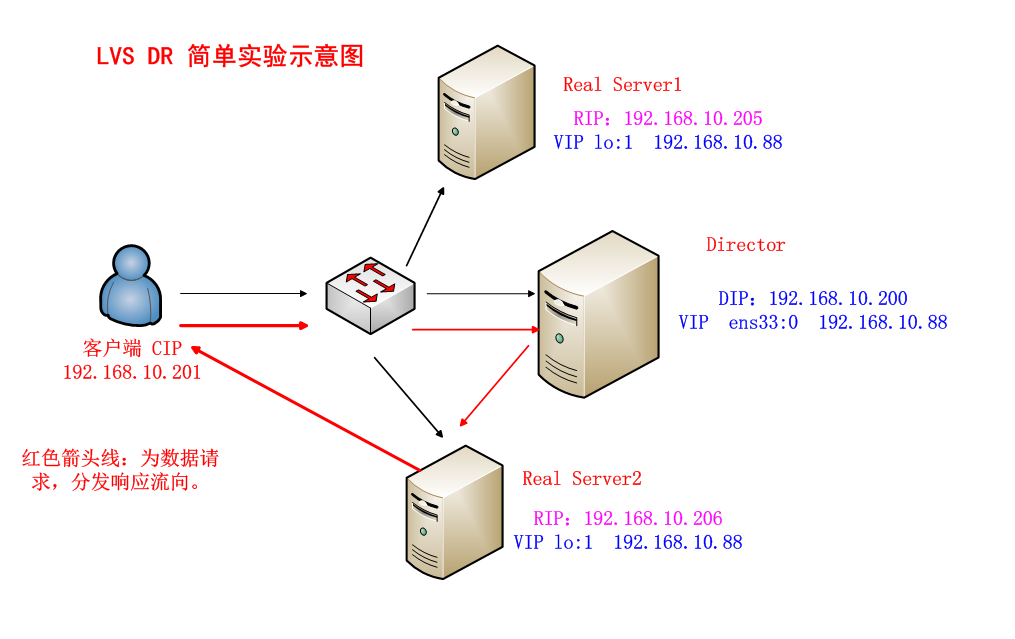
使用使用3台机子,每台机子都可以直接连接外网,每台机子只有一块网卡。每台机子都通过配置网卡别名配一个vip
1、Director分发器配置
1、安装ipvsadm、net-tools
因为我的系统是最小化安装的,没有ifconfig命令,所以要安装net-tools
[root@localhost ~]# yum install -t ipvsadm net-tools2、编写dr模式脚本,并执行
#!/bin/bash
#关闭路由端口转发,其实就dr模式,开不开启路由转发都行
echo 0 > /proc/sys/net/ipv4/ip_forward
#相关变量
ipv=/usr/sbin/ipvsadm
vip=192.168.10.88
rs1=192.168.10.205
rs2=192.168.10.206
#通过网卡别名配置vip,也就是虚拟网卡
ifdown ens33 #先关闭网卡再开启,是为了清空已有的虚拟网卡设置
ifup ens33
ifconfig ens33:0 $vip broadcast $vip netmask 255.255.255.255 up
route add -host $vip dev ens33:0
#设置规则
$ipv -C
$ipv -A -t $vip:80 -s wrr
$ipv -a -t $vip:80 -r $rs1:80 -g -w 1
$ipv -a -t $vip:80 -r $rs2:80 -g -w 1参数:-g:表示dr模式,-w:权重
执行脚本:
[root@node5 ~]# sh lvs_dr_rs.sh2、RS1、RS2配置
1、RS1、RS2安装net-tools
# yum install -y net-tools
2、RS1、RS2安装httpd服务
# yum install -y httpd
测试页:
RS1:
[root@node5 ~]# echo "<h1> Real Server 1 :192.168.10.205 </h1>" > /var/www/html/index.html RS2:
[root@node1 ~]# echo "<h1> Real Server 2 :192.168.10.206 </h1>" > /var/www/html/index.html RS1、RS2开启httpd服务,并清空防火墙规则
# systemctl restart httpd
# iptables -F
2、编写dr脚本,并执行。
RS1、RS2都创建一个脚本:lvs_dr_rs.sh,脚本内容:
#!/bin/bash
vip=192.168.10.88
#把vip绑定在lo上,是为了实现rs直接把结果返回给客户端
ifconfig lo:0 $vip broadcast $vip netmask 255.255.255.255 up
route add -host $vip lo:0
#修改arp参数
echo 1 > /proc/sys/net/ipv4/conf/all/arp_ignore
echo 1 > /proc/sys/net/ipv4/conf/lo/arp_ignore
echo 2 > /proc/sys/net/ipv4/conf/all/arp_announce
echo 2 > /proc/sys/net/ipv4/conf/lo/arp_announce
因为Director、Real Server都配置了相同的VIP(192.168.10.88),如果不关闭ARP转发,则ip冲突了。
arp参数解释:
arp_ignore为1:只回答目标ip地址是访问本网络接口(此处为ens33)的ARP查询请求。
也就是说,arp_ignore设为1,当别人的arp请求过来的时候,如果接收的网卡设备上面没有这个ip,就不做出相应。默认为0,只要这台机子上任何一个网卡设备上面有这个ip,就响应arp请求,并发送mac地址。
arp_announce(宣告)设为2:对查询目标使用最适当的本地地址。例如,如果在ens33接口上接收到了一个VIP的arp请求包,内核判断这个VIP地址是不是跟ens33接口上的IP一样。如果一样,则回复这个包;如果不一样,就丢弃不回应。
RS1、RS2执行脚本:
# sh lvs_dr_rs.sh3、测试
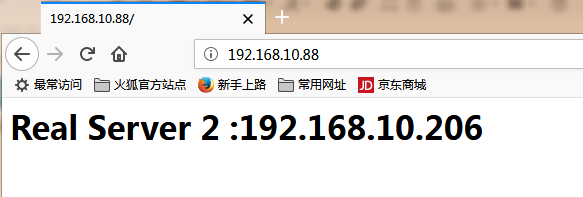
浏览器打开vip:192.168.10.88
使用curl测试,但不能在director上执行curl测试:
在192.168.10.207机子上测试:
[root@localhost ~]# curl 192.168.10.88
<h1> Real Server 1 :192.168.10.205 </h1>
[root@localhost ~]# curl 192.168.10.88
<h1> Real Server 2 :192.168.10.206 </h1>
[root@localhost ~]# curl 192.168.10.88
<h1> Real Server 1 :192.168.10.205 </h1>
[root@localhost ~]# curl 192.168.10.88
<h1> Real Server 2 :192.168.10.206 </h1>
[root@localhost ~]# ifconfig
eth0      Link encap:Ethernet  HWaddr 00:0C:29:24:42:91  inet addr:192.168.10.207  Bcast:192.168.10.255  Mask:255.255.255.0
OK。lvs-dr搭建成功。
4、ab压力测试
在192.168.10.207机子上测试。
1、安装httpd-tools工具
[root@localhost ~]# yum install -y httpd-tools2、使用ab命令测试。
语法:ab -n 数字 -c 数字 http://连接
参数解释:
-n:requests Number of requests to perform,在测试会话中所执行的请求总个数。默认时,仅执行一个请求
-c:concurrency Number of multiple requests to make,一次产生的请求个数。默认是,一次一个。
测试:同时处理1000个请求,一次要执行1000个并发请求。
[root@localhost ~]# ab -n 1000 -c 1000 http://192.168.10.88/index.html
This is ApacheBench, Version 2.3 <$Revision: 655654 $>
Copyright 1996 Adam Twiss, Zeus Technology Ltd, http://www.zeustech.net/
Licensed to The Apache Software Foundation, http://www.apache.org/Benchmarking 192.168.10.88 (be patient)
Completed 100 requests
Completed 200 requests
Completed 300 requests
Completed 400 requests
Completed 500 requests
Completed 600 requests
Completed 700 requests
apr_socket_recv: Connection reset by peer (104)
Total of 742 requests completed
失败,分发器、RS1、RS2均执行一下命令:
# echo "net.ipv4.tcp_syncookies = 0" >> /usr/lib/sysctl.d/50-default.conf
# sysctl -p
重新测试:
[root@localhost ~]# ab -n 1000 -c 1000 http://192.168.10.88/index.html
This is ApacheBench, Version 2.3 <$Revision: 655654 $>
Copyright 1996 Adam Twiss, Zeus Technology Ltd, http://www.zeustech.net/
Licensed to The Apache Software Foundation, http://www.apache.org/Benchmarking 192.168.10.88 (be patient)
Completed 100 requests
Completed 200 requests
Completed 300 requests
Completed 400 requests
Completed 500 requests
Completed 600 requests
Completed 700 requests
Completed 800 requests
Completed 900 requests
Completed 1000 requests
Finished 1000 requestsServer Software:        Apache/2.4.6
Server Hostname:        192.168.10.88
Server Port:            80Document Path:          /index.html
Document Length:        41 bytesConcurrency Level:      1000
Time taken for tests:   3.394 seconds
Complete requests:      1000
Failed requests:        0
Write errors:           0
Total transferred:      301301 bytes
HTML transferred:       41041 bytes
Requests per second:    294.67 [#/sec] (mean)
Time per request:       3393.581 [ms] (mean)
Time per request:       3.394 [ms] (mean, across all concurrent requests)
Transfer rate:          86.70 [Kbytes/sec] receivedConnection Times (ms)min  mean[+/-sd] median   max
Connect:        1   99  12.8     98     124
Processing:    31 1317 1313.0    127    3250
Waiting:        2 1311 1317.0    121    3249
Total:        113 1416 1314.8    237    3351Percentage of the requests served within a certain time (ms)50%    23766%   216075%   216980%   315090%   332195%   333998%   334799%   3350100%   3351 (longest request)
[root@localhost ~]#
测试结果解释:
Server Software: Apache/2.4.6 #被测试的httpd版本
Server Hostname: 192.168.10.88 #服务器主机名
Server Port: 80 #服务器端口Document Path: /index.html #测试的页面文档
Document Length: 41 bytes # 文档大小Concurrency Level: 1000 #并发数
Time taken for tests: 3.394 seconds #整个测试的耗时
Complete requests: 1000 #完成的请求数量
Failed requests: 0 #失败的请求数量
Write errors: 0
Total transferred: 301301 bytes #整个测试中总传输字节数
HTML transferred: 41041 bytes #整个场景中HTML内容传输量。
Requests per second: 294.67 [#/sec] (mean) #每秒处理请求数,相当于服务器中的每秒事务数,后面的括号的mean表示这是一个平均值。
Time per request: 3393.581 [ms] (mean) #平均请求响应时间,mean表示这是一个平均值。
Time per request: 3.394 [ms] (mean, across all concurrent requests) #每个请求的时间,1.080[毫秒](意思是说,在所有的并发请求),每个请求实际运行时间的平均值。由于对于并发请求,cpu实际上并不是同时处理的,而是按照每个请求获得的时间片逐个轮转处理的,所以基本上第一个Time per request时间约等于第二个Time per request时间乘以并发请求数。
Transfer rate: 86.70 [Kbytes/sec] received #传输速率,平均每秒网络上的流量,可以帮助排除是否存在网络流量过大导致响应时间延长的问题。Connection Times (ms) #连接时间
min mean[+/-sd] median max
Connect: 1 99 12.8 98 124
Processing: 31 1317 1313.0 127 3250
Waiting: 2 1311 1317.0 121 3249
Total: 113 1416 1314.8 237 3351Percentage of the requests served within a certain time (ms) #在一定的时间内提供服务的请求的百分比(毫秒)
50% 237
66% 2160
75% 2169
80% 3150
90% 3321
95% 3339
98% 3347
99% 3350
100% 3351 (longest request)
三、keepalived+LVS搭建
keepalived本身具有负载均衡功能,内置了ipvsadm的功能,因此不需要使用ipvsadm设置规则了。
这里使用3台机子:

1、还原实验环境
由于前面已经做了DR模式,所以为了有一个干净的实验环境,把三台机子还原快照。
2、director设置
1、安装keepalived
[root@localhost ~]# yum install keepalived -y2、配置keepalived
keepalived安装目录:/etc/keepalived/
[root@localhost ~]# cd /etc/keepalived/
[root@localhost keepalived]# mv keepalived.conf keepalived.conf.bak
[root@localhost keepalived]# grep -v "#" keepalived.conf.bak > keepalived.conf
[root@localhost keepalived]# vim keepalived.conf
! Configuration File for keepalivedglobal_defs {notification_email {acassen@firewall.loc}notification_email_from Alexandre.Cassen@firewall.locsmtp_server 192.168.200.1smtp_connect_timeout 30router_id LVS_DEVEL
}vrrp_instance VI_1 {state MASTER  #备用服务器为BACKUPinterface ens33 #绑定vip的网卡,这里为ens33virtual_router_id 51priority 100  #权重,备用服务器上的权重比MASTER的权重小,比如设为90advert_int 1authentication {auth_type PASSauth_pass 1111}virtual_ipaddress {192.168.10.88 #设置vip}
}virtual_server 192.168.10.88 80 {delay_loop 6 #每隔6每秒查询real server的状态lb_algo rr  #lvs算法,这里为rr:轮询lb_kind DR  #lvs模式,DR模式persistence_timeout 50 #同一IP的连接50秒内被分配到同一台real  serverprotocol TCP  #使用TCP协议real_server 192.168.10.205 80 {weight 100 #权重TCP_CHECK {connect_timeout 10 #10秒无响应超时nb_get_retry 3delay_before_retry 3connect_port 80}}real_server 192.168.10.206 80 {weight 100 #权重TCP_CHECK {connect_timeout 10 #10秒无响应超时nb_get_retry 3delay_before_retry 3connect_port 80}}
}
解释:
! Configuration File for keepalived
global_defs {
notification_email {
acassen@firewall.loc
}
notification_email_from Alexandre.Cassen@firewall.loc
smtp_server 192.168.200.1
smtp_connect_timeout 30
router_id LVS_DEVEL
}vrrp_instance VI_1 {
state MASTER #备用服务器为BACKUP
interface ens33 #绑定vip的网卡,这里为ens33
virtual_router_id 51
priority 100 #权重,备用服务器上的权重比MASTER的权重小,比如设为90
advert_int 1
authentication {
auth_type PASS
auth_pass 1111 #认证密钥,默认1111,可使用 openssl rand -hex 6产生
}
virtual_ipaddress {
192.168.10.88 #设置vip
}
}virtual_server 192.168.10.88 80 {
delay_loop 6 #每隔6每秒查询real server的状态
lb_algo rr #lvs算法,这里为rr:轮询
lb_kind DR #lvs模式,DR模式
persistence_timeout 50 #同一IP的连接50秒内被分配到同一台real server
protocol TCP #使用TCP协议real_server 192.168.10.205 80 {
weight 100 #权重
TCP_CHECK {
connect_timeout 10 #10秒无响应超时
nb_get_retry 3
delay_before_retry 3
connect_port 80
}
}
real_server 192.168.10.206 80 {
weight 100 #权重
TCP_CHECK {
connect_timeout 10 #10秒无响应超时
nb_get_retry 3
delay_before_retry 3
connect_port 80
}
}
}
3、清空防火墙,关闭selinux
这里是临时关闭selinux
[root@localhost ~]# iptables -F
[root@localhost ~]# setenforce 0
[root@localhost ~]#
4、启动keepalived
[root@localhost ~]# systemctl start keepalived查看一下ip:
[root@localhost ~]# ip addr
1: lo: <LOOPBACK,UP,LOWER_UP> mtu 65536 qdisc noqueue state UNKNOWN group default qlen 1000link/loopback 00:00:00:00:00:00 brd 00:00:00:00:00:00inet 127.0.0.1/8 scope host lovalid_lft forever preferred_lft foreverinet6 ::1/128 scope host valid_lft forever preferred_lft forever
2: ens33: <BROADCAST,MULTICAST,UP,LOWER_UP> mtu 1500 qdisc pfifo_fast state UP group default qlen 1000link/ether 00:0c:29:55:10:a8 brd ff:ff:ff:ff:ff:ffinet 192.168.10.200/24 brd 192.168.10.255 scope global noprefixroute ens33valid_lft forever preferred_lft foreverinet 192.168.10.88/32 scope global ens33valid_lft forever preferred_lft foreverinet6 fe80::b3d1:90a4:26af:f468/64 scope link noprefixroute valid_lft forever preferred_lft forever
3: ens37: <BROADCAST,MULTICAST,UP,LOWER_UP> mtu 1500 qdisc pfifo_fast state UP group default qlen 1000link/ether 00:0c:29:55:10:b2 brd ff:ff:ff:ff:ff:ff
[root@localhost ~]#
OK,虚拟ip已经设置好了
5、查看ipvsadm的规则
要看规则,必须安装ipvsadm
[root@localhost ~]# yum install ipvsadm -y
查看规则:
[root@localhost ~]# ipvsadm -L -n
IP Virtual Server version 1.2.1 (size=4096)
Prot LocalAddress:Port Scheduler Flags-> RemoteAddress:Port           Forward Weight ActiveConn InActConn
TCP  192.168.10.88:80 rr persistent 50
规则没添加成功。RS1、RS2清空防火墙、关闭selinux之后,director重启keepalived
[root@localhost ~]# systemctl restart keepalived
[root@localhost ~]# ipvsadm -L -n
IP Virtual Server version 1.2.1 (size=4096)
Prot LocalAddress:Port Scheduler Flags-> RemoteAddress:Port           Forward Weight ActiveConn InActConn
TCP  192.168.10.88:80 rr persistent 50-> 192.168.10.205:80            Route   100    0          0         -> 192.168.10.206:80            Route   100    0          0
[root@localhost ~]#
OK,规则添加成功了。
3、RS1、RS2设置
1、RS1、RS2安装httpd、创建测试页参考前面的实验
2、RS1、RS2清空防火墙、关闭selinux
3、RS1、RS2编写脚本并执行
脚本名:lvs_dr_rs.sh,脚本内容如下:
#!/bin/bash
vip=192.168.10.88
#把vip绑定在lo上,是为了实现rs直接把结果返回给客户端
ifdown lo
ifup lo
ifconfig lo:0 $vip broadcast $vip netmask 255.255.255.255 up
route add -host $vip lo:0
#修改arp参数
echo 1 > /proc/sys/net/ipv4/conf/all/arp_ignore
echo 1 > /proc/sys/net/ipv4/conf/lo/arp_ignore
echo 2 > /proc/sys/net/ipv4/conf/all/arp_announce
echo 2 > /proc/sys/net/ipv4/conf/lo/arp_announce
RS1、RS2执行脚本:
# sh lvs_dr_rs.sh4、测试
浏览器打开vip:192.168.10.88

curl测试:
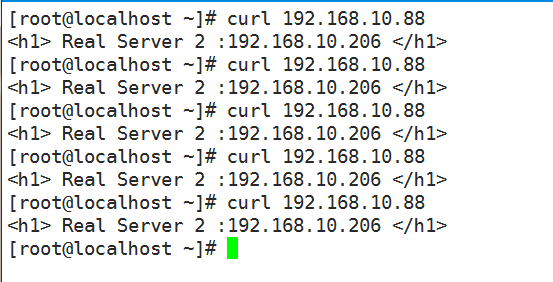
因为设置了:persistence_timeout 50 #同一IP的连接50秒内被分配到同一台real server
所以请求分配到同一rs。没有轮询效果,把persistence_timeout 50删除,重启keepalived,再请求:
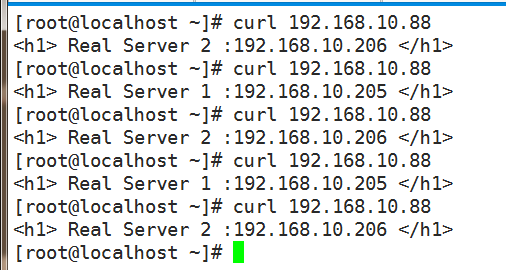
OK。轮询效果出来了
这里keepalived之配置了MASTER,没有配置BACKUP。


