目录
- 背景
- 实现步骤
- 1. 下载截图工具PhantomJS
- 2. 测试PhantomJS工具
- 3. 在java项目中集成PhantomJS
- 总结
背景
在之前开发的一个VisualDrag低代码拖拽模板中,每次保存需要截一张封面图进行保存用来做缩略图预览。在画布上的东西直接转成canvas很方便,直接html2canvas就可以了,但是像浏览器这种元素就行不通了,因为浏览器加载得到资源是超链接的,无法获取第三方网页的html,如果在js中直接请求全部都是跨域了,尝试了很多种方法也行不通,所以想到了一个方法另辟蹊径,把超链接的浏览器截图交给服务端处理,web端直接传给服务端超链接和截图的位置大小,服务端截图完后直接返回给web端图片地址或者数据流,然后截图的时候直接把图片替换浏览器放在画布上,就可以截图成功了。
实现的方案有很多,比如:PhantomJS,Selenium WebDriver,HtmlUnit,Puppeteer等,大致的思路都是在服务端静默的模仿打开浏览器,从而进行截图。
由于服务端一般使用java,本次实现的方案是使用java + PhantomJS + rasterize.js
实现步骤
1. 下载截图工具PhantomJS
简介:
PhantomJS是一个基于webkit的javaScript API。它使用QtWebKit作为它核心浏览器的功能,使用webkit来编译解释执行javaScript代码。任何你可以基于在webkit浏览器做的事情,它都能做到。它不仅是个隐性的浏览器,提供了诸如css选择器、支持wen标准、DOM操作、json、HTML5等,同时也提供了处理文件I/O的操作,从而使你可以向操作系统读写文件等。phantomJS的用处可谓非常广泛诸如网络监测、网页截屏、无需浏览器的wen测试、页面访问自动化等。
各个平台下载地址:https://phantomjs.org/download.html
也可以网盘下载:https://pan.baidu.com/s/1mLHdwlSzyIGsiIYBeZY0eg
提取码 :ehim
选择下载windows的PhantomJS包
下载后解压目录如下:
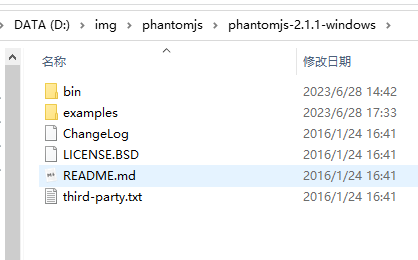
其中bin目录是PhantomJS工具的执行环境
examples是许多该工具执行时需要的不同场景的demo,比如下面我用到的rasterize.js 。
2. 测试PhantomJS工具
执行脚本如下(我把rasterize.js放在了bin目录):
phantomjs.exe rasterize.js https://www.baidu.com/ test.png
执行完之后就在bin当前目录生成了一直test.png的图片。
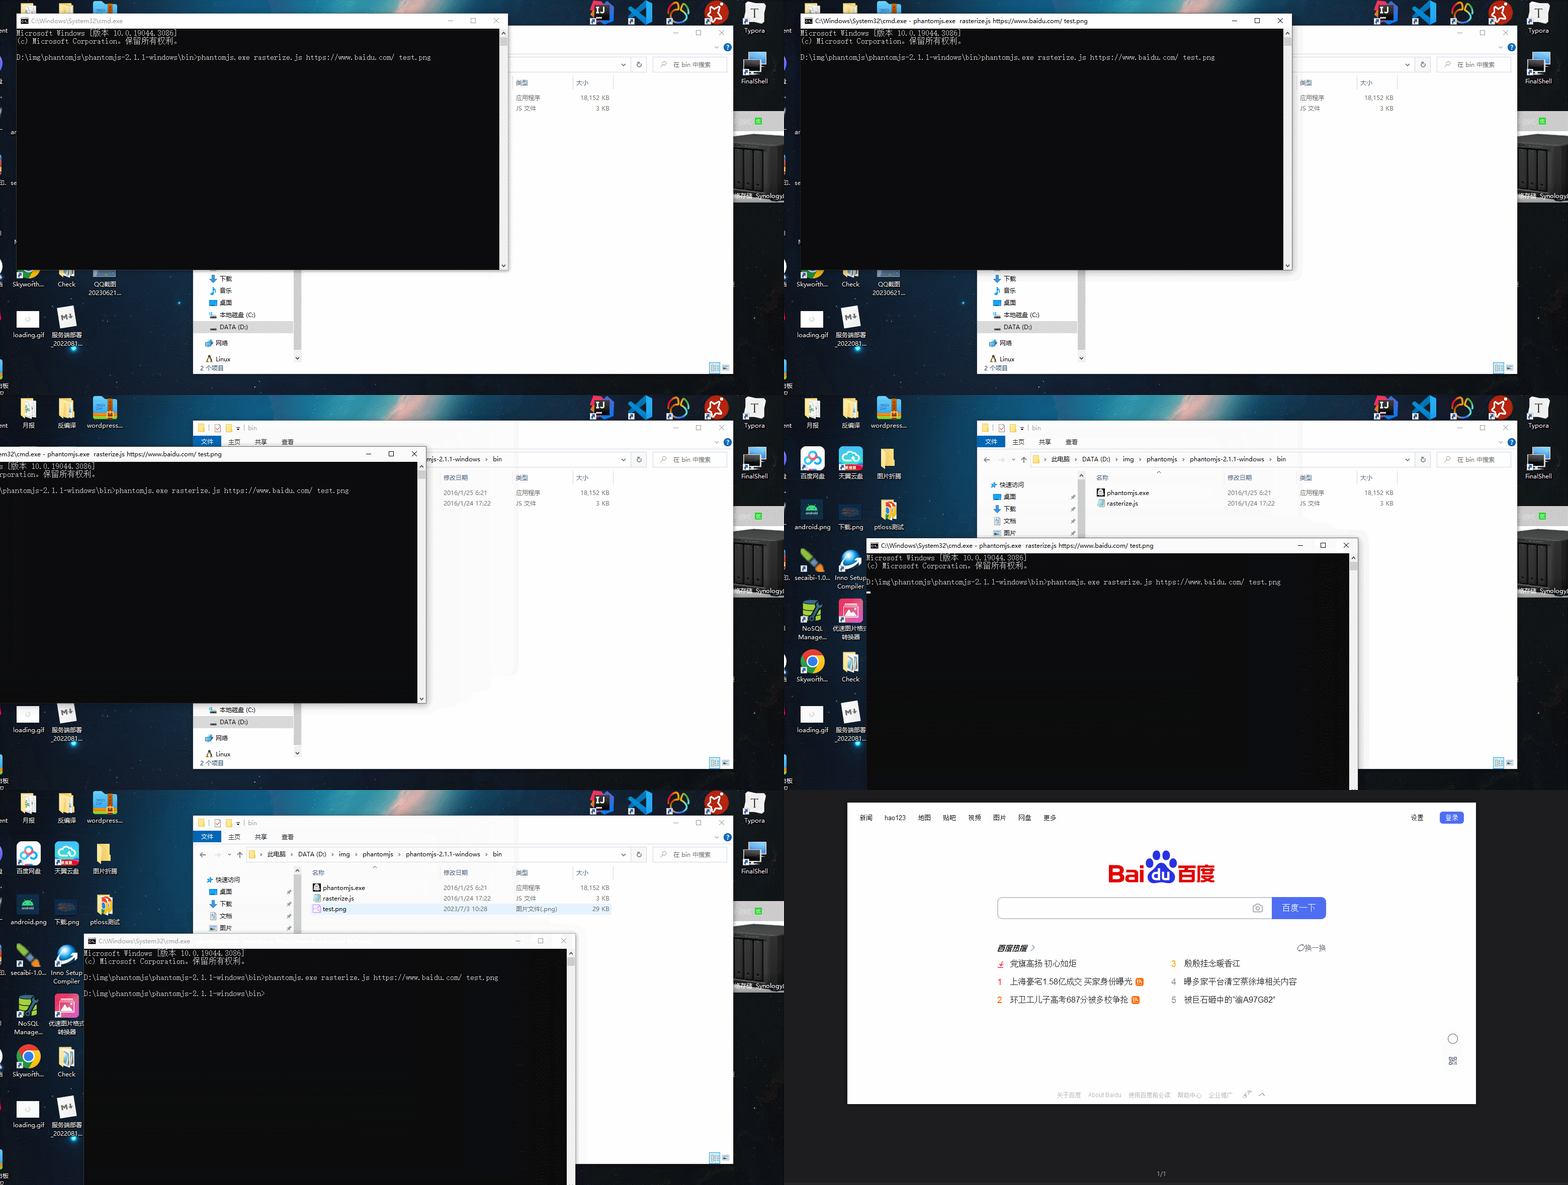
当然也可以自己指定参数位置等。
examples文件夹下面的rasterize.js也不是很复杂,可以自己看代码进行传参,大致就是传例如 宽*高px 的参数,然后js脚本中会对参数进行分割处理,最后变成下面的命令模式进行执行:phantomjs.exe + rasterize.js + 链接url + 截图保存位置 + X轴 + Y轴 + 宽 + 高
所以业务需要,我仿照rasterize.js自己写了一个截图脚本:
"use strict";
var page = require('webpage').create(),system = require('system');
/*
用法:
1. 默认使用方法为(两个参数): phantomjs.exe + rasterize.js + 链接url + 截图保存位置
2. (七个参数): phantomjs.exe + rasterize.js + 链接url + 截图保存位置 + X轴 + Y轴 + 宽 + 高
*/page.viewportSize = {width: 600,height: 600
};
page.clipRect = {top: 0,left: 0,width: 600,height: 600
};
var address = system.args[1];
var output = system.args[2];
var clipRect;if (system.args.length > 3) {var x = parseInt(system.args[3]);var y = parseInt(system.args[4]);var width = parseInt(system.args[5]);var height = parseInt(system.args[6]);page.viewportSize = {width: width,height: height};clipRect = {top: y,left: x,width: width,height: height};
}page.open(address, function (status) {if (status !== 'success') {console.log('Unable to load the address!');phantom.exit(1);} else {window.setTimeout(function () {page.clipRect = clipRect;page.render(output);phantom.exit();}, 200);}
});
用法:
- 默认使用方法为(两个参数): phantomjs.exe + rasterize.js + 链接url + 截图保存位置
- (七个参数): phantomjs.exe + rasterize.js + 链接url + 截图保存位置 + X轴 + Y轴 + 宽 + 高
3. 在java项目中集成PhantomJS
ScreenshotUtil工具类
package com.team.utils;import lombok.extern.slf4j.Slf4j;import java.io.BufferedReader;
import java.io.IOException;
import java.io.InputStream;
import java.io.InputStreamReader;import org.springframework.beans.factory.annotation.Value;
import org.springframework.stereotype.Component;/*** Created by tao.* Date: 2022/1/24 16:56* 描述: 根据网页地址转换成图片*/@Component
@Slf4j
public class ScreenshotUtil {public static String phantomjsPath;@Value("${phantomjs}")public void setPhantomjs(String phantomjs) {phantomjsPath = phantomjs;}public static String path;@Value("${file.windows.path}")public void setPath(String p) {path = p;}private static String BLANK = " ";// 下面内容可以在配置文件中配置// 执行cmd命令public static String cmd(String imgagePath, String url, String width, String height) {String binPath = phantomjsPath + "bin/phantomjs.exe";// 插件引入地址String jsPath = phantomjsPath + "examples/rasterize.js";// js引入地址// return binPath + BLANK + jsPath + BLANK + url + BLANK + imgagePath;return binPath + BLANK + jsPath + BLANK + url + BLANK + imgagePath + BLANK + "0" + BLANK + "0" + BLANK + width + BLANK + height;}//关闭命令public static void close(Process process, BufferedReader bufferedReader) throws IOException {if (bufferedReader != null) {bufferedReader.close();}if (process != null) {process.destroy();process = null;}}/*** @param url* @throws IOException*/public static String screenshot(String url, String width, String height) throws IOException {String tempPath = path;// 图片保存目录String imgagePath = tempPath + "缩略图/" + System.currentTimeMillis() + ".png";//图片路径System.out.println(imgagePath);//Java中使用Runtime和Process类运行外部程序Process process = Runtime.getRuntime().exec(cmd(imgagePath, url, width, height));InputStream inputStream = process.getInputStream();BufferedReader reader = new BufferedReader(new InputStreamReader(inputStream));String tmp = "";while ((tmp = reader.readLine()) != null) {close(process, reader);}System.out.println("url截图成功");return imgagePath;}
}
其中文件的路径我放在了配置文件里
测试如下:
@Testpublic void test() throws Exception {String url = "https://www.baidu.com/";//以百度网站首页为例ScreenshotUtil.screenshot(url, "400", "300");}
执行代码就可以在指定目录下获取url的400*300的截图。
总结
服务端使用PhantomJS工具进行对网页的截图还是行得通的,但是截图的过程需要几秒钟,响应稍微有些慢,有兴趣可以对比一下其他网页的截图方案。
