分享一个国外的趣味项目,俯卧撑计数自动计数项目,这个准确度还可以,考虑因素比较全,据说是新加坡军方使用的。
原文链接:https://aryanvij02.medium.com/push-ups-with-python-mediapipe-open-a544bd9b4351
github 地址: GitHub - aryanvij02/PushUpCounter: A simple program using Mediapipe and OpenCV to count the number of Push Ups done. The main goal is to ensure proper form while doing Push Ups so as to achieve maximum effect.

程序原理介绍
在新加坡军队中,有一种测试叫做IPPT(个人身体素质测试)。这个测试的困难不在于它对体力的要求有多高,而在于用来计算做俯卧撑和仰卧起坐次数的电子机器。
和大多数人一样,我的俯卧撑动作总是不达标(根据机器的意见)。此外,由于缺乏参照机器标准的练习,许多NSMen(已经完成两年强制性服役的人)在IPPT测试中都难以取得好成绩。
因此,我决定使用mediapipe和OpenCV创建一个程序,跟踪我们的俯卧撑动作,确保我们每一个俯卧撑动作都达标。
程序结构介绍
该项目有两个文件即可运行:
文件一:PoseModule.py
文件二:main.pyPoseModule.py
模块一:PoseModule.py 模块
上面的代码来源于PoseModule.py,有以下几个功能:
-
激活mediapipe的姿势检测模块。
-
检测人体。
-
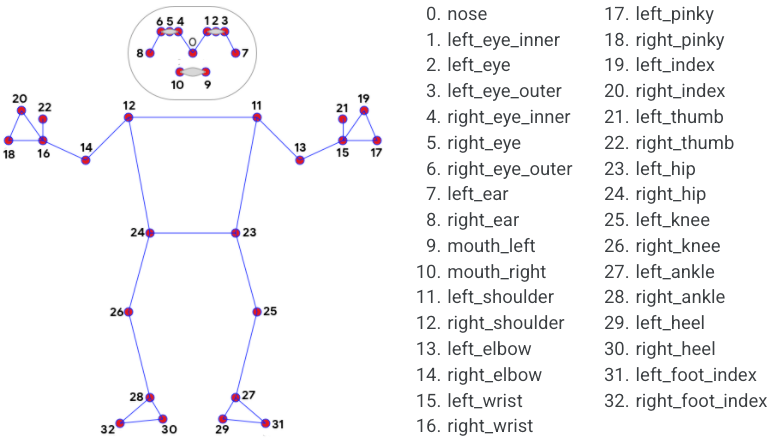
根据模型找到人体上不同肢体关节的位置。(肢体显示在上面的图片中)。
-
查找关节之间的角度(取决于你选择的关节)。对于我的俯卧撑程序,我选择找到肘部、肩部和臀部的角度,因为这些对俯卧撑动作的标准至关重要。
源码如下:
import cv2
import mediapipe as mp
import mathclass poseDetector():def __init__(self, mode=False, complexity=1, smooth_landmarks=True,enable_segmentation=False, smooth_segmentation=True,detectionCon=0.5, trackCon=0.5):self.mode = modeself.complexity = complexityself.smooth_landmarks = smooth_landmarksself.enable_segmentation = enable_segmentationself.smooth_segmentation = smooth_segmentationself.detectionCon = detectionConself.trackCon = trackConself.mpDraw = mp.solutions.drawing_utilsself.mpPose = mp.solutions.poseself.pose = self.mpPose.Pose(self.mode, self.complexity, self.smooth_landmarks,self.enable_segmentation, self.smooth_segmentation,self.detectionCon, self.trackCon)def findPose(self, img, draw=True):imgRGB = cv2.cvtColor(img, cv2.COLOR_BGR2RGB)self.results = self.pose.process(imgRGB)if self.results.pose_landmarks:if draw:self.mpDraw.draw_landmarks(img, self.results.pose_landmarks,self.mpPose.POSE_CONNECTIONS)return imgdef findPosition(self, img, draw=True):self.lmList = []if self.results.pose_landmarks:for id, lm in enumerate(self.results.pose_landmarks.landmark):# finding height, width of the image printedh, w, c = img.shape# Determining the pixels of the landmarkscx, cy = int(lm.x * w), int(lm.y * h)self.lmList.append([id, cx, cy])if draw:cv2.circle(img, (cx, cy), 5, (255, 0, 0), cv2.FILLED)return self.lmListdef findAngle(self, img, p1, p2, p3, draw=True):# Get the landmarksx1, y1 = self.lmList[p1][1:]x2, y2 = self.lmList[p2][1:]x3, y3 = self.lmList[p3][1:]# Calculate Angleangle = math.degrees(math.atan2(y3 - y2, x3 - x2) -math.atan2(y1 - y2, x1 - x2))if angle < 0:angle += 360if angle > 180:angle = 360 - angleelif angle > 180:angle = 360 - angle# print(angle)# Drawif draw:cv2.line(img, (x1, y1), (x2, y2), (255, 255, 255), 3)cv2.line(img, (x3, y3), (x2, y2), (255, 255, 255), 3)cv2.circle(img, (x1, y1), 5, (0, 0, 255), cv2.FILLED)cv2.circle(img, (x1, y1), 15, (0, 0, 255), 2)cv2.circle(img, (x2, y2), 5, (0, 0, 255), cv2.FILLED)cv2.circle(img, (x2, y2), 15, (0, 0, 255), 2)cv2.circle(img, (x3, y3), 5, (0, 0, 255), cv2.FILLED)cv2.circle(img, (x3, y3), 15, (0, 0, 255), 2)cv2.putText(img, str(int(angle)), (x2 - 50, y2 + 50),cv2.FONT_HERSHEY_PLAIN, 2, (0, 0, 255), 2)return angledef main():detector = poseDetector()cap = cv2.VideoCapture(0)while cap.isOpened():ret, img = cap.read()  # ret is just the return variable, not much in there that we will use.if ret:img = detector.findPose(img)cv2.imshow('Pose Detection', img)if cv2.waitKey(10) & 0xFF == ord('q'):breakcap.release()cv2.destroyAllWindows()if __name__ == "__main__":main()
模块二:运行主程序模块PushUpCounter.py
实际的俯卧撑计数的代码。我们使用PoseModule并确定一个俯卧撑合格与否的标准。
import cv2
import mediapipe as mp
import numpy as np
import PoseModule as pmcap = cv2.VideoCapture(0)
detector = pm.poseDetector()
count = 0
direction = 0
form = 0
feedback = "Fix Form"while cap.isOpened():ret, img = cap.read()  # 640 x 480# Determine dimensions of video - Help with creation of box in Line 43width = cap.get(3)  # float `width`height = cap.get(4)  # float `height`# print(width, height)img = detector.findPose(img, False)lmList = detector.findPosition(img, False)# print(lmList)if len(lmList) != 0:elbow = detector.findAngle(img, 11, 13, 15)shoulder = detector.findAngle(img, 13, 11, 23)hip = detector.findAngle(img, 11, 23, 25)# Percentage of success of pushupper = np.interp(elbow, (90, 160), (0, 100))# Bar to show Pushup progressbar = np.interp(elbow, (90, 160), (380, 50))# Check to ensure right form before starting the programif elbow > 160 and shoulder > 40 and hip > 160:form = 1# Check for full range of motion for the pushupif form == 1:if per == 0:if elbow <= 90 and hip > 160:feedback = "Up"if direction == 0:count += 0.5direction = 1else:feedback = "Fix Form"if per == 100:if elbow > 160 and shoulder > 40 and hip > 160:feedback = "Down"if direction == 1:count += 0.5direction = 0else:feedback = "Fix Form"# form = 0print(count)# Draw Barif form == 1:cv2.rectangle(img, (580, 50), (600, 380), (0, 255, 0), 3)cv2.rectangle(img, (580, int(bar)), (600, 380), (0, 255, 0), cv2.FILLED)cv2.putText(img, f'{int(per)}%', (565, 430), cv2.FONT_HERSHEY_PLAIN, 2,(255, 0, 0), 2)# Pushup countercv2.rectangle(img, (0, 380), (100, 480), (0, 255, 0), cv2.FILLED)cv2.putText(img, str(int(count)), (25, 455), cv2.FONT_HERSHEY_PLAIN, 5,(255, 0, 0), 5)# Feedbackcv2.rectangle(img, (500, 0), (640, 40), (255, 255, 255), cv2.FILLED)cv2.putText(img, feedback, (500, 40), cv2.FONT_HERSHEY_PLAIN, 2,(0, 255, 0), 2)cv2.imshow('Pushup counter', img)if cv2.waitKey(10) & 0xFF == ord('q'):breakcap.release()
cv2.destroyAllWindows()
有个需要注意的地方在第17-21行。确定从相机捕捉到的图像的分辨率,并在绘制俯卧撑计数的矩形时调整像素值,等等。(第68-82行)。
环境部署说明:
新建虚拟环境,无需安装其他框架
pip install mediapipe -i https://pypi.tuna.tsinghua.edu.cn/simple
pip install opencv-python -i https://pypi.tuna.tsinghua.edu.cn/simple