1. 实验目的
①理解并掌握误差反向传播算法;
②能够使用单层和多层神经网络,完成多分类任务;
③了解常用的激活函数。
2. 实验内容
①设计单层和多层神经网络结构,并使用TensorFlow建立模型,完成多分类任务;
②调试程序,通过调整超参数和训练模型参数,使模型在测试集上达到最优性能;
③测试模型,使用MatPlotlib对结果进行可视化呈现。
3. 实验过程
题目一:
分别使用单层神经网络和多层神经网络,对Iris数据集中的三种鸢尾花分类,并测试模型性能,以恰当的形式展现训练过程和结果。
要求:
⑴编写代码实现上述功能;
⑵记录实验过程和结果:
改变隐含层层数、隐含层中节点数等超参数,综合考虑准确率、交叉熵损失、和训练时间等,使模型在测试集达到最优的性能,并以恰当的方式记录和展示实验结果;
⑶分析和总结:
这个模型中的超参数有哪些?简要说明你寻找最佳超参数的过程,请分析它们对结果准确性和训练时间的影响,以表格或其他合适的图表形式展示。通过以上结果,可以得到什么结论,或对你有什么启发。
① 代码
单层神经网络:
import tensorflow as tf
import pandas as pd
import numpy as np
import matplotlib.pyplot as plt
plt.rcParams['font.family'] = "SimHei"#设置gpu
gpus = tf.config.experimental.list_physical_devices('GPU')
tf.config.experimental.set_memory_growth(gpus[0],True)
for gpu in gpus:tf.config.experimental.set_memory_growth(gpu,True)#下载数据集
TRAIN_URL = "http://download.tensorflow.org/data/iris_training.csv"
train_path = tf.keras.utils.get_file(TRAIN_URL.split('/')[-1],TRAIN_URL)TEST_URL = "http://download.tensorflow.org/data/iris_test.csv"
test_path = tf.keras.utils.get_file(TEST_URL.split("/")[-1],TEST_URL)df_iris_train = pd.read_csv(train_path,header=0)
df_iris_test = pd.read_csv(test_path,header=0)iris_train = np.array(df_iris_train) #(120,5)
iris_test = np.array(df_iris_test) #(30,5)#拆
x_train = iris_train[:,0:4]#(120,4)
y_train = iris_train[:,4]#(120,)
x_test = iris_test[:,0:4]
y_test = iris_test[:,4]#中心化
x_train = x_train - np.mean(x_train,axis=0)#(dtype(float64))
x_test = x_test - np.mean(x_test,axis=0)
#独热编码
X_train = tf.cast(x_train,tf.float32)
Y_train = tf.one_hot(tf.constant(y_train,dtype=tf.int32),3)
X_test = tf.cast(x_test,tf.float32)
Y_test = tf.one_hot(tf.constant(y_test,dtype=tf.int32),3)#超参数
learn_rate = 0.5
iter = 100
display_step = 5
#初始化
np.random.seed(612)
W = tf.Variable(np.random.randn(4,3),dtype=tf.float32)  #权值矩阵
B = tf.Variable(np.zeros([3]),dtype=tf.float32) #偏置值
acc_train = []
acc_test = []
cce_train = []
cce_test = []for i in range(iter + 1):with tf.GradientTape() as tape:PRED_train = tf.nn.softmax(tf.matmul(X_train,W) + B)Loss_train = tf.reduce_mean(tf.keras.losses.categorical_crossentropy(y_true=Y_train,y_pred=PRED_train))PRED_test = tf.nn.softmax(tf.matmul(X_test,W) + B)Loss_test = tf.reduce_mean(tf.keras.losses.categorical_crossentropy(y_true=Y_test,y_pred=PRED_test))accuracy_train = tf.reduce_mean(tf.cast(tf.equal(tf.argmax(PRED_train.numpy(),axis=1),y_train),tf.float32))accuracy_test = tf.reduce_mean(tf.cast(tf.equal(tf.argmax(PRED_test.numpy(),axis=1),y_test),tf.float32))acc_train.append(accuracy_train)acc_test.append(accuracy_test)cce_train.append(Loss_train)cce_test.append(Loss_test)grads = tape.gradient(Loss_train,[W,B])W.assign_sub(learn_rate*grads[0])#dL_dW (4,3)B.assign_sub(learn_rate*grads[1])#dL_dW (3,)if i % display_step == 0:print("i:%d,TrainAcc:%f,TrainLoss:%f,TestAcc:%f,TestLoss:%f" % (i, accuracy_train, Loss_train, accuracy_test, Loss_test))#绘制图像
plt.figure(figsize=(10,3))
plt.suptitle("训练集和测试集的损失曲线和迭代率曲线",fontsize = 20)
plt.subplot(121)
plt.plot(cce_train,color="b",label="train")
plt.plot(cce_test,color="r",label="test")
plt.xlabel("Iteration")
plt.ylabel("Loss")
#plt.title("训练集和测试集的损失曲线",fontsize = 18)
plt.legend()plt.subplot(122)
plt.plot(acc_train,color="b",label="train")
plt.plot(acc_test,color="r",label="test")
plt.xlabel("Iteration")
plt.ylabel("Accuracy")
#plt.title("训练集和测试集的迭代率曲线",fontsize = 18)
plt.legend()plt.show()
多层神经网络
import pandas as pd
import numpy as np
import tensorflow as tf
import matplotlib.pyplot as plt
plt.rcParams['font.family'] = "SimHei"#下载数据集
TRAIN_URL = "http://download.tensorflow.org/data/iris_training.csv"
train_path = tf.keras.utils.get_file(TRAIN_URL.split('/')[-1],TRAIN_URL)TEST_URL = "http://download.tensorflow.org/data/iris_test.csv"
test_path = tf.keras.utils.get_file(TEST_URL.split("/")[-1],TEST_URL)
#表示第一行数据作为列标题
df_iris_train = pd.read_csv(train_path,header=0)
df_iris_test = pd.read_csv(test_path,header=0)iris_train = np.array(df_iris_train)#将二维数据表转换为numpy数组,(120,5),训练集有120条样本
iris_test = np.array(df_iris_test)
train_x = iris_train[:,0:4]
train_y = iris_train[:,4]
test_x = iris_test[:,0:4]
test_y = iris_test[:,4]train_x = train_x - np.mean(train_x,axis=0)
test_x = test_x - np.mean(test_x,axis=0)X_train = tf.cast(train_x,tf.float32)
Y_train = tf.one_hot(tf.constant(train_y,dtype=tf.int32),3) #将标签值转换为独热编码的形式(120,3)X_test = tf.cast(test_x,tf.float32)
Y_test = tf.one_hot(tf.constant(test_y,dtype=tf.int32),3)learn_rate = 0.55
iter = 70
display_step = 13np.random.seed(612)
#隐含层
W1 = tf.Variable(np.random.randn(4,16),dtype=tf.float32) #W1(4,16)
B1 = tf.Variable(tf.zeros(16),dtype=tf.float32)#输出层
W2 = tf.Variable(np.random.randn(16,3),dtype=tf.float32) #W2(16,3)
B2 = tf.Variable(np.zeros([3]),dtype=tf.float32)cross_train = []    #保存每一次迭代的交叉熵损失
acc_train = []      #存放训练集的分类准确率cross_test = []
acc_test = []for i in range(iter + 1):with tf.GradientTape() as tape:# 5.1定义网络结构# H= X * W1 + B1Hidden_train = tf.nn.relu(tf.matmul(X_train,W1) + B1)# Y = H * W2 + B2Pred_train = tf.nn.softmax(tf.matmul(Hidden_train,W2) + B2)#计算训练集的平均交叉熵损失函数0Loss_train = tf.reduce_mean(tf.keras.losses.categorical_crossentropy(y_true=Y_train,y_pred=Pred_train))#H = X * W1 + B1Hidden_test = tf.nn.relu(tf.matmul(X_test,W1) + B1)# Y = H * W2 + B2Pred_test = tf.nn.softmax(tf.matmul(Hidden_test,W2) + B2)#计算测试集的平均交叉熵损失函数Loss_test = tf.reduce_mean(tf.keras.losses.categorical_crossentropy(y_true=Y_test,y_pred=Pred_test))Accuarcy_train = tf.reduce_mean(tf.cast(tf.equal(tf.argmax(Pred_train.numpy(),axis=1),train_y),tf.float32))Accuarcy_test = tf.reduce_mean(tf.cast(tf.equal(tf.argmax(Pred_test.numpy(),axis=1),test_y),tf.float32))#记录每一次迭代的交叉熵损失和准确率cross_train.append(Loss_train)cross_test.append(Loss_test)acc_train.append(Accuarcy_train)acc_test.append(Accuarcy_test)#对交叉熵损失函数W和B求偏导grads = tape.gradient(Loss_train,[W1,B1,W2,B2])W1.assign_sub(learn_rate * grads[0])B1.assign_sub(learn_rate * grads[1])W2.assign_sub(learn_rate * grads[2])B2.assign_sub(learn_rate * grads[3])if i % display_step == 0:print("i:%d,TrainLoss:%f,TrainAcc:%f,TestLoss:%f,TestAcc:%f" % (i, Loss_train, Accuarcy_train, Loss_test, Accuarcy_test))plt.figure(figsize=(12,5))
plt.suptitle("训练集和测试集的损失曲线和迭代率曲线",fontsize = 20)
plt.subplot(121)
plt.plot(acc_train,color="b",label="train")
plt.plot(acc_test,color="r",label="test")
plt.xlabel("Iteration")
plt.ylabel("Loss")
#plt.title("训练集和测试集的损失曲线",fontsize = 18)
plt.legend()plt.subplot(122)
plt.plot(cross_train,color="b",label="train")
plt.plot(cross_test,color="r",label="test")
plt.xlabel("Iteration")
plt.ylabel("Accuracy")
#plt.title("训练集和测试集的迭代率曲线",fontsize = 18)
plt.legend()plt.show()
② 结果记录
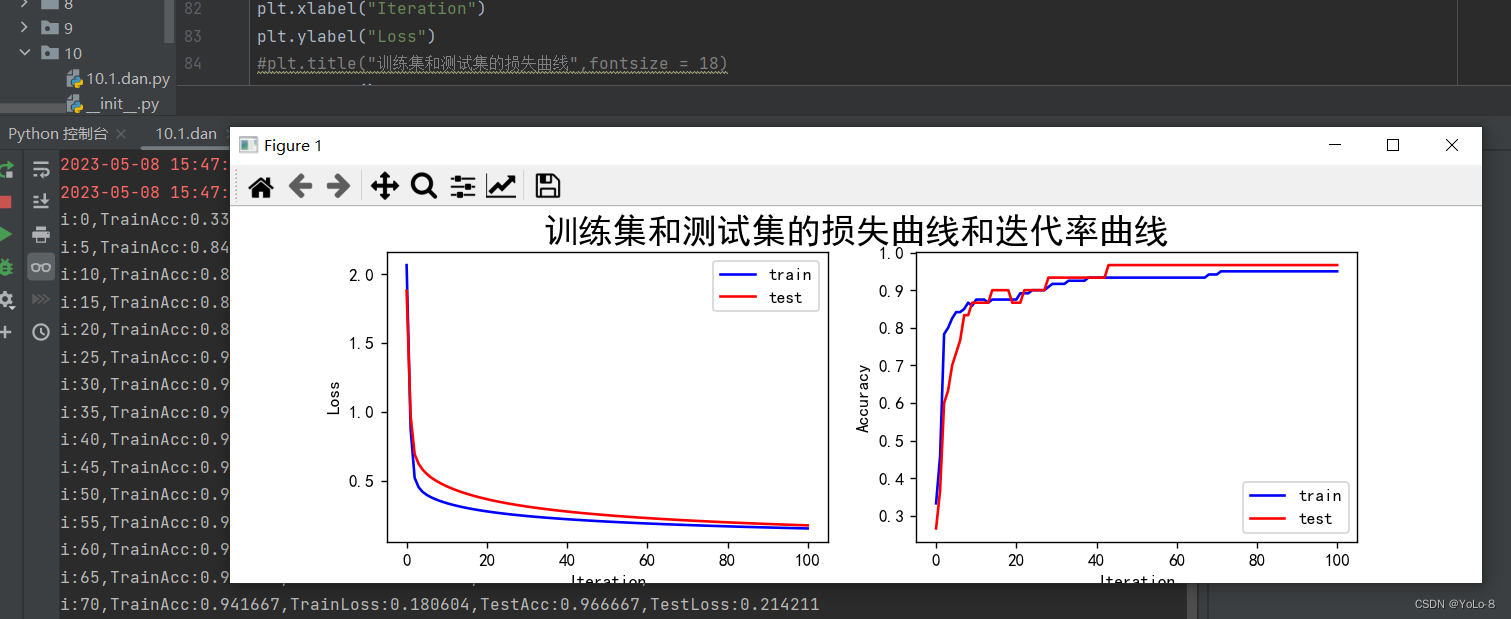
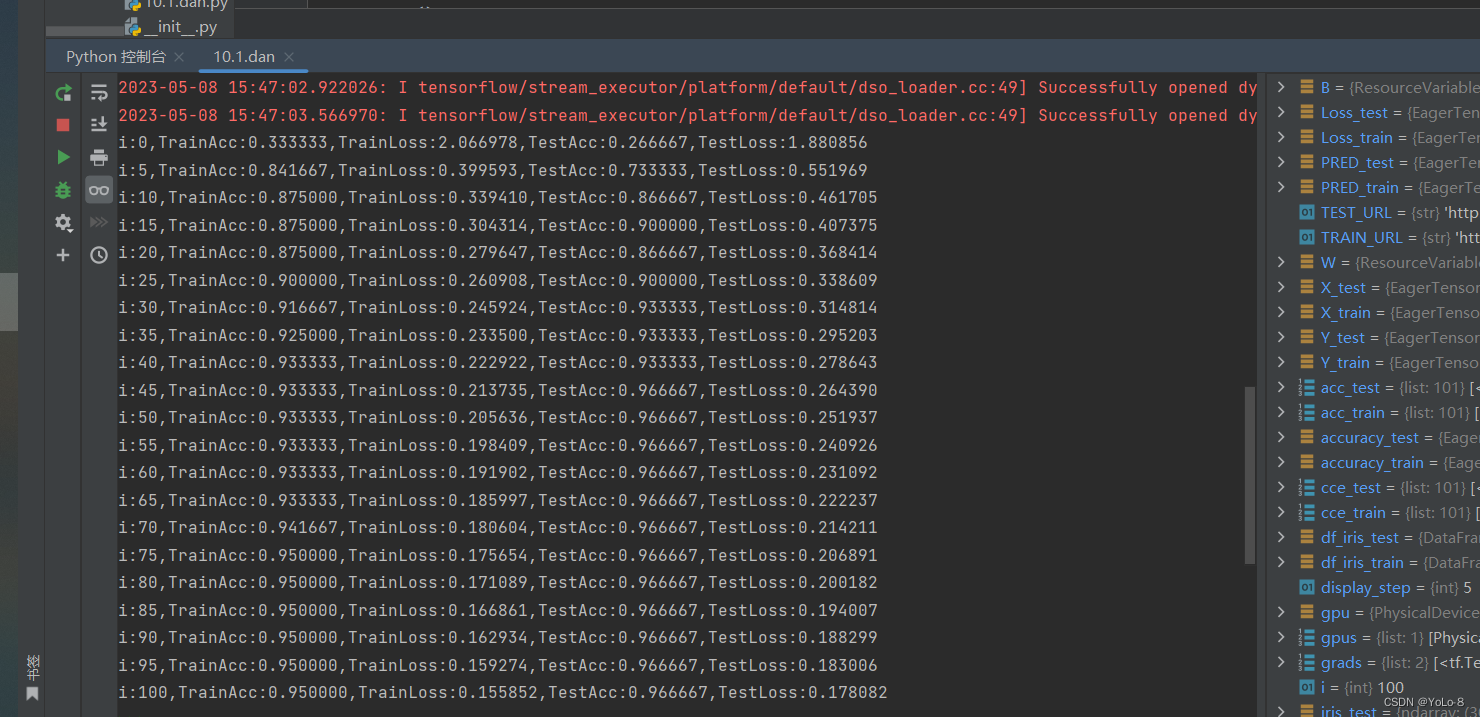
单层神经网络:
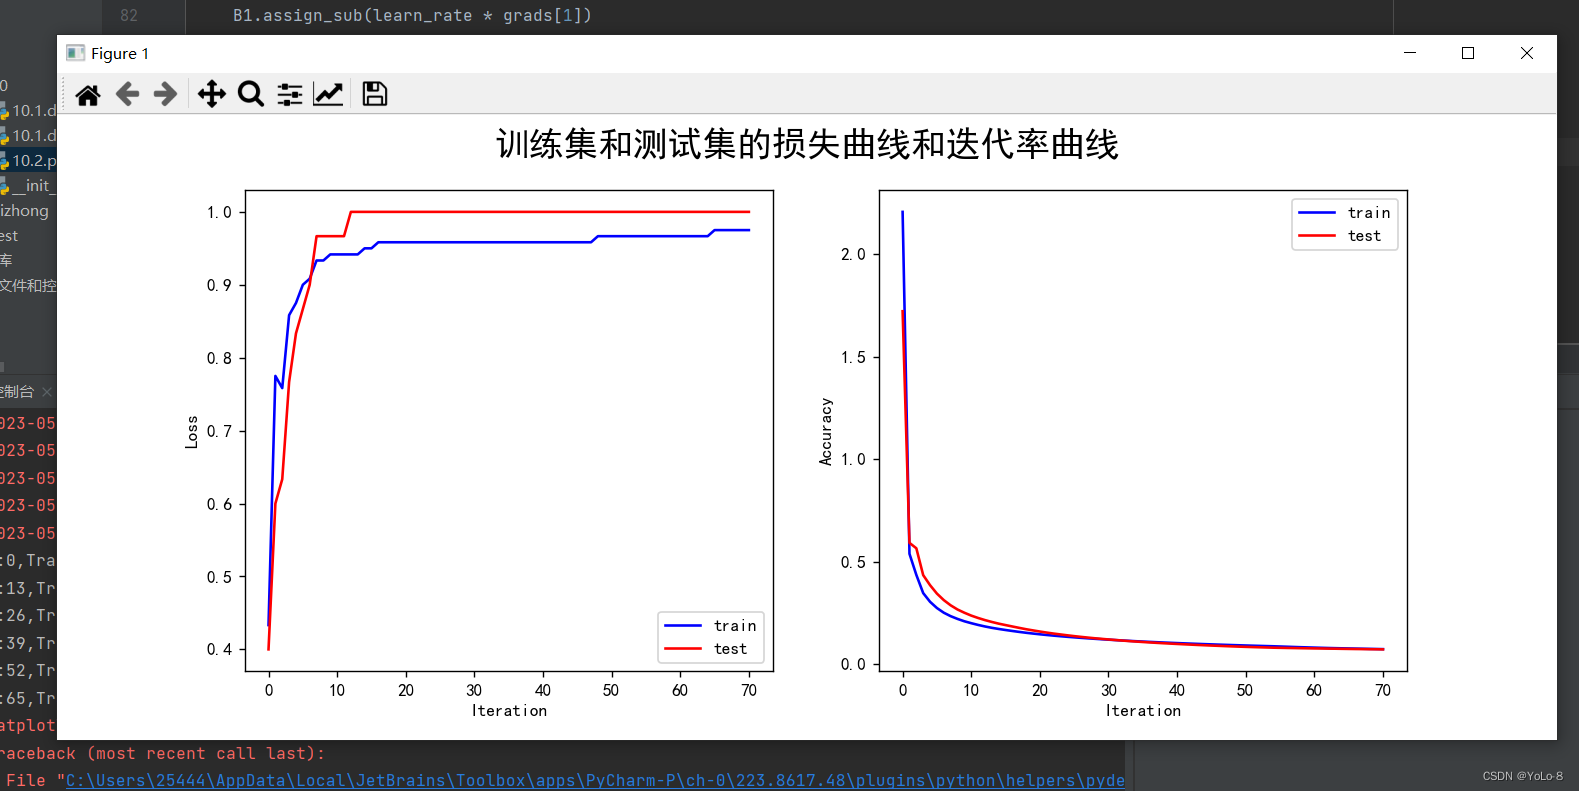
多层神经网络

③ 实验总结
参learn_rate = 0.5,iter = 100,display_step = 5其中神经网络的学习速度主要根据训练集上代价函数下降的快慢有关,而最后的分类的结果主要跟在验证集上的分类正确率有关。因此可以根据该参数主要影响代价函数还是影响分类正确率进行分类。超参数调节可以使用贝叶斯优化。
题目二:
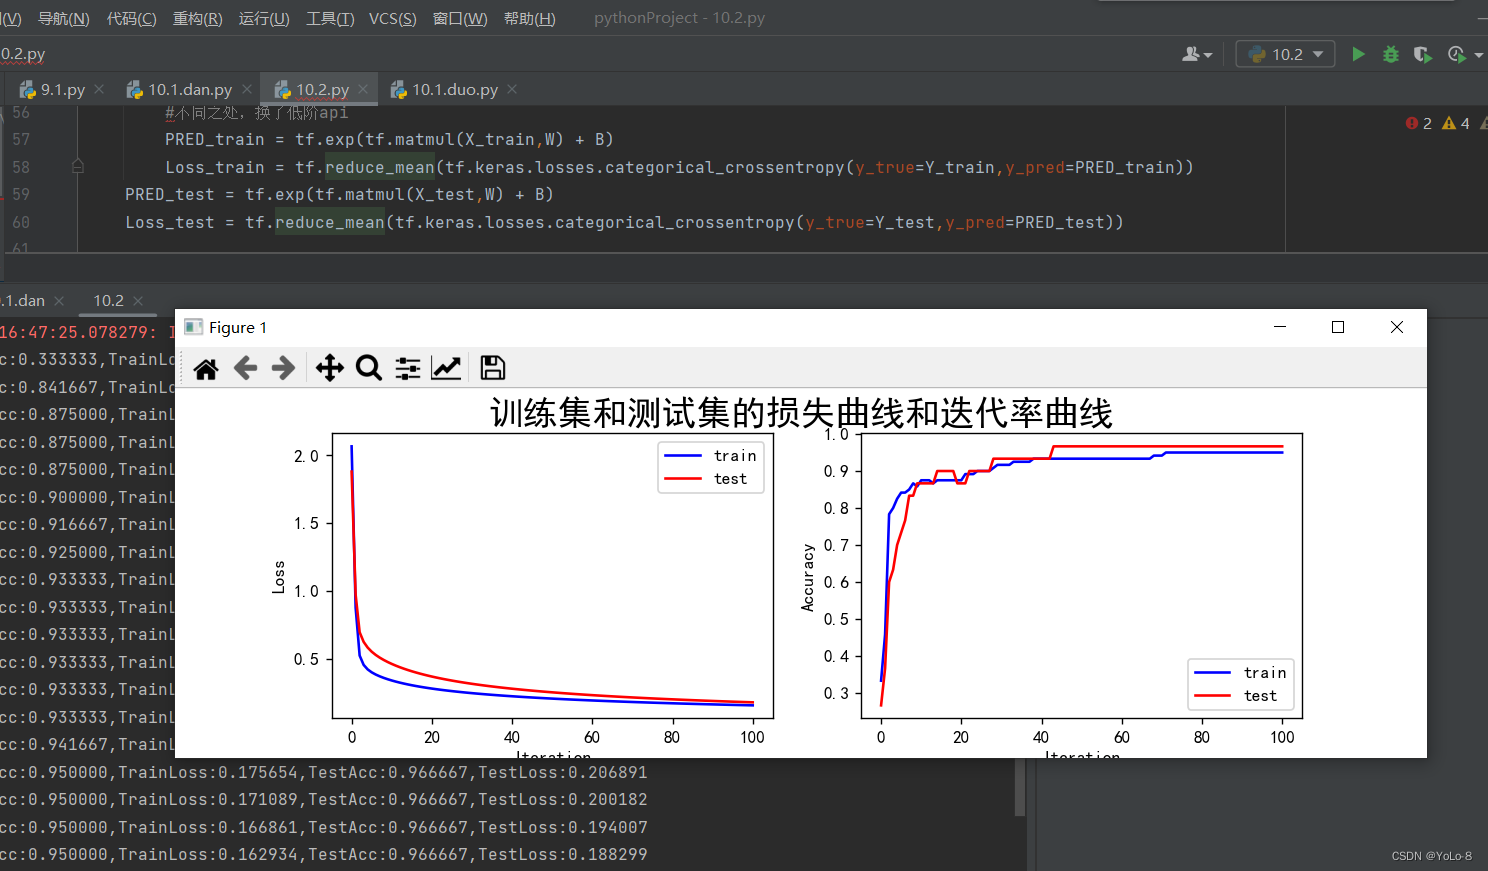
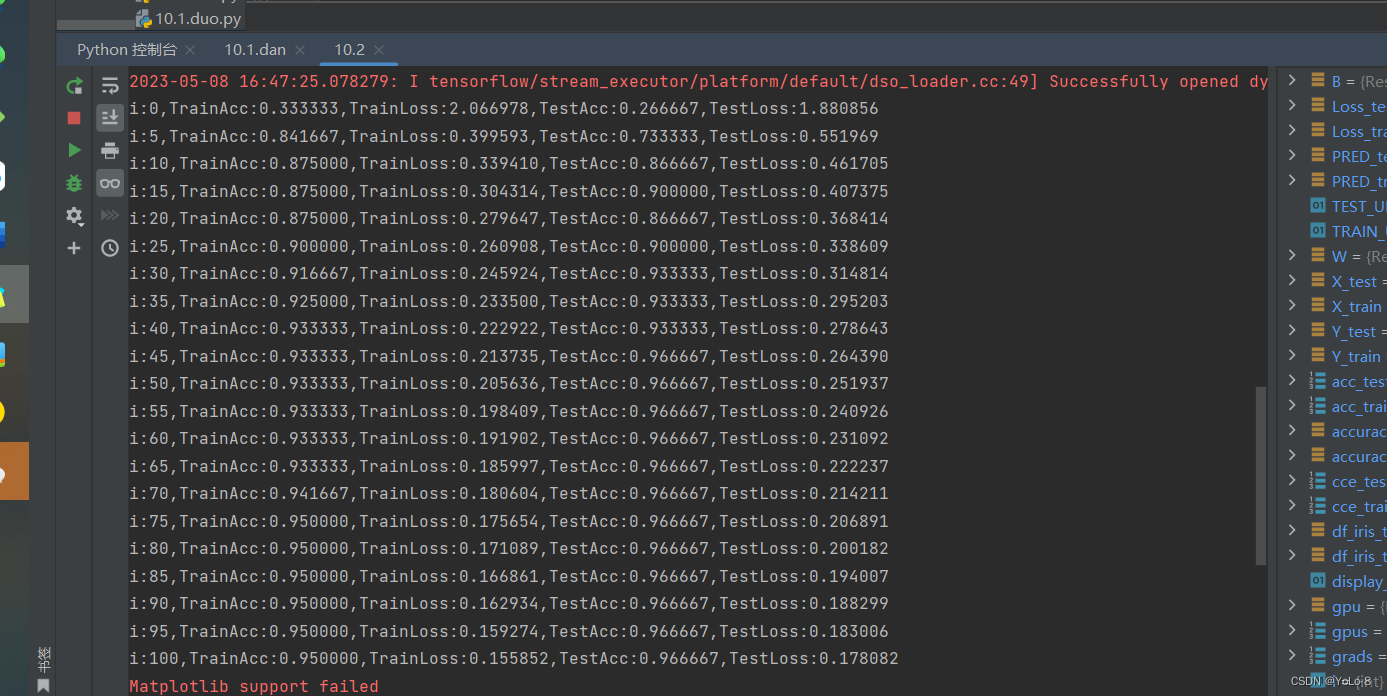
使用低阶API实现Softmax函数和交叉熵损失函数,并使用它们修改题目一,看下结果是否相同。
① 代码
不同之处

import tensorflow as tf
import pandas as pd
import numpy as np
import matplotlib.pyplot as plt
plt.rcParams['font.family'] = "SimHei"#设置gpu
gpus = tf.config.experimental.list_physical_devices('GPU')
tf.config.experimental.set_memory_growth(gpus[0],True)
for gpu in gpus:tf.config.experimental.set_memory_growth(gpu,True)#下载数据集
TRAIN_URL = "http://download.tensorflow.org/data/iris_training.csv"
train_path = tf.keras.utils.get_file(TRAIN_URL.split('/')[-1],TRAIN_URL)TEST_URL = "http://download.tensorflow.org/data/iris_test.csv"
test_path = tf.keras.utils.get_file(TEST_URL.split("/")[-1],TEST_URL)df_iris_train = pd.read_csv(train_path,header=0)
df_iris_test = pd.read_csv(test_path,header=0)iris_train = np.array(df_iris_train) #(120,5)
iris_test = np.array(df_iris_test) #(30,5)#拆
x_train = iris_train[:,0:4]#(120,4)
y_train = iris_train[:,4]#(120,)
x_test = iris_test[:,0:4]
y_test = iris_test[:,4]#中心化
x_train = x_train - np.mean(x_train,axis=0)#(dtype(float64))
x_test = x_test - np.mean(x_test,axis=0)
#独热编码
X_train = tf.cast(x_train,tf.float32)
Y_train = tf.one_hot(tf.constant(y_train,dtype=tf.int32),3)
X_test = tf.cast(x_test,tf.float32)
Y_test = tf.one_hot(tf.constant(y_test,dtype=tf.int32),3)#超参数
learn_rate = 0.5
iter = 100
display_step = 5
#初始化
np.random.seed(612)
W = tf.Variable(np.random.randn(4,3),dtype=tf.float32)  #权值矩阵
B = tf.Variable(np.zeros([3]),dtype=tf.float32) #偏置值
acc_train = []
acc_test = []
cce_train = []
cce_test = []for i in range(iter + 1):with tf.GradientTape() as tape:#不同之处,换了低阶apiPRED_train = tf.exp(tf.matmul(X_train,W) + B)Loss_train = tf.reduce_mean(tf.keras.losses.categorical_crossentropy(y_true=Y_train,y_pred=PRED_train))PRED_test = tf.exp(tf.matmul(X_test,W) + B)Loss_test = tf.reduce_mean(tf.keras.losses.categorical_crossentropy(y_true=Y_test,y_pred=PRED_test))accuracy_train = tf.reduce_mean(tf.cast(tf.equal(tf.argmax(PRED_train.numpy(),axis=1),y_train),tf.float32))accuracy_test = tf.reduce_mean(tf.cast(tf.equal(tf.argmax(PRED_test.numpy(),axis=1),y_test),tf.float32))acc_train.append(accuracy_train)acc_test.append(accuracy_test)cce_train.append(Loss_train)cce_test.append(Loss_test)grads = tape.gradient(Loss_train,[W,B])W.assign_sub(learn_rate*grads[0])#dL_dW (4,3)B.assign_sub(learn_rate*grads[1])#dL_dW (3,)if i % display_step == 0:print("i:%d,TrainAcc:%f,TrainLoss:%f,TestAcc:%f,TestLoss:%f" % (i, accuracy_train, Loss_train, accuracy_test, Loss_test))#绘制图像
plt.figure(figsize=(10,3))
plt.suptitle("训练集和测试集的损失曲线和迭代率曲线",fontsize = 20)
plt.subplot(121)
plt.plot(cce_train,color="b",label="train")
plt.plot(cce_test,color="r",label="test")
plt.xlabel("Iteration")
plt.ylabel("Loss")
#plt.title("训练集和测试集的损失曲线",fontsize = 18)
plt.legend()plt.subplot(122)
plt.plot(acc_train,color="b",label="train")
plt.plot(acc_test,color="r",label="test")
plt.xlabel("Iteration")
plt.ylabel("Accuracy")
#plt.title("训练集和测试集的准确率曲线",fontsize = 18)
plt.legend()plt.show()
② 实验结果
4. 实验小结&讨论题
①在神经网络中,激活函数的作用是什么?常用的激活函数有哪些?在多分类问题中,在输出层一般使用使用什么激活函数?隐含层一般使用使用什么激活函数?为什么?
答:激活函数的作用是去线性化;常用到激活函数:tanh,ReL,Sigmoid;Sigmoid函数用于输出层,tanh函数用于隐含层。
②什么是损失函数?在多分类问题中,一般使用什么损失函数?为什么?
答:损失函数是用来评估模型的预测值与真实值不一致的程度
(1)L1范数损失L1Loss
(2)均方误差损失MSELoss
(3)交叉熵损失CrossEntropyLoss
③神经网络的深度和宽度对网络性能有什么影响?
答:如果一个深层结构能够刚刚好解决问题,那么就不可能用一个更浅的同样紧凑的结构来解决,因此要解决复杂的问题,要么增加深度,要么增加宽度。但是神经网络一般来说不是越深越好,也不是越宽越好,并且由于计算量的限制或对于速度的需求,如何用更少的参数获得更好的准确率无疑是一个永恒的追求。
④训练数据和测试数据对神经网络的性能有何影响?在选择、使用和划分数据集时,应注意什么?
答:注意使用的范围和整体效果。
![[230523]托福写作第一次课 | 10:20~11:20](/images/no-images.jpg)
