微信小程序自定义相机
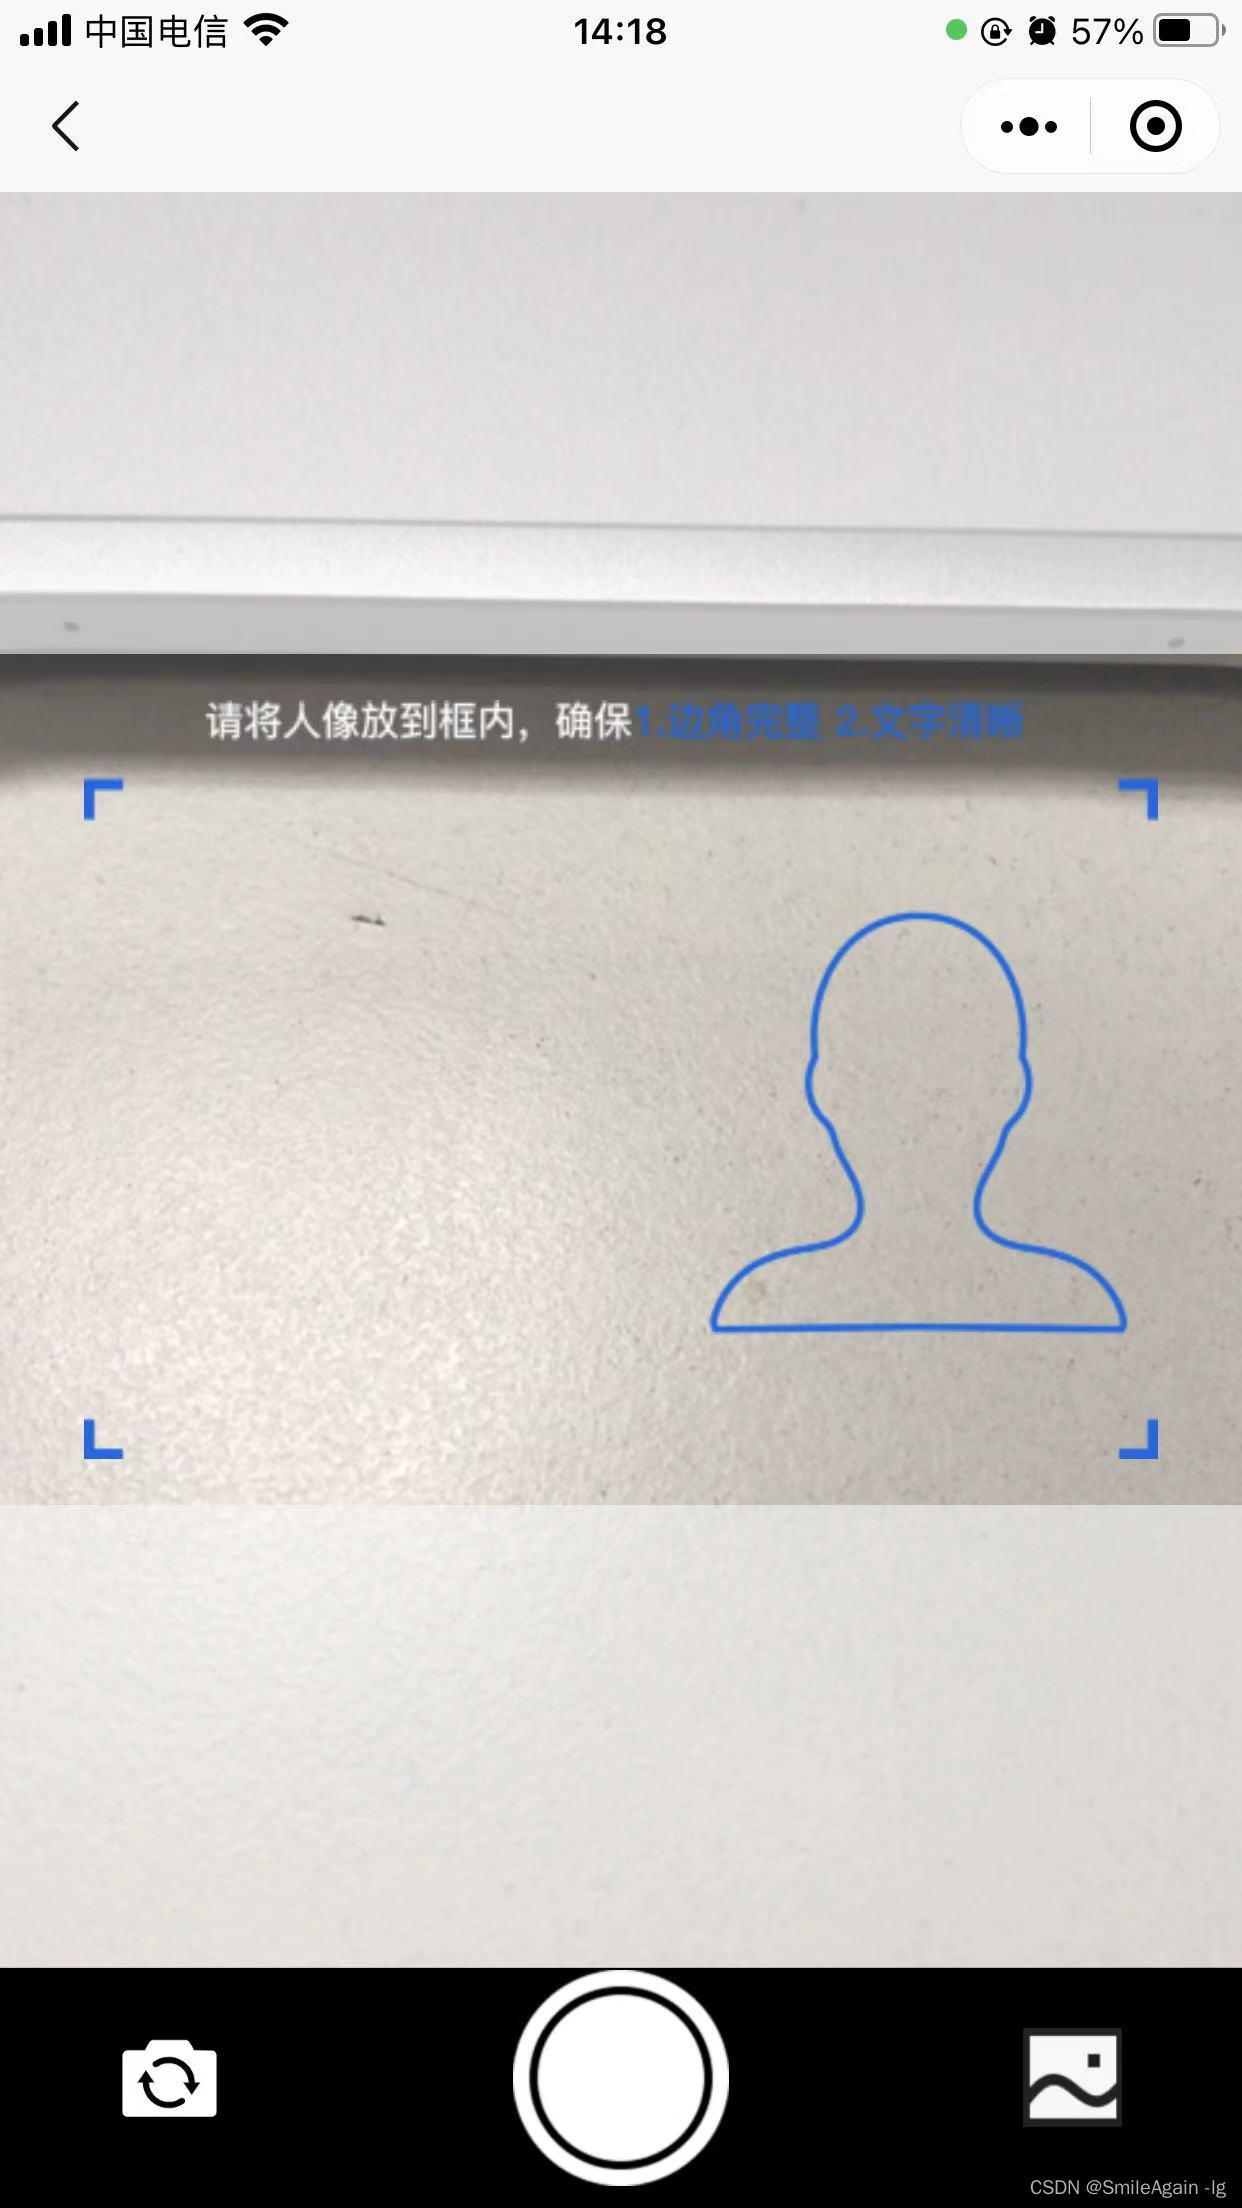
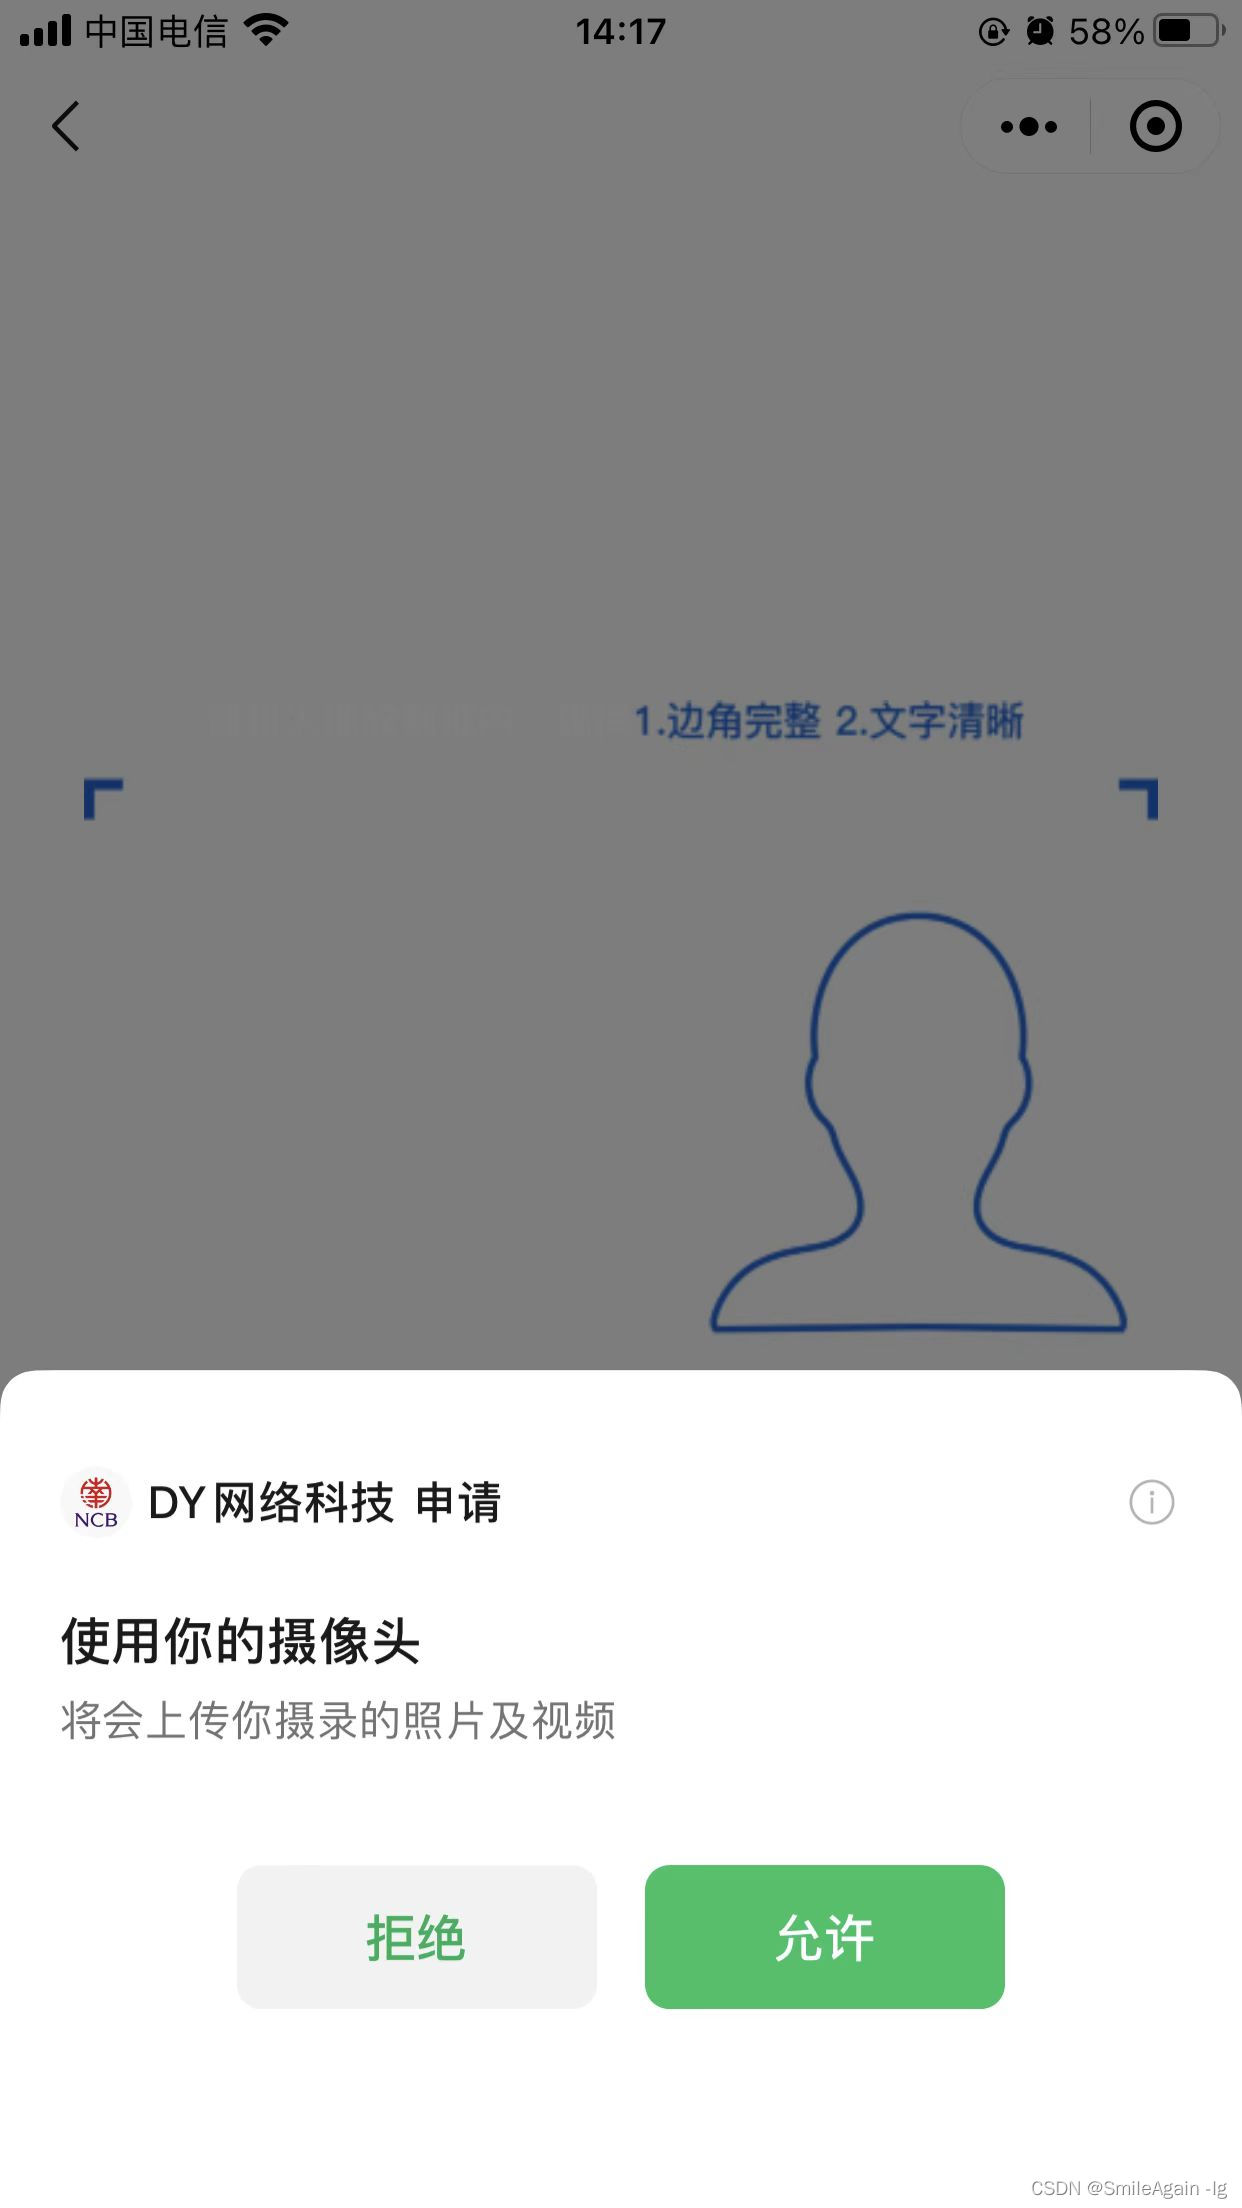
效果
文章目录
- 微信小程序自定义相机
- 效果
- 需求
- 一、小程序自定义相机
- 1.使用uniapp的camera组件
- 二、使用cover-view,cover-image加辅助边框
- 三、相机拒绝授权后,无法再次拉起授权问题
- 完整的代码
需求
uni.chooseMedia可以拉起手机自带相机,但是特殊情况下需要给相机加框和辅助线,比如相机身份证辅助框,这时就会用到uni-app的camera组件,使用 cover-view cover-image 覆盖在上面,实现相机辅助框的效果
一、小程序自定义相机
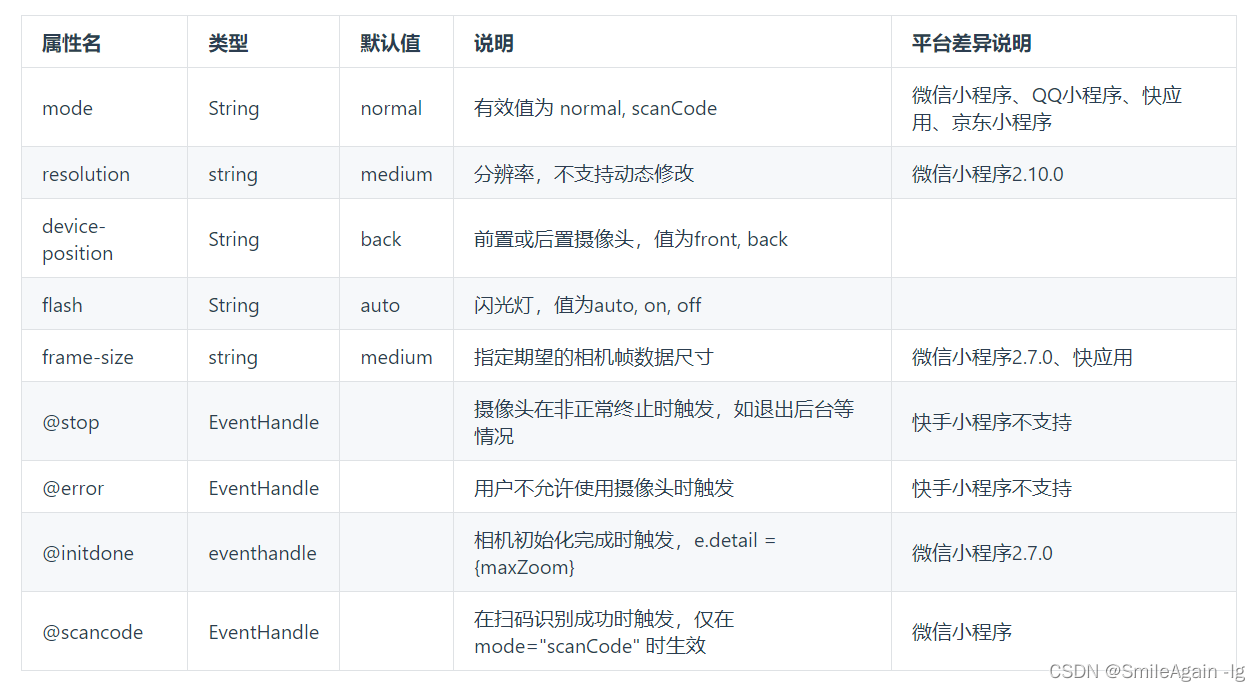
1.使用uniapp的camera组件
camera组件链接地址:https://uniapp.dcloud.net.cn/component/camera.html#camera
代码如下(示例):
<template><view><camera device-position="back" flash="off" @error="error" style="width: 100%; height: 300px;"></camera><button type="primary" @click="takePhoto">拍照</button><view>预览</view><image mode="widthFix" :src="src"></image></view>
</template>
export default {data() {return {src:""}},methods: {takePhoto() {const ctx = uni.createCameraContext();ctx.takePhoto({quality: 'high',success: (res) => {this.src = res.tempImagePath}});},error(e) {console.log(e.detail);}}
}
属性说明:
二、使用cover-view,cover-image加辅助边框
代码如下(示例):
<camera mode="normal" :device-position="devicePosition" :flash="flashStyle":style="{ height: cameraHeight + 'px' }" @error="errorCamera"><cover-view class="controls" style="width: 100%;height: 100%;"><cover-view class="controls1-bgcolor"></cover-view><cover-view class="controls2-bgcolor"><!-- 人像照 --><cover-image v-if="photoType=='idpositive'" class="w569-h828" :src="front" /><!-- 国徽照 --><cover-image v-else class="w569-h828" :src="side" /></cover-view><cover-view class="controls3-bgcolor"></cover-view></cover-view>
</camera>
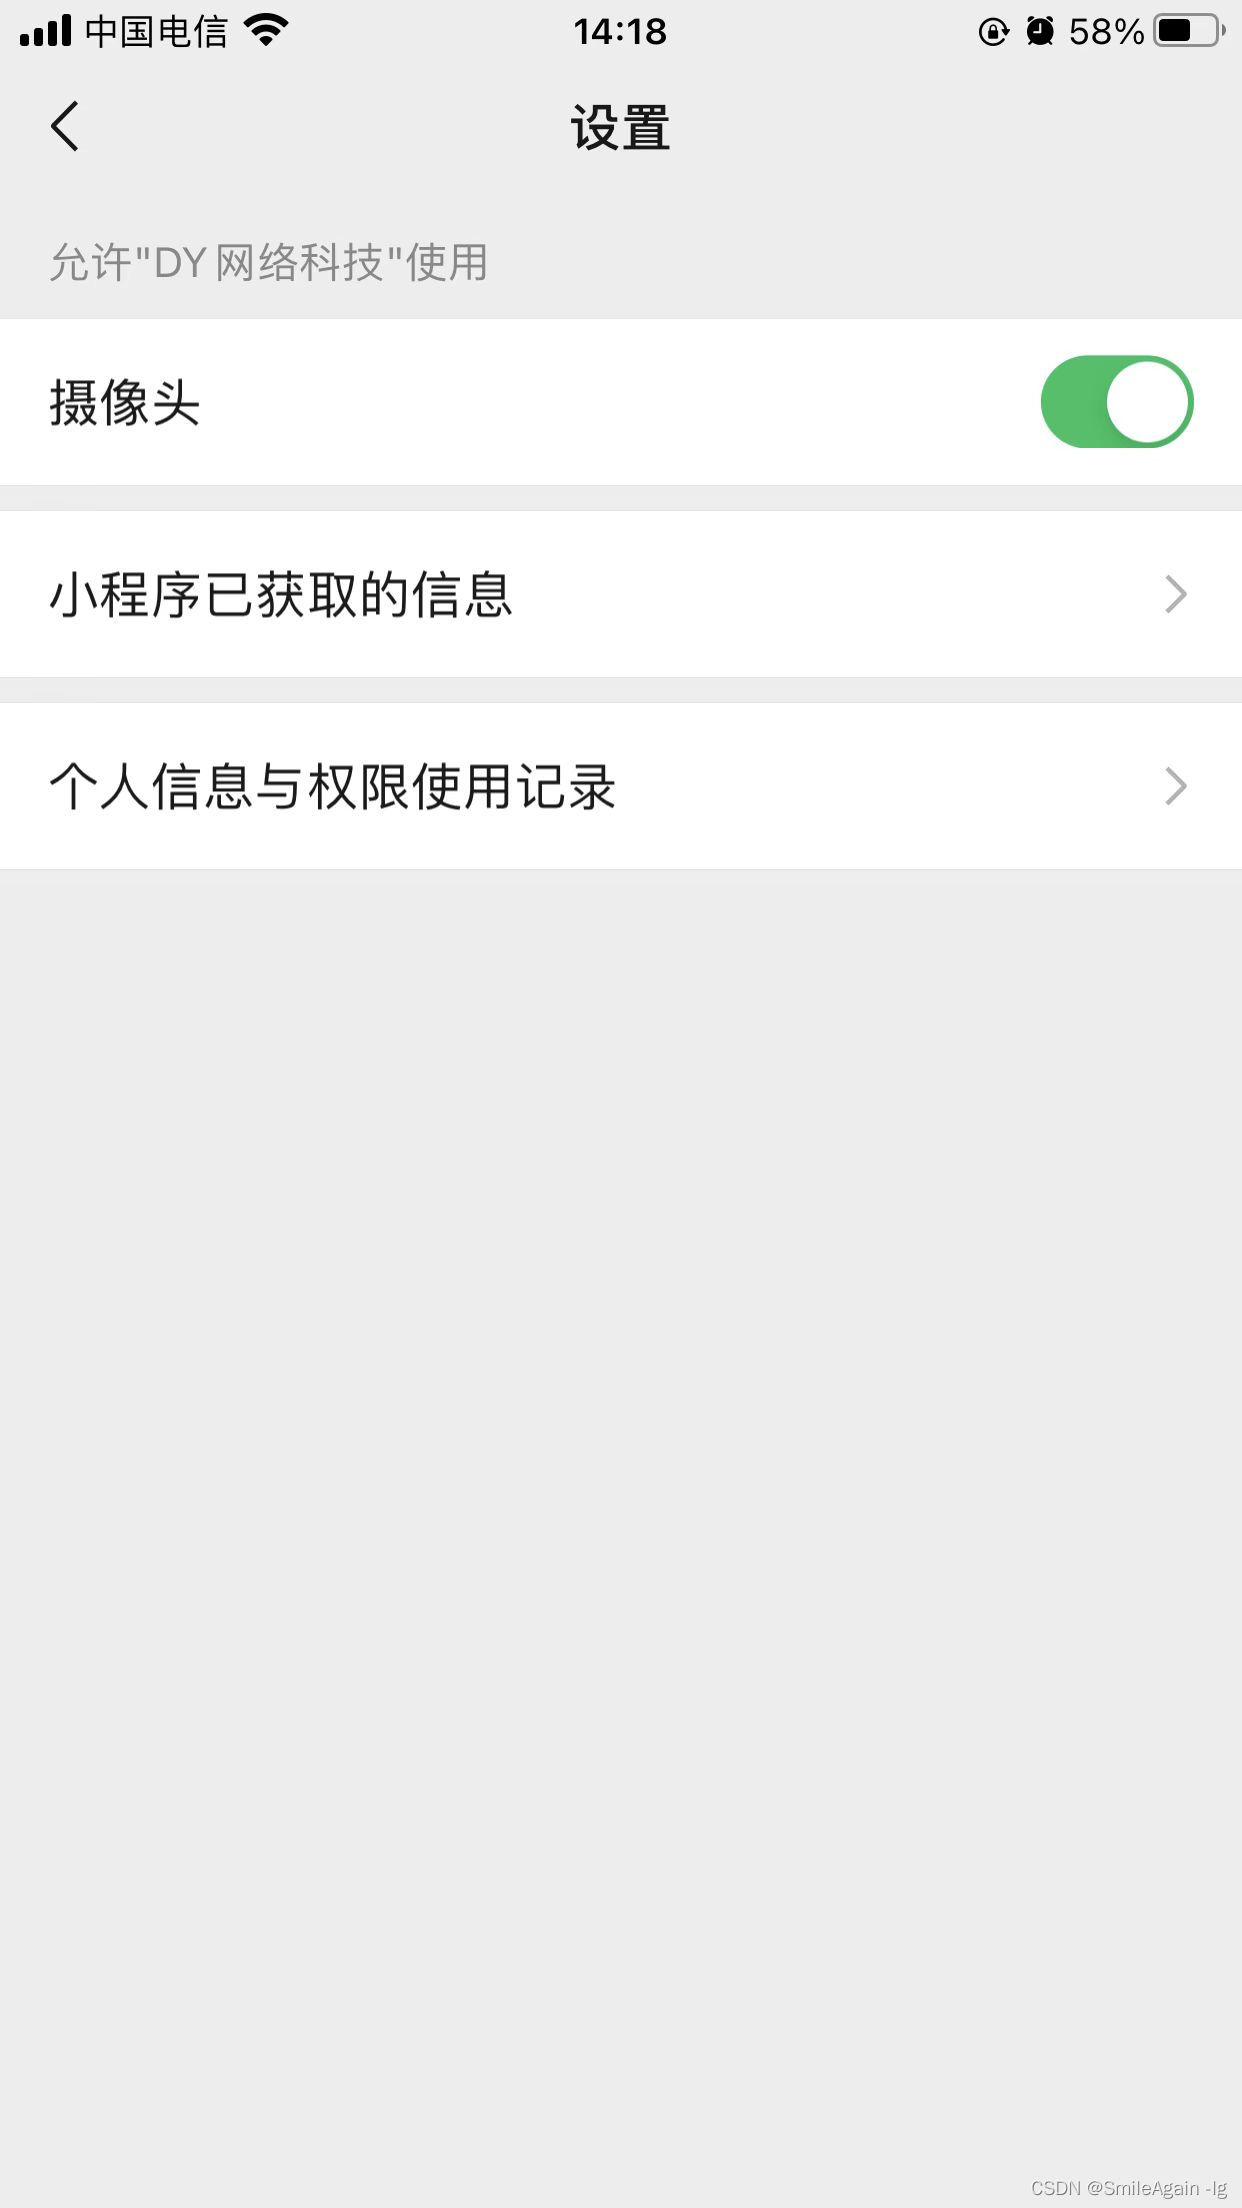
三、相机拒绝授权后,无法再次拉起授权问题
相机初次进入会拉起授权,授权拒绝后无法再次拉起,针对这个问题,可以先通过uni.getSetting获取用户的当前设置;
代码如下(示例):
uni.openSetting({success(res) {console.log(res.authSetting)}
});
然后通过uni.openSetting调起客户端小程序设置界面,进行设置,并返回用户设置的操作结果。
uni.openSetting({success(res) {console.log(res.authSetting)}
});
解决相机无法拉起授权问题重点:什么时候获取用户的当前设置?什么时候拉起相机小程序相机设置界面?
1、获取用户当前设置只能在camera组件使用页面使用该方法
2、如果小程序初始化就获取当前设置 并拉起相机设置界面,会存在相机初始化时同时加载默认授权弹框和自定义弹框
3、由于相机授权决绝后即不允许使用摄像头,@error事件刚好是 用户不允许使用摄像头时触发,正确的使用是在@error事件中使用
errorCamera(e){const that = this;uni.getSetting({success(res) {if (!res.authSetting["scope.camera"]) {uni.showModal({title: '提示',content: '请开启摄像头权限,否则无法拍照',confirmText: '去开启',success(res) {if (res.confirm) {uni.openSetting({success(res) {if (res.authSetting["scope.camera"]) {uni.navigateBack({delta: 1})} else {uni.navigateBack({delta: 1})}}})} else if (res.cancel) {uni.navigateBack({delta: 1})}}})}}})}, 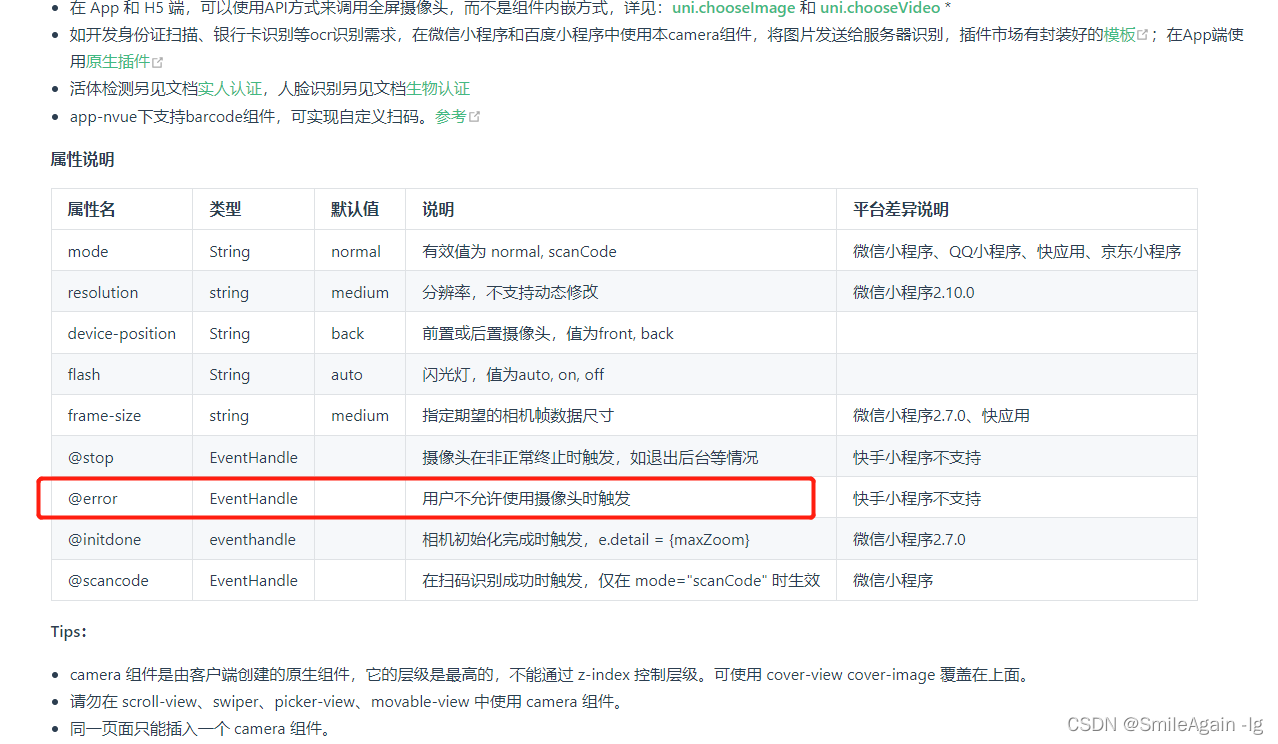
完整的代码
提示:相机框引导框可以让ui设计
代码如下(示例):
<template><view :style="{ height: windowHeight + 'px' }"><camera mode="normal" :device-position="devicePosition" :flash="flashStyle":style="{ height: cameraHeight + 'px' }" @error="errorCamera"><cover-view class="controls" style="width: 100%;height: 100%;"><cover-view class="controls1-bgcolor"></cover-view><cover-view class="controls2-bgcolor"><!-- 人像照 --><cover-image v-if="photoType=='idpositive'" class="w569-h828" :src="front" /><!-- 国徽照 --><cover-image v-else class="w569-h828" :src="side" /></cover-view><cover-view class="controls3-bgcolor"></cover-view></cover-view></camera><view class="bottom font-36-fff"><view class="wrap"><view class="back" @click="switchBtn"><image :src="flip" mode="" style="width: 60rpx; height: 60rpx;"></image></view><!-- <view class="back" @click="flashBtn">闪光灯</view> --><view @click="takePhoto"><image class="w131-h131" :src="icon"></image></view><view @click="chooseImage"><image :src="picture" mode="" style="width: 60rpx; height: 60rpx;"></image></view></view></view></view>
</template><script>export default {data() {return {front: '../../static/idcard/front.png', // 人像照side: '../../static/idcard/side.png', // 国徽照flip: '../../static/idcard/flip.png', // 反转icon: '../../static/idcard/icon.png', // 相机picture: '../../static/idcard/picture.png', // 照片cameraContext: {},windowHeight: '',cameraHeight: '',idcardFrontSide: true,photoType: '',devicePosition: 'back', // 摄像头默认后置flashStyle: 'off',};},onLoad(options) {if (uni.createCameraContext) {this.cameraContext = uni.createCameraContext()} else {// 如果希望用户在最新版本的客户端上体验您的小程序,可以这样子提示uni.showModal({title: '提示',content: '当前微信版本过低,无法使用该功能,请升级到最新微信版本后重试。'})}this.photoType = options.photoType;this.devicePosition = 'back';},onShow() {const systemInfo = uni.getSystemInfoSync()this.windowHeight = systemInfo.windowHeightthis.cameraHeight = systemInfo.windowHeight - 80},methods: {errorCamera(e){const that = this;uni.getSetting({success(res) {if (!res.authSetting["scope.camera"]) {uni.showModal({title: '提示',content: '请开启摄像头权限,否则无法拍照',confirmText: '去开启',success(res) {if (res.confirm) {uni.openSetting({success(res) {if (res.authSetting["scope.camera"]) {uni.navigateBack({delta: 1})} else {uni.navigateBack({delta: 1})}}})} else if (res.cancel) {uni.navigateBack({delta: 1})}}})}}})},// 拍照takePhoto() {uni.showLoading({title: '拍摄中'})this.cameraContext.takePhoto({quality: 'normal',success: (res) => {console.log('拍摄照片', res)let idPhoto = res.tempImagePath;this.chosePhoto(idPhoto);uni.showToast({title: '拍照成功',icon: 'none',duration: 1200})},fail: (err) => {uni.showToast({title: '拍照失败,请检查系统是否授权',icon: 'none',duration: 1200})}})},// 从相册选取chooseImage() {uni.chooseImage({count: 1,sizeType: ['original', 'compressed'],sourceType: ['album'],success: (res) => {let idPhoto = res.tempFilePaths[0];this.chosePhoto(idPhoto);},fail: (err) => {}});},//反转switchBtn() {if (this.devicePosition == 'front') {this.devicePosition = 'back'} else {this.devicePosition = 'front'}},// flashBtn(){// 	if(this.flashStyle == 'on'){// 		this.flashStyle = 'off'// 	}else{// 		this.flashStyle = 'on'// 	}// },// 选择图片跳转chosePhoto(item) {if (this.photoType == 'idpositive') {let pages = getCurrentPages(); //获取所有页面栈实例列表let nowPage = pages[pages.length - 1]; //当前页页面实例let prevPage = pages[pages.length - 2]; //上一页页面实例prevPage.$vm.idpositive = item; //修改上一页data里面的参数值prevPage.$vm.checkoutface = true; //修改上一页data里面的参数值uni.navigateBack({ //uni.navigateTo跳转的返回,默认1为返回上一级delta: 1});} else if (this.photoType == 'idback') {let pages = getCurrentPages(); //获取所有页面栈实例列表let nowPage = pages[pages.length - 1]; //当前页页面实例let prevPage = pages[pages.length - 2]; //上一页页面实例prevPage.$vm.idback = item; //修改上一页data里面的参数值prevPage.$vm.checkoutId = true; //修改上一页data里面的参数值uni.navigateBack({ //uni.navigateTo跳转的返回,默认1为返回上一级delta: 1});}}},}
</script><style lang="less" scoped>.icon-w569-h828 {width: 569rpx;height: 828rpx;}.controls {display: flex;align-items: center;justify-content: center;flex-direction: column;}.controls1-bgcolor {list-style: none;padding: 0;margin: 0;width: 100%;height: 60%;background-color: rgba(248, 248, 248, 0.6);}.controls2-bgcolor {list-style: none;padding: 0;margin: 0;width: 100%;height: 110%;display: flex;align-items: center;justify-content: center;}.controls2-bgcolor1 {width: 7%;height: 150%;background-color: rgba(248, 248, 248, 0.6);}.controls3-bgcolor {list-style: none;padding: 0;margin: 0;width: 100%;height: 60%;background-color: rgba(248, 248, 248, 0.6);}.bottom {width: 100%;background-color: #000;.wrap {display: flex;align-items: center;justify-content: space-between;height: 80px;padding: 0 73rpx;}}.w569-h828 {width: 650rpx;height: 460rpx;background-color: rgba(0, 0, 0, 0) !important;}.w131-h131 {width: 131rpx;height: 131rpx;}.font-36-fff {font-size: 36rpx;color: #fff;}
</style>
![[安卓相机1]简单小Demo](/images/no-images.jpg)