题目
一、在当前主机编写脚本文件history_max.sh显示主机中执行频率最高的前5个命令。
方法一:利用~/.bash_history文件
方法二:利用history命令
二、判断主机是否存在rhel用户,如果存在则设置密码为redhat,如果不存在则创建用户并设置密码。
三、通过设置变量HISTTIMEFORMAT,使得当执行history命令时输出格式如下
一、在当前主机编写脚本文件history_max.sh显示主机中执行频率最高的前5个命令。
方法一:利用~/.bash_history文件
思路:找到记录历史命令的文件~/.bash_history,通过sort、uniq等命令进行排序、统计操作,进而得到结果并输出。
操作:
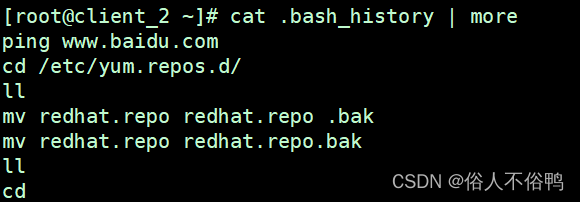
1、查看~/.bash_history文件内容

2、根据~/.bash_history文件内容特征,用vim编写history_max.sh脚本
[root@client_2 shell]# vim history_max.sh
#!/bin/bash
history_file=~/.bash_history
echo "  count cmd"
echo "`sort $history_file | uniq -c | sort -k1 -nr | head -5`"
注释:
sort 表示将切割出的内容排序;
uniq -c 表示删除连续的重复行并在每列旁边显示该行连续重复出现的次数;
sort -k1 -nr 表示指定第一列为排序依据并以数值型倒序排序。
3、设置history_max.sh脚本为可执行文件
[root@client_2 shell]# chmod a+rx history_max.sh 4、运行脚本
[root@client_2 shell]# ./history_max.sh count cmd58 ll38 vim history_max.sh 26 ./history_max.sh 16 mount15 cd
方法二:利用history命令
思路:使用history命令获取记录历史命令,再通过tr、cut、sort、uniq等命令进行替换、切割、排序、统计操作,进而得到结果并输出。
操作:
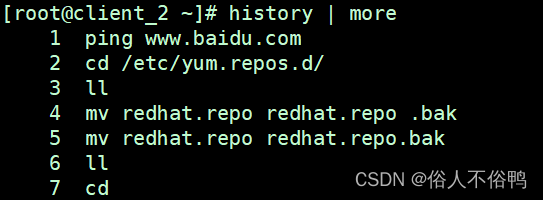
1、查看history输出内容

2、根据history输出内容特征,用vim编写history_max.sh脚本
[root@client_2 shell]# vim history_max.sh
#!/bin/bash
echo "  count cmd"
history | tr -s ' ' | cut -d' ' -f3- | sort | uniq -c | sort -k1 -nr | head -5
注释:
tr -s ' ' 表示将history输出的重复空格删除;
cut -d' ' -f3- 表示切割出以空格为分隔符的第3列及以后的所有列;
sort 表示将切割出的内容排序;
uniq -c 表示删除连续的重复行并在每列旁边显示该行连续重复出现的次数;
sort -k1 -nr 表示指定第一列为排序依据并以数值型倒序排序。
注意:若将history命令的输出结果保存到变量中,那么echo该变量时要将该变量加双引号,不加双引号会输出为一行,不方便阅读。如下:
#!/bin/bashecho "  count cmd"
hist="`history | tr -s ' ' | cut -d' ' -f3- | sort | uniq -c | sort -k1 -nr | head -5`"
echo "$hist"
3、设置history_max.sh脚本为可执行文件
[root@client_2 shell]# chmod a+rx history_max.sh 4、运行脚本
[root@client_2 shell]# source history_max.sh count cmd58 ll38 vim history_max.sh 27 ./history_max.sh 16 mount15 cd
注意:这里要用source方式来执行脚本文件,如果用./history_max.sh命令执行,则不会返回结果。
因为./history_max.sh命令会创建出一个bash子进程,脚本调用history命令会在该子进程中进行,不会在本进程中进行,当脚本运行结束子进程也结束,本进程不会有返回结果;
而source命令并没有创建新的子shell进程,脚本里面所有创建的变量都会保存到当前的shell里面,所以无论是将history的返回值写到变量里输出还是直接调用history命令,都能够有返回结果。所以这里要用source方法。
二、判断主机是否存在rhel用户,如果存在则设置密码为redhat,如果不存在则创建用户并设置密码。
操作:
1、使用vim编辑useradd_rhel.sh脚本
[root@client_2 shell]# vim useradd_rhel.sh
#!/bin/bash
if grep rhel /etc/passwd &> /dev/null
thenecho "user rhel already exists."
elseuseradd rhel -p redhatecho "add user rhel successfully."
fi
2、设置useradd_rhel.sh脚本为可执行文件
[root@client_2 shell]# chmod a+rx useradd_rhel.sh 3、运行脚本
[root@client_2 shell]# ./useradd_rhel.sh
add user rhel successfully.[root@client_2 shell]# ./useradd_rhel.sh
user rhel already exists.
三、通过设置变量HISTTIMEFORMAT,使得当执行history命令时输出格式如下:
[2022-12-25 16:53:42][root]history操作:
1、打开 /etc/profile 或 /etc/bashrc 文件,设置环境变量HISTTIMEFORMAT
[root@client_2 ~]# vim /etc/profile
export HISTTIMEFORMAT="[%F %T][`whoami`]"
2、重新读取文件
[root@client_2 ~]# source /etc/profile
3、验证生效
[root@client_2 ~]# history | more1 [2022-12-25 15:18:20][root]ping www.baidu.com2 [2022-12-25 15:18:20][root]cd /etc/yum.repos.d/3 [2022-12-25 15:18:20][root]ll4 [2022-12-25 15:18:20][root]mv redhat.repo redhat.repo .bak
over~


