文章目录
- 前言
- 先看官网
- 一、JDK自带的URLConnection方式
- 二、Apache的HttpClient方式
- 三、okhttp3方式
- 四、Unirest方式
- 五、RestTemplate方式
- 其它细节
- getAccessToken
- 构建参数map
- byte[]数组
- 源码下载
前言
先介绍一下项目场景,主要是通过微信小程序二维码裂变分享,每个账号有专属邀请二维码,分享出去,有新人扫码入驻,就可以得到现金奖励或红包奖励。当然,产品设计会更丰富,不止有裂变模式,还有渠道推广模式,还有各种奖励规则,但核心实现都是生成二维码。对于如何生成微信小程序二维码,本文一共列举了5种实现方式,其中第1、2种是网上常见的方式,第3、4、5种封装的更为优雅,文末可打包下载开箱即用的全套源码,我更期待老铁的文末 投票 :哪种方式你更喜欢?

先看官网
项目主要用的是微信官方提供的服务端能力,考虑到涉及secret和token等安全问题,所以从架构上设计的调用链路为:前端->后端API->微信API。裂变的场景决定要选择获取不限制的小程序码接口,永久有效,数量暂无限制,接口英文名:getUnlimitedQRCode。
官方地址:https://developers.weixin.qq.com/miniprogram/dev/OpenApiDoc/qrcode-link/qr-code/getUnlimitedQRCode.html

一、JDK自带的URLConnection方式
在网上常见的方式,这是从 JDK1.1 开始就自带的Http请求方式,核心代码如下:
public byte[] getWechatQrcodeByHttpURL(String url, Map<String, Object> body) {HttpURLConnection httpURLConnection = null;try {httpURLConnection = (HttpURLConnection) new URL(url).openConnection();httpURLConnection.setRequestMethod("POST");// 发送POST请求必须设置如下两行httpURLConnection.setDoOutput(true);httpURLConnection.setDoInput(true);// 获取URLConnection对象对应的输出流PrintWriter printWriter = new PrintWriter(httpURLConnection.getOutputStream());// 发送请求参数printWriter.write(JSONObject.toJSONString(body));// flush输出流的缓冲printWriter.flush();//开始获取数据try (InputStream inputStream = httpURLConnection.getInputStream();ByteArrayOutputStream out = new ByteArrayOutputStream()) {byte[] buffer = new byte[1024];int len = -1;while ((len = inputStream.read(buffer)) != -1) {out.write(buffer, 0, len);}return out.toByteArray();}} catch (Exception e) {e.printStackTrace();} finally {if (httpURLConnection != null) {httpURLConnection.disconnect();}}return null;
}
JDK自带的方式,功能虽然可以实现,但代码看上去确实跟不上时代发展了!
二、Apache的HttpClient方式
HttpClient 相比于 JDK 自带的 URLConnection方式,代码做了封装,可读性和简洁度都显著提升!核心代码如下:
public byte[] getWechatQrcodeByHttpClient(String url, Map<String, Object> body) {CloseableHttpClient httpClient = HttpClientBuilder.create().build();HttpPost httpPost = new HttpPost(url);try {StringEntity entity = new StringEntity(JSONObject.toJSONString(body));entity.setContentType("image/png");httpPost.setEntity(entity);HttpResponse response = httpClient.execute(httpPost);try (InputStream inputStream = response.getEntity().getContent();ByteArrayOutputStream out = new ByteArrayOutputStream()) {byte[] buffer = new byte[1024];int len = -1;while ((len = inputStream.read(buffer)) != -1) {out.write(buffer, 0, len);}return out.toByteArray();}} catch (Exception e) {e.printStackTrace();}return null;
}
Maven依赖:
<dependency><groupId>org.apache.httpcomponents</groupId><artifactId>httpclient</artifactId><version>4.5.12</version>
</dependency>
三、okhttp3方式
okhttp3是Square公司开发,用于替代 HttpUrlConnection和Apache HttpClient方式,优雅的 API 设计,且链式调用,让你顺滑到底!
核心代码如下:
public byte[] getWechatQrcodeByOkhttp3(String url, Map<String, Object> body) {OkHttpClient client = new OkHttpClient().newBuilder().build();okhttp3.MediaType mediaType = okhttp3.MediaType.parse("application/json");RequestBody requestBody = RequestBody.create(mediaType, JSONObject.toJSONString(body));Request request = new Request.Builder().url(url).method("POST", requestBody).build();try {Response response = client.newCall(request).execute();if (response.isSuccessful()) {return response.body().bytes();}} catch (IOException e) {e.printStackTrace();}return null;
}
Maven依赖:
<dependency><groupId>com.squareup.okhttp3</groupId><artifactId>okhttp</artifactId><version>3.14.2</version>
</dependency>
四、Unirest方式
okhttp3方式其实不管是性能还是代码的链式调用,都已经非常优秀。但作为底层基于Apache HttpClient方式的unirest-java,提供了更为便捷、链式调用、功能强大的API用于http请求!核心代码如下(一行代码搞定,屌爆了!!!):
public byte[] getWechatQrcodeByUnirest(String url, Map<String, Object> body) {return Unirest.post(url).body(JSONObject.toJSONString(body)).asBytes().getBody();
}
Maven依赖:
<dependency><groupId>com.konghq</groupId><artifactId>unirest-java</artifactId><version>3.11.11</version>
</dependency>
五、RestTemplate方式
我之前写过一篇博文对RestTemplate.exchange结合案例进行了详细的介绍:RestTemplate.exchange各种用法(包括泛型等 --全),推荐阅读!
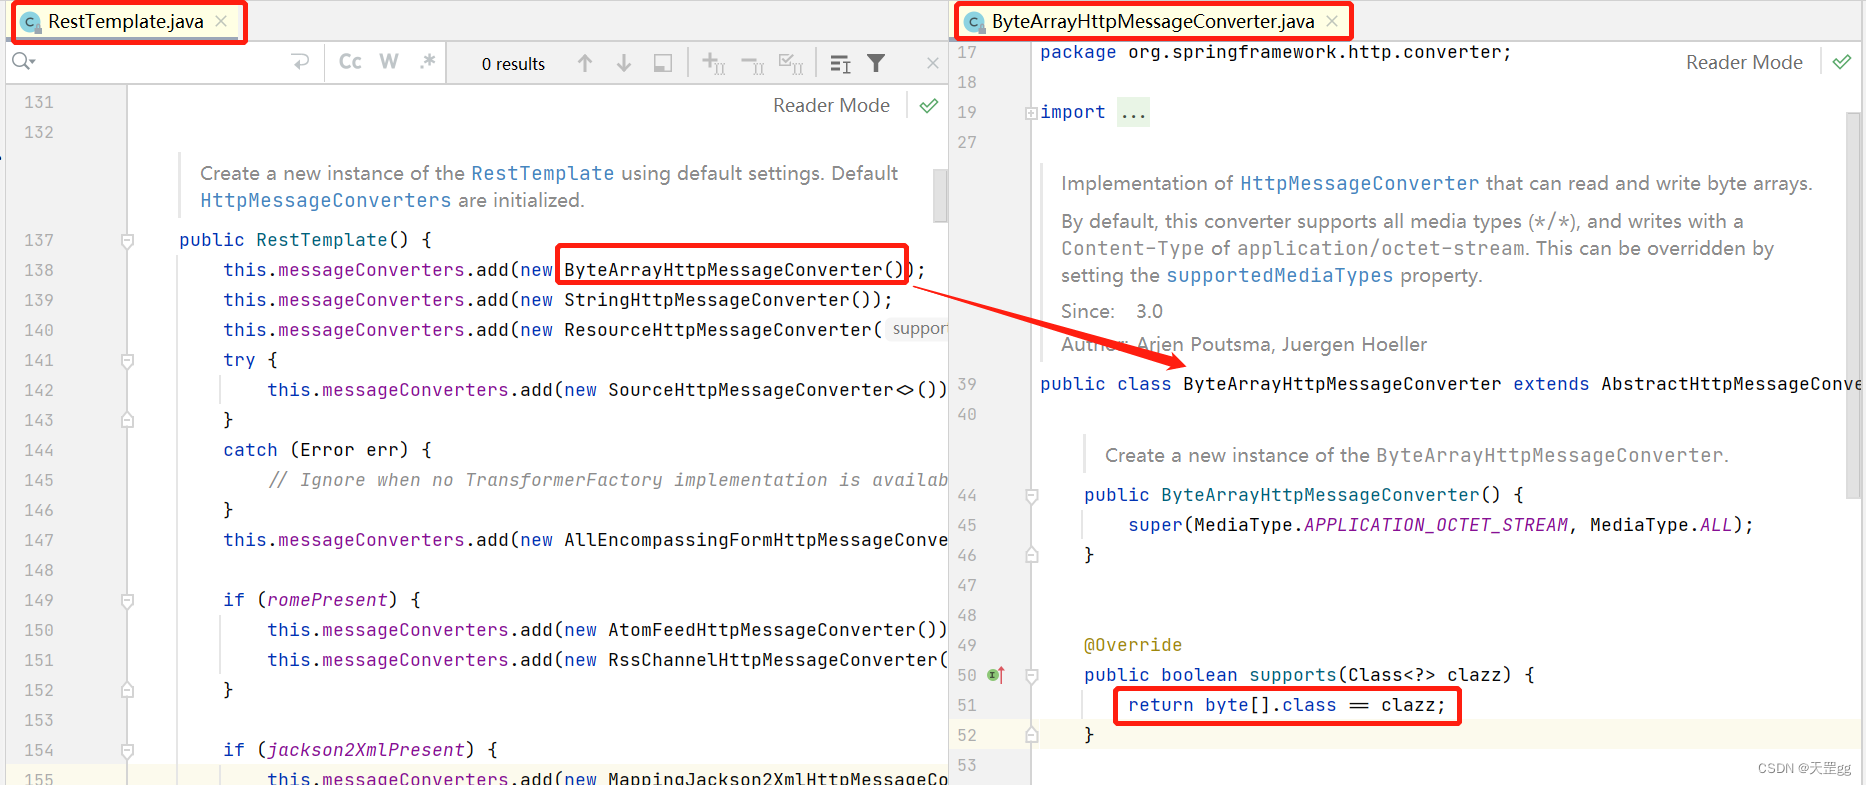
这也是我们项目实际使用的方式,使用Spring框架开发,还是强烈推荐使用Spring的RestTemplate,它是对于其它方式的高级封装,内部可以配置ClientHttpRequestFactory来指定底层请求方式:
- 指定为SimpleClientHttpRequestFactory,则内部使用JDK自带的HttpURLConnection方式
- 指定为HttpComponentsClientHttpRequestFactory,则内部使用Apache HttpClient方式
- 指定为OkHttp3ClientHttpRequestFactory,则内部使用okhttp3方式
核心代码也是一行:
public byte[] getWechatQrcodeByRestTemplate(String url, Map<String, Object> body) {return restTemplate.exchange(url, HttpMethod.POST, new HttpEntity<>(body, null), byte[].class).getBody();
}
另外,RestTemplate在构造函数中默认增加了ByteArrayHttpMessageConverter,可以读取和写入字节数组的HttpMessageConverter的实现,默认情况下,此转换器支持所有媒体类型(media types)。

其它细节
getAccessToken
这是接口调用凭证,用restTemplate调用也是非常简洁,核心代码如下:
private String wechatQrcodeUrl = "https://api.weixin.qq.com/wxa/getwxacodeunlimit?access_token=";
private String appid = "替换成你的appid";
private String s = "替换成你的secret";public String getAccessToken() {String url = String.format(wechatAccessTokenUrl, appid, s);Map<String, String> responseBody = restTemplate.exchange(url, HttpMethod.GET, null, new ParameterizedTypeReference<Map<String, String>>() {}).getBody();if (responseBody == null || responseBody.get("errcode") != null) {// 获取失败System.out.println("getAccessToken失败:" + (responseBody == null ? "null" : responseBody.toString()));return null;}return responseBody.get("access_token");
}
对于access_token,建议保存到redis,2小时过期后再获取
构建参数map
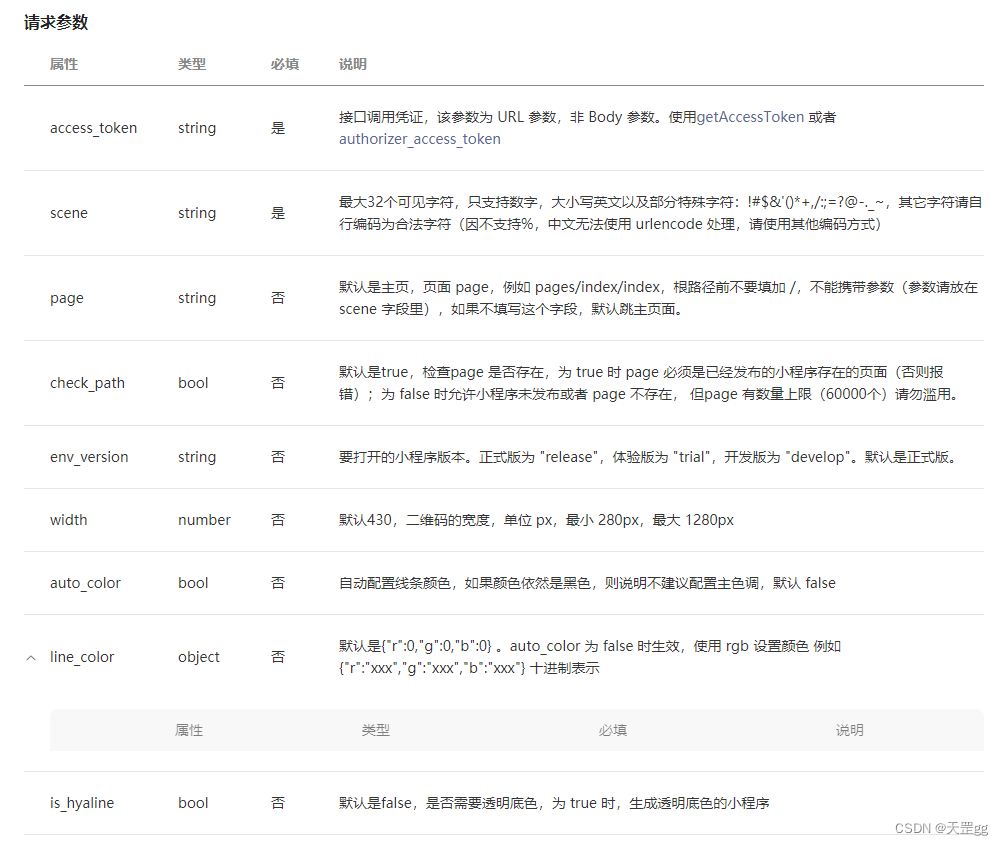
body 就是参数Map,需要根据实际情况自行设定:
Map<String,Object> body = new HashMap<>();
// 场景码,与前端约定,最终是需要前端解析
body.put("scene", scene);
// 正式版为 "release",体验版为 "trial",开发版为 "develop"。默认是正式版。
body.put("env_version", envVersion);
// 透明,根据你的场景自行设置body参数
body.put("is_hyaline", true);

byte[]数组
为什么要先得到byte[]数组?,因为我们需要先判断返回结果是否包含errcode,如果不包含,才是图片Buffer!
如果不包含errorCode,那么byte[]数组不管是保存本地,还是转成Base64,或者上传到OSS,都非常湿滑了!
- 保存本地
private void saveQrCodeToLocal(byte[] bytes) {try {InputStream inputStream = new ByteArrayInputStream(bytes);FileOutputStream out = new FileOutputStream("d:\\test.png");byte[] buffer = new byte[8192];int bytesRead = 0;while ((bytesRead = inputStream.read(buffer, 0, 8192)) != -1) {out.write(buffer, 0, bytesRead);}out.flush();inputStream.close();out.close();} catch (IOException e) {e.printStackTrace();}
}
- Base64
Base64.getEncoder().encodeToString(bytes);
- 上传OSS
这是我们项目使用的, 底层做了封装,直接传byte[]即可,非常方便!
源码下载
源码都是经过实测的,可以直接使用!
下载地址:https://download.csdn.net/download/scm_2008/87398320
❤️ 博客主页:https://blog.csdn.net/scm_2008
❤️ 欢迎点赞👍 收藏 ⭐留言✏️ 如有错误敬请指正!
❤️ 本文由 天罡gg 原创,首发于 CSDN博客🙉
❤️ 停下休息的时候不要忘了别人还在奔跑,希望大家抓紧时间学习,全力奔赴更美好的生活


