最近在研究喷涂喷绘项目,需要做大量纹理图形运算,因此更适合用GPU来处理,在unity中用ComputeShader完成像素运算,SurfaceShader完成纹理渲染。
实现思路:
1.用射线碰撞模型,得到碰撞纹理坐标brushX和brushY
2.ComputeShader拿到brush坐标,在纹理相应的位置做像素运算,并输出纹理ComputeTexture
3.通过SurfaceShader渲染纹理
管理代码:
using System;
using System.Collections;
using System.Collections.Generic;
using UnityEditor.VersionControl;
using UnityEngine;
using UnityEngine.UI;namespace Game.Patinter
{public class PatintManager : MonoBehaviour{//图片尺寸public static int textureSize = 1024;//渲染模型public GameObject paintSurfacePanel;//渲染模型public GameObject paintDataPanel;//运算shaderprivate ComputeShader computeShader;//运算纹理private RenderTexture computeTexture;//输出纹理private Texture2D resultTexture;private int computeShaderKernel;// Start is called before the first frame updatevoid Start(){//实例化shadercomputeShader = (ComputeShader) Resources.Load("Shader/PaintComputeShader", typeof(ComputeShader));computeShaderKernel = computeShader.FindKernel("PaintCompute");//创建纹理computeTexture = new RenderTexture(textureSize, textureSize, 24);computeTexture.enableRandomWrite = true;computeTexture.Create();//绑定纹理computeShader.SetTexture(computeShaderKernel, "paintTexture", computeTexture);computeShader.SetInt("textureSize", textureSize);//输出纹理resultTexture = new Texture2D(textureSize, textureSize, TextureFormat.ARGB32, false);}// Update is called once per framevoid Update(){//鼠标左键按下开始喷绘if (Input.GetMouseButton(0)){var ray = Camera.main.ScreenPointToRay(Input.mousePosition);RaycastHit hit;Physics.Raycast(ray, out hit, 100);//检测到碰撞体if (hit.collider != null){var hitX = hit.textureCoord.x;var hitY = hit.textureCoord.y;Render(hitX, hitY);return;}//未检测到碰撞体Render(0, 0);}else{Render(0, 0);}//空格清空面板if (Input.GetKeyDown(KeyCode.Space)){computeTexture = new RenderTexture(textureSize, textureSize, 24);computeTexture.enableRandomWrite = true;computeTexture.Create();computeShader.SetTexture(computeShaderKernel, "paintTexture", computeTexture);Render(0, 0);}}void Render(float hitX, float hitY){//传入绘制点computeShader.SetFloat("brushX", hitX * textureSize);computeShader.SetFloat("brushY", hitY * textureSize);//纹理运算computeShader.Dispatch(computeShaderKernel, textureSize / 8, textureSize / 8, 1);//拷贝纹理RenderTexture.active = computeTexture;resultTexture.ReadPixels(new Rect(0, 0, textureSize, textureSize), 0, 0);resultTexture.Apply();//渲染纹理paintDataPanel.GetComponent<MeshRenderer>().material.SetTexture("_MainTex", resultTexture);paintSurfacePanel.GetComponent<MeshRenderer>().material.SetTexture("_PaintDataTex", resultTexture);}}
}
代码很简单,就80行;在Start中初始化;Update中检测射线实时渲染;Render负责传入参数启动运算。
ComputeShader:
// Each #kernel tells which function to compile; you can have many kernels
#pragma kernel PaintCompute// Create a RenderTexture with enableRandomWrite flag and set it
// with cs.SetTexture
RWTexture2D<float4> paintTexture;float brushX;
float brushY;int textureSize;[numthreads(8,8,1)]
void PaintCompute(uint3 id : SV_DispatchThreadID)
{//绘制点有效if (brushX != 0 && brushY != 0){// TODO: insert actual code here!//和绘制点距离float dis = distance(id.xy, float2(brushX, brushY));//距离小于90个像素if (dis < 90){float4 v = paintTexture[id.xy];//添加边缘模糊float rate = 1 - dis / 90;v.x += 0.04 * rate;paintTexture[id.xy] = v;}}//流体效果if (id.y > 0){float4 v = paintTexture[id.xy];//大于0.9向下流动if (v.x > 0.9){v.x -= 0.02f;paintTexture[id.xy] = v;float4 down = paintTexture[id.xy - float2(0, 1)];if (down.x < 0.8f)down.x = 0.8;down += float4(0.0178f, 0, 0, 0);paintTexture[id.xy - float2(0, 1)] = down;}}
}
为了更像喷绘的效果,需要加上边缘模糊和流体效果
模型shader:
Shader "Custom/PaintSurfaceShader"
{Properties{_Color ("Color", Color) = (1,1,1,1)_MainTex ("Albedo (RGB)", 2D) = "white" {}_PaintDataTex ("PaintDataTex (RGB)", 2D) = "black" {}_Glossiness ("Smoothness", Range(0,1)) = 0.5_Metallic ("Metallic", Range(0,1)) = 0.0}SubShader{Tags{"RenderType"="Opaque"}LOD 200CGPROGRAM// Physically based Standard lighting model, and enable shadows on all light types#pragma surface surf Standard fullforwardshadows// Use shader model 3.0 target, to get nicer looking lighting#pragma target 3.0sampler2D _MainTex;sampler2D _PaintDataTex;struct Input{float2 uv_MainTex;float3 worldRefl;INTERNAL_DATA};half _Glossiness;half _Metallic;fixed4 _Color;// Add instancing support for this shader. You need to check 'Enable Instancing' on materials that use the shader.// See https://docs.unity3d.com/Manual/GPUInstancing.html for more information about instancing.// #pragma instancing_options assumeuniformscalingUNITY_INSTANCING_BUFFER_START(Props)// put more per-instance properties hereUNITY_INSTANCING_BUFFER_END(Props)void surf(Input IN, inout SurfaceOutputStandard o){// Albedo comes from a texture tinted by colorfixed4 c = tex2D(_MainTex, IN.uv_MainTex);fixed4 p = tex2D(_PaintDataTex, IN.uv_MainTex);o.Albedo = c.rgb * (1 - p.r) + _Color * p.r;// Metallic and smoothness come from slider variableso.Metallic = _Metallic;o.Smoothness = _Glossiness;o.Alpha = c.a;}ENDCG}FallBack "Diffuse"
}
将模型本身的纹理和喷涂上色混合
热力图Shader:
Shader "Custom/PaintDataShader"
{Properties{_Color ("Color", Color) = (1,1,1,1)_MainTex ("Albedo (RGB)", 2D) = "black" {}_ColorMapTex ("ColorMap (RGB)", 2D) = "black" {}_Glossiness ("Smoothness", Range(0,1)) = 0.5_Metallic ("Metallic", Range(0,1)) = 0.0}SubShader{Tags{"RenderType"="Opaque"}LOD 200CGPROGRAM// Physically based Standard lighting model, and enable shadows on all light types#pragma surface surf Standard fullforwardshadows// Use shader model 3.0 target, to get nicer looking lighting#pragma target 3.0sampler2D _MainTex;sampler2D _ColorMapTex;struct Input{float2 uv_MainTex;float3 worldPos;};half _Glossiness;half _Metallic;fixed4 _Color;// Add instancing support for this shader. You need to check 'Enable Instancing' on materials that use the shader.// See https://docs.unity3d.com/Manual/GPUInstancing.html for more information about instancing.// #pragma instancing_options assumeuniformscalingUNITY_INSTANCING_BUFFER_START(Props)// put more per-instance properties hereUNITY_INSTANCING_BUFFER_END(Props)void surf(Input IN, inout SurfaceOutputStandard o){// Albedo comes from a texture tinted by colorfixed4 c = tex2D(_MainTex, IN.uv_MainTex);fixed4 m = tex2D(_ColorMapTex, float2((1 - c.r)*0.9 + 0.09, 0.1));o.Albedo = m.rgb;// Metallic and smoothness come from slider variableso.Metallic = _Metallic;o.Smoothness = _Glossiness;o.Alpha = c.a;}ENDCG}FallBack "Diffuse"
}
此功能是为了反映喷涂渲染状况
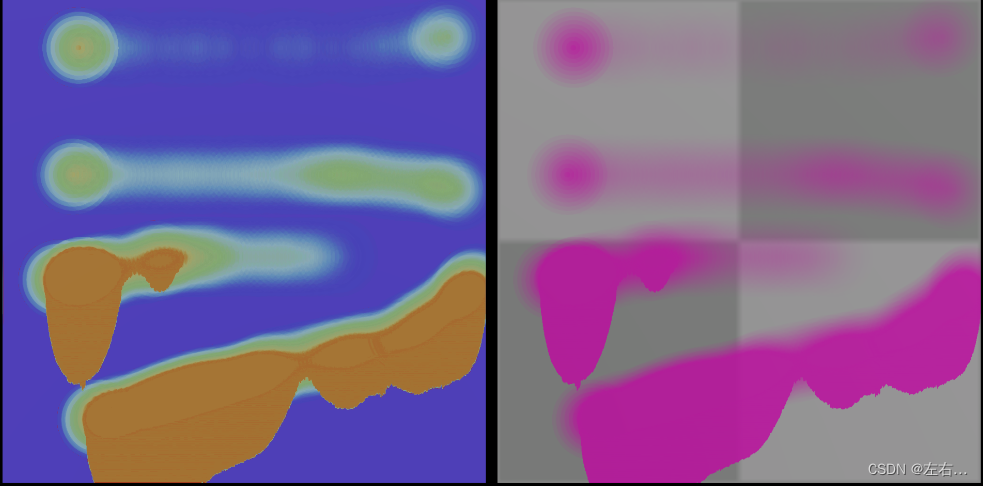
效果:

左边是热力图,右边效果图
源码:https://download.csdn.net/download/u014261855/87777737
后记:流体没有+法线,还有优化空间,有兴趣的朋友可以优化讨论


