文章目录
- 创建springboot项目
- jib插件
- 介绍
- 使用
- 打tar包
- Docker部署springboot项目
在工作中,作为一名后端开发人员,项目部署运维的事我们可能都要同时干,今天想跟大家聊聊关于springboot项目使用docker部署相关操作。后期还会跟大家分享docker-compose部署微服务相关的知识。我在工作中,是通过jib插件将springboot项目打成镜像tar包,然后load进docker里进行使用的。
创建springboot项目
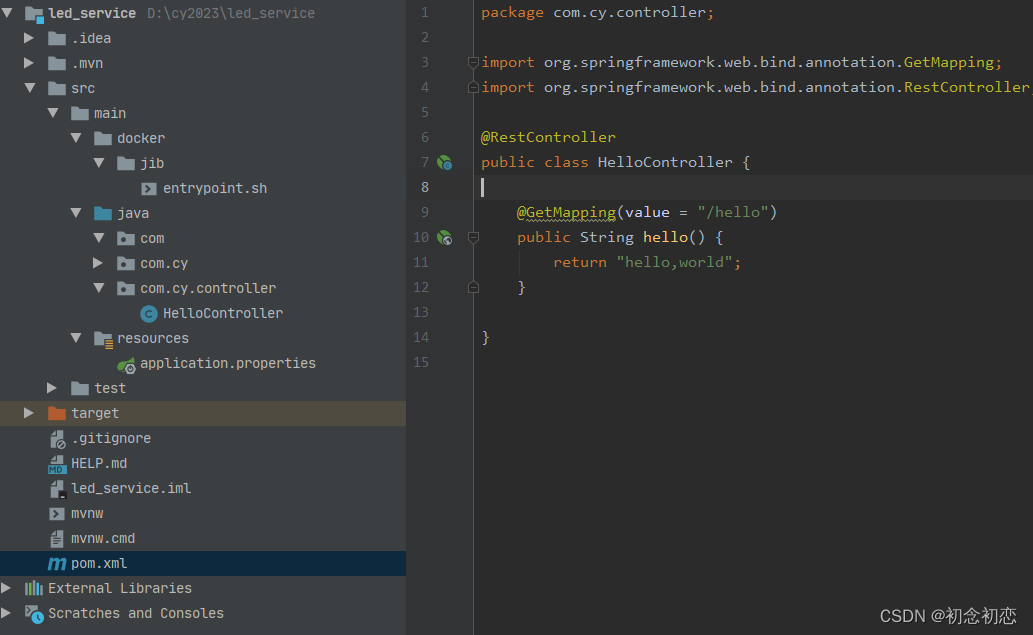
编写一个HelloController,如下图:

启动成功后浏览器访问:http://localhost:8088/hello,页面返回:hello,world,说明 Spring Boot 项目正常。
jib插件
介绍
jib Github地址 https://github.com/GoogleContainerTools/jib 谷歌开源的,实力毋庸置疑,star有11.9k。
- Jib是一个由Google开发的基于Docker镜像构建的工具,它的Maven插件可以让我们以更高效的方式构建和管理Docker镜像。
- 使用Jib,我们可以摆脱手动编写Dockerfile的繁琐过程,而是直接将我们的Java应用程序打包为镜像,并将其推送到容器仓库中,从而大大简化了Docker容器化的过程。
- 使用jib插件也可以直接打包成tar镜像包,load进docker里使用。
使用
jib插件无需写dokcerfile文件,所以参数都用pom中的参数来完成,可以像写dockerfile一样写pom文件。
<?xml version="1.0" encoding="UTF-8"?>
<project xmlns="http://maven.apache.org/POM/4.0.0" xmlns:xsi="http://www.w3.org/2001/XMLSchema-instance"xsi:schemaLocation="http://maven.apache.org/POM/4.0.0 https://maven.apache.org/xsd/maven-4.0.0.xsd"><modelVersion>4.0.0</modelVersion><parent><groupId>org.springframework.boot</groupId><artifactId>spring-boot-starter-parent</artifactId><version>2.7.11</version><relativePath/> <!-- lookup parent from repository --></parent><groupId>com.cy</groupId><artifactId>led_service</artifactId><version>0.0.1-SNAPSHOT</version><name>led_service</name><description>ledf服务</description><properties><java.version>11</java.version><jib-maven-plugin.version>3.2.1</jib-maven-plugin.version><jib-maven-plugin.image>eclipse-temurin:11-jre-focal</jib-maven-plugin.image><jib-maven-plugin.architecture>amd64</jib-maven-plugin.architecture></properties><dependencies><dependency><groupId>org.springframework.boot</groupId><artifactId>spring-boot-starter-web</artifactId></dependency><dependency><groupId>org.springframework.boot</groupId><artifactId>spring-boot-starter-test</artifactId><scope>test</scope></dependency></dependencies><build><defaultGoal>spring-boot:run</defaultGoal><finalName>led</finalName><plugins><plugin><groupId>org.springframework.boot</groupId><artifactId>spring-boot-maven-plugin</artifactId></plugin><plugin><groupId>com.google.cloud.tools</groupId><artifactId>jib-maven-plugin</artifactId></plugin></plugins><pluginManagement><plugins><plugin><groupId>com.google.cloud.tools</groupId><artifactId>jib-maven-plugin</artifactId><version>${jib-maven-plugin.version}</version><configuration><from><image>${jib-maven-plugin.image}</image><platforms><platform><architecture>${jib-maven-plugin.architecture}</architecture><os>linux</os></platform></platforms></from><to><image>led:latest</image></to><container><workingDirectory>/application</workingDirectory><volumes>/application/log</volumes><entrypoint><shell>bash</shell><option>-c</option><arg>/entrypoint.sh</arg></entrypoint><ports><port>8088</port></ports><environment><SPRING_OUTPUT_ANSI_ENABLED>ALWAYS</SPRING_OUTPUT_ANSI_ENABLED><JHIPSTER_SLEEP>0</JHIPSTER_SLEEP></environment><creationTime>USE_CURRENT_TIMESTAMP</creationTime><user>1000</user></container><extraDirectories><paths>src/main/docker/jib</paths><permissions><permission><file>/entrypoint.sh</file><mode>755</mode></permission></permissions></extraDirectories></configuration></plugin><plugin><artifactId>maven-clean-plugin</artifactId><version>${maven-clean-plugin.version}</version></plugin></plugins></pluginManagement></build></project>
- from 定义了依赖镜像 相当于dockerfile 中的 FROM;
- to 打包好后的镜像信息,jib在打包时可以使用maven内置变量;
- workingDirectory 指定工作目录 相当于dockerfile 中的 WORKDIR;
- volumes 相当于 dockerdile 中的 VOLUME 指定容器的目录挂载点;
- environment 容器的环境变量,可以指定多个;
- ports 容器要暴露的端口号;
- entrypoint 相当于dockerfile中的 entrypoint,entrypoint没指定时jib将会输出默认的执行命令,格式是java -cp;
注意:配置了entrypoint.sh,要按照配置的位置src/main/docker/jib增加该文件
#!/bin/shecho "The application will start in ${JHIPSTER_SLEEP}s..." && sleep ${JHIPSTER_SLEEP}
exec java ${JAVA_OPTS} -noverify -XX:+AlwaysPreTouch -Djava.security.egd=file:/dev/./urandom -cp /app/resources/:/app/classes/:/app/libs/* "com.cy.LedServiceApplication"  "$@"
打tar包
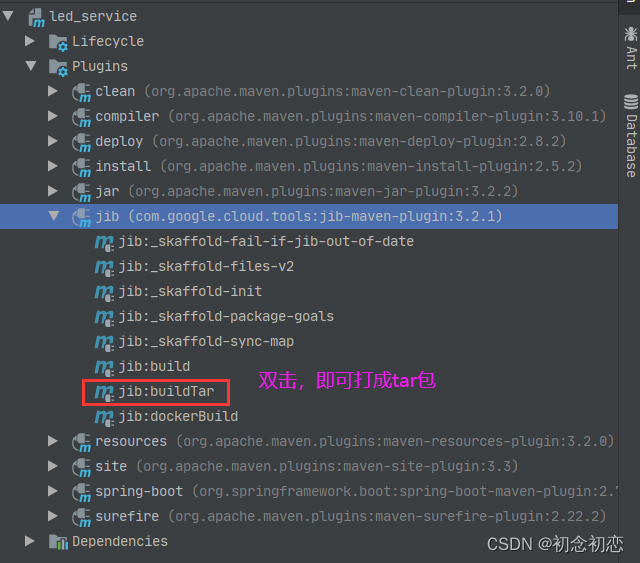
可以使用命令,也可以双击插件打包,我主要使用jib:buildTar这个命令打tar包。

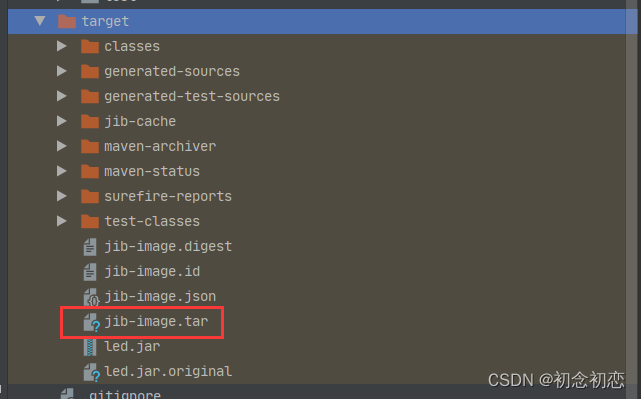
在target目录下会生成一个tar包,如下图:

Docker部署springboot项目
1、将生成的tar包上传到linux系统指定目录下

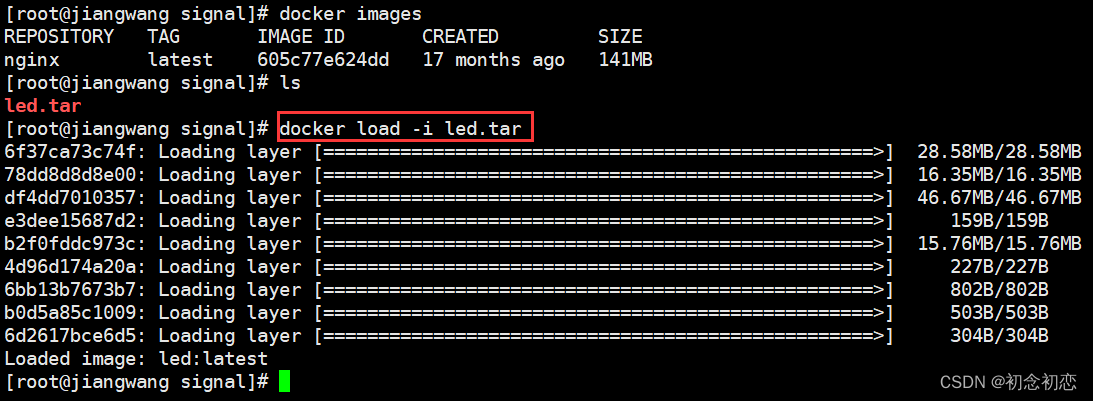
2、执行docker load -i xxx.tar,如下图:

3、执行docker images 查看镜像文件,发现已生成led镜像文件。

4、运行镜像文件,启动容器。执行命令docker run -d -p 9008:8088 --name led01 led

5、浏览器输入外网网址访问一下,如下图所示,说明使用 Docker 部署 Spring Boot 项目成功!
这里你的外网9008端口首先要开放了,可以去安全组设置


