参考:
- d2l
x.1 AlexNet
研究人员认为:
- 更大更干净的数据集或是稍加改进的特征提取方法,比任何学习算法带来的进步大得多。
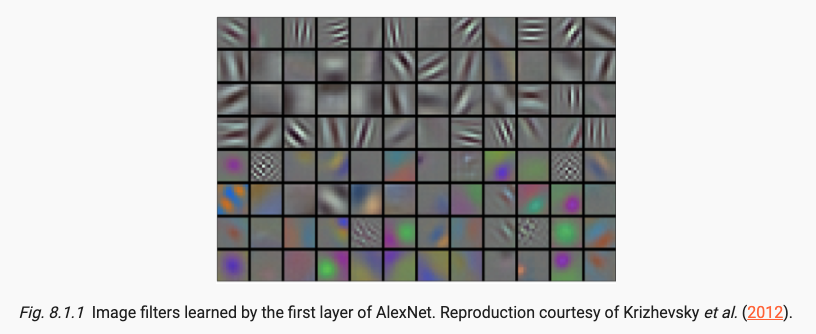
- 认为特征本身应该被学习,即卷积核参数应该是可学习的。
- 创新点在于GPU与更深的网络,使用ReLU激活函数,Dropout层。
可参考:
AlexNet https://blog.csdn.net/qq_43369406/article/details/127295070
CODE::AlexNet_model https://blog.csdn.net/qq_43369406/article/details/129171352
x.2 VGG
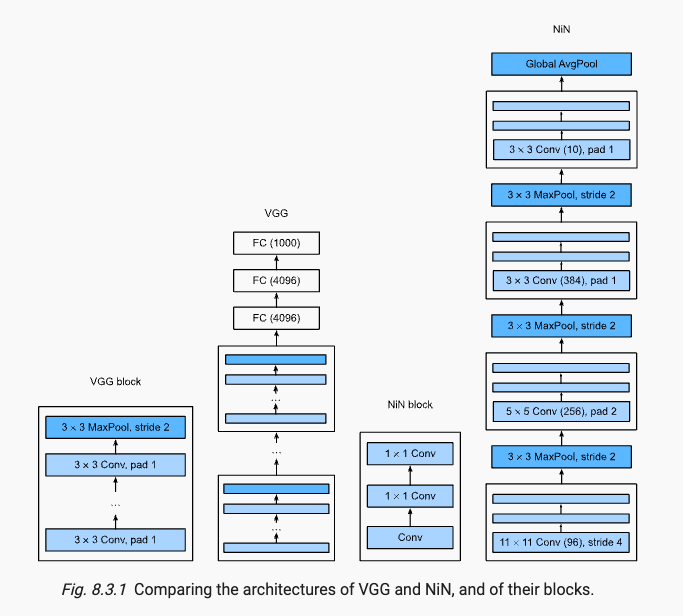
VGG引入了自定义层,能够更加快速定义层结构。VGG亮点在于,通过堆叠多个3x3卷积核来代替大尺度卷积核,以此达到减少所需参数的目的。虽然减少了参数但是具有相同的感受野。
可参考:
- VGG 网络介绍
https://blog.csdn.net/qq_43369406/article/details/127485929 - CODE::VGG16_model
https://blog.csdn.net/qq_43369406/article/details/129174640
x.3 NiN
最后一层如果使用全连接层会放弃表征的空间结构,所以使用全卷积代替。
x.4 GoogLeNet
GoogLeNet最大的特点在于解决了多大的卷积核最适合的问题,因为以前流行的网络使用小到1x1,大到11x11的卷积核,Inception模块使用了4条并行的路径,这种Inception的输出图中height和width相同而channel不同,最终在channel方向上进行了concat短接,结构如下:
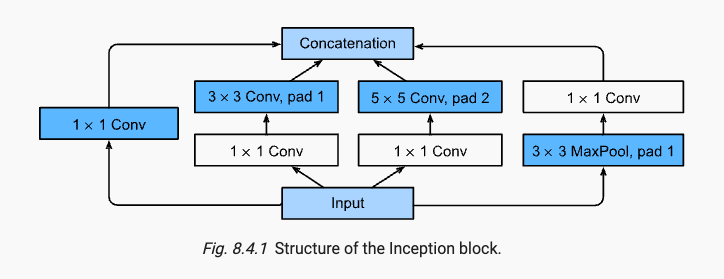
我们注意到在数字图像处理中常常使用各种尺寸的滤波器探索图像,这意味着不同尺寸的滤波器可以有效地识别不同范围的图像细节。还使用了辅助分类器,1x1卷积核降维。
参考:
- GoogLeNet 网络简介
https://blog.csdn.net/qq_43369406/article/details/127608423 - CODE::GoogLeNet_model
https://blog.csdn.net/qq_43369406/article/details/129189694
x.5 ResNet
x.5.1 BatchNormalization
BN作为现代深度学习中浓墨重彩的一笔,它的出现能够可持续加速深层网络的收敛。回顾神经网络碰到的挑战如下:
- 数据预处理方式会对最终结果产生巨大影响。第一步是规范化输入特征,使得全部输入特征 ~ N (0, 1)
- 在中间隐藏层中,如果一个层的可变值是另一层的100倍,这种变量分布中的偏移会阻碍网络的收敛。通过中间隐藏层后的数据难以控制,需要BN归一化。
- 更深层的网络复杂,容易过拟合,意味着正则化更加重要。如L2正则化,在loss中增加weight decay,通过Adam可简易实现。
在BN层中,每一个通道的数据具有四个参数,其中miu和sigma并不是learnable parameters,并不会出现在model.parameters()中;而scale parameter - lambda和shift parameter - beta是learnable parameters可学习参数,会参加梯度计算,如下:

而miu和sigma便是mini-batch小批量样本的均值和方差,

需要注意到的是BN层具有自己的处理顺序,如:Linear-BN-Activation或者Conv-BN-Act

BN同Dropout在model.eval()时候会失去活性,
建议参看BN代码实现如下:
"""1. BN
"""
def batch_norm(X, gamma, beta, moving_mean, moving_var, eps, momentum):# Use is_grad_enabled to determine whether we are in training modeif not torch.is_grad_enabled():# In prediction mode, use mean and variance obtained by moving averageX_hat = (X - moving_mean) / torch.sqrt(moving_var + eps)else:assert len(X.shape) in (2, 4)if len(X.shape) == 2:# When using a fully connected layer, calculate the mean and# variance on the feature dimensionmean = X.mean(dim=0)var = ((X - mean) ** 2).mean(dim=0)else:# When using a two-dimensional convolutional layer, calculate the# mean and variance on the channel dimension (axis=1). Here we# need to maintain the shape of X, so that the broadcasting# operation can be carried out latermean = X.mean(dim=(0, 2, 3), keepdim=True)var = ((X - mean) ** 2).mean(dim=(0, 2, 3), keepdim=True)# In training mode, the current mean and variance are usedX_hat = (X - mean) / torch.sqrt(var + eps)# Update the mean and variance using moving averagemoving_mean = (1.0 - momentum) * moving_mean + momentum * meanmoving_var = (1.0 - momentum) * moving_var + momentum * varY = gamma * X_hat + beta  # Scale and shiftreturn Y, moving_mean.data, moving_var.dataclass BatchNorm(nn.Module):# num_features: the number of outputs for a fully connected layer or the# number of output channels for a convolutional layer. num_dims: 2 for a# fully connected layer and 4 for a convolutional layerdef __init__(self, num_features, num_dims):super().__init__()if num_dims == 2:shape = (1, num_features)else:shape = (1, num_features, 1, 1)# The scale parameter and the shift parameter (model parameters) are# initialized to 1 and 0, respectivelyself.gamma = nn.Parameter(torch.ones(shape))self.beta = nn.Parameter(torch.zeros(shape))# The variables that are not model parameters are initialized to 0 and# 1self.moving_mean = torch.zeros(shape)self.moving_var = torch.ones(shape)def forward(self, X):# If X is not on the main memory, copy moving_mean and moving_var to# the device where X is locatedif self.moving_mean.device != X.device:self.moving_mean = self.moving_mean.to(X.device)self.moving_var = self.moving_var.to(X.device)# Save the updated moving_mean and moving_varY, self.moving_mean, self.moving_var = batch_norm(X, self.gamma, self.beta, self.moving_mean,self.moving_var, eps=1e-5, momentum=0.1)return Y# test
temp_builtin = [i for i in torch.nn.BatchNorm2d(4).parameters()]
temp_diy = [i for i in BatchNorm(num_features=4, num_dims=4).parameters()]
# self.moving_mean() and var is not nn.Parameters(), not learnable."""2. LeNet
"""
class BNLeNetScratch(d2l.Classifier):def __init__(self, lr=0.1, num_classes=10):super().__init__()self.save_hyperparameters()self.net = nn.Sequential(nn.LazyConv2d(6, kernel_size=5), BatchNorm(6, num_dims=4),nn.Sigmoid(), nn.AvgPool2d(kernel_size=2, stride=2),nn.LazyConv2d(16, kernel_size=5), BatchNorm(16, num_dims=4),nn.Sigmoid(), nn.AvgPool2d(kernel_size=2, stride=2),nn.Flatten(), nn.LazyLinear(120),BatchNorm(120, num_dims=2), nn.Sigmoid(), nn.LazyLinear(84),BatchNorm(84, num_dims=2), nn.Sigmoid(),nn.LazyLinear(num_classes))trainer = d2l.Trainer(max_epochs=10, num_gpus=1)
data = d2l.FashionMNIST(batch_size=128)
model = BNLeNetScratch(lr=0.1)
model.apply_init([next(iter(data.get_dataloader(True)))[0]], d2l.init_cnn)  # 因为使用了Lazy init所以要先forward一个Tensor初始化模型
trainer.fit(model, data)# learnable gamma and beta
print(model.net[1].gamma.reshape((-1,)), model.net[1].beta.reshape((-1,)))
x.5.2 ResNet
随着网络的层数加深,深刻理解新添加的层如何提升神经网络的性能变得至关重要,给定X个特征,y个标签的数据集,我们需要使得f尽量拟合f星,如下:

而为了更接近f星,我们需要尽量使用类似右侧的嵌套函数,复杂度从F1到F6依次增加。
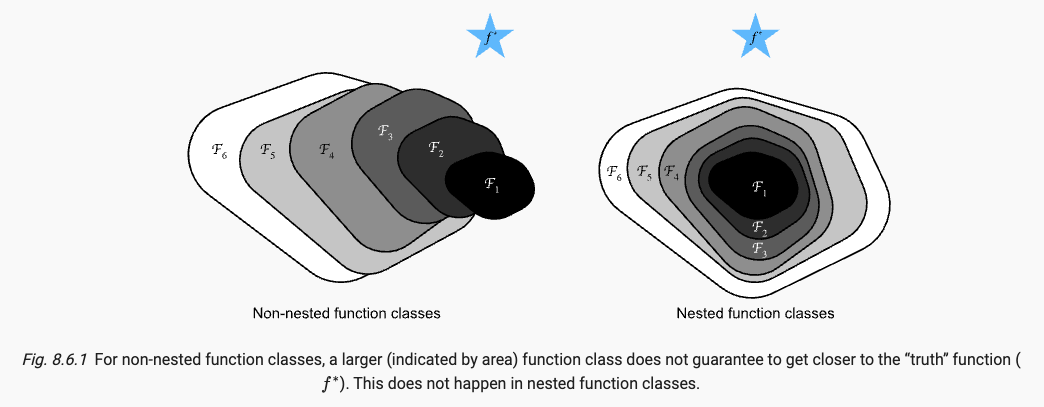
将较复杂的函数类包含较小的函数类这一思想引入,我们得到残差网络核心思想:每个附加层都应该更容易地包含原始函数作为其元素之一。
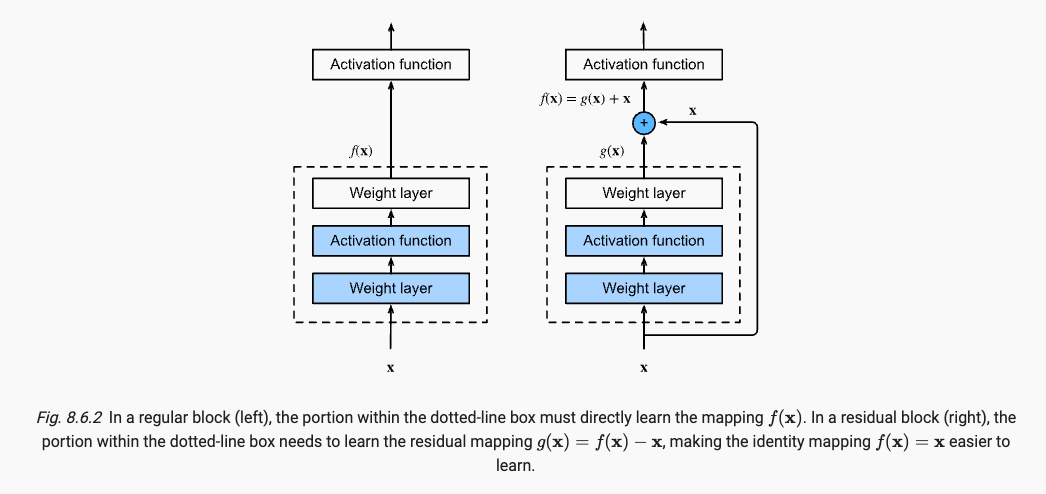
ResNet的两点在于引入了BN和残差模块,加深了网络深度,如下:

参考:
- ResNet 简介
https://blog.csdn.net/qq_43369406/article/details/127500443 - ResNet 代码实现
https://blog.csdn.net/qq_43369406/article/details/127508108 - CODE::ResNet_model
https://blog.csdn.net/qq_43369406/article/details/129190380
x.6 DenseNet
将ResNet更改为联系前面多层,并使用Concat拼接。
x.7 Designing Convolution Network Architectures
从AlexNet到ResNet,SENet由于加入了位置信息和注意力机制,是Transformers的前身。
NAS的大展身手的诞生了EfficientNets。
手工设计和NAS的结合诞生出了RegNets。
为了设置拟合能力更强的网络,应该使用更深的(channel更大)网络。


