目录
一.上节内容复习
1.进程和线程的区别
2.创建线程的四种方式
二.多线程的优点的代码展示
1.多线程的优点
2.代码实现
三.Thread类常用的方法
1.Thread类中的构造方法
2.Thread类中的属性
1.为线程命名并获取线程的名字
2.演示isDaemon()
3.演示isAlive()
4.演示getState()
3.Thread类中的方法
1.启动一个线程---start()方法
2.等待一个线程---join()方法
3.中断一个线程----interrupt()方法
3.获取当前线程
4.休眠当前线
5.主动让出CPU---yield()方法
一.上节内容复习
上节内容指路:Java之多线程初阶
1.进程和线程的区别
1.进程中至少包含一个线程(主线程)
2.进程是申请计算机资源的最小单位
3.线程是CPU调度的最小单位
4.进程之间是相互隔离的,线程是使用的是进程统一申请来的资源,之间可以相互影响
2.创建线程的四种方式
1.继承Thread类并重写run()方法
2.实现Runnable接口并重写run()方法
3.通过匿名内部类创建Thread和实现Runnable
4.通过Lambda表达式实现一个线程
二.多线程的优点的代码展示
1.多线程的优点
通过上一节的学习我们知道多线程可以充分利用CPU的资源,提高程序的运行效率
2.代码实现
public class Demo6_10B {public static void main(String[] args) {serial();concurrent();}public static long COUNT = 10_0000_0000L;//串行执行10亿次的自增public static void serial() {long start = System.currentTimeMillis();long a = 0L;for (int i = 0; i < COUNT; i++) {a++;}long b = 0L;for (int i = 0; i < COUNT; i++) {b++;}long end = System.currentTimeMillis();System.out.println("串行的总耗时为:" + (end - start) + " ms");}//并行执行10亿次的自增public static void concurrent() {long start = System.currentTimeMillis();Thread thread1=new Thread(()->{long a=0L;for (int i = 0; i < COUNT; i++) {a++;}});Thread thread2=new Thread(()->{long a=0L;for (int i = 0; i < COUNT; i++) {a++;}});thread1.start();thread2.start();try {thread1.join();thread2.join();} catch (InterruptedException e) {throw new RuntimeException(e);}long end = System.currentTimeMillis();System.out.println("并行的总耗时为:" + (end - start) + " ms");}
}
注意:并行代码进行实现的时候一定要加 thread1.join();和 thread2.join();这两段代码,join()方法的作用是等待线程执行完毕之后,继续执行下面的代码.如果我们没有这两段代码的话,可能会发生如下情况:两个线程的自增操作还没有完成,主线程(main)线程已经执行完毕,也就是直接打印最终执行的总耗时,正确的耗时的结果应该为串行耗时的一半多.
这里没有加join()代码执行的结果,可以看到主线程执行完毕,线程1和线程2还没有执行完毕.
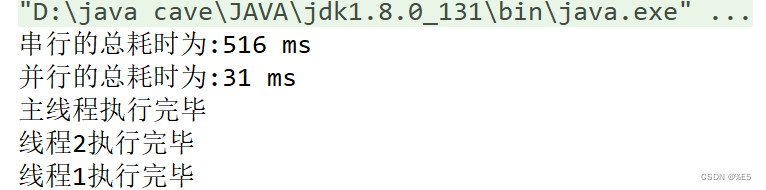
加join()打印结果:

我们多执行几次代码,发现每一次并行的耗时都是串行耗时的一半多一些,那么为什么不是一半呢?其实仔细思考我们不难想出:线程的创建和销毁也是需要一定时间的,因此总是一半多一些.
接下来我们将COUNT的值改小点,比如改到COUNT=10_000L,这个时候我们再执行

发现串行的总耗时比并行的总耗时还要短,因此我们可以大胆推测,并不是所有的场景下多线程的效率都是最高的,当我们的运算量很小的时候,创建线程的时间比代码运行的时间还短,这样子显然是不适合用多线程的.
三.Thread类常用的方法
1.Thread类中的构造方法
| 方法 | 说明 |
| Thread() | 创建一个线程对象 |
| Thread(String name) | 创建一个线程对象,并为它命名 |
| Thread(Runnable target) | 使用Runnable对象创建线程 |
| Thread(Runnable target,String name) | 使用Runnable对象创建线程,并命名 |
| 【了解】 Thread(ThreadGroup group, Runnable target) | 线程可以被用来分组管理,分好的组即为线程组,这 个目前我们了解即可 |
Thread t1 = new Thread();
Thread t2 = new Thread ( new MyRunnable ());Thread t3 = new Thread ( " 这是线程名 " );Thread t4 = new Thread ( new MyRunnable (), "这是线程名" );
2.Thread类中的属性
| 属性 | 获取方法 |
| ID | getId() |
| 名称 | getName() |
| 状态 | getState() |
| 优先级 | getPriority() |
| 是否后台线程 | isDaemon() |
| 是否存活 | isAlive() |
| 是否被中断 | isInterrupted() |
1.为线程命名并获取线程的名字
public class Demo7_ThreadName {public static void main(String[] args) {Thread thread = new Thread(() -> {while (true) {System.out.println(Thread.currentThread().getName() + ":hello Thread");try {Thread.sleep(1000);} catch (InterruptedException e) {throw new RuntimeException(e);}}}, "这是thread线程");thread.start();}
}
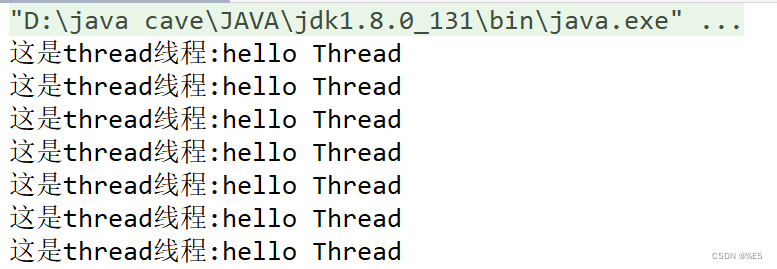
在jconsole中查看线程的名字
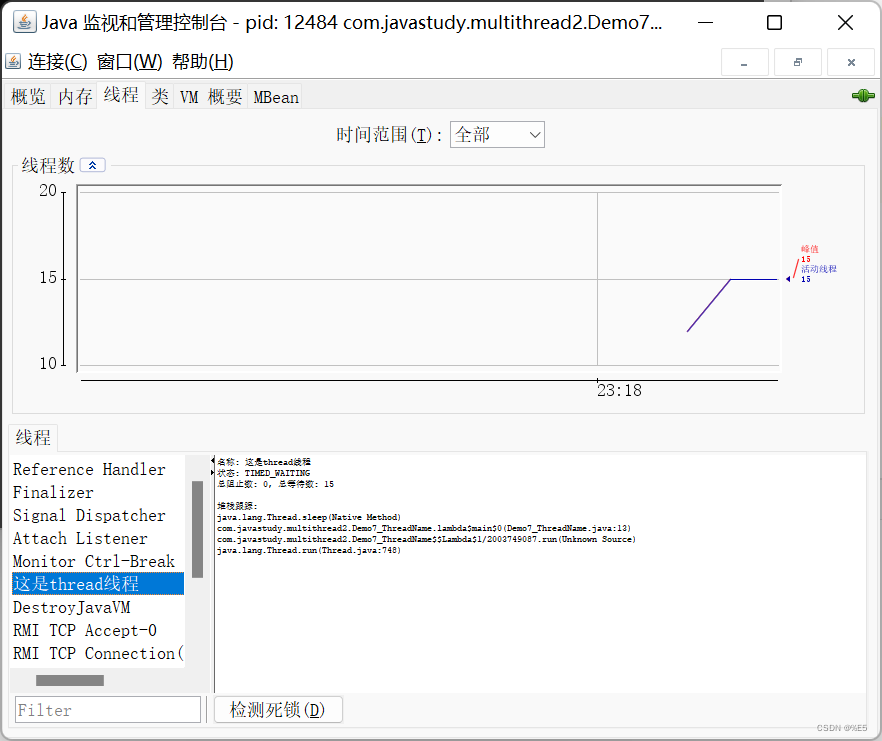
当我们不执行线程名字的时候,系统会自动生成线程名,从Thread0开始依次向后进行生成
2.演示isDaemon()
我们之前使用的线程都是前台线程,因为创建线程之后默认都是前台线程,必须手动设置成为后台线程,我们通过 thread.setDaemon(true);代码将这个进行设置为后台进程
public class Demo8_Daemon {public static void main(String[] args) throws InterruptedException {Thread thread = new Thread(() -> {while (true) {System.out.println(Thread.currentThread().getName() + ":hello Thread");try {Thread.sleep(1000);} catch (InterruptedException e) {throw new RuntimeException(e);}}});//手动设置为后台线程,默认为false,也就是前台线程thread.setDaemon(true);System.out.println("是否存活:" + thread.isAlive());// 启动线程thread.start();// 休眠一会,确保系统PCB创建成功Thread.sleep(500);System.out.println("是否存活:" + thread.isAlive());System.out.println("main线程执行完成");System.out.println("是否存活:" + thread.isAlive());}
}
打印结果如下:
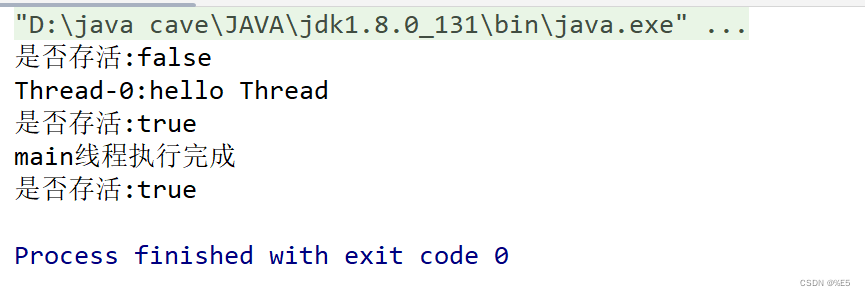
我们可以看出来,随着main方法的执行完毕,程序也进行了关闭
和前台进程进行对比,前台进程打印的结果如下:
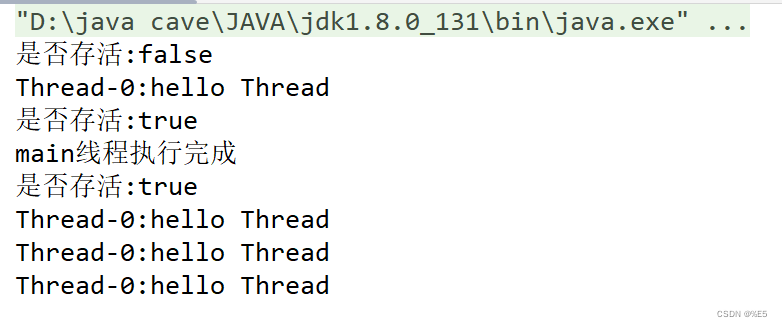
因此我们可以总结出前台进程和后台进程运行的场景
前台进程:在一些需要需要精确业务,容错率低的事务中采用前台进程,如银行转账,要确保转账线程的完成.
后台进程:在一些容错率高的任务,可以采用,如微信的步数计算,并不需要精确计算你精确的步数,不影响主线程的关闭..
3.演示isAlive()
public class Demo9_IsAlive {public static void main(String[] args) {Thread thread = new Thread(() -> {int cnt = 0;while (true) {System.out.println("hello thread.....");cnt++;try {Thread.sleep(1000);} catch (InterruptedException e) {throw new RuntimeException(e);}if (cnt == 5)break;}});System.out.println("是否存活:" + thread.isAlive());// 启动线程thread.start();System.out.println("是否存活:" + thread.isAlive());//等待线程执行完毕try {thread.join();} catch (InterruptedException e) {throw new RuntimeException(e);}System.out.println("是否存活:" + thread.isAlive());}
}
打印的结果如下:
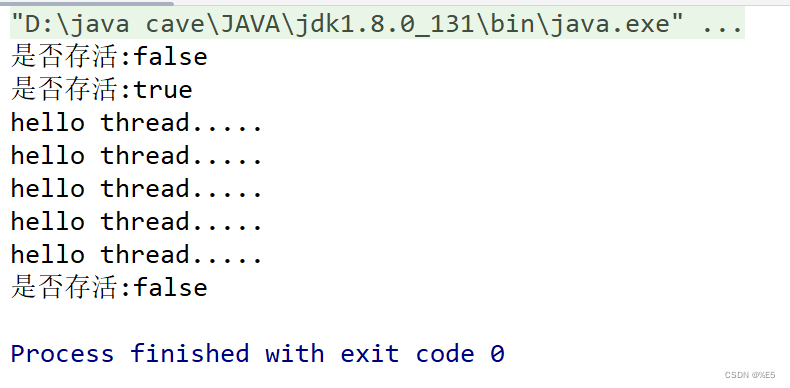
由此我们可以总结得出:isAlive()方法是判断系统线程(PCB)是否存活,并不是我们new出来的Thread对象
4.演示getState()
- NEW:创建一个Java线程(对象),但还没有调用start()方法,也就是没有参与CPU调度,此时就是一个Java的对象
- RUNNABLE: 运行或在就绪队列中(PCB的就绪队列)
- BLOCKED: 等待锁的时候进入堵塞状态(synchronized)
- WAITING: 没有时间限制的等待
- TIMED_WAITING: 等待一段时间(有时间限制的等待)(过时不候)
- TERMINATED:线程执行完成,PCB在操作系统中已经销毁,但是JAVA对象还在
线程状态之间的转换图

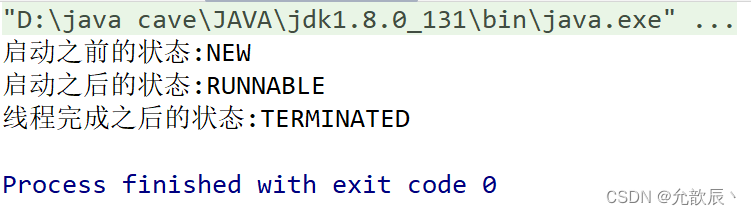
这里来观察三种状态NEW-->TIME_WAITING-->TERMINATED
public class Demo14_State {public static void main(String[] args) {Thread thread=new Thread(()->{try {Thread.sleep(1000);} catch (InterruptedException e) {throw new RuntimeException(e);}});System.out.println("启动之前的状态:"+thread.getState());thread.start();//等待线程的创建try {Thread.sleep(1000);} catch (InterruptedException e) {throw new RuntimeException(e);}System.out.println("启动之后的状态:"+thread.getState());//等待线程结束try {thread.join();} catch (InterruptedException e) {throw new RuntimeException(e);}System.out.println("线程完成之后的状态:"+thread.getState());}
}
打印的结果为:

这里来观察三种状态NEW-->RUNNABLE-->TERMINATED
public class Demo14_State {public static void main(String[] args) {Thread thread=new Thread(()->{for(long i=0;i<10000000000L;++i){}});System.out.println("启动之前的状态:"+thread.getState());thread.start();//等待线程的创建try {Thread.sleep(1000);} catch (InterruptedException e) {throw new RuntimeException(e);}System.out.println("启动之后的状态:"+thread.getState());//等待线程结束try {thread.join();} catch (InterruptedException e) {throw new RuntimeException(e);}System.out.println("线程完成之后的状态:"+thread.getState());}
}
打印的结果如下:
具体堵塞的状态BLOCK(synchronized具体的用法下一节)
public class Demo16_State2 {public static void main(String[] args) {final Object object = new Object();Thread t1 = new Thread(new Runnable() {@Overridepublic void run() {//此时object对象就是锁synchronized (object) {while (true) {System.out.println("张三");try {Thread.sleep(1000);} catch (InterruptedException e) {e.printStackTrace();}}}}}, "t1");t1.start();Thread t2 = new Thread(new Runnable() {@Overridepublic void run() {synchronized (object) {System.out.println("李四");System.out.println("hehe");}}}, "t2");t2.start();//等待线程的创建try {Thread.sleep(1000);} catch (InterruptedException e) {throw new RuntimeException(e);}System.out.println("线程1此时的状态:"+t1.getState());System.out.println("线程2此时的状态:"+t2.getState());}}因为线程一的状态处以sleep(1000),所以他现在是TIMED_WAITING,因为线程一拿到了锁是object对象,而线程二也没有拿到,需要等到线程一释放锁才可以继续进行,所以线程二的状态为BLOCK
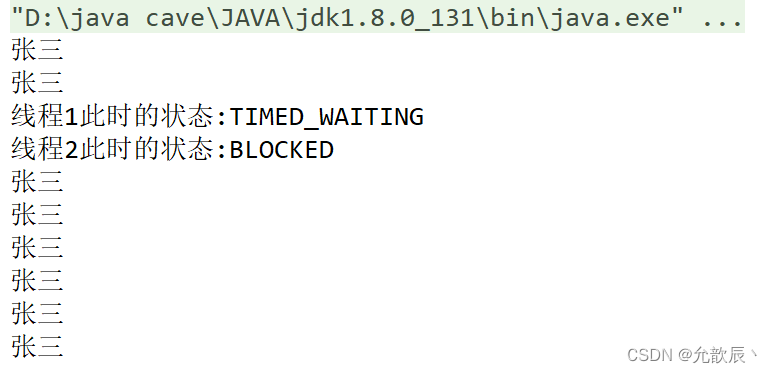
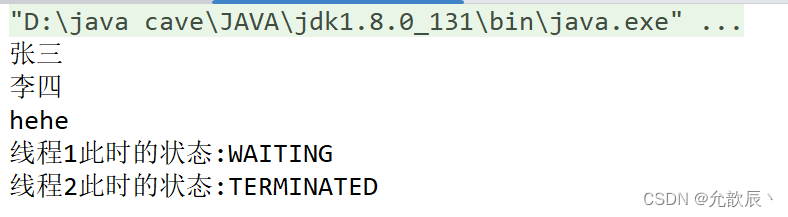
将上面代码的Thread.sleep(1000)代码改换为object.wait();代码可以观察到WAIT状态
具体的打印如下,可以看到线程一处在WAIT状态,每一继续向下打印,并且锁也没有释放,所以线程二一致处在BLOCK状态
结论:
3.Thread类中的方法
1.启动一个线程---start()方法
我们前面一节讲过start方法,通过调用start0()本地方法来启动一个线程
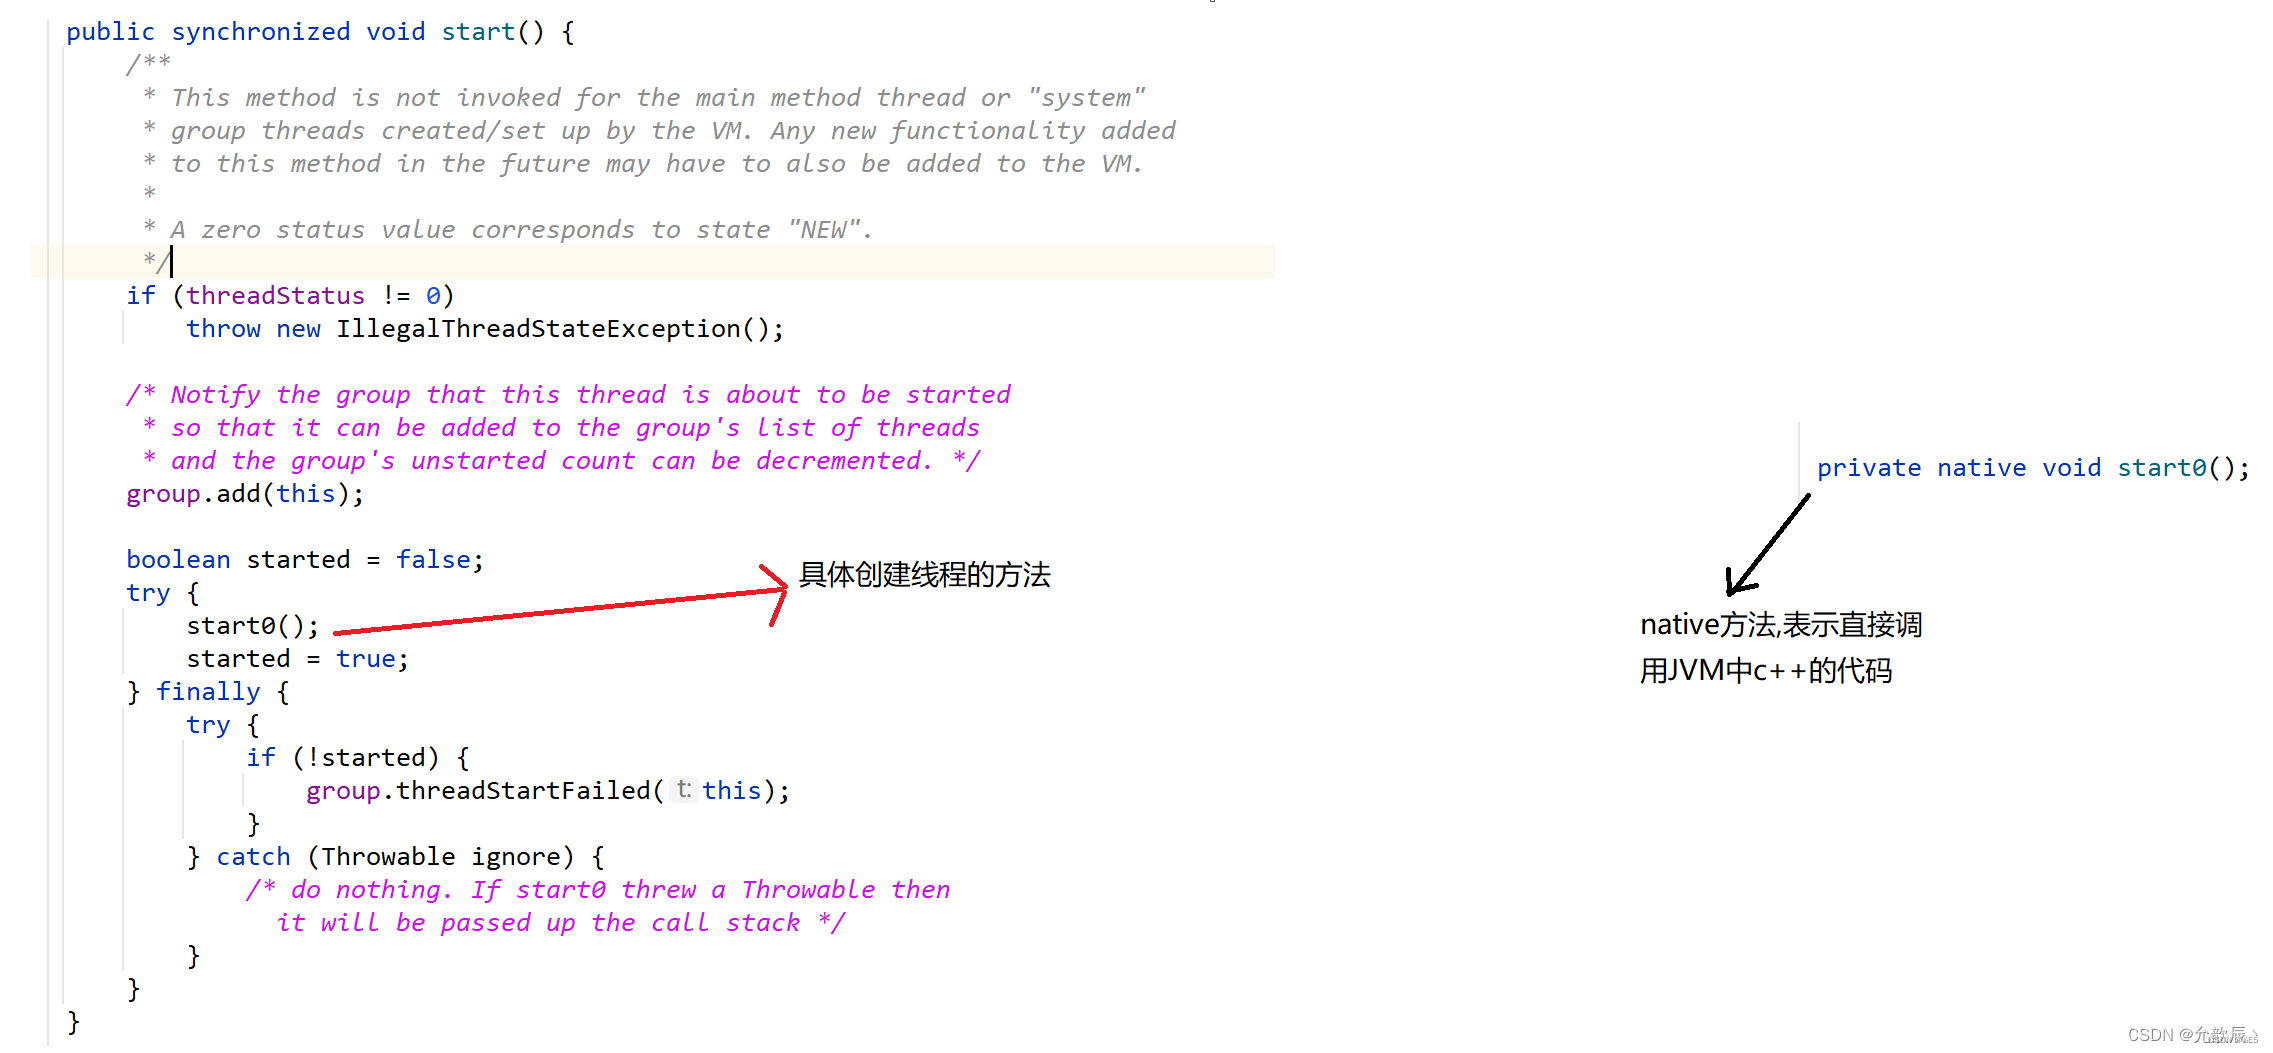
有上面的基础,这里我们来分析一下start()方法和run()方法的区别
1.start()方法是真正申请一个系统线程,run()方法是定义线程要执行的任务
2.直接调用run()方法,不会去申请一个真正的系统线程(PCB),而是调用对象的方法
调用start()方法,JVM会调用本地方法去申请一个真正的系统线程(PCB),并执行run()方法中的逻辑
接下来通过下段代码来更好的理解:
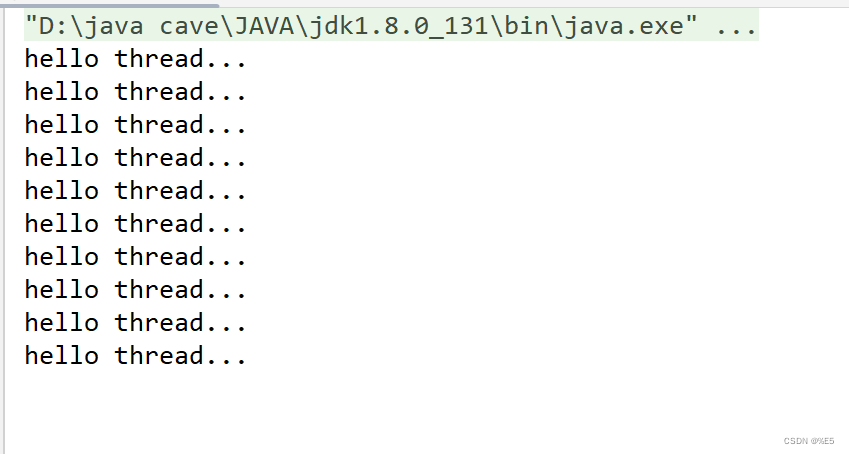
public class Demo13_StartRun {public static void main(String[] args) {Thread thread = new Thread(() -> {while (true) {System.out.println("hello thread...");try {Thread.sleep(1000);} catch (InterruptedException e) {e.printStackTrace();}}});thread.run();
//        thread.start();System.out.println("线程状态:" + thread.getState());System.out.println("主线程结束");}
}
调用run()方法打印的结果:
调用start()方法打印的结果:

可以观察到调用run()方法根本不会打印主线程结束,而调用start()方法会打印.
2.等待一个线程---join()方法
join()方法的作用:等待当前线程结束,进行到下一步的工作
| 方法 | 说明 |
| public void join() | 等待线程结束 |
| public void join(long millis) | 等待线程结束,最多等 millis 毫秒 |
| public void join(long millis, int nanos) | 同理,但可以更高精度 |
public class Demo12_Join {public static void main(String[] args) {Thread thread = new Thread(() -> {for (int i = 0; i < 5; ++i) {System.out.println("hello,thread " + i);try {Thread.sleep(1000);} catch (InterruptedException e) {throw new RuntimeException(e);}}});thread.start();System.out.println("join之前,线程状态:" + thread.getState());System.out.println("join之前,是否存活:" + thread.isAlive());// 使用join等待thread线程结束try {thread.join();} catch (InterruptedException e) {e.printStackTrace();}System.out.println("join之后,线程状态:" + thread.getState());System.out.println("join之后,是否存活:" + thread.isAlive());System.out.println("主线程执行完成。");}
}
打印的结果: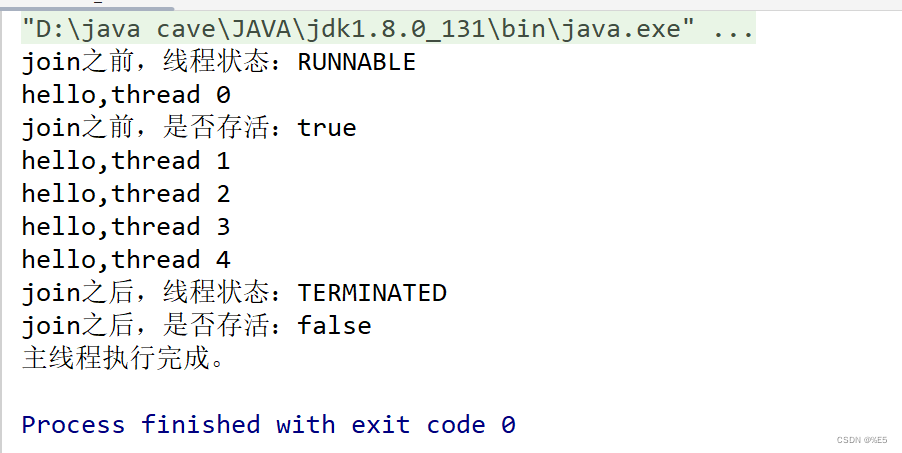
3.中断一个线程----interrupt()方法
线程的中断:停止或者中断当前线程的任务.
实现线程的中断有如下两种方式
1.通过是否中断的标志位(手动)
通过isQuit的修改来中断线程
public class Demo10_Interrupted {public static boolean isQuit = false;public static void main(String[] args) {Thread thread = new Thread(() -> {while (!isQuit) {System.out.println("hello thread...");try {Thread.sleep(100);} catch (InterruptedException e) {e.printStackTrace();}}System.out.println("线程任务完成");});// 启动线程thread.start();//让子线程先执行一段时间try {Thread.sleep(1000);} catch (InterruptedException e) {throw new RuntimeException(e);}//通过修改isQuit来中断线程isQuit = true;//让子线程先结束try {Thread.sleep(1000);} catch (InterruptedException e) {throw new RuntimeException(e);}System.out.println("主线程任务完成");}
}
打印的结果如下:

2.通过Thread类提供的interrupted()方法来中断线程
public class Demo11_Interrupted02 {public static void main(String[] args) {Thread thread = new Thread(() -> {while (!Thread.currentThread().isInterrupted()) {System.out.println("hello thread...");try {Thread.sleep(100);} catch (InterruptedException e) {e.printStackTrace();}}System.out.println("是否中断:" + Thread.currentThread().isInterrupted());System.out.println("线程任务完成");});// 启动线程thread.start();//让子线程先执行一段时间try {Thread.sleep(1000);} catch (InterruptedException e) {throw new RuntimeException(e);}//中断线程,修改Thread的中断标志thread.interrupt();//让子线程先结束try {Thread.sleep(1000);} catch (InterruptedException e) {throw new RuntimeException(e);}System.out.println("主线程任务完成");}
}
当我们采用如上的代码来进行线程的中断,打印的结果如下:
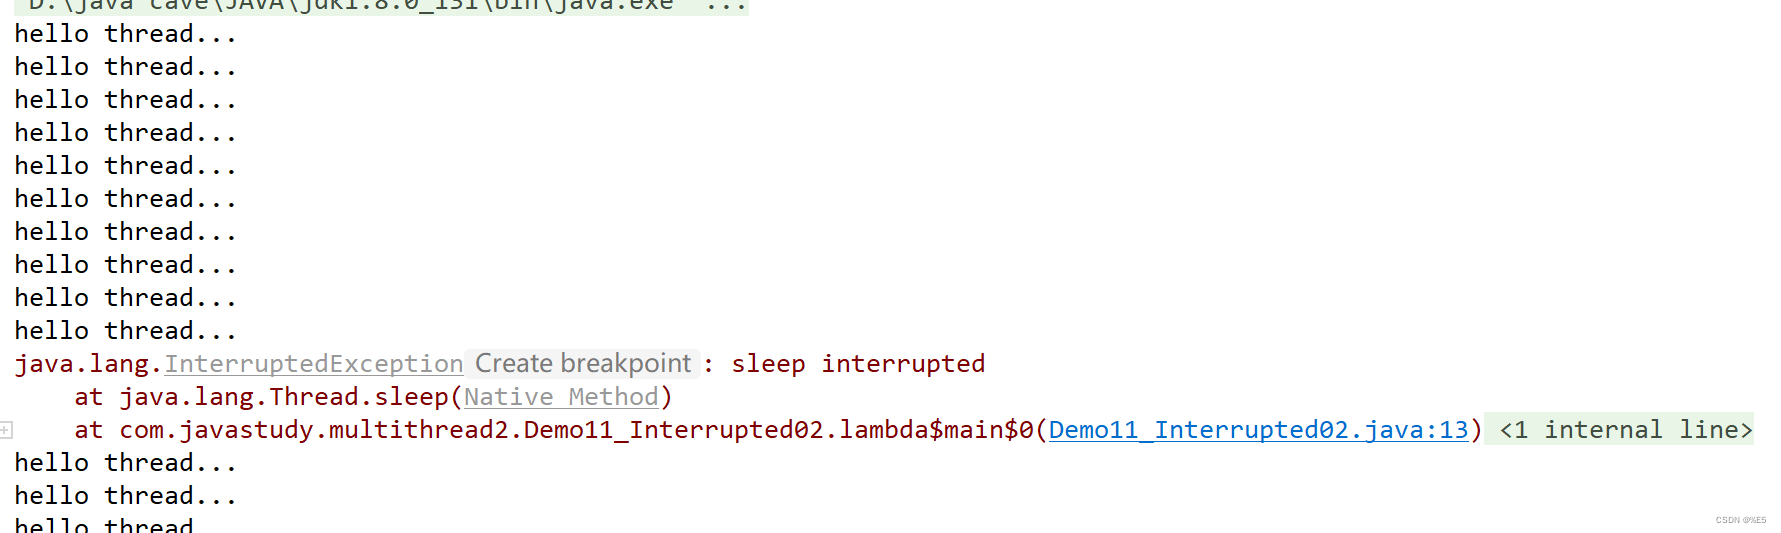
因为当前子线程的状态处于sleep()或者堵塞状态,这个时候线程中断的状态是sleep()或者堵塞状态,比如现实情境下张三学习1秒,睡觉1分钟,我们打断张三的状态,大概率张三在睡觉,我们打断的是张三睡觉的状态.
那么到底该怎么进行线程的中断呢?我们看到打印的结果的时候看到有异常的捕获,其实我们可以想到在异常捕获的时候加上一个break即可.
public class Demo11_Interrupted02 {public static void main(String[] args) {Thread thread = new Thread(() -> {while (!Thread.currentThread().isInterrupted()) {System.out.println("hello thread...");try {Thread.sleep(100);} catch (InterruptedException e) {e.printStackTrace();break;}}System.out.println("是否中断:" + Thread.currentThread().isInterrupted());System.out.println("线程任务完成");});// 启动线程thread.start();//让子线程先执行一段时间try {Thread.sleep(1000);} catch (InterruptedException e) {throw new RuntimeException(e);}//中断线程,修改Thread的中断标志thread.interrupt();//让子线程先结束try {Thread.sleep(1000);} catch (InterruptedException e) {throw new RuntimeException(e);}System.out.println("主线程任务完成");}
}
3.获取当前线程
| 方法 | 说明 |
| public static Thread currentThread(); | 返回当前线程对象的引用 |
public class ThreadDemo {public static void main(String[] args) {//获取到的是主线程mainThread thread = Thread.currentThread();System.out.println(thread.getName());}
}
4.休眠当前线
try {Thread.sleep(1000);} catch (InterruptedException e) {throw new RuntimeException(e);}sleep方法只是保证在这个时间段内进行休眠,不被调度到CPU运行,并不是很精准
5.主动让出CPU---yield()方法
public class Demo15_Yield {public static void main(String[] args) {Thread thread1=new Thread(()->{while (true){System.out.println("我是张三");
//                Thread.yield();}});Thread thread2=new Thread(()->{while (true){System.out.println("我是李四");}});thread1.start();thread2.start();}
}
当注释掉yield()方法的打印是这样的,基本上都是一半一半的打印.
当使用yield()方法,明显李四的打印大于张三