目录
1、环境准备
1)pom.xml引入Redis依赖
2) 演示业务场景
2、SpringBoot集成Redis单机模式
1) 通过MyBatis逆向工程生成实体Bean和数据持久层
2) application.yml 中配置redis连接信息
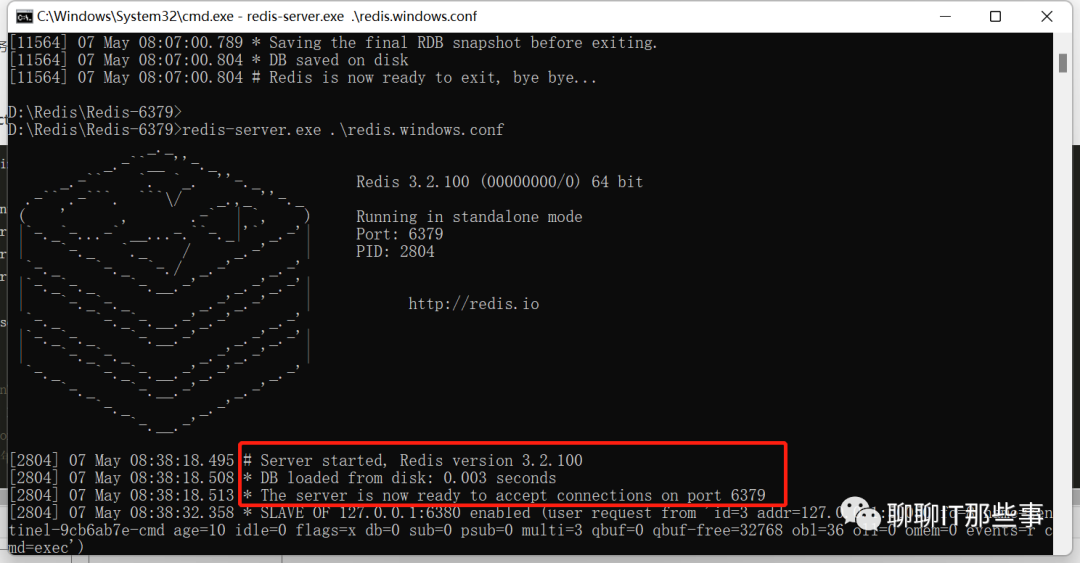
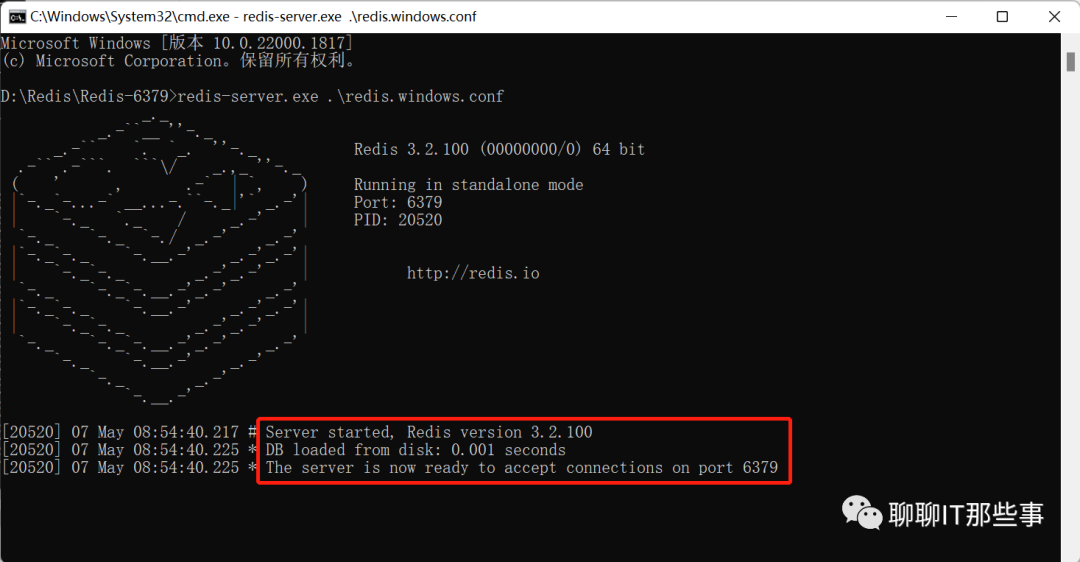
3) 启动redis服务
4) XinTuProductRedisController类
5) XinTuProductRedisService实现
6) 启动类SpringbootApplication
7) 启动SpringBootCase应用,访问测试
8) 打开Redis 客户端
3、缓存穿透现象
1) 穿透测试
XinTuRedisPenetrateController测试类。
2 )启动应用程序,浏览器访问测试
3)造成的问题
4)解决方法
4、SpringBoot集成Redis哨兵模式(一主三从三哨兵)
5. 哨兵配置
1)验证主从数据同步
2) 主节点选举

以下案例依然在SpringBootCase项目基础上完成。(Redis采用Redis-x64-3.2.100版本)
1、环境准备
1)pom.xml引入Redis依赖
<dependency><groupId>org.springframework.boot</groupId><artifactId>spring-boot-starter-data-redis</artifactId>
</dependency>
2) 演示业务场景
根据商品总数功能,先从Redis缓存中查找,如果找不到,再从MySQL数据库中查找,然后将数据放到Redis缓存。
2、SpringBoot集成Redis单机模式
1) 通过MyBatis逆向工程生成实体Bean和数据持久层
实体类:
package com.xintu.demo.entity;import java.util.Date;public class TProduct {private Integer id;private Integer categoryId;private String itemType;private String title;private String sellPoint;private String price;private Integer num;private String image;private Integer status;private Integer priority;private String createdUser;private Date createdTime;private String modifiedUser;private Date modifiedTime;public Integer getId() {return id;}public void setId(Integer id) {this.id = id;}public Integer getCategoryId() {return categoryId;}public void setCategoryId(Integer categoryId) {this.categoryId = categoryId;}public String getItemType() {return itemType;}public void setItemType(String itemType) {this.itemType = itemType == null ? null : itemType.trim();}public String getTitle() {return title;}public void setTitle(String title) {this.title = title == null ? null : title.trim();}public String getSellPoint() {return sellPoint;}public void setSellPoint(String sellPoint) {this.sellPoint = sellPoint == null ? null : sellPoint.trim();}public String getPrice() {return price;}public void setPrice(String price) {this.price = price == null ? null : price.trim();}public Integer getNum() {return num;}public void setNum(Integer num) {this.num = num;}public String getImage() {return image;}public void setImage(String image) {this.image = image == null ? null : image.trim();}public Integer getStatus() {return status;}public void setStatus(Integer status) {this.status = status;}public Integer getPriority() {return priority;}public void setPriority(Integer priority) {this.priority = priority;}public String getCreatedUser() {return createdUser;}public void setCreatedUser(String createdUser) {this.createdUser = createdUser == null ? null : createdUser.trim();}public Date getCreatedTime() {return createdTime;}public void setCreatedTime(Date createdTime) {this.createdTime = createdTime;}public String getModifiedUser() {return modifiedUser;}public void setModifiedUser(String modifiedUser) {this.modifiedUser = modifiedUser == null ? null : modifiedUser.trim();}public Date getModifiedTime() {return modifiedTime;}public void setModifiedTime(Date modifiedTime) {this.modifiedTime = modifiedTime;}
}
数据层Mapper:
package com.xintu.demo.mapper;import com.xintu.demo.entity.TProduct;
import com.xintu.demo.entity.TProductExample;
import java.util.List;import org.apache.ibatis.annotations.Mapper;
import org.apache.ibatis.annotations.Param;@Mapper //方式一:添加@Mapper注解,等同于主类上加@MapperScan("com.demo.demo.mapper")
public interface TProductMapper {long countByExample(TProductExample example);int deleteByExample(TProductExample example);int deleteByPrimaryKey(Integer id);int insert(TProduct record);int insertSelective(TProduct record);List<TProduct> selectByExample(TProductExample example);TProduct selectByPrimaryKey(Integer id);int updateByExampleSelective(@Param("record") TProduct record, @Param("example") TProductExample example);int updateByExample(@Param("record") TProduct record, @Param("example") TProductExample example);int updateByPrimaryKeySelective(TProduct record);int updateByPrimaryKey(TProduct record);
}
2) application.yml 中配置redis连接信息

完整application.yml配置文件如下:
#spring:
#  profiles:
#      active: test #激活对应环境配置,以测试环境为例
server:port: 8888 # 设置内嵌Tomcat端口号servlet:context-path: /springbootcase # 设置项目上下文根路径,这个在请求访问的时候需要用到test:site: 35xintu.com #测试站点user: xintu #测试用户spring:datasource: # mysql相关配置url: jdbc:mysql://localhost:3306/xintu?useUnicode=true&characterEncoding=utf-8&serverTimezone=Asia/Shanghaiusername: rootpassword: xxx #根据自己的本地配置情况设置devtools:restart:enabled: true  #设置开启热部署additional-paths: src/main/java #重启目录exclude: WEB-INF/** #排除一些不需要自动重启的资源log-condition-evaluation-delta: false #关闭在什么情况下重启的日志记录,需要时可以打开thymeleaf:cache: false #使用Thymeleaf模板引擎,关闭缓存redis: #配置redis连接信息(单机模式)host: 192.168.92.134port: 6379password: #根据自己的本地配置情况设置#在application.yml配置文件中指定映射文件的位置,这个配置只有接口和映射文件不在同一个包的情况下,才需要指定:
mybatis:mapper-locations: classpath:mapper/*.xml
3) 启动redis服务
4) XinTuProductRedisController类
package com.xintu.demo.controller;import com.xintu.demo.service.XinTuProductRedisService;
import org.springframework.beans.factory.annotation.Autowired;
import org.springframework.web.bind.annotation.GetMapping;
import org.springframework.web.bind.annotation.RestController;import javax.servlet.http.HttpServletRequest;/*** @author XinTu* @classname XinTuProductRedisController* @description TODO* @date 2023年05月05日 5:21*/@RestController
public class XinTuProductRedisController {@Autowiredprivate XinTuProductRedisService productRedisService;@GetMapping(value = "/productredis/allProductNumber")public String allProductNumber(HttpServletRequest request) {Long allProductNumber = productRedisService.allProduct();return "商品数量:" + allProductNumber;}
}
5) XinTuProductRedisService实现
package com.xintu.demo.service;import com.xintu.demo.entity.TProductExample;
import com.xintu.demo.mapper.TProductMapper;
import org.springframework.beans.factory.annotation.Autowired;
import org.springframework.data.redis.core.RedisTemplate;
import org.springframework.data.redis.serializer.StringRedisSerializer;
import org.springframework.stereotype.Service;import java.util.concurrent.TimeUnit;/*** @author XinTu* @classname XinTuProductRedisService* @description TODO* @date 2023年05月05日 5:22*/
@Service
public class XinTuProductRedisService {@Autowiredprivate TProductMapper productMapper;// 注入 spring data当中的 RedisTemplate 类@Autowiredprivate RedisTemplate redisTemplate;public Long allProduct() {//设置redisTemplate对象key的序列化方式redisTemplate.setKeySerializer(new StringRedisSerializer());//从redis缓存中获取总商品数Long productCount = (Long) redisTemplate.opsForValue().get("product_count");System.out.println("查询Redis数据库..."+productCount);//判断是否为空if (null == productCount) { //去mysql数据库查询,并存放到redis缓存中System.out.println("查询MySQL数据库...");TProductExample example = new TProductExample();productCount = productMapper.countByExample(example);redisTemplate.opsForValue().set("product_count",productCount, 1, TimeUnit.SECONDS); // 会影响缓存穿透执行时长}return productCount;}}
6) 启动类SpringbootApplication
package com.xintu.demo;import com.xintu.demo.config.XinTuConfigInfo;
import org.springframework.beans.factory.annotation.Autowired;
import org.springframework.beans.factory.annotation.Value;
import org.springframework.boot.SpringApplication;
import org.springframework.boot.autoconfigure.SpringBootApplication;
import org.springframework.transaction.annotation.EnableTransactionManagement;
import org.springframework.web.bind.annotation.GetMapping;
import org.springframework.web.bind.annotation.RequestParam;
import org.springframework.web.bind.annotation.RestController;@EnableTransactionManagement //开启事务
@RestController
@SpringBootApplication
public class SpringbootApplication {@Autowiredprivate XinTuConfigInfo configInfo; //测试@ConfigurationProperties@Value("${test.site}")private String site;@Value("${test.user}")private String user;public static void main(String[] args) {SpringApplication.run(SpringbootApplication.class, args);}@GetMapping("/hello")public String hello(@RequestParam(value = "name", defaultValue = "World") String name) {return String.format("欢迎 %s 来到<a href=\"http://www.35xintu.com\">35新途</a>!", name);}@GetMapping("/value")public String testValue() { //测试 @Value 注解return String.format("欢迎 %s 来到<a href=\"http://www.35xintu.com\">%s</a>!" , user,site);}@GetMapping("/config")public String config() { //测试 @ConfigurationProperties 注解System.out.println("hello");return String.format("欢迎 %s 来到<a href=\"http://www.35xintu.com\">%s</a>!" , configInfo.getUser(),configInfo.getSite());}}
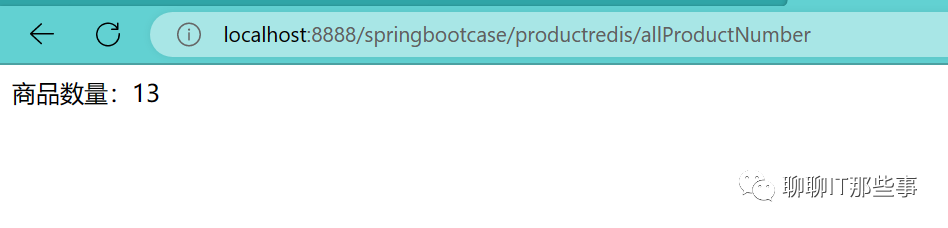
7) 启动SpringBootCase应用,访问测试
http://localhost:8888/springbootcase/productredis/allProductNumber
8) 打开Redis 客户端
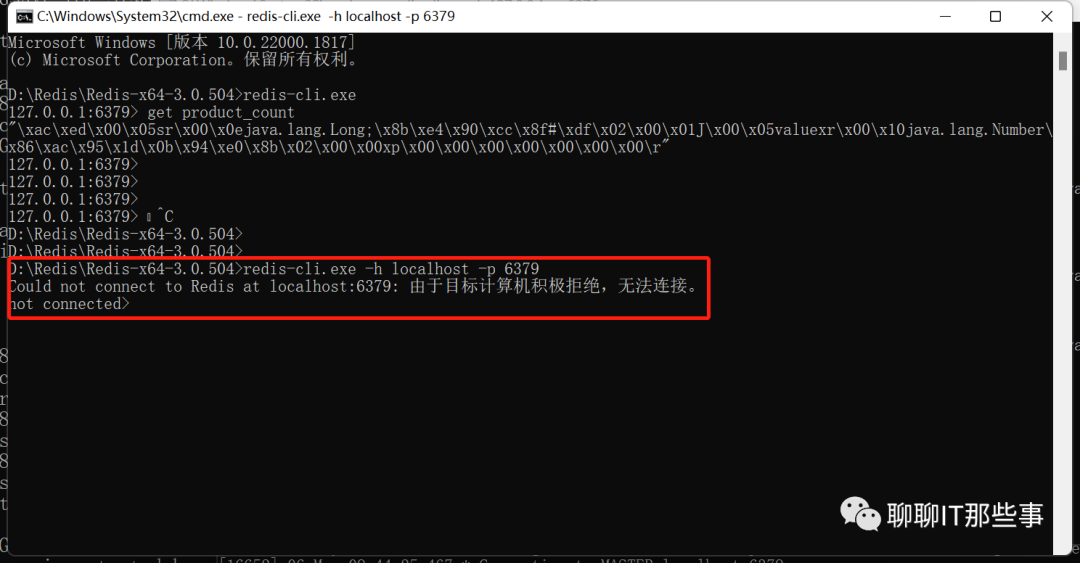
启动命令:redis-cli.exe查询命令:get product_count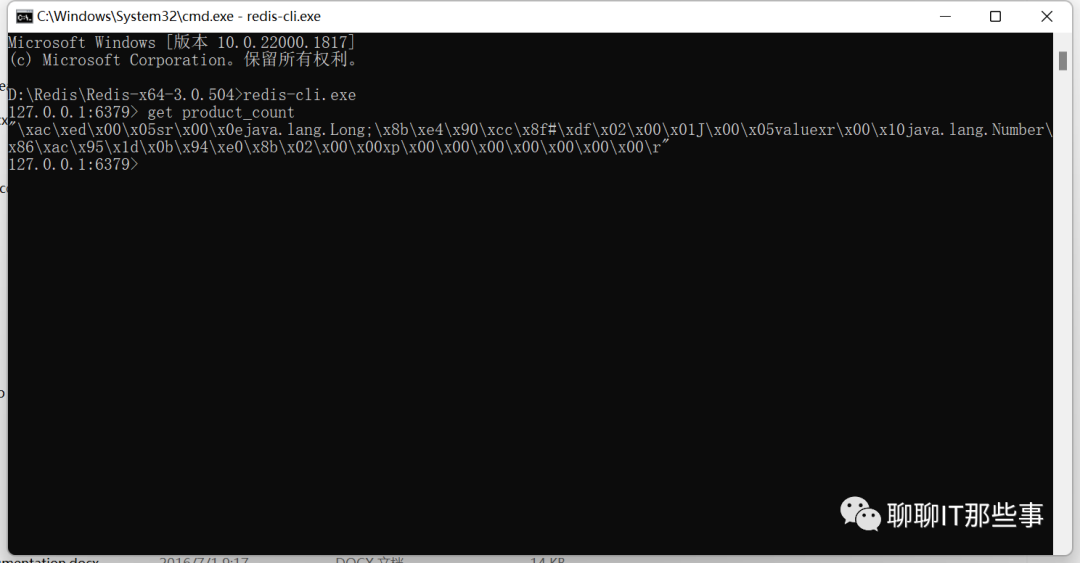
3、缓存穿透现象
1) 穿透测试
XinTuRedisPenetrateController测试类。
package com.xintu.demo.controller;import com.xintu.demo.service.XinTuProductRedisService;
import org.springframework.beans.factory.annotation.Autowired;
import org.springframework.web.bind.annotation.GetMapping;
import org.springframework.web.bind.annotation.RestController;import javax.servlet.http.HttpServletRequest;
import java.util.concurrent.ExecutorService;
import java.util.concurrent.Executors;/*** @author XinTu* @classname XinTuRedisPenetrateController* @description 模拟缓存穿透* @date 2023年05月05日 6:00*/@RestController
public class XinTuRedisPenetrateController {@Autowiredprivate XinTuProductRedisService productRedisService;@GetMapping(value = "/productredispenetrate/allProductNumber")public String allProductNumber(HttpServletRequest request) {Long allProductNumber = productRedisService.allProduct();//线程池个数,一般建议是CPU内核数 或者 CPU内核数据*2ExecutorService executorService = Executors.newFixedThreadPool(8);for (int i = 0; i < 2000; i++) {executorService.submit(new Runnable() {@Override public void run() {productRedisService.allProduct();}});}return "商品数量:" + productRedisService.allProduct();}
}
2 )启动应用程序,浏览器访问测试

3)造成的问题

多个线程都去查询数据库,这种现象就叫做缓存穿透,如果并发比较大,对数据库的压力过大,有可能造成数据库宕机。
4)解决方法
方案一:加同步锁
修改StudentServiceImpl中的代码
public Long allProduct() {//设置redisTemplate对象key的序列化方式redisTemplate.setKeySerializer(new StringRedisSerializer());//从redis缓存中获取总商品数Long productCount = (Long) redisTemplate.opsForValue().get("product_count");System.out.println("查询Redis数据库..."+productCount);//判断是否为空if (null == productCount) { //去mysql数据库查询,并存放到redis缓存中//设置同步代码块synchronized (this) { //加同步锁productCount = (Long) redisTemplate.opsForValue().get("product_count");if (null == productCount) { // 双重验证System.out.println("查询MySQL数据库...");TProductExample example = new TProductExample();productCount = productMapper.countByExample(example);redisTemplate.opsForValue().set("product_count",productCount, 1, TimeUnit.SECONDS); // 会影响缓存穿透执行时长}}}return productCount;
}
启动应用程序,浏览器访问测试,查看控制台输出只有第一个线程查询数据库,其它线程查询Redis缓存,这样的解决的小问题就是第一批进来的用户会有一个等待,但是这样的影响可以忽略。
① 为什么要做双层验证?
防止线程获取到cpu执行权限的时候,其他线程已经将数据放到Redis中了,所以再次判断;
不能将synchronized范围扩大,因为如果Redis缓存中如果有数据,线程不应该同步,否则影响效率。
② 加同步锁是否是最优方案?
如何是在集群模式下,这种方式依然会有问题。这个时候就需要考虑采用redis分布式锁了,具体方案大家可以自行研究。
4、SpringBoot集成Redis哨兵模式(一主三从三哨兵)
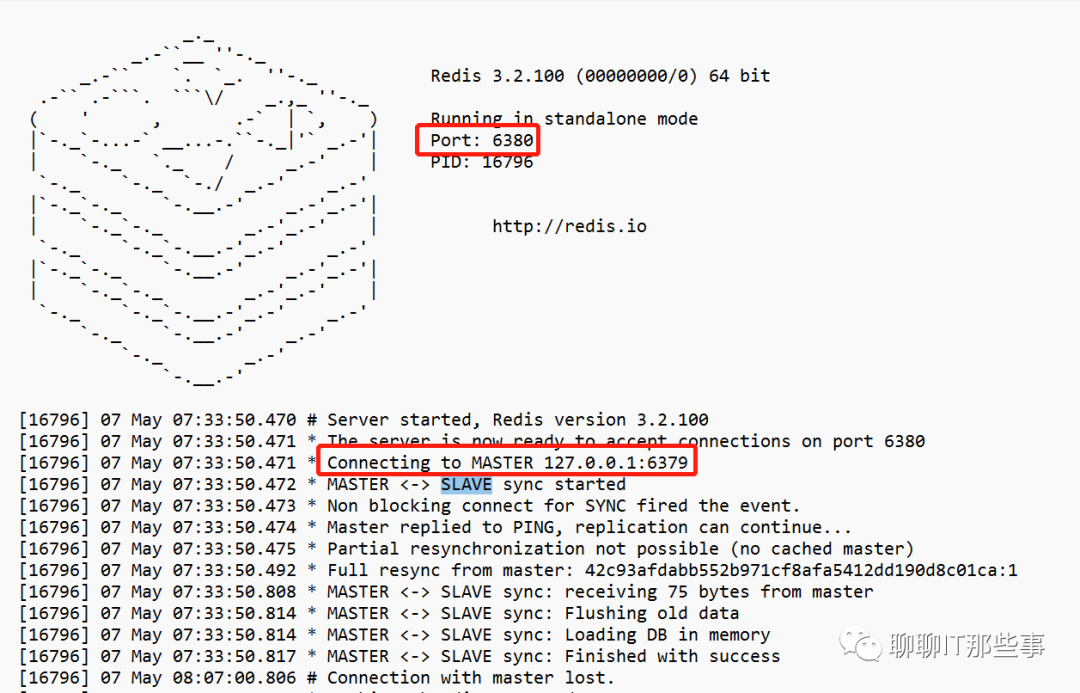
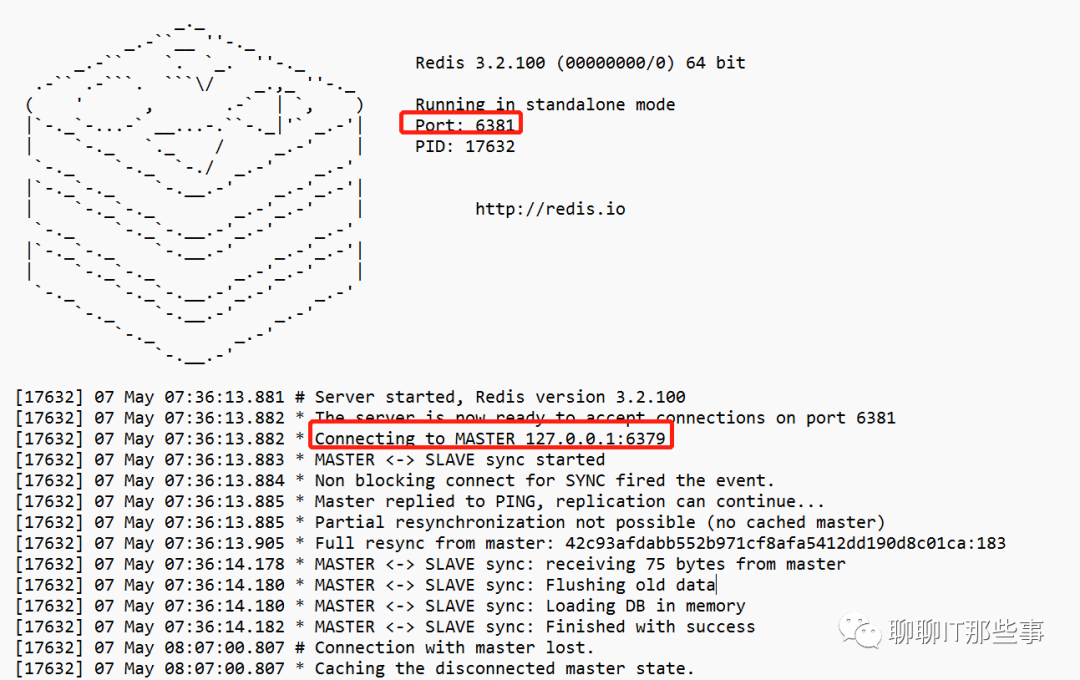
6379是主节点,6380和6381是从节点。
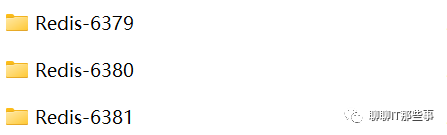
分别修改每个redis.windows.conf和redis.windows-service.conf中的端口号为:6379(主节点保持不变)、6380、6381。
从节点配置文件需要加:
slaveof localhost 6379
从节点整体配置文件:
# 端口配置
port 6380
# 日志文件名
logfile "redis_log_6380.log"
# rdb持久化文件名字
dbfilename "dump6380.rdb"
# 本地ip
bind 127.0.0.1
# 绑定主从关系【该设置说明端口6380的服务为从机,它的主机为:6379】# 从机是否只能读 默认是yes
slave-read-only no
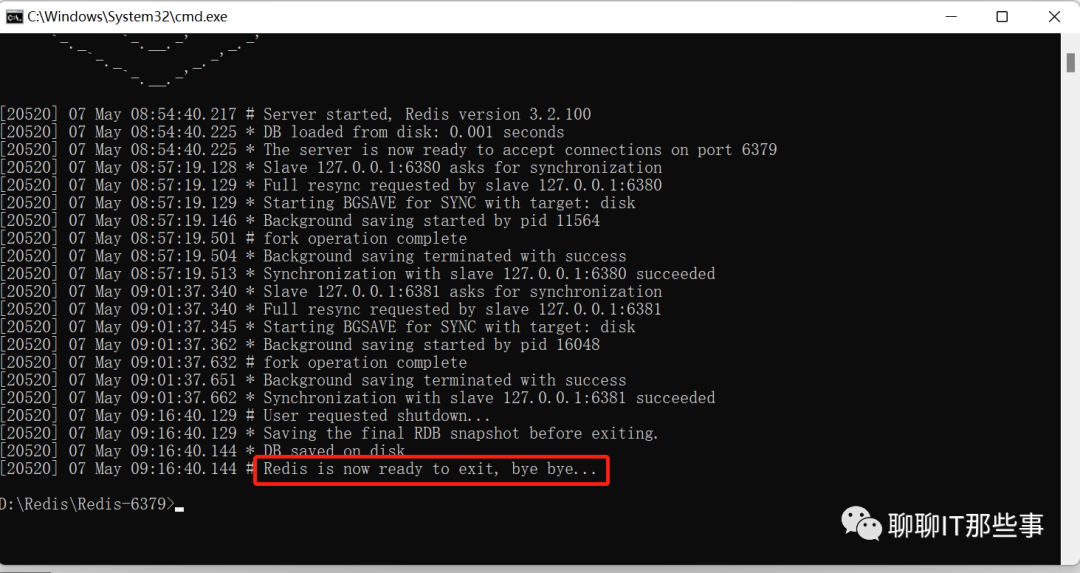
4. 分别启动三台Redis服务器
主节点启动,
从节点启动,
验证主节点,

从节点验证,
5. 哨兵配置
#哨兵模式redis集群配置(哨兵模式)
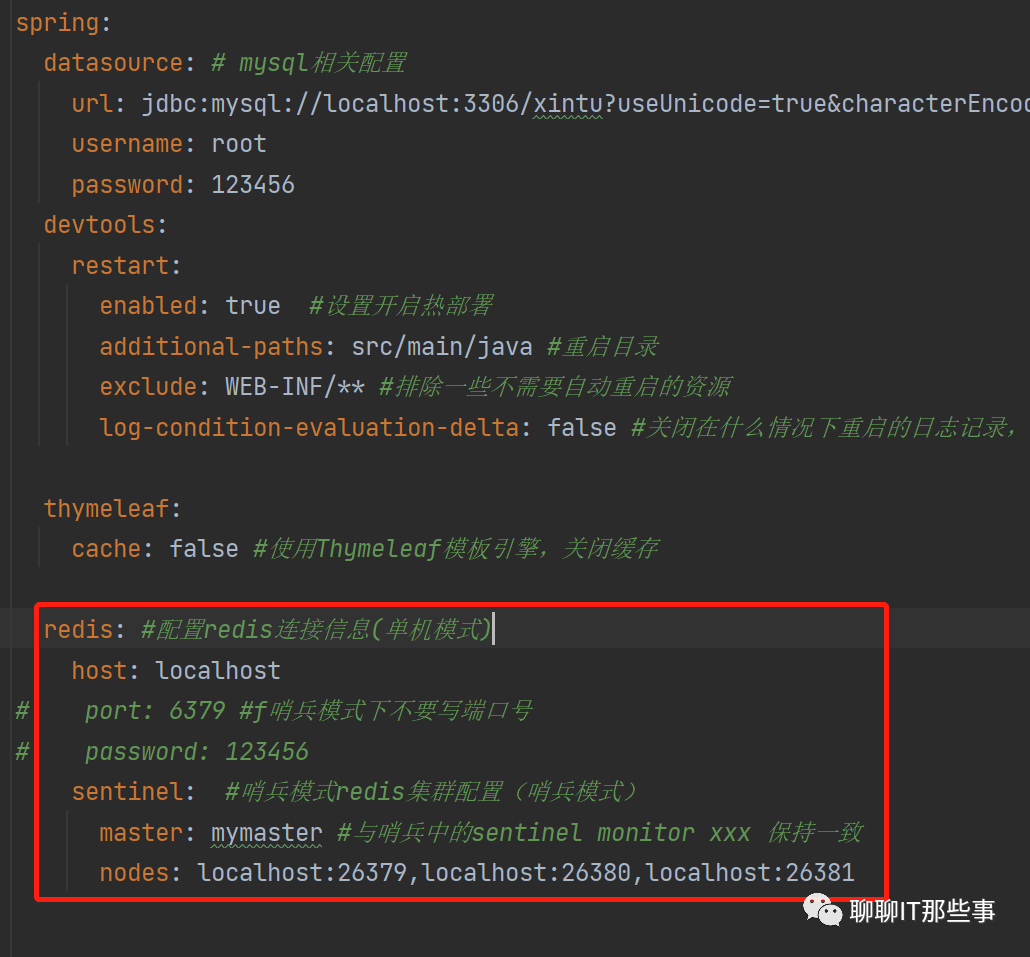
redis: #配置redis连接信息(单机模式)host: localhost
# port: 6379 #f哨兵模式下不要写端口号
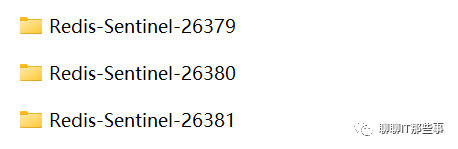
# password: 123456sentinel: #哨兵模式redis集群配置(哨兵模式)master: mymaster #与哨兵中的sentinel monitor xxx 保持一致nodes: localhost:26379,localhost:26380,localhost:26381哨兵直接复制Redis文件目录即可。老王这里分为Redis-Sentinel-26379、Redis-Sentinel-26380、Redis-Sentinel-26381。
三个哨兵节点分别增加 sentinel.conf 文件, 文件内容如下:
# 哨兵sentinel实例运行的端口 默认26379
port 26379# 保护模式
protected-mode no# 本地ip
bind 127.0.0.1# 哨兵监听的主服务器 后面的1表示主机挂掉以后进行投票,只需要2票就可以从机变主机
sentinel myid 9c65a6f7aad9e2419a6abce1ce56ff28cb81df34# 设置主机的密码(无密码可以省略)
# sentinel auth-pass mymaster 35xintu# 设置未得到主机响应时间,此处代表5秒未响应视为宕机
sentinel monitor mymaster 127.0.0.1 6380 2# 设置等待主机活动时间,此处代表15秒主机未活动,则重新选举主机
sentinel down-after-milliseconds mymaster 5000# 设置重新选举主机后,同一时间同步数据的从机数量,此处代表重新选举主机后,每次2台从机同步主机数据,直到所有从机同步结束
sentinel failover-timeout mymaster 15000
现在我们启动3个哨兵.
注意,启动redis主备集群时要先启动主,后启动从,哨兵先启动哪个都可以。
启动哨兵命令:redis-server.exe sentinel.conf --sentinel
分被启动成功之后,就可以进行测试了。

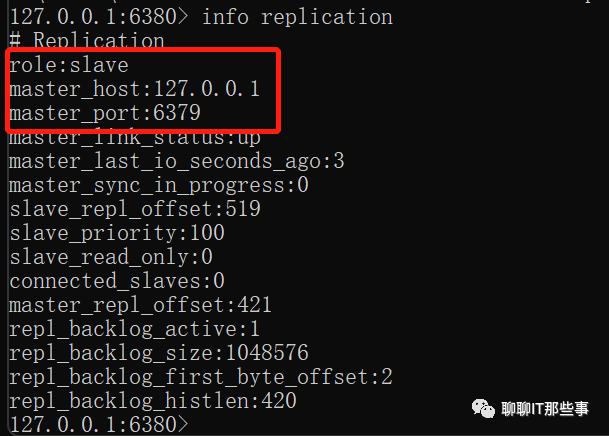
1)验证主从数据同步
客户端连接命令:redis-cli.exe -h 127.0.0.1 -p 6380。

2) 主节点选举
停掉主节点:
验证主节点是否关闭,
哨兵模式中,进行重新选举,

然后看SpringBoot控制台,页切换为了6380.
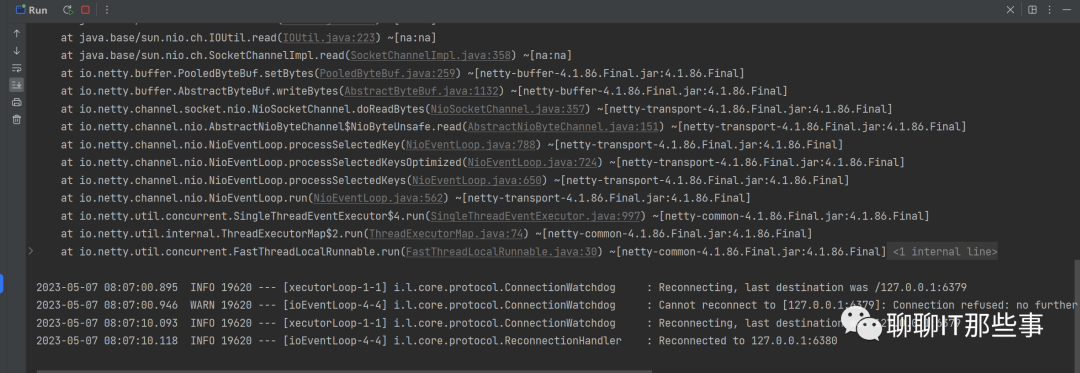
此时,说明哨兵模式已经生效,关于主从复制和哨兵机制的原理部分,会在后面的redis相关课程当中给大家详细分析,本篇注重的是SpringBoot集成Redis实战。
以上!可关注,持续输出优质内容!