20220612
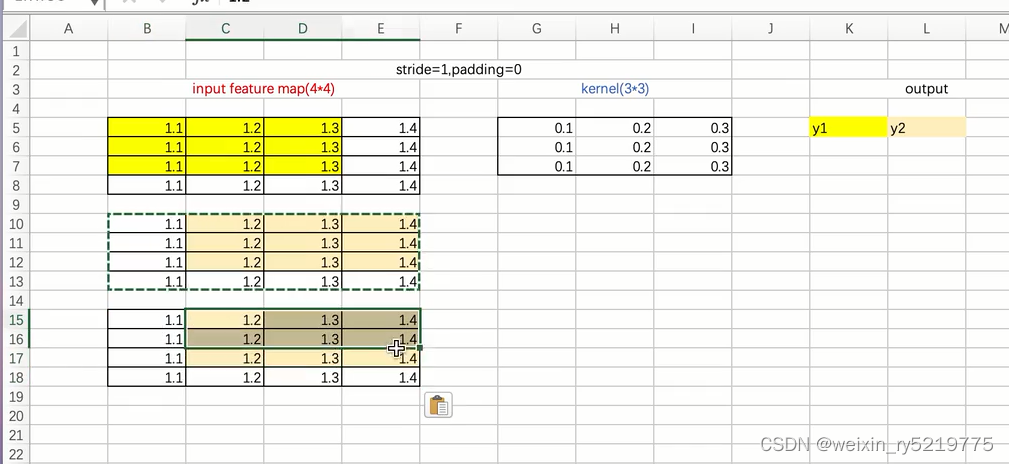
 excel也可以画图
20220525

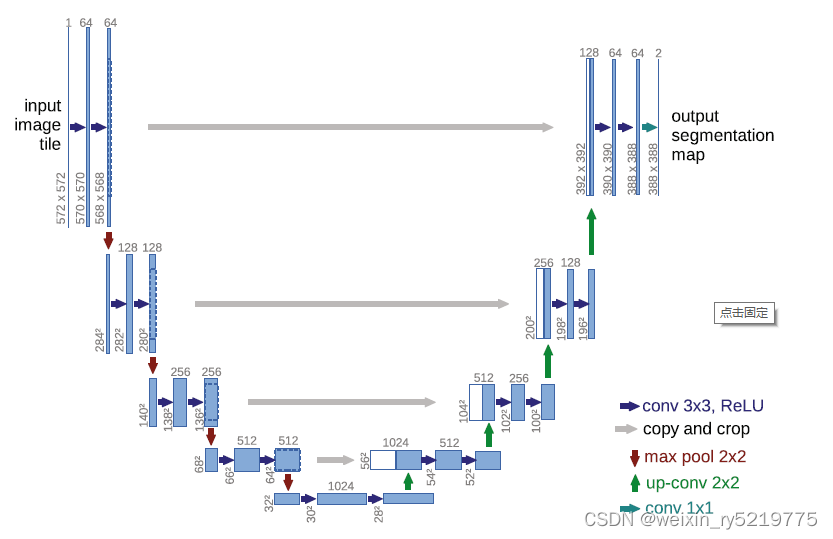
U-net架构(例如最低分辨率为32x32像素)。每个蓝框对应一个多通道特征图。通道的数量在方框的顶部表示。x-y尺寸在盒子的左下边缘。白盒代表复制的特征映射。箭头表示不同的操作
神经网络简单清晰的画法
The network architecture is illustrated in Figure 1. It consists of a contracting path (left side) and an expansive path (right side). The contracting path follows the typical architecture of a convolutional network. It consists of the repeated application of two 3x3 convolutions (unpadded convolutions), each followed by a rectified linear unit (ReLU) and a 2x2 max pooling operation with stride 2 for downsampling. At each downsampling step we double the number of feature channels. Every step in the expansive path consists of an upsampling of the feature map followed by a 2x2 convolution ( up-convolution ) that halves the number of feature channels, a concatenation with the correspondingly cropped feature map from the contracting path, and two 3x3 convolutions, each followed by a ReLU. The cropping is necessary due to the loss of border pixels in every convolution. At the final layer a 1x1 convolution is used to map each 64-component feature vector to the desired number of classes. In total the network has 23 convolutional layers.
20220404
https://blog.csdn.net/weixin_43329700/article/details/104356714
绘制相关系数热力图
20220114

plt.xticks(ticks=[3,14,999],labels=my_label,rotation=60, ha='right') 标签实现旋转
20211230


plt.figure(num=1,figsize=(12,8))
两幅图的差异是因为figsize的不同
20211223
 横轴以字符形式显示才能正常显示
20211223
常用的画布尺寸大小 长 8,12 高:6
https://blog.csdn.net/qq_27825451/article/details/82967904
matplotlib高级教程之形状与路径——patches和path
Axes,patches
pathes绘制内置的形状
https://www.cnblogs.com/cymx66688/p/10536403.html
countplot:作用是使用条形显示每个分箱器中的观察计数
20211214
https://mp.weixin.qq.com/s/t7thjByKrZFw6K4dq8COiQ
小白也能看懂的Matplotlib简明教程
20210824

箱型图
从下往上的直线 最低值 25% 50% 75% 分位 最高值
比较三个箱子的 50%的线 三个对价格有明显影响差异
箱型图适合考察分类变量对因变量的影响

黑点为离群点 3个标准差之外

画直方图
长尾巴在右 左偏

比较容易看
幂转换

颜色深 比较集中
分散程度 越分散 影响越大

聚类最终 多维度查看结果

k=3 时候 杂乱
特征稳定性
20210712
画图半天画不出来 可能是字符无法转成数值
https://blog.csdn.net/qq_41689620/article/details/85218329
中文乱码
20210423
https://blog.csdn.net/yoggiecda/article/details/103030388
数据分析最有用的25个 Matplotlib图
20210114
matplotlib 使用交互模型
https://blog.csdn.net/kyle1314608/article/details/113267427
把画图固定在pycharm里面
图片保存
在plt.show()之前执行plt.savefig()函数即可。
简单例子:
import matplotlib.pyplot as plt
x=[1,2,3,4,5]
y=[10,5,15,10,20]
plt.plot(x,y,'ro-',color='blue')
plt.savefig('testblueline.jpg')
plt.show()
中文标题不现实from matplotlib import pyplot as plt, font_manager# 字体实例对象my_font=font_manager.FontProperties(fname="C:\Windows\Fonts\simhei.ttf",size=7.0)# 气温x=range(0,120)# 时间y_1=[random.randint(20,35) for i in range(120)]y_2 = [random.randint(20, 35) for i in range(120)]# 格式化x轴标题_x_labels=["10点{}分".format(i) for i in range(60)]_x_labels+=["11点{}分".format(i) for i in range(60)]plt.xlabel("时间",fontproperties=my_font)plt.ylabel("温度",fontproperties=my_font)plt.title("温度测试用例",fontproperties=my_font)#设置表格plt.grid(alpha=0.4)# 画图plt.plot(x, y_1,label="123",linestyle=":")plt.plot(x, y_2,label="456",linestyle="--")# 添加图例plt.legend(prop=my_font,loc="upper left")# 设置中文显示 fontpropertiesplt.xticks(list(x)[::3],_x_labels[::3],rotation=45,fontproperties=my_font)#显示plt.show()
https://blog.csdn.net/csdnsevenn/article/details/82731538
同时画两条线图


同时画两条线图
在代码里面只能插入连接
eval_indices=range(0,len(train_loss),display_step) #横轴坐标的长度列表
plt.plot(eval_indices,train_loss,'k-')
plt.title('softmax loss per iteration')
plt.xlabel('iteration')
plt.ylabel('softmax loss')
plt.show()
plt.plot(eval_indices,train_acc,'k-',label='train set accuracy')
plt.plot(eval_indices,test_acc,'r--',label='test set accuracy')
plt.title('train and test accuracy')
plt.xlabel('generation')
plt.ylabel('accuracy')
plt.legend(loc='lower right')
plt.show()
同时画两条线图
【Python】绘制热力图seaborn.heatmap,cmap设置颜色的参数
https://blog.csdn.net/ztf312/article/details/102474190
cmap,热力图颜色
https://www.jianshu.com/p/08f4ecac9eef
plt.imshow
plt.legend(loc=‘lower right’)
图中间的说明


