目录
1、前言
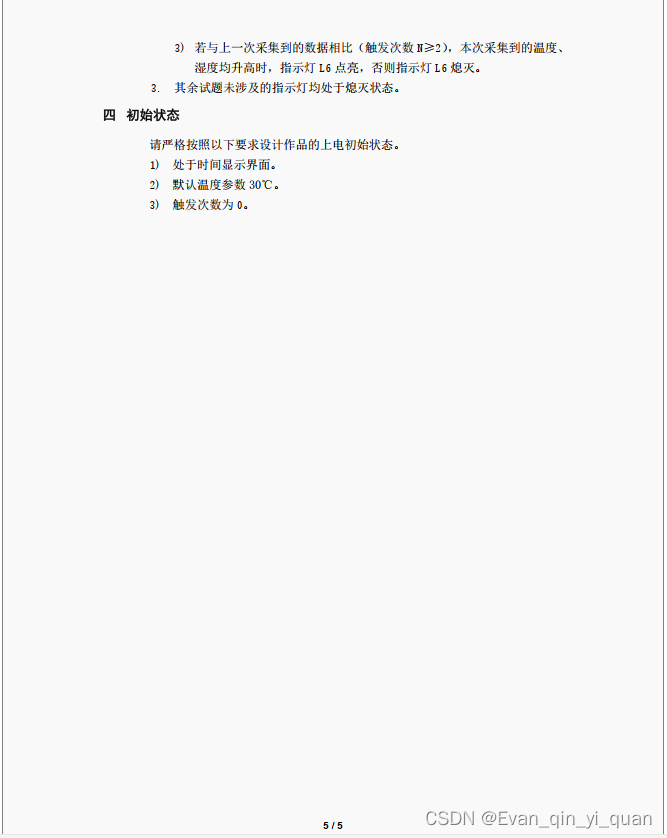
2、题目
3、程序架构
3.1 display.c
3.2 ds1302.c
3.3 iic.c
3.4 onewire.c
3.5 main.c 主函数文件
3.6 环境配置
4. 历年蓝桥杯单片机试题和答案
1、前言
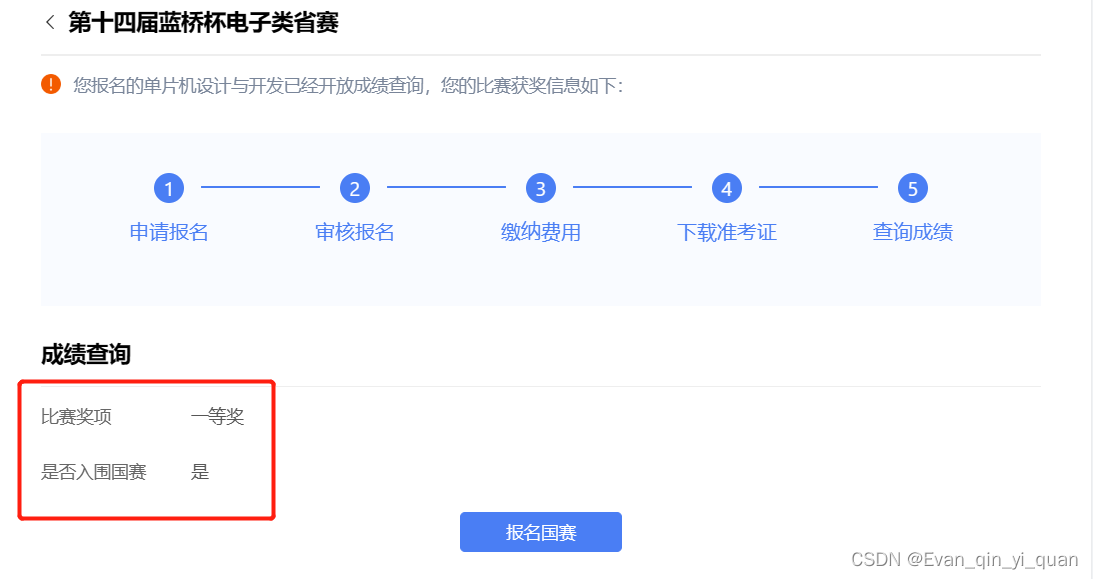
抽空复习了一下,拿下单片机省赛一等奖,在此分享一下最新的14届省赛程序设计答案
2、题目
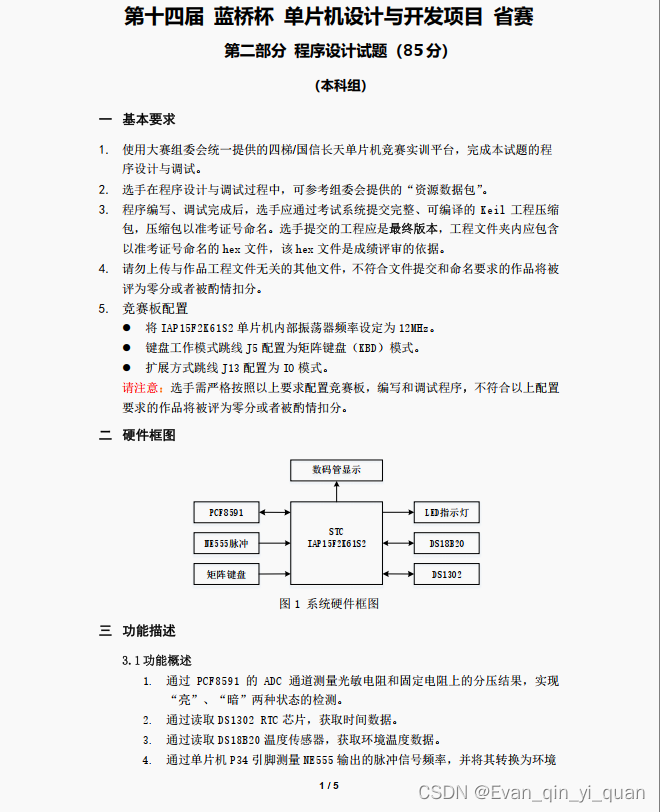
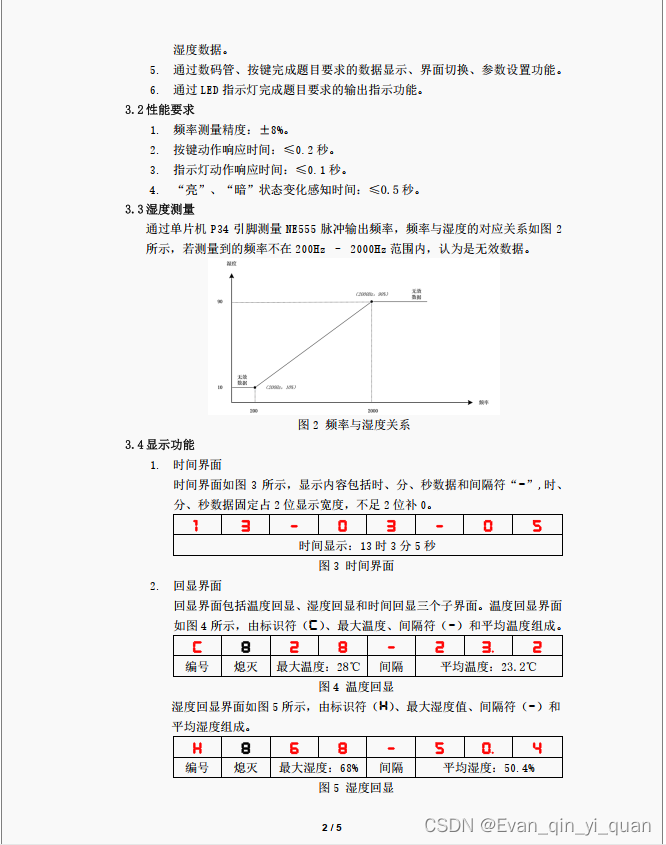
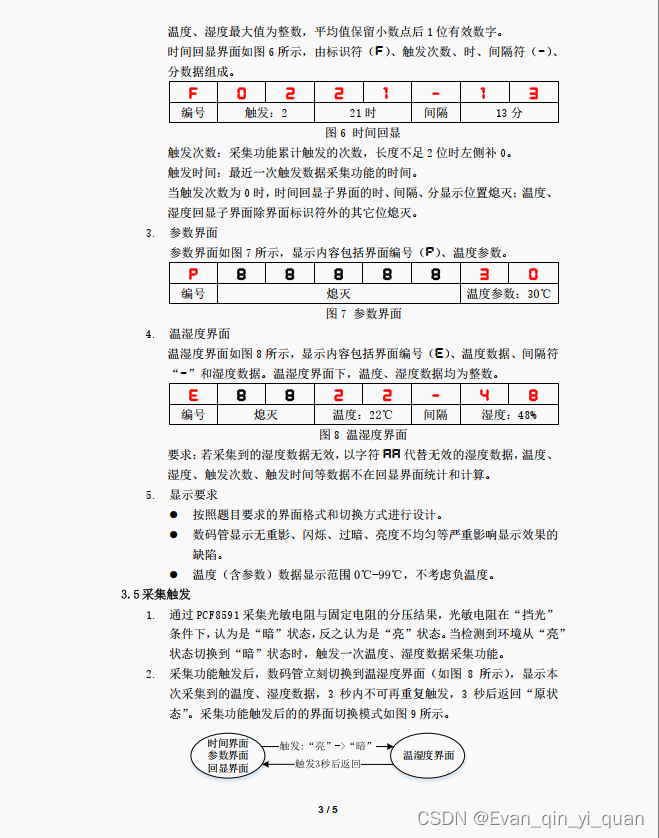
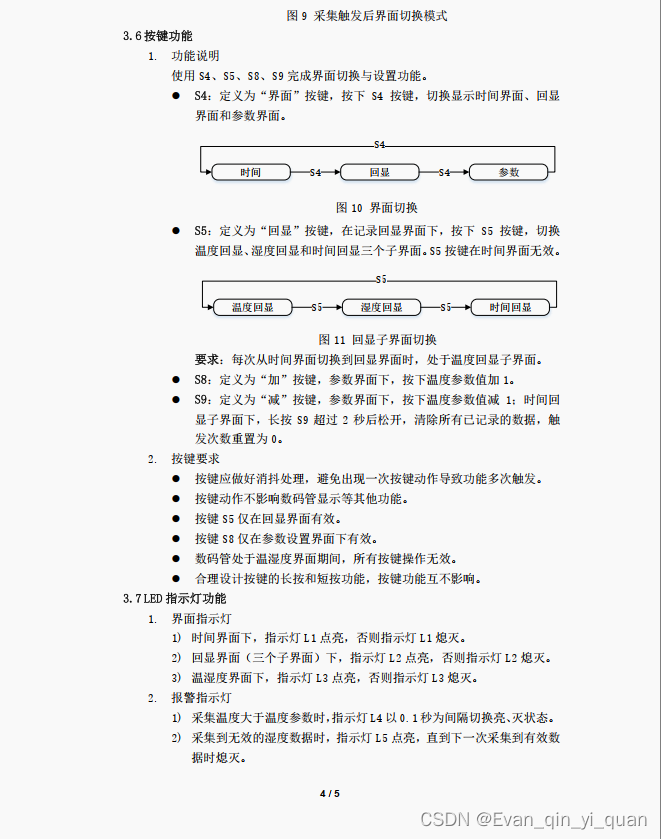
3、程序架构

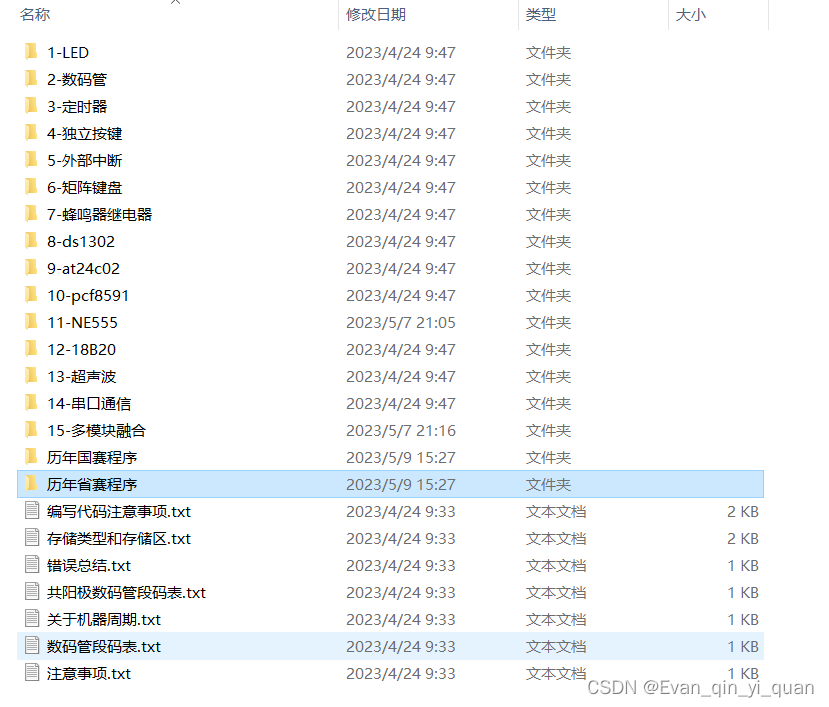
模块化编程,每个模块的程序单独写在一个文中,下面分别给出图中文件的详细代码
3.1 display.c
主要包含数码管、led显示。
#include "display.h"
code unsigned char Seg_Table[] =
{
0xc0, 0xf9, 0xa4, 0xb0, 0x99, 0x92, 0x82, 0xf8, 0x80, 0x90, //9
0x88, //A
0x83, //b
0xc6, //C  12
0xa1, //d
0x86, //E
0x8e, //F 15
0xbf,  // - 16
0x89,  // H 17
0x8C,  // P 18
0x88  // R  19
};
//0-9带小数点
code unsigned char Seg_Table_f[] = { 0x40, 0x79, 0x24, 0x30, 0x19, 0x12, 0x02, 0x78, 0x00, 0x10};
void Delayms(int ms)		//@12.000MHz
{unsigned char i, j;int k =0;for(k=0;k<ms;k++){i = 12;j = 169;do{while (--j);} while (--i);}
}
//选择开启哪一个锁存器
void SelectHc573(char wei)
{switch(wei){case 4: P2 = (P2 & 0x1f) | 0x80; break; //LED驱动case 5: P2 = (P2 & 0x1f) | 0xa0; break; //蜂鸣器,继电器case 6: P2 = (P2 & 0x1f) | 0xc0; break; //数码管位选case 7: P2 = (P2 & 0x1f) | 0xe0; break; //数码管段选}P2 = (P2 & 0x1f) | 0x00;
}
//系统初始化,关蜂鸣器继电器、数码管
void SysInit()
{P0 = 0x00;SelectHc573(5);SelectHc573(6);P0 = 0xff;SelectHc573(4);
}
//数码管无小数点显示,参数wei:打开哪一个数码管,参数duan:显示什么内容
void DisplaySeg(char wei, char duan)
{P0 = 0x01 << wei - 1;SelectHc573(6);P0 = Seg_Table[duan];SelectHc573(7);Delayms(1);P0 = 0x01 << wei - 1;SelectHc573(6);P0 = 0xff;SelectHc573(7);
}
//数码管带小数点显示
void DisplaySeg_f(char wei, char duan)
{P0 = 0x01 << wei - 1;SelectHc573(6);P0 = Seg_Table_f[duan];SelectHc573(7);Delayms(1);P0 = 0x01 << wei - 1;SelectHc573(6);P0 = 0xff;SelectHc573(7);
}//LED显示,参数wei:控制哪一个LED,参数on_off:1-点亮,0-关闭
void DisplayLed(char wei,char on_off)
{static unsigned char temp = 0xff;if(on_off){switch(wei){case 1: temp = temp & 0xfe; break;case 2: temp = temp & 0xfd; break;case 3: temp = temp & 0xfb; break;case 4: temp = temp & 0xf7; break;case 5: temp = temp & 0xef; break;case 6: temp = temp & 0xdf; break;}}else{switch(wei){case 1: temp = temp | 0x01; break;case 2: temp = temp | 0x02; break;case 3: temp = temp | 0x04; break;case 4: temp = temp | 0x08; break;case 5: temp = temp | 0x10; break;case 6: temp = temp | 0x20; break;}}P0 = temp;SelectHc573(4);
}
上面代码中头文件display.h
#ifndef  __DISPLAY_H__
#define  __DISPLAY_H__#include <stc15.h>
void Delayms(int ms)	;	//@12.000MHz
void SelectHc573(char wei);
void SysInit();
void DisplayLed(char wei,char on_off);
void DisplaySeg(char wei, char duan);
void DisplaySeg_f(char wei, char duan);
#endif
3.2 ds1302.c
主要是ds1302写时间函数,和读时间函数
/*	# 	DS1302代码片段说明1. 	本文件夹中提供的驱动代码供参赛选手完成程序设计参考。2. 	参赛选手可以自行编写相关代码或以该代码为基础,根据所选单片机类型、运行速度和试题中对单片机时钟频率的要求,进行代码调试和修改。
*/
#include "ds1302.h"//
void Write_Ds1302(unsigned  char temp)
{unsigned char i;for (i=0;i<8;i++)     	{ SCK = 0;SDA = temp&0x01;temp>>=1; SCK=1;}
}   //
void Write_Ds1302_Byte( unsigned char address,unsigned char dat )
{RST=0;	_nop_();SCK=0;	_nop_();RST=1; 	_nop_();  Write_Ds1302(address);	Write_Ds1302(dat);		RST=0;
}//
unsigned char Read_Ds1302_Byte ( unsigned char address )
{unsigned char i,temp=0x00;RST=0;	_nop_();SCK=0;	_nop_();RST=1;	_nop_();Write_Ds1302(address);for (i=0;i<8;i++) 	{		SCK=0;temp>>=1;	if(SDA)temp|=0x80;	SCK=1;} RST=0;	_nop_();SCK=0;	_nop_();SCK=1;	_nop_();SDA=0;	_nop_();SDA=1;	_nop_();return (temp);
}
//本行之前的代码是官方给出的,本行下面的代码是自己写的
#define  WP   0x8e
#define  W_HOUR   0x84
#define  W_MIN   0x82
#define  W_SEC   0x80
#define  R_HOUR   0x85
#define  R_MIN   0x83
#define  R_SEC   0x81
//写入一个初始时间到ds1302
void WriteDateTo1302(ds1302 *date)
{unsigned char hour,min,sec;hour = date->hour/10*16 + date->hour%10; //十进制转16进制min = date->min/10*16 + date->min%10;sec = date->sec/10*16 + date->sec%10;Write_Ds1302_Byte(WP,0x00);Write_Ds1302_Byte(W_HOUR,hour);Write_Ds1302_Byte(W_MIN,min);Write_Ds1302_Byte(W_SEC,sec);Write_Ds1302_Byte(WP,0x80);
}
//读取当前时间
ds1302 ReadTimeFrom1302()
{unsigned char hour,min,sec;ds1302 date;hour = Read_Ds1302_Byte(R_HOUR);min = Read_Ds1302_Byte(R_MIN);sec = Read_Ds1302_Byte(R_SEC);date.hour = hour/16*10 +  hour%16; //十六进制转十进制date.min = min/16*10 +  min%16;date.sec = sec/16*10 +  sec%16;return date;
}
头文件ds1302.h,该文件从今年开始官方不提供,都是自己写
#ifndef  __DS1302_H__
#define  __DS1302_H__#include "intrins.h"
#include <stc15.h>#define SCK  P17
#define SDA  P23
#define RST  P13
//定义ds1302数据类型
typedef struct{unsigned char hour;unsigned char min;unsigned char sec;
}ds1302;
ds1302 ReadTimeFrom1302();
void WriteDateTo1302(ds1302 *date);
#endif
3.3 iic.c
用于读取pcf8591通道1的电压
/*	#   I2C代码片段说明1. 	本文件夹中提供的驱动代码供参赛选手完成程序设计参考。2. 	参赛选手可以自行编写相关代码或以该代码为基础,根据所选单片机类型、运行速度和试题中对单片机时钟频率的要求,进行代码调试和修改。
*/
#include "iic.h"
#include "intrins.h"
#define DELAY_TIME	5//
static void I2C_Delay(unsigned char n)
{do{_nop_();_nop_();_nop_();_nop_();_nop_();_nop_();_nop_();_nop_();_nop_();_nop_();_nop_();_nop_();_nop_();_nop_();_nop_();		}while(n--);
}//
void I2CStart(void)
{sda = 1;scl = 1;I2C_Delay(DELAY_TIME);sda = 0;I2C_Delay(DELAY_TIME);scl = 0;
}//
void I2CStop(void)
{sda = 0;scl = 1;I2C_Delay(DELAY_TIME);sda = 1;I2C_Delay(DELAY_TIME);
}//
void I2CSendByte(unsigned char byt)
{unsigned char i;for(i=0; i<8; i++){scl = 0;I2C_Delay(DELAY_TIME);if(byt & 0x80){sda = 1;}else{sda = 0;}I2C_Delay(DELAY_TIME);scl = 1;byt <<= 1;I2C_Delay(DELAY_TIME);}scl = 0;
}//
unsigned char I2CReceiveByte(void)
{unsigned char da;unsigned char i;for(i=0;i<8;i++){   scl = 1;I2C_Delay(DELAY_TIME);da <<= 1;if(sda) da |= 0x01;scl = 0;I2C_Delay(DELAY_TIME);}return da;
}//
unsigned char I2CWaitAck(void)
{unsigned char ackbit;scl = 1;I2C_Delay(DELAY_TIME);ackbit = sda; scl = 0;I2C_Delay(DELAY_TIME);return ackbit;
}//
void I2CSendAck(unsigned char ackbit)
{scl = 0;sda = ackbit; I2C_Delay(DELAY_TIME);scl = 1;I2C_Delay(DELAY_TIME);scl = 0; sda = 1;I2C_Delay(DELAY_TIME);
}
本行之前的代码是官方给出的,本行下面的代码是自己写的
unsigned char ADC_Output(char channel)
{unsigned char adc_val;I2CStart();I2CSendByte(0x90);I2CWaitAck();I2CSendByte(channel);I2CWaitAck();I2CStart();I2CSendByte(0x91);I2CWaitAck();adc_val = I2CReceiveByte();I2CSendAck(1);I2CStop();return adc_val;
}
对应的头文件iic.h
#ifndef  __IIC_H__
#define  __IIC_H__#include <stc15.h>#define sda  P21
#define scl  P20unsigned char ADC_Output(char channel);
#endif
3.4 onewire.c
/*	# 	单总线代码片段说明1. 	本文件夹中提供的驱动代码供参赛选手完成程序设计参考。2. 	参赛选手可以自行编写相关代码或以该代码为基础,根据所选单片机类型、运行速度和试题中对单片机时钟频率的要求,进行代码调试和修改。
*/
#include "onewire.h"
//
void Delay_OneWire(unsigned int t)
{unsigned char i;while(t--){for(i=0;i<12;i++);}
}//
void Write_DS18B20(unsigned char dat)
{unsigned char i;for(i=0;i<8;i++){DQ = 0;DQ = dat&0x01;Delay_OneWire(5);DQ = 1;dat >>= 1;}Delay_OneWire(5);
}//
unsigned char Read_DS18B20(void)
{unsigned char i;unsigned char dat;for(i=0;i<8;i++){DQ = 0;dat >>= 1;DQ = 1;Delay_OneWire(1);//本行代码可删去,原来没有的,只是为了适应本人的板子添加if(DQ){dat |= 0x80;}	    Delay_OneWire(5);}return dat;
}//
bit init_ds18b20(void)
{bit initflag = 0;DQ = 1;Delay_OneWire(12);DQ = 0;Delay_OneWire(80);DQ = 1;Delay_OneWire(10); initflag = DQ;     Delay_OneWire(5);return initflag;
}
//本行之前的代码是官方给出的,本行下面的代码是自己写的
unsigned char rd_temperature()
{unsigned char temp,th,tl;init_ds18b20();Write_DS18B20(0xcc);Write_DS18B20(0x44);init_ds18b20();//本函数上面部分是启动温度转化,下面部分是温度读取// 为防止开机上电读取出现85,可在上电先启动温度转换,延时750模式,再进入循环。	Write_DS18B20(0xcc);Write_DS18B20(0xbe);tl = Read_DS18B20(); //先读低8位,再读高8位th = Read_DS18B20();temp = (th*256 + tl)*0.0625;return temp;
}
对应的onewire.h
#ifndef  __ONEWIRE_H__
#define  __ONEWIRE_H__#include <stc15.h>#define DQ  P14
unsigned char rd_temperature();
#endif
3.5 main.c 主函数文件
#include "display.h"
#include "onewire.h"
#include "ds1302.h"
#include "iic.h"
#include "string.h"
ds1302 date = {23,59,55}; //初始化时间为23-59-55
unsigned int FREQUENTCY; //NE5555频率
unsigned char count,count2,flag_1s,sec,key_val,flag_100ms;
unsigned char show_switching = 1,collect_flag=1,show,S5_flag=1,L4_flag,L5_flag,L6_flag;
unsigned char adc_val,t_para=30,count_triggle,count3,count_sec;
unsigned char temp=0,humidity,i,last_hour,last_min;
unsigned char t[3],h[3]; //用于保存采集的温度、湿度,只保存3组
/* 参数说明:count,count2用于定时器中断计时,flag_1s 用来表示1S时间到,统计NE555的频率sec:       在定时器2中,用来3S计时,sec=3后,自动退出温湿度显示界面key_val:   只是用来记录按键,S4按下key_val=4,S5按下key_val=5flag_100ms:0.1S标志位,指示灯 L4 以 0.1 秒为间隔切换亮、灭状态。show_switching:界面切换,1:时间显示界面,2:回显界面,3:参数显示collect_flag = 1:处于亮环境标志show : 0:  温湿度显示界面,1:显示show_switching对应的界面S5_flag:    回显界面下,切换温度、湿度、时间回显L4_flag,L5_flag,L6_flag:分别表示LED4、5、6的点亮标志位adc_val:ADC转化后输出值, t_para 温度参数,count_triggle:记录触发数据采集次数count3,count_sec :用于S9长按2S的计时temp,humidity : 温度、湿度。 i:范围0-1-2,用于作为t[3],h[3]数组的索引last_hour,last_min :最近一次采集触发的时间
*/void Timer0Init(void);		//@12.000MHz;
void Timer1Init(void);		//10毫秒@12.000MHz
void Timer2Init(void);	//20毫秒@12.000MHz
void show_switch();
void key_board();
unsigned char max(unsigned char str[]);void main()
{  SysInit();WriteDateTo1302(&date);Timer0Init();Timer1Init();Timer2Init();while(1){ //频率和湿度的转换关系if(FREQUENTCY<2000 && FREQUENTCY > 200)humidity = 2/45.0*FREQUENTCY + 1.11;else if(FREQUENTCY == 2000)humidity = 90;else if(FREQUENTCY == 200)humidity = 10;elsehumidity = 0;   //无效数据adc_val = ADC_Output(0x01); if( adc_val> 100)   collect_flag = 1;  //亮,adc_val<100代表暗if(collect_flag == 1 && adc_val<=100){ //满足条件触发数据测量collect_flag=0;   AUXR |= 0x10; //启动定时器2show = 1, t[i] = temp;      if(humidity != 0) { h[i] = humidity; L5_flag = 0;}else{              L5_flag = 1; //采集到无效数据,无效数据不保存,触发LED5}count_triggle++;if( i == 0 && count_triggle>=2){ //本次采集大小与上次对比if(temp > t[2] && humidity > h[2])  L6_flag = 1;else      L6_flag = 0;}else        L6_flag = 0;if(i!= 0 && count_triggle>=2) {//本次采集大小与上次对比if(temp > t[i-1] && humidity > h[i-1])  L6_flag = 1; //温湿度都大于上次,触发LED6else      L6_flag = 0;}else        L6_flag = 0;i++; if(i>3) i = 0;last_hour = date.hour, last_min = date.min;if(temp > t_para)          L4_flag = 1; //采集温度大于温度参数,触发LED4else                       L4_flag = 0;} key_board();   //按键检测函数show_switch(); //所有显示放在此函数内,为了使按键按下,不影响显示内容}
}
void show_switch()
{   unsigned char t_max,h_max;int   t_avr,h_avr;date = ReadTimeFrom1302();		 temp = rd_temperature();t_max = max(t), h_max = max(h);t_avr = (t[0]+t[1]+t[2])/3.0 * 10; h_avr = (h[0]+h[1]+h[2])/3.0 * 10;if(show != 1){if(show_switching == 1){ //时间显示界面DisplaySeg(1,date.hour/10); DisplaySeg(2,date.hour%10); DisplaySeg(3,16);DisplaySeg(4,date.min/10); DisplaySeg(5,date.min%10); DisplaySeg(6,16);DisplaySeg(7,date.sec/10); DisplaySeg(8,date.sec%10);}if(show_switching == 2){ //回显界面,默认温度回显Cswitch(S5_flag){ // 温度回显C,  湿度回显H,时间回显Fcase 1:  DisplaySeg(1,12); if(count_triggle != 0){ DisplaySeg(3,t_max/10); DisplaySeg(4,t_max%10); //最大温度DisplaySeg(5,16); DisplaySeg(6,t_avr/100); DisplaySeg_f(7,t_avr%100/10); DisplaySeg(8,t_avr%10);}break;case 2:  DisplaySeg(1,17); if(count_triggle != 0){DisplaySeg(3,h_max/10); DisplaySeg(4,h_max%10); //最大湿度DisplaySeg(5,16); DisplaySeg(6,h_avr/100); DisplaySeg_f(7,h_avr%100/10); DisplaySeg(8,h_avr%10);}break;case 3:  DisplaySeg(1,15); DisplaySeg(2,count_triggle/10); DisplaySeg(3,count_triggle%10);//触发次数if(count_triggle != 0){DisplaySeg(4,last_hour/10); DisplaySeg(5,last_hour%10); //上一次触发的时间DisplaySeg(6,16);  DisplaySeg(7,last_min/10); DisplaySeg(8,last_min%10);}break;}}if(show_switching == 3){ //参数设置界面DisplaySeg(1,18);DisplaySeg(7,t_para/10); DisplaySeg(8,t_para%10);}}else{  //温湿度显示界面,每次显示3S后自动推出DisplaySeg(1,14); // E DisplaySeg(4,temp/10); DisplaySeg(5,temp%10); DisplaySeg(6,16); //温度if(humidity != 0) {DisplaySeg(7,humidity/10); DisplaySeg(8,humidity%10);          //湿度}else{DisplaySeg(7,19); DisplaySeg(8,19); }}
// LED 显示switch(show_switching){case 1:  DisplayLed(1,1);DisplayLed(2,0);DisplayLed(3,0);  break;case 2:  DisplayLed(2,1);DisplayLed(1,0);DisplayLed(3,0);  break;case 3:  DisplayLed(3,1);DisplayLed(1,0);DisplayLed(2,0);  break;}if(L4_flag == 1){if(flag_100ms)   DisplayLed(4,1); //L4亮else             DisplayLed(4,0); //L4灭}else{DisplayLed(4,0);}if(L5_flag == 1){DisplayLed(5,1); //L5亮}else{DisplayLed(5,0);//L5灭} if(L6_flag == 1){DisplayLed(6,1);  //L6亮}else{DisplayLed(6,0); //L6灭}
}
void key_board()
{unsigned char key;P44 = 0, P42 = 1; P3 |= 0x0f;key = P3; key = key & 0x0c;if(key != 0x0c){Delayms(5);if(key != 0x0c){switch(key){case 0x04:  key_val = 4;  show_switching++; //每次进入回显界面默认是温度回显if(show_switching > 3) {  show_switching = 1 ; S5_flag = 1; }break;  case 0x08:  key_val = 5; if(show_switching == 2) S5_flag++;if(S5_flag > 3)   S5_flag = 1;           break;}}while(key != 0x0c){key = P3; key = key & 0x0c;show_switch();}}//第二列按键P44 = 1, P42 = 0; P3 |= 0x0f;key = P3; key = key & 0x0c;if(key != 0x0c){Delayms(5);if(key != 0x0c){  // S8++, S9--switch(key){case 0x04:  key_val = 8; if(show_switching == 3)  t_para++;if(t_para > 99)  t_para = 0;break;  case 0x08:  key_val = 9; if(show_switching == 3)  t_para--;if(t_para == 255)  t_para = 99;						                         break;}if(S5_flag == 3)  { count3 = 0, count_sec = 0;} //时间回显下,S9按下2秒计时开始  }while(key != 0x0c){key = P3; key = key & 0x0c;show_switch();if(count_sec >= 2 && S5_flag == 3) { //时间回显界面,长按S9两秒,数据清零memset(t,0,sizeof(t)),  memset(h,0,sizeof(h));count_triggle = 0;}}}
}
void Timer0Init(void)		//@12.000MHz
{AUXR &= 0x7F;		//定时器时钟12T模式TMOD &= 0xF0;		//设置定时器模式TMOD |= 0x04;TL0 = 0;		//设置定时初值TH0 = 0;		//设置定时初值TF0 = 0;		//清除TF0标志ET0 = 1;TR0 = 1;		//定时器0开始计时
}
void Timer1Init(void)		//10毫秒@12.000MHz
{AUXR &= 0xBF;		//定时器时钟12T模式TMOD &= 0x0F;		//设置定时器模式TL1 = 0xF0;		//设置定时初值TH1 = 0xD8;		//设置定时初值TF1 = 0;		//清除TF1标志TR1 = 1;		//定时器1开始计时ET1 = 1;EA = 1;
}void Timer1() interrupt 3
{count++; count3++;if(count == 100){count = 0;flag_1s = 1;}if(count %10 == 0){flag_100ms = ~flag_100ms;}if(flag_1s == 1){flag_1s = 0; TR0 = 0;FREQUENTCY = TH0*256 + TL0 ;TH0 = 0, TL0 = 0; TR0 = 1;}if(count3 == 100) {count3 = 0; count_sec++;}
}
void Timer2Init(void)		//20毫秒@12.000MHz
{AUXR &= 0xFB;		//定时器时钟12T模式T2L = 0xE0;		//设置定时初值T2H = 0xB1;		//设置定时初值
//	AUXR |= 0x10;		//定时器2开始计时AUXR &= 0xef;IE2 |= 0x04;
}
void Timer2() interrupt 12
{count2++;if(count2 == 50){count2 = 0;sec++;if(sec == 3){sec = 0; show = 0;AUXR &= 0xef; //停止定时器2}}
}
//求数组的最大值,这里数组大小固定为3
unsigned char max(unsigned char str[])
{unsigned char Max = str[0] , i;for(i=1;i<3;i++){if( str[i] > Max)Max =  str[i] ;}return Max;
}
3.6 环境配置
keil5 创建工程,选择芯片型号STC15F2K60S2,将上述.c文件都添加在Source Group 1下进行编译
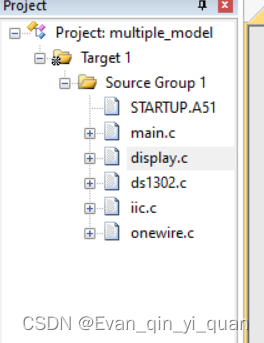
编译成功后,0错误,0警告

第14届完整工程代码:
第14届蓝桥杯省赛程序设计题源码,第14届驱动代码和以往相比发生了一些改变,需要注意,只给除了c文件,头文件需要自己手写资源-CSDN文库
4. 历年蓝桥杯单片机试题和答案
需要历年程序题客观题试题和答案,可在咸鱼购买,另外需要程序指导也可私信
闲鱼】https://m.tb.cn/h.UFji1l1?tk=hM4BdnfMkVP CZ0001 「我在闲鱼发布了【蓝桥杯各模块程序驱动代码,历年试题答案,程序无bug。如需程】」
点击链接直接打开
https://m.tb.cn/h.UFji1l1?tk=hM4BdnfMkVP CZ0001


