- 网络和多线程的文章中也有部分GUI的代码
基础知识
- GUI(Graphics User Interface)图形用户界面
- Java不擅长图形编程
- AWT(Abstract Window Toolkit),因为要调用一些操作系统的东西,所以AWT没有完全支持的跨平台
- 新的javax.swing*;实现了完全跨平台,但也离不开AWT
- java.awt*;
- java.awt.color.*;
- java.awt.event.*;
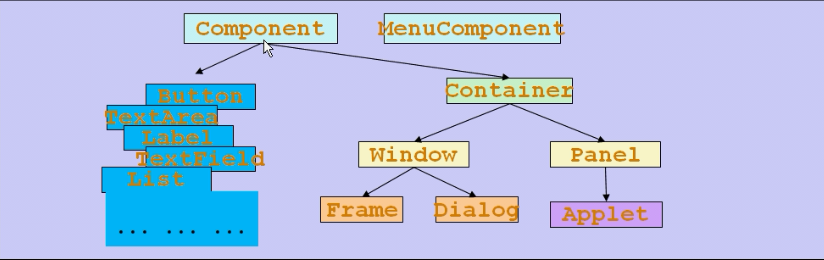
- Component是最顶层的类,所有可以显示的图形元素,是抽象类
- Container是用来容纳其他Component的容器,可以容纳Component和自己
- Window是可以自由停泊的顶级窗口,分为Frame和Dialog
- Panel必须装到Window中显示出来,典型的是Applet,被JS和Ajaxt替代了
- Frame是大窗口,Dialog是帮助,关于的对话框,
- Dialog又分为模态(主窗口不能运行)和非模态(主窗口可以运行)

布局管理器
- AWT提供了5中布局管理器:控件都会随着窗口的变化而变化,这也是控件的特点
- FlowLayout 默认居中对齐 Panel类的默认布局管理器 流水器布局
- frame.setLayout(new FlowLayout(FlowLayout.LEFT, 20, 40));//指定两个Component之间的水平距离20,垂直距离40
- FlowLayout实现了java.awt.LayoutManager接口
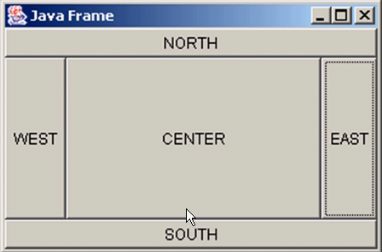
- BorderLayout Frame类的默认布局管理器
- 默认一个区域只能加一个组件,后面的会盖住前面的组件,可以再嵌套Panel
- 北南两个区域在水平方向缩放,东西两个区域在垂直方向缩放
- Button bc = new Button(“BC”);
- frame.add(bn, BorderLayout.NORTH);//默认就是borderlayout
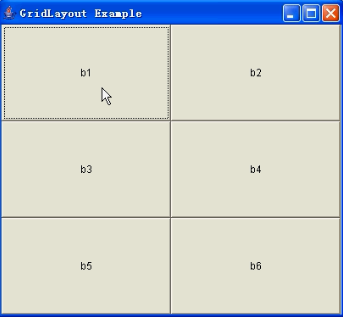
- GridLayout 把空间划分成一个个的小格
- frame.setLayout (new GridLayout(3,2)); //设置为3行2列
- frame.add(b1); frame.add(b2); frame.add(b3); frame.add(b3); frame.add(b4); frame.add(b5); frame.add(b6);//launchFrame可以不写frame.
- frame.pack();//frame在外面抱着button正好包一圈,否则会只剩下一个标题栏,缩放窗口时才会出现button,在BorderLayout中是不留中间的空白
- CardLayout
- GridBagLayout
- 5种布局管理器由java.awt.LayoutManager接口统一控制
- 用了布局管理器之后,控件自己的setLocation(),setSize(),setBounds()等方法会被布局管理器覆盖,如果需要自己设置组件的大小和位置,就取消布局管理器
- setLayout(null)
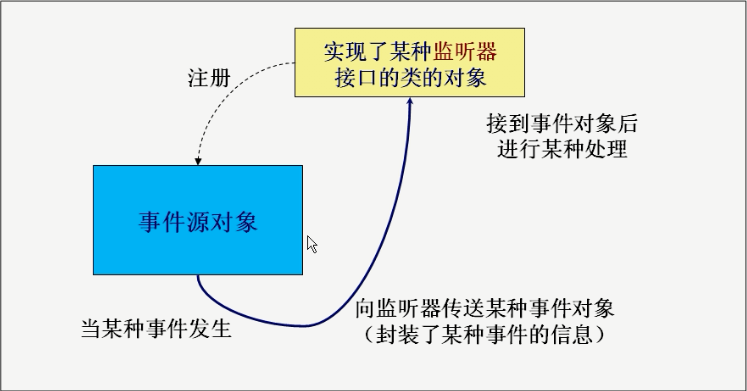
事件模型
- awt和swing用的是同一套事件监听机制
- 钩子函数,又叫,某一件事发生引起这个函数发生
- 事件模式一般都实现了监听模式
- 多种种方式:
button.addActionListener(bh);
class Monitor implements ActionListener {public void actionPerformed(ActionEvent e) {Button button = (Button)e.getSource();//可以得到是哪个鼠标被点了frame.addPoint(new Point(e.getX(),e.getY()));//可以得到鼠标点击的坐标System.out.println("a button has been pressed");    }
}
- 系统把具体的时间包装成事件放到ActionEvent中,e就知道时间的具体信息
- 鼠标的ActionListener事件是点击,TextField的ActionListener事件是光标定位在文本框里敲回车,不同的组件的响应时间不同,但都有
- 或者
this.addWindowListener(new WindowAdapter() {public void windowClosing(WindowEvent e) {System.exit(0);}}); //关闭窗口功能或
this.addKeyListener(new KeyMonitor());//把监听器的对象加到Frame里面,在窗口没显示之前
private class KeyMonitor extends KeyAdapter {//添加键盘控制坦克移动的方向//如果直接实现listener接口,里面的方法都必须实现,很多都是跟这个类没关系的//KeyAdapter内部已经实现的listener的接口,并且已经重写的空方法,只需要写自己关心的方法就行了public void keyPressed(KeyEvent e) {//不是必须实现的方法myTank.keyPressed(e);}}
或者 一个监听器监听两个按钮
Button b1 = new Button("Start");
Button b2 = new Button("Stop");
Monitor2 bh = new Monitor2();
b1.addActionListener(bh);
b2.addActionListener(bh);
b2.setActionCommand("game over");//不加ActionCommand,默认是构造是传进去的那个名字
class Monitor2 implements ActionListener {public void actionPerformed(ActionEvent e) {System.out.println("a button has been pressed," + "the relative info is:\n " + e.getActionCommand());    }
}
组件
- textField.setEchoChar(‘*’);//密码框的输入格式
- 每个组件都有自己的setLocation(), setBounds(),setSize()等函数在setLayout(null)时可以用
paint
- 改变窗口大小时自动重画
- 简单的聊天窗口雏形 中详细分析了paint()方法的调用关系
小测试
TestMultiFrame.java 另写Frame子类弹出窗口
import java.awt.*;
public class TestMultiFrame {public static void main(String args[]) {MyFrame f1 = new MyFrame(100, 100, 200, 200, Color.BLUE);//new一个对象时,堆内存里就分配了对象了,分配出来就调用构造方法,构造方法调用setVisible()把自己显示出来MyFrame f2 = new MyFrame(300, 100, 200, 200, Color.YELLOW);MyFrame f3 = new MyFrame(100, 300, 200, 200, Color.GREEN);MyFrame f4 = new MyFrame(300, 300, 200, 200, Color.MAGENTA);}
}
class MyFrame extends Frame {static int id;MyFrame(int x, int y, int w, int h, Color color) {super("MyFrame " + (++id));//调用了Frame类的一个构造方法,往TitleBar上设置文字setBackground(color);setLayout(null);//内部布局管理器设置为空setBounds(x, y, w, h);//设置窗口的大小和位置setVisible(true);}
}
TestMultiPanel.java
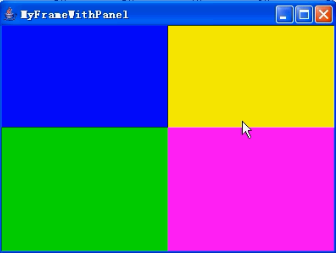
- panel不随Frame大小的改变而改变
import java.awt.*;
public class TestMultiPanel {public static void main(String args[]) {new MyFrame2("MyFrameWithPanel",300,300,400,300);}
}
class MyFrame2 extends Frame{private Panel p1,p2,p3,p4;MyFrame2(String s,int x,int y,int w,int h){super(s);setLayout(null);p1 = new Panel(null); p2 = new Panel(null);//null表示不帶自己的布局管理器p3 = new Panel(null); p4 = new Panel(null);p1.setBounds(0,0,w/2,h/2);//这里设置bounds是相对与外层Framep2.setBounds(0,h/2,w/2,h/2);p3.setBounds(w/2,0,w/2,h/2);p4.setBounds(w/2,h/2,w/2,h/2);//p1.setBackground(new Color(0, 0, 102));//三原色 红绿蓝 计算机中p1.setBackground(Color.BLUE);p2.setBackground(Color.GREEN);p3.setBackground(Color.YELLOW);p4.setBackground(Color.MAGENTA);add(p1);add(p2);add(p3);add(p4);//panel添加到FramesetBounds(x,y,w,h);setVisible(true);}
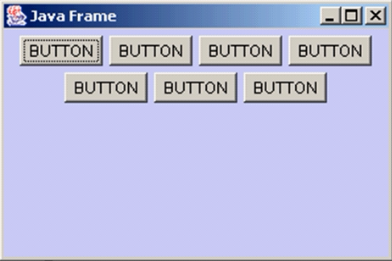
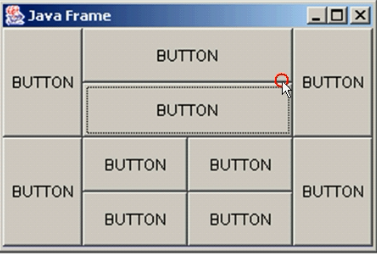
}实现指定的Panel堆放 TenButtons.java
import java.awt.*;
public class TenButtons {public static void main(String args[]) {Frame f = new Frame("Java Frame");f.setLayout(new GridLayout(2,1)); //两行一列f.setLocation(300,400);f.setSize(300,200);f.setBackground(new Color(204,204,255));Panel p1 = new Panel(new BorderLayout());Panel p2 = new Panel(new BorderLayout());Panel p11 = new Panel(new GridLayout(2,1));Panel p21 = new Panel(new GridLayout(2,2));p1.add(new Button("BUTTON"),BorderLayout.WEST);p1.add(new Button("BUTTON"),BorderLayout.EAST);p11.add(new Button("BUTTON"));p11.add(new Button("BUTTON"));p1.add(p11,BorderLayout.CENTER);//p11夹在了p1的中间p2.add(new Button("BUTTON"),BorderLayout.WEST);p2.add(new Button("BUTTON"),BorderLayout.EAST);for(int i =1;i<=4;i++) {p21.add(new Button("BUTTON"));} p2.add(p21,BorderLayout.CENTER);f.add(p1);f.add(p2);//上半面是p1,下半面是p2f.setVisible(true);}
}
坦克大战先行版
涉及的小知识点
- 多线程中的生产者消费者图形界面解决了图片加载第一次显示不出来的问题
- 直接在新建的java文件上写就行了,是java.awt.Frame项目
- Frame默认BorderLayout布局
- 实现了多线程控制刷新
- 利用双缓冲画图:重写update方法
- 添加键盘控制上下左右移动
- 包含两个文件,关于对象持有大管家的引用没有涉及,这里只着重介绍图形界面
- 对应于soldier坦克大战:0.0 – 0.9
TankClient.java
import java.awt.*;
import java.awt.event.*;
public class TankClient extends Frame{public static final int GAME_WIDTH = 800;//常量一般定义成public static finalpublic static final int GAMW_HEIGH = 600;Tank myTank = new Tank(50, 50);Image offScreenImage = null;public void update(Graphics g) {//Frame的父类Window的父类Container中的方法,在这里实现双缓冲if(offScreenImage == null) {offScreenImage = this.createImage(GAME_WIDTH, GAMW_HEIGH);//和launchFrame中的窗口一样大小}//如果这里不判断是否为空,就会每次repaint更新都创建一个新的背面的图片Graphics gOffScreen = offScreenImage.getGraphics();//拿到这张图片的画笔Color c = gOffScreen.getColor();//获得本来的背景颜色gOffScreen.setColor(Color.green);gOffScreen.fillRect(0, 0, GAME_WIDTH, GAMW_HEIGH);//画一个矩形,前景色为绿色gOffScreen.setColor(c);//设定画笔为原来的颜色paint(gOffScreen);//画到了背面图片上了,传递进来的Graphics g才是前面屏幕画笔g.drawImage(offScreenImage, 0, 0, null);//把后面的图片贴到前面来}public void paint(Graphics g) {//继承自Frame的父类Window,重画时自动调用,不用自己调用myTank.draw(g);//让对象自己画自己,只把主屏幕的画笔传过去就行了} public void launchFrame() {//自己写的方法this.setLocation(100, 100);//左上角位置this.setSize(GAME_WIDTH, GAMW_HEIGH);//窗口大小this.setTitle("TankWar");//设置窗口名字this.addWindowListener(new WindowAdapter() {@Overridepublic void windowClosing(WindowEvent e) {System.exit(0);}}); //关闭窗口功能this.setResizable(false);//窗口大小不可变this.setBackground(Color.green);//设置窗口背景颜色this.addKeyListener(new KeyMonitor());//把监听器的对象加到Frame里面,在窗口没显示之前setVisible(true);//设置窗口可见模式new Thread(new PaintThread()).start();//启用重画线程}public static void main(String[] args) {TankClient tc = new TankClient();tc.launchFrame();} private class PaintThread implements Runnable {//定义内部类实现多线程重画,也可以继承自Threadpublic void run() {//实现Runnable接口必须重写run方法while(true) {//!!!这里不能少repaint();//内部类可以非常方便的访问外部包装类或包装类父类的成员变量和方法//repaint调用update方法,update方法在调用paint方法,双缓冲就是重写update方法,截断paint方法try {Thread.sleep(100);//每隔100ms重画一次} catch (InterruptedException e) {e.printStackTrace();}}}}private class KeyMonitor extends KeyAdapter {//添加键盘控制坦克移动的方向//如果直接实现listener接口,里面的方法都必须实现,很多都是跟这个类没关系的//KeyAdapter内部已经实现的listener的接口,并且已经重写的空方法,只需要写自己关心的方法就行了public void keyPressed(KeyEvent e) {//不是必须实现的方法myTank.keyPressed(e);}}
}
Tank.java
import java.awt.*;
import java.awt.event.*;
public class Tank {private int x, y;//左上角坐标private boolean bL = false, bU = false, bR = false, bD = false;enum Direction {L, LU, U, RU, R, RD, D, LD, STOP };private Direction dir = Direction.STOP;public Tank(int x, int y) {this.x = x;this.y = y;}public void draw(Graphics g) {//从TankClient类中传递过来一只画笔,画出来是在主屏幕上的Color c = g.getColor();//获得本来的背景颜色g.setColor(Color.red);//画笔颜色,前景色g.fillOval(x, y, 30, 30);//画圆,左上角坐标和长宽g.setColor(c);//设定画笔为原来的颜色}public void keyPressed(KeyEvent e) {int key = e.getKeyCode();switch (key) {case KeyEvent.VK_LEFT :x -= 5; break;case KeyEvent.VK_UP :y -= 5; break;case KeyEvent.VK_RIGHT :x += 5; break;case KeyEvent.VK_DOWN :y += 5; break;}}
}
简单的聊天窗口雏形
涉及的小知识点
- 解释了repaint()调用update(),update()调用paint()之间的实现
- 响应回车和鼠标事件的写法
- 控件和渲染之间不影响,控件不会重画,也不会被覆盖
import java.awt.*;
import java.awt.event.*;
public class ChatClient extends Frame{TextField tfText = new TextField();TextArea taContent = new TextArea();Button button = new Button("发送");public static int i = 100;public static void main(String[] args) {new ChatClient().launchFrame();}
//    public void update(Graphics g) {//画的是细的圆,也就是没在上一次的基础上画
//        g.drawOval(i, 500, 100, 100);
//        i += 1;
//        super.update(g);
//    }
//    public void update(Graphics g) {//画的是粗的,在上一次的基础上更新了,没有重新铺一层画布
//        g.drawOval(i, 500, 100, 100);
//        i += 1;
//        paint(g);//加不加这句话不影响这个update函数,因为重写了这个update函数,paint就相当于自己写的函数,而不是继承自父类的函数了
//    }public void paint(Graphics g) {//paint不会遮挡控件,而且控件不会重画,一直在那里g.drawOval(i, 500, 100, 100);i += 1;}public void launchFrame() {setLocation(100, 100);setSize(800, 600);setBackground(Color.green);add(taContent, BorderLayout.NORTH);add(tfText, BorderLayout.SOUTH);add(button, BorderLayout.EAST);
//        pack(); //不用pack中间会有一大块背景颜色很难看addWindowListener(new WindowAdapter() {public void windowClosing(WindowEvent e) {System.exit(0);}});tfText.addActionListener(new TFListener());button.addMouseListener(new MouseAdapter() {public void mouseClicked(MouseEvent e) {String s = tfText.getText().trim();//去掉两边的空格taContent.setText(s);//输入框传到文本框中tfText.setText("");//设置输入框为空}});setVisible(true);new PaintThread().start();}private class TFListener implements ActionListener {//敲回车响应事件public void actionPerformed(ActionEvent e) {String s = tfText.getText().trim();//去掉两边的空格taContent.setText(s);//输入框传到文本框中tfText.setText("");//设置输入框为空}}private class PaintThread extends Thread {public void run() {while(true) {repaint();try {sleep(500);} catch (InterruptedException e) {e.printStackTrace();}}}}
}
贪吃蛇项目
涉及的小知识点
- paint中填充背景
- 计分
- 显示游戏结束
- 彩蛋闪动
- 线程暂停 可以利用重画线程驱动paint(),再用paint()驱动蛇的move()移动,实现暂停
- 使用public static final int ROWS = 30; 就可以对外提供访问
- 其他类中的draw()方法不用public属性,不让其他类访问
- 按键传递
- 蛇的move()函数写的有技巧
- 彩蛋随机出现
- 矩形冲突检测
- 彩蛋不出现在蓝色框里
- 画蛇的时候drag()中,先move再画,键盘控制更灵敏一些
- 检测和自己的身体不相撞
- y.setScore(y.getScore() + 5); 在Snake的eat()方法中,咏鹅挺好
- 蛇的死亡处理的很好,在Paintthread中设置了running属性,并利用gameOver全局变量在paint()方法中改变running值,并且暂停
- gameover提示字体和颜色的设置
- 重新开始public void reStart() {
- this.pause = false; gameOver = false;
- s = new Snake(Yard.this);//旧蛇直接扔掉添加新蛇
- }
Yard.java
import java.awt.*;
import java.awt.event.*;
public class Yard extends Frame {PaintThread paintThread = new PaintThread();private boolean gameOver = false; // 游戏是否结束public static final int ROWS = 30;public static final int COLS = 30;public static final int BLOCK_SIZE = 15; //行高private Font fontGameOver = new Font("宋体", Font.BOLD, 50);//设置字体private int score = 0;Snake s = new Snake(this);Egg e = new Egg();Image offScreenImage = null;public void launchFrame() {this.setLocation(200, 200);this.setSize(COLS * BLOCK_SIZE, ROWS * BLOCK_SIZE);this.addWindowListener(new WindowAdapter() {public void windowClosing(WindowEvent e) {System.exit(0);}});this.setVisible(true);this.addKeyListener(new KeyMonitor());new Thread(paintThread).start();}public static void main(String[] args) {new Yard().launchFrame();}public void stop() {gameOver = true;}public void paint(Graphics g) {Color c = g.getColor();g.setColor(Color.GRAY);g.fillRect(0, 0, COLS * BLOCK_SIZE, ROWS * BLOCK_SIZE);//填充背景g.setColor(Color.DARK_GRAY);for (int i = 1; i < ROWS; i++) {// 画出横竖线g.drawLine(0, BLOCK_SIZE * i, COLS * BLOCK_SIZE, BLOCK_SIZE * i);}for (int i = 1; i < COLS; i++) {g.drawLine(BLOCK_SIZE * i, 0, BLOCK_SIZE * i, BLOCK_SIZE * ROWS);}g.setColor(Color.YELLOW);g.drawString("score:" + score, 10, 60);if (gameOver) {g.setFont(fontGameOver);g.drawString("游戏结束", 120, 180);paintThread.pause();}g.setColor(c);s.eat(e);//每次画的时候检测一下是否吃到了e.draw(g);s.draw(g);}public void update(Graphics g) {if (offScreenImage == null) {offScreenImage = this.createImage(COLS * BLOCK_SIZE, ROWS * BLOCK_SIZE);}Graphics gOff = offScreenImage.getGraphics();paint(gOff);g.drawImage(offScreenImage, 0, 0, null);}private class PaintThread implements Runnable {private boolean running = true;private boolean pause = false;public void run() {while (running) {if (pause)continue;elserepaint();try {Thread.sleep(100); //这里设置游戏的速度} catch (InterruptedException e) {e.printStackTrace();}}}public void pause() {this.pause = true;}public void reStart() {this.pause = false;s = new Snake(Yard.this);//重画gameOver = false;}public void gameOver() {running = false;}}private class KeyMonitor extends KeyAdapter {public void keyPressed(KeyEvent e) {int key = e.getKeyCode();if (key == KeyEvent.VK_F2) {paintThread.reStart();}s.keyPressed(e);//也可以在Snake中实现KeyMonitor类,类似于坦克大战}}public int getScore() {return score;}public void setScore(int score) {this.score = score;}
}
Snake.java
import java.awt.*;
import java.awt.event.KeyEvent;
public class Snake {private Node head = null;private Node tail = null; //自己定义的类private int size = 0;private Node n = new Node(20, 30, Dir.L);private Yard y;public Snake(Yard y) {head = n; //对于一个内部类,必须先new外部类,再new内部类tail = n; //头和尾要对应与同一个Nodesize = 1;this.y = y;}public void addToTail() {Node node = null;switch(tail.dir) {case L :node = new Node(tail.row, tail.col + 1, tail.dir);break;case U :node = new Node(tail.row + 1, tail.col, tail.dir);break;case R :node = new Node(tail.row, tail.col - 1, tail.dir);break;case D :node = new Node(tail.row - 1, tail.col, tail.dir);break;}tail.next = node;node.prev = tail;tail = node;size ++;}public void addToHead() {Node node = null;switch(head.dir) {case L :node = new Node(head.row, head.col - 1, head.dir);break;case U :node = new Node(head.row - 1, head.col, head.dir);break;case R :node = new Node(head.row, head.col + 1, head.dir);break;case D :node = new Node(head.row + 1, head.col, head.dir);break;}node.next = head;head.prev = node;head = node;size ++;}public void draw(Graphics g) {if(size <= 0) return;move();//先move再画,键盘控制更灵敏一些for(Node n = head; n != null; n = n.next) {n.draw(g);}}private void move() { //这里写的比较有技巧,想当与最后一节加到前面,然后删除最后的addToHead();deleteFromTail();checkDead();}private void checkDead() {if(head.row < 2 || head.col < 0 || head.row > Yard.ROWS || head.col > Yard.COLS)  {y.stop();}for(Node n = head.next; n != null; n = n.next) {//检测和自己的身体不相撞if(head.row == n.row && head.col == n.col) {y.stop();}}}private void deleteFromTail() {if(size == 0) return;tail = tail.prev;tail.next = null;}private class Node {int w = Yard.BLOCK_SIZE;int h = Yard.BLOCK_SIZE;int row , col;Dir dir = Dir.L;Node next = null;Node prev = null;Node(int row, int col, Dir dir) {this.row = row;this.col = col;this.dir = dir;}void draw(Graphics g) {//不让其他人访问,不用publicColor c = g.getColor();g.setColor(Color.BLACK);g.fillRect(Yard.BLOCK_SIZE * col, Yard.BLOCK_SIZE * row, w, h);g.setColor(c);}}public void eat(Egg e) {//矩形冲突检测if(this.getRect().intersects(e.getRect())) {e.reAppear();this.addToHead();//添加到尾巴上相当于添加到头上y.setScore(y.getScore() + 5);}}private Rectangle getRect() {return new Rectangle(Yard.BLOCK_SIZE * head.col, Yard.BLOCK_SIZE * head.row, head.w, head.h);}public void keyPressed(KeyEvent e) {int key = e.getKeyCode();switch(key) {case KeyEvent.VK_LEFT :if(head.dir != Dir.R)head.dir = Dir.L;break;case KeyEvent.VK_UP :if(head.dir != Dir.D)head.dir = Dir.U;break;case KeyEvent.VK_RIGHT :if(head.dir != Dir.L)head.dir = Dir.R;break;case KeyEvent.VK_DOWN :if(head.dir != Dir.U)head.dir = Dir.D;break;}}
}
Egg.java
import java.awt.*;
import java.util.Random;
public class Egg {int row, col;int w = Yard.BLOCK_SIZE;int h = Yard.BLOCK_SIZE;private static Random r = new Random();private Color color = Color.GREEN;public Egg(int row, int col) {this.row = row;this.col = col;}public Egg() { //重载构造方法,随机出现在屏幕上某个位置this(r.nextInt(Yard.ROWS-2) + 2, r.nextInt(Yard.COLS));} //这样就可以不出现在蓝色框里了public void reAppear() {this.row = r.nextInt(Yard.ROWS-2) + 2;this.col = r.nextInt(Yard.COLS);}public Rectangle getRect() {return new Rectangle(Yard.BLOCK_SIZE * col, Yard.BLOCK_SIZE * row, w, h);}public void draw(Graphics g) {Color c = g.getColor();g.setColor(color);g.fillOval(Yard.BLOCK_SIZE * col, Yard.BLOCK_SIZE * row, w, h);g.setColor(c);if(color == Color.GREEN) color = Color.RED;else color = Color.GREEN;}
}
enum Dir
public enum Dir {L, U, R, D
}
在JFrame上显示跳动的蓝色矩形
- jike -> Absolute Layout绝对布局
- 新建JFrame文件
public class TestAL extends JFrame {private JPanel contentPane;private JTextField textField;JLabel lblNewLabel;/*** Launch the application.*/public static void main(String[] args) {EventQueue.invokeLater(new Runnable() {public void run() {try {TestAL frame = new TestAL();frame.setVisible(true);} catch (Exception e) {e.printStackTrace();}}});}/*** Create the frame.*/public TestAL() {setDefaultCloseOperation(JFrame.EXIT_ON_CLOSE);setBounds(100, 100, 450, 300);contentPane = new JPanel();contentPane.setBorder(new EmptyBorder(5, 5, 5, 5));setContentPane(contentPane);contentPane.setLayout(null);textField = new JTextField();textField.setBounds(6, 6, 438, 28);contentPane.add(textField);textField.setColumns(10);JButton btnNewButton = new JButton("New button");btnNewButton.addMouseListener(new MouseAdapter() {@Overridepublic void mouseClicked(MouseEvent e) {new SwingWorker<String, Integer>() {int  oriy = lblNewLabel.getY();@Overrideprotected String doInBackground() throws Exception {while (true) {Thread.sleep(20);publish((int)(Math.cos(System.currentTimeMillis()/80)*50));}}@Overrideprotected void process(List<Integer> chunks) {for (int y:chunks) {lblNewLabel.setLocation(lblNewLabel.getX(), oriy+y);}super.process(chunks);}}.execute();}});btnNewButton.setBounds(6, 59, 117, 29);contentPane.add(btnNewButton);lblNewLabel = new JLabel("New label");lblNewLabel.setLocation(135, 128);lblNewLabel.setSize(200, 50);lblNewLabel.setBackground(Color.BLUE);lblNewLabel.setOpaque(true);contentPane.add(lblNewLabel);}
}