前言
最近崩溃平台有BUG,native的崩溃堆栈解析不出来,只能自己线下人肉解堆栈了。本着能善用工具提高工作效果的习惯,最终收获了如下的zshe脚本(方法)用于后续的工作,借此笔记跟大家分享与交流,供大家参考之
分享产物
// xxx.so是我关注出现崩溃的so
stackwalk=/Applications/Android\ Studio.app/Contents/plugins/android-ndk/resources/lldb/bin/minidump_stackwalk# for minidump
stackwalk=/Applications/Android\ Studio.app/Contents/plugins/android-ndk/resources/lldb/bin/minidump_stackwalk# for minidump
function dumpaddr() {${stackwalk} -s $1 | grep libxxx.so | head -n $2
}function adumpaddr() {${stackwalk} -s $1 | grep libxxx.so | head -n $2 | awk -F"+" '{print $2}' | xargs -I {} llvm-addr2line -p -f -C -e $3 {}
}
具体说明
首先我们回顾一下地址解析命令,即add2line。我的环境下配置的是这样的
$ type llvm-addr2line
llvm-addr2line is /Users/luo/Library/Android/sdk/ndk/23.0.7599858/toolchains/llvm/prebuilt/darwin-x86_64/bin/llvm-addr2line
add2line的输入是带有调试符号信息的so文件,还有我们想解析的崩溃堆栈地址,如下示例
$ llvm-addr2line -p -f -C -e xxx.so文件路径 0x3f80f 0x122c26 0xd1e 0x79a 0xd22 0xd22 0xd1e 0xd22 0xd1e 0x79a 0xd1e 0x3ffe5 0x746e5 0x11b4e2 0x3ffe5 0x11b4e2 0x8437b 0x7a7df 0x7e53f 0x79a 0x3ffe5 0x40417 0x11b4e2 0xdeefe
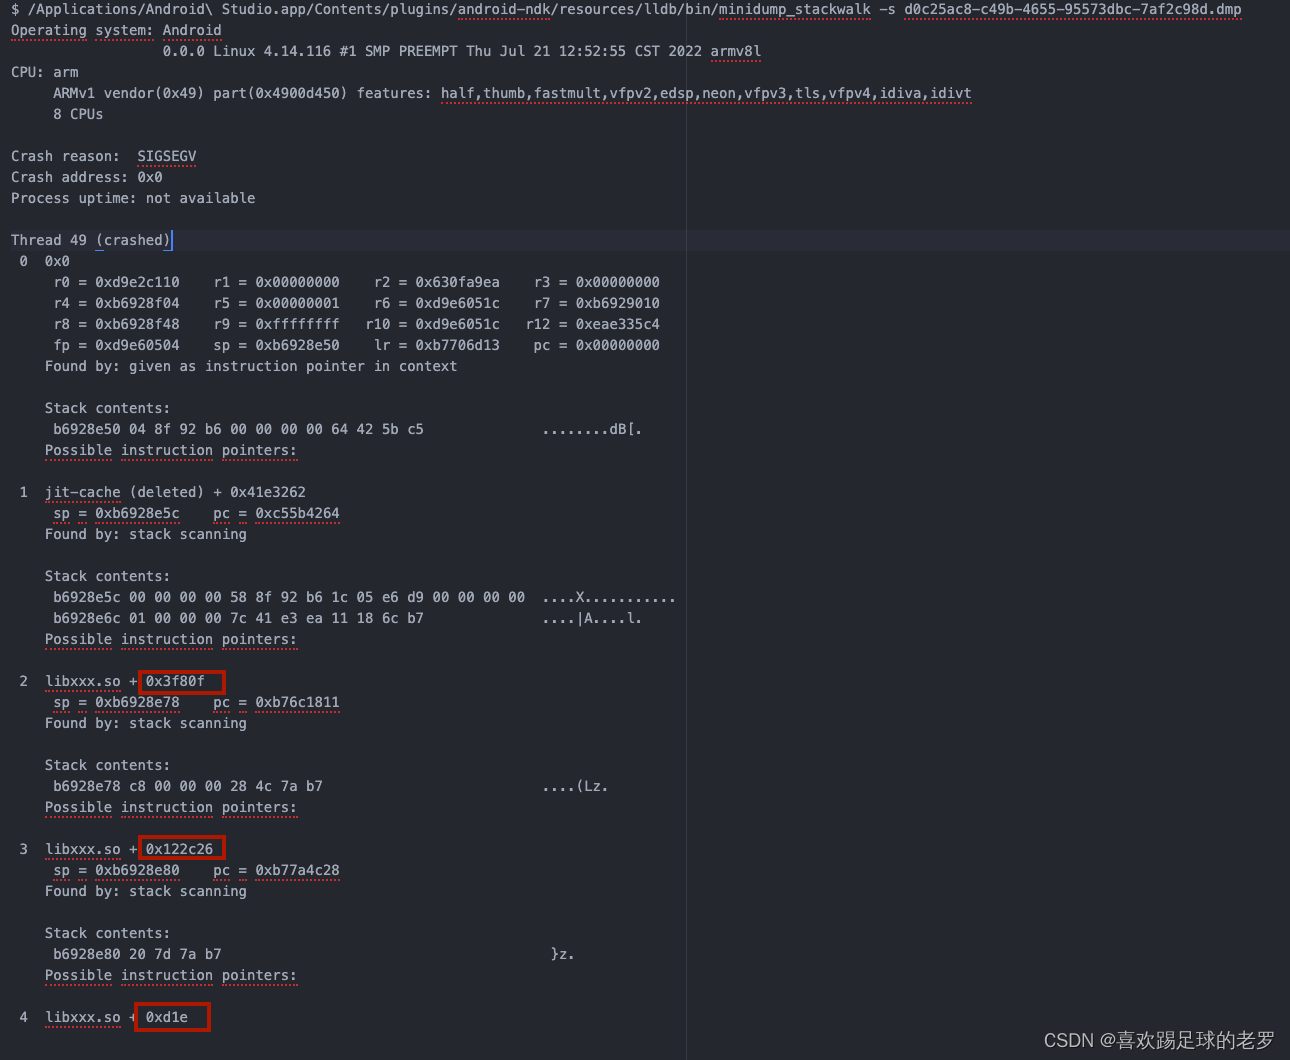
so文件可以下载到,然后我们需要利用minidump_stackwalk命令从dump文件读取崩溃堆栈信息,获取我们需要的那些崩溃地址(如下图红圈圈住的地址)

所以dumpaddr方法是过滤想要用的一批地址,需要调整第二个参数
$ /Applications/Android\ Studio.app/Contents/plugins/android-ndk/resources/lldb/bin/minidump_stackwalk -s d0c25ac8-c49b-4655-95573dbc-7af2c98d.dmp | grep libxxx.so | head -n 302  libxxx.so + 0x3f80f3  libxxx.so + 0x122c264  libxxx.so + 0xd1e7  libxxx.so + 0x79a8  libxxx.so + 0xd229  libxxx.so + 0xd22
10  libxxx.so + 0xd1e
11  libxxx.so + 0xd22
12  libxxx.so + 0xd1e
15  libxxx.so + 0x79a
16  libxxx.so + 0xd1e
18  libxxx.so + 0x3ffe5
19  libxxx.so + 0x746e5
21  libxxx.so + 0x11b4e2
23  libxxx.so + 0x3ffe5
25  libxxx.so + 0x11b4e2
26  libxxx.so + 0x8437b
27  libxxx.so + 0x7a7df
30  libxxx.so + 0x7e53f
32  libxxx.so + 0x79a
33  libxxx.so + 0x3ffe5
34  libxxx.so + 0x40417
36  libxxx.so + 0x11b4e2
37  libxxx.so + 0xdeefe
39  libxxx.so + 0x87d17
40  libxxx.so + 0x3f80f2  libxxx.so + 0xa6bbd4  libxxx.so + 0xa63935  libxxx.so + 0x10fc126  libxxx.so + 0x10fba1# 换方法调用
$ dumpaddr d0c25ac8-c49b-4655-95573dbc-7af2c98d.dmp 302  libxxx.so + 0x3f80f3  libxxx.so + 0x122c264  libxxx.so + 0xd1e7  libxxx.so + 0x79a8  libxxx.so + 0xd229  libxxx.so + 0xd22
10  libxxx.so + 0xd1e
11  libxxx.so + 0xd22
12  libxxx.so + 0xd1e
15  libxxx.so + 0x79a
16  libxxx.so + 0xd1e
18  libxxx.so + 0x3ffe5
19  libxxx.so + 0x746e5
21  libxxx.so + 0x11b4e2
23  libxxx.so + 0x3ffe5
25  libxxx.so + 0x11b4e2
26  libxxx.so + 0x8437b
27  libxxx.so + 0x7a7df
30  libxxx.so + 0x7e53f
32  libxxx.so + 0x79a
33  libxxx.so + 0x3ffe5
34  libxxx.so + 0x40417
36  libxxx.so + 0x11b4e2
37  libxxx.so + 0xdeefe
39  libxxx.so + 0x87d17
40  libxxx.so + 0x3f80f2  libxxx.so + 0xa6bbd // 这里是其它线程的调用堆,所以我们调过调整 方法的第二个参数来示作过滤4  libxxx.so + 0xa63935  libxxx.so + 0x10fc126  libxxx.so + 0x10fba1
再加上 head -n $2 | awk -F"+" '{print $2}
就是截出地址,然后通过xargs命令把地址参数交给add2line解析出对应函数行数信息
具体的使用就是CD到dump文件目录
先dumpaddr然后ctrl + a ,输按a 再ctrl + e ,再输入so的路径
# luo@ ericluodeMacBook-Pro-2 in ~/Downloads/d0c25ac8-c49b-4655-95573dbc-7af2c98d_2 [15:56:51]
$ dumpaddr d0c25ac8-c49b-4655-95573dbc-7af2c98d.dmp 262  libxxx.so + 0x3f80f3  libxxx.so + 0x122c264  libxxx.so + 0xd1e7  libxxx.so + 0x79a8  libxxx.so + 0xd229  libxxx.so + 0xd22
10  libxxx.so + 0xd1e
11  libxxx.so + 0xd22
12  libxxx.so + 0xd1e
15  libxxx.so + 0x79a
16  libxxx.so + 0xd1e
18  libxxx.so + 0x3ffe5
19  libxxx.so + 0x746e5
21  libxxx.so + 0x11b4e2
23  libxxx.so + 0x3ffe5
25  libxxx.so + 0x11b4e2
26  libxxx.so + 0x8437b
27  libxxx.so + 0x7a7df
30  libxxx.so + 0x7e53f
32  libxxx.so + 0x79a
33  libxxx.so + 0x3ffe5
34  libxxx.so + 0x40417
36  libxxx.so + 0x11b4e2
37  libxxx.so + 0xdeefe
39  libxxx.so + 0x87d17
40  libxxx.so + 0x3f80f# luo@ ericluodeMacBook-Pro-2 in ~/Downloads/d0c25ac8-c49b-4655-95573dbc-7af2c98d_2 [15:56:55]
$ adumpaddr d0c25ac8-c49b-4655-95573dbc-7af2c98d.dmp 26 libxxx.so的具体路径
后面的崩溃栈函数信息没有贴出来
说明:
# 这个逻辑可以得到一串地址,xargs把前面的一列地址转成了一行,可以copy这一行内容,然后手动输入add2line so地址 paste的也是可以的
${stackwalk} -s $1 | grep libxxx.so | head -n $2 | awk -F"+" '{print $2}' | xargs
相关文章
- 之前写的《breakpad的学习与使用笔记》


