纱织小姐雅典娜
Recently, I have been wanting to up my game when it comes to analysing data — so I decided to use this as an opportunity to take AWS Athena for a whirl and see what it’s capable of.
最近,在分析数据时,我一直想提高自己的游戏水平-因此,我决定以此为契机,尝试一下AWS Athena,看看它的功能。
Throughout this blog I am going to try and understand Athena and the features it has while working with a chocolate dataset.
在整个博客中,我将尝试理解Athena及其在处理巧克力数据集时所具有的功能。
那么雅典娜是什么? 🤔 (So what is Athena? 🤔)

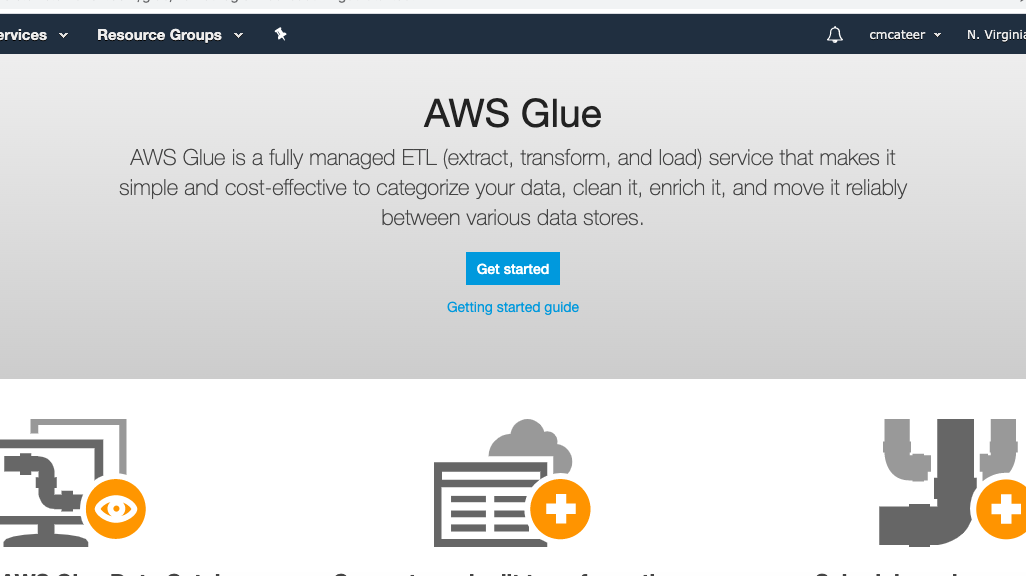
AWS Athena is an interactive query service that analyses data using standard SQL. Athena is able to work with both structured and unstructured data and can work directly with data stored in s3!
AWS Athena是一种交互式查询服务,可使用标准SQL分析数据。 雅典娜既可以使用结构化数据也可以使用非结构化数据,并且可以直接使用s3中存储的数据!
我们将使用👩💻 (What we’ll be using 👩💻)
In this blog we are going to be integrating with a number of different AWS services including :
在此博客中,我们将与许多不同的AWS服务集成,包括:
- S3 S3
- IAM 我是
- Glue 胶
- Athena 雅典娜
We are going to be storing our data in an S3 bucket and then using a Glue crawler to create the table schema required by Athena — don’t worry if this sounds a bit scary now, we will be going through and explaining this step by step.
我们将数据存储在S3存储桶中,然后使用Glue搜寻器创建Athena所需的表模式-别担心,如果现在听起来有点吓人,我们将逐步进行解释。 。
显示数据 (Show me the data 🍫)
I am going to be using a chocolate dataset from Kaggle, which is a CSV file containing over 1700 ratings for chocolate bars and includes information regarding the type of bean being used, the regional origin and the percentage of cocoa they contain. The rating is a score between 1–5 (5 being great and 1 being unpleasant.)
我将使用来自Kaggle的巧克力数据集 ,该数据集是一个CSV文件,其中包含1700多个巧克力棒评级,其中包含有关所用豆类的类型,区域来源以及可可豆所占百分比的信息。 评分是1到5之间的分数(5分是好,1分是不愉快。)
存储数据🗄 (Storing the data 🗄)
Before we dive straight into working with Athena we need to put our data in AWS Simple Storage Service (S3).
在深入研究Athena之前,我们需要将数据放入AWS Simple Storage Service(S3)。
You will need to create a bucket within s3 that has two folders inside it, one for the chocolate dataset and one for the results of the queries.
您将需要在s3中创建一个存储桶,其中有两个文件夹,一个用于巧克力数据集,一个用于查询结果。
If you have not worked with S3 before, check out my previous post that will guide you though creating your bucket, uploading data and creating folders!
如果您以前从未使用过S3,请查看我以前的文章 ,该文章将指导您创建存储桶,上传数据和创建文件夹!
雅典娜时间⏰ (Athena Time ⏰)
So in this tutorial we want to use Athena to run the following queries against our data:
因此,在本教程中,我们想使用Athena对我们的数据运行以下查询:
- Get all the countries listed in the dataset 获取数据集中列出的所有国家
- Sort countries by rating 按评分对国家进行排序
- Discover the relationship between cocoa solids percentage and rating 发现可可固形物百分比与等级之间的关系
让我们直接潜入🏊♂️ (Lets dive straight in 🏊♂️)
In the AWS console we will navigate to Athena:
在AWS控制台中,我们将导航到Athena:

Once Athena opens we can go ahead and click on get started:
雅典娜开放后,我们可以继续并单击“开始使用”:
连接数据🧩 (Connecting the Data 🧩)
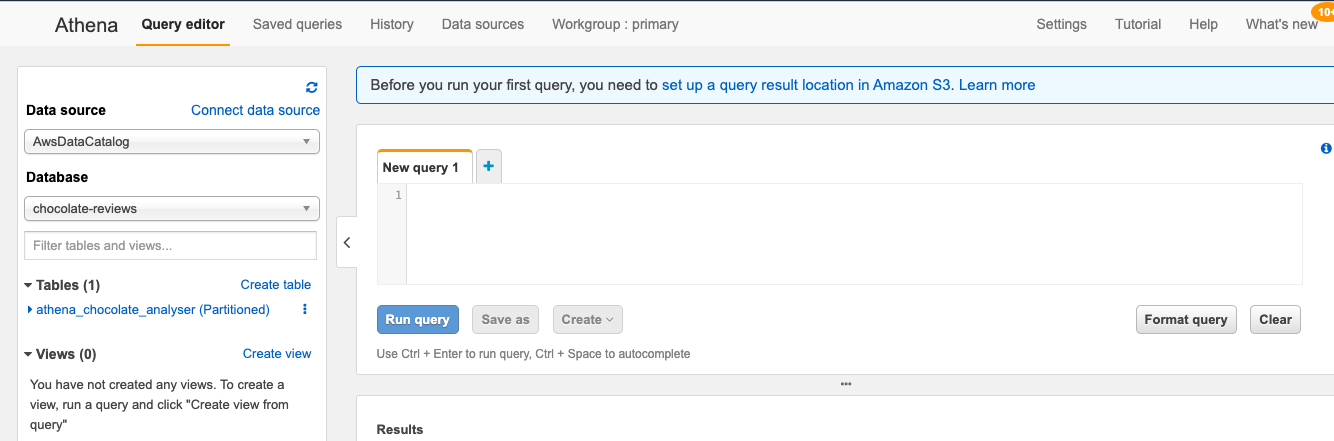
First thing we will need to do is connect to the data that we have stored in S3. In Athena you will see at the top left hand side of the screen there is an option to Connect Data source, we will want to select this.
我们需要做的第一件事是连接到我们存储在S3中的数据。 在Athena中,您会在屏幕的左上角看到Connect Data source的选项,我们将要选择它。
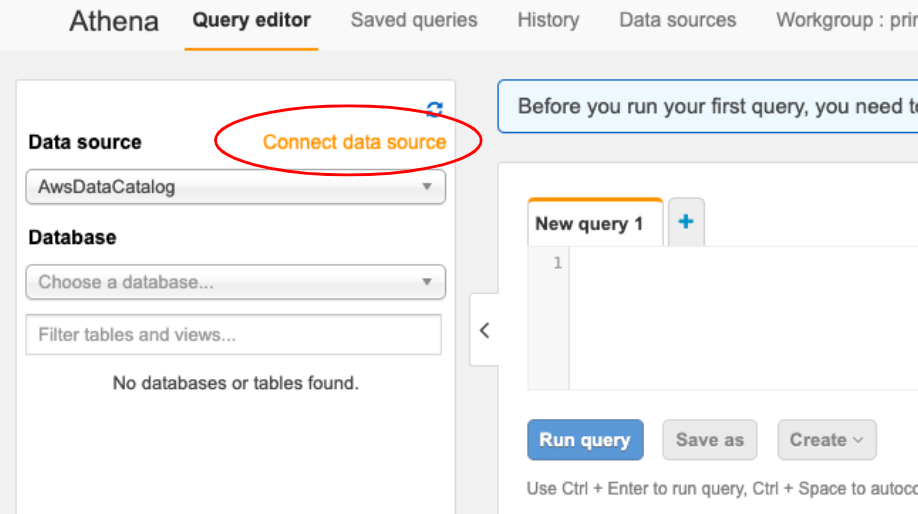
Once selected, you will see this:
选择后,您将看到以下内容:
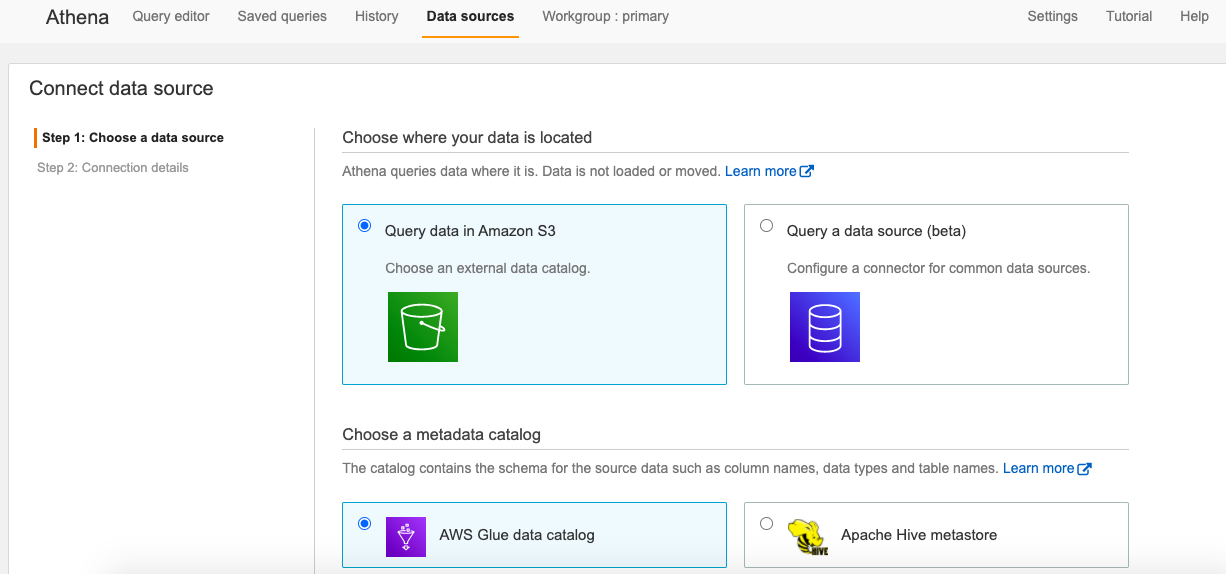
This will allow us to choose our data source and connection method. We will choose S3 for our datasource as this is where our data lives and for the metatdata catalog we will go for the default which is AWS Glue.
这将使我们能够选择我们的数据源和连接方法。 我们将为数据源选择S3,因为这是我们的数据所在的位置,对于metatdata目录,我们将使用默认值AWS Glue。
我听到你在问什么胶水? 🤔 (What is Glue I hear you asking? 🤔)
AWS Glue is a fully managed extract, transform, and load (ETL) service that makes it easy for customers to prepare and load their data for analytics
AWS Glue是一项完全托管的提取,转换和加载(ETL)服务,可让客户轻松准备和加载其数据以进行分析
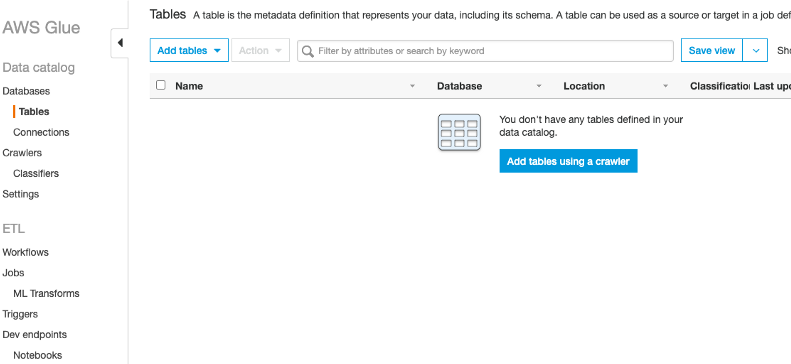
In Athena, tables are formed from the metadata definitions of the data’s schema. However, since S3 is just the data, we need to use aGlue Data Catalog to store this metadata about what lives within our selected S3 location (e.g. location, structure, column names, data types etc.) It is this metadata that will allow Athena to query our dataset!
在Athena中,表是根据数据架构的元数据定义形成的。 但是,由于S3只是数据,因此我们需要使用Glue Data Catalog来存储有关所选S3位置中生活的元数据(例如位置,结构,列名,数据类型等)。正是这种元数据将允许雅典娜查询我们的数据集!
One thing you might be thinking at this point is, how are we going to get this metadata to store in our Glue Data Catalog? Well, this is were Glue Crawlers come into play!
此时您可能会想的一件事是,我们如何将这些元数据存储在我们的Glue数据目录中? 好吧,这是Glue Crawlers开始扮演的角色!
We can use a Glue Crawler to automatically extract our metadata, and create our table definitions!
我们可以使用Glue Crawler自动提取我们的元数据,并创建我们的表定义!
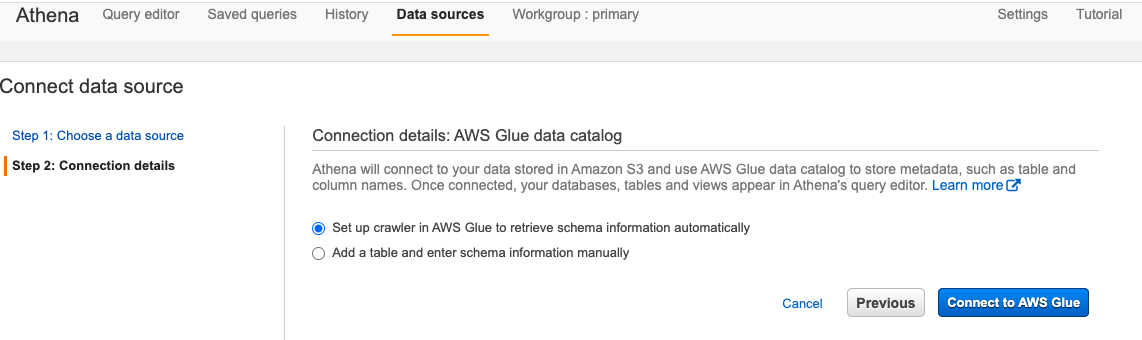
In the previous step when we choose our data source and connection method, this screen is then displayed and it is here where we want to select to set up our Glue Crawler:
在上一步中,当我们选择数据源和连接方法时,将显示此屏幕,在这里我们要选择设置胶粘剂履带:
When we go ahead and click connect AWS Glue, it will open up the Glue console for us:
当我们继续并单击connect AWS Glue ,它将为我们打开Glue控制台:
Here we select Get Started then select Add table using a Crawler :
在这里,我们选择Get Started然后选择“ Add table using a Crawler :
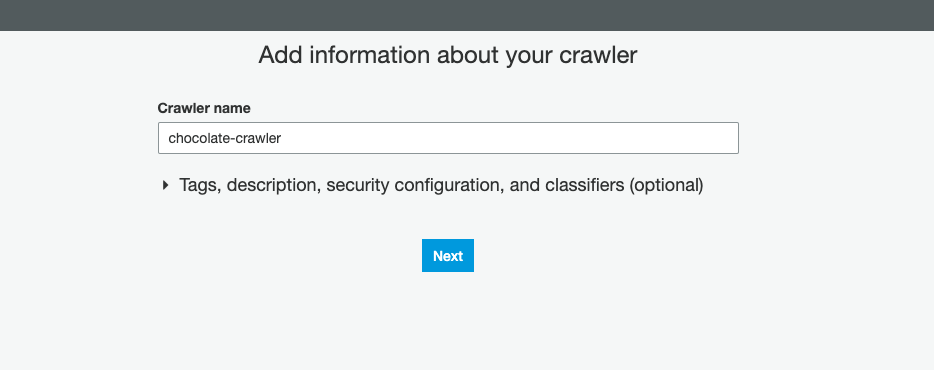
This prompts us to give our crawler a name:
这提示我们给我们的搜寻器起一个名字:
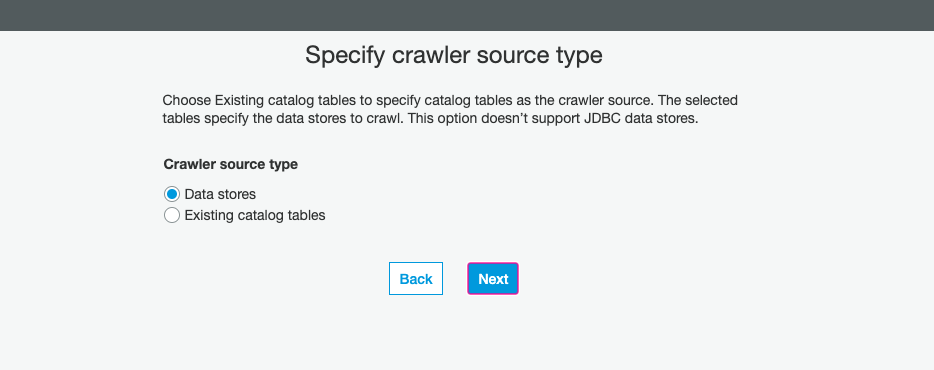
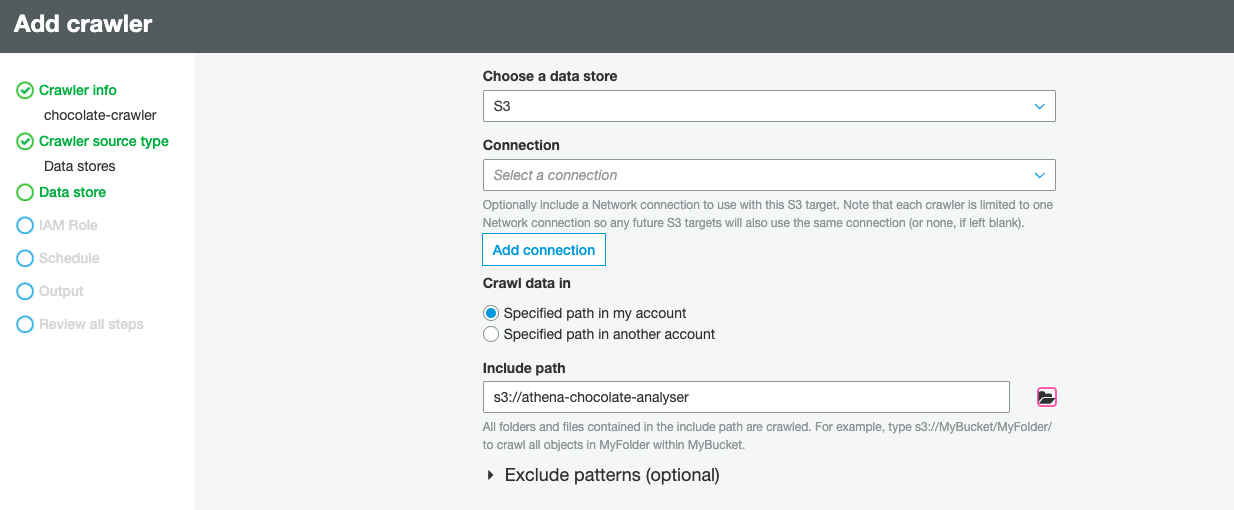
With our crawler named, we now also need to select Data Stores as our crawler source type:
使用我们的搜寻器命名后,我们现在还需要选择Data Stores作为我们的搜寻器源类型:
Now we need to actually point it to our S3 bucket, typically a connection is not required for Amazon Simple Storage(S3) sources/targets, so we can leave this part blank:
现在,我们实际上需要将其指向我们的S3存储桶,通常Amazon Simple Storage(S3)源/目标不需要连接,因此我们可以将此部分留空:
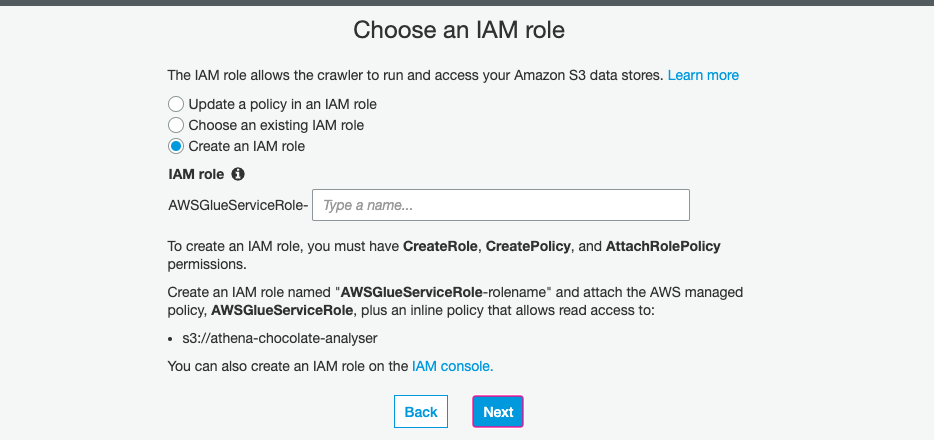
创建IAM角色 (Creating an IAM role)
An IAM role is an Identity and Access Management entity that defines a set of permissions for making AWS service requests.
IAM角色是身份和访问管理实体,它定义了一组用于发出AWS服务请求的权限。
Our next step involves creating an IAM role to allow the crawler to have permission to access the data that we have put in S3.
我们的下一步涉及创建IAM角色,以允许搜寻器有权访问我们在S3中放入的数据。
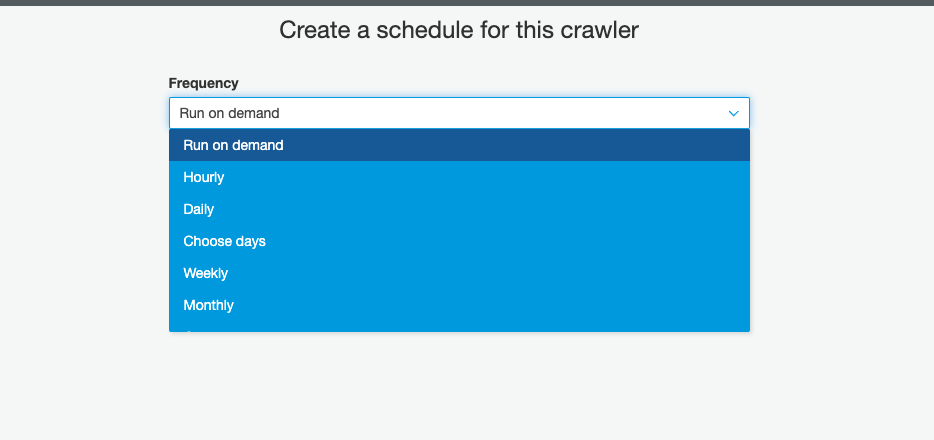
When working with data that is constantly changing, you might have it set up that new data is being added to S3 hourly, daily or monthly — for this you can schedule the crawler to make sure it is always working with your most up to date data, by creating Crawler schedules expressed in cron format. However for this tutorial we are just going to select the Run on Demandsetting as we only have the one dataset and we want to trigger it:
当使用不断变化的数据时,您可能会设置每小时,每天或每月将新数据添加到S3中-为此,您可以安排搜寻器以确保它始终与最新数据一起使用,通过创建以cron格式表示的Crawler时间表。 但是,对于本教程,我们将选择Run on Demand设置,因为我们只有一个数据集,并且我们想触发它:
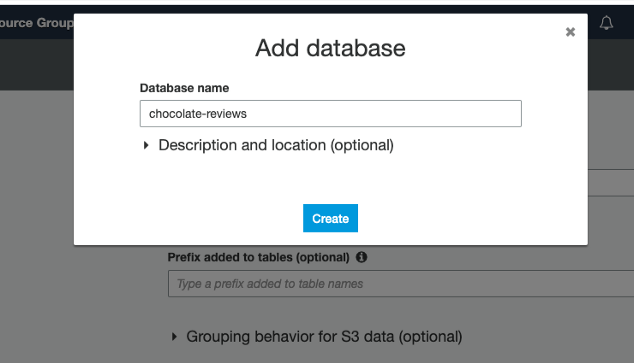
Now we have nearly got our crawler set up, we just need to add a database for the data to be store in:
现在我们几乎已经完成了搜寻器的设置,我们只需要添加一个数据库即可将数据存储在以下位置:
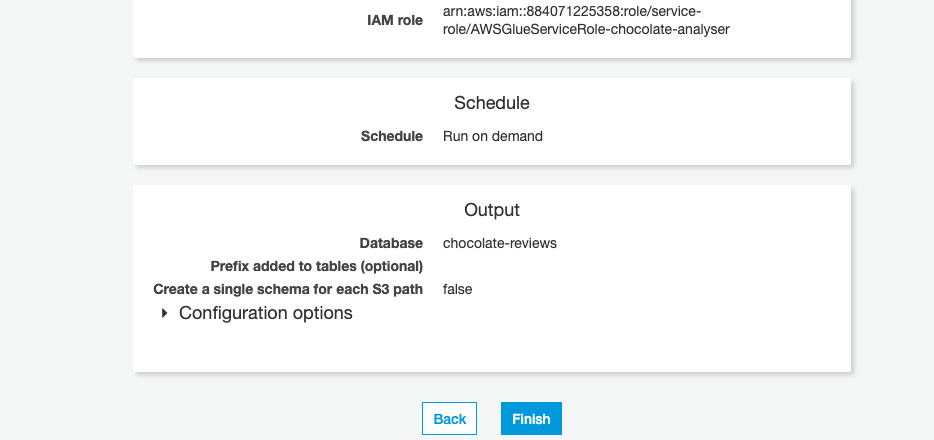
Once the database has been created, you are presented with an overall summary, if everything looks good — click Finish
创建数据库后,如果一切看起来不错,将为您提供总体摘要-单击“ Finish
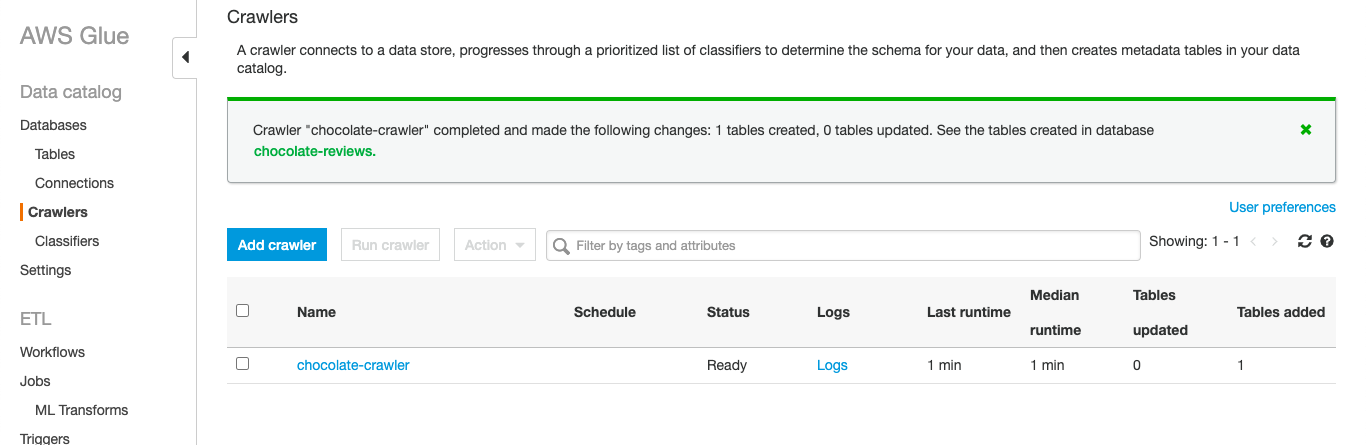
With our crawler set up, we can go ahead and kick it off, by selecting Run Now and we will then be notified once the crawler has ran:
设置好我们的搜寻器后,我们可以选择Run Now继续进行,一旦搜寻器Run Now ,我们就会收到通知:
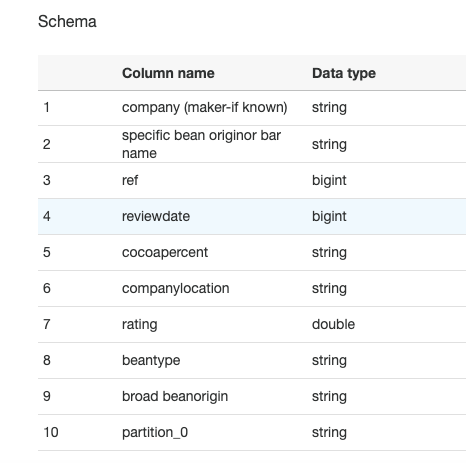
The crawler has now went through our data, and inspected portions of it to determine the schema. Once we click into view it, we can see that it has been able to pick out each of the columns names and the data type for each column:
搜寻器现在浏览了我们的数据,并检查了其中的部分以确定架构。 单击查看后,我们可以看到它已经能够选择每个列的名称和每个列的数据类型:
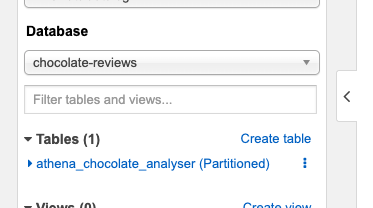
Now if we flip back to Athena, we can see that our database and table have now been populated with what we have just created:
现在,如果我们回到雅典娜,我们可以看到我们的数据库和表已经填充了我们刚创建的内容:
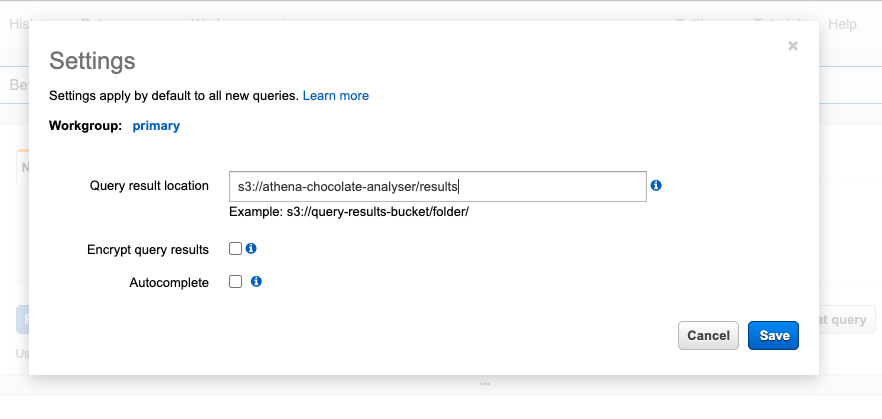
One last thing we will need to set up before we query our data, is the results location — to do this, you can click on the link at the top of the page in the blue notification box:
在查询数据之前,我们需要设置的最后一件事是结果位置-为此,您可以单击页面顶部蓝色通知框中的链接:
Athena needs to know where the results from each query should be stored. For this we want to direct it to the results folder we created in S3:
雅典娜需要知道每个查询的结果应该存储在哪里。 为此,我们要将其定向到我们在S3中创建的结果文件夹:
让乐趣开始🎬 (Let the fun begin 🎬)
Now we have all our set up done, we can dive in and start querying the data!
现在我们已完成所有设置,可以深入研究并开始查询数据!
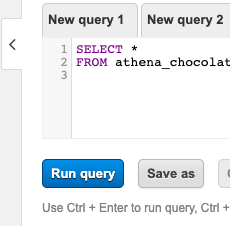
To query the data we can use standard SQL commands such as SELECT, FROM, WHERE, GROUP BY, ORDER BY, etc. I will go over some of this below, but to actually run the queries we need to enter them into the Query Panel on Athena, which is shown in the screen shot below:
要查询数据,我们可以使用标准SQL命令,例如SELECT, FROM, WHERE, GROUP BY, ORDER BY等。我将在下面介绍其中的一些命令,但实际上要运行查询,我们需要将其输入查询面板在雅典娜上,如下图所示:
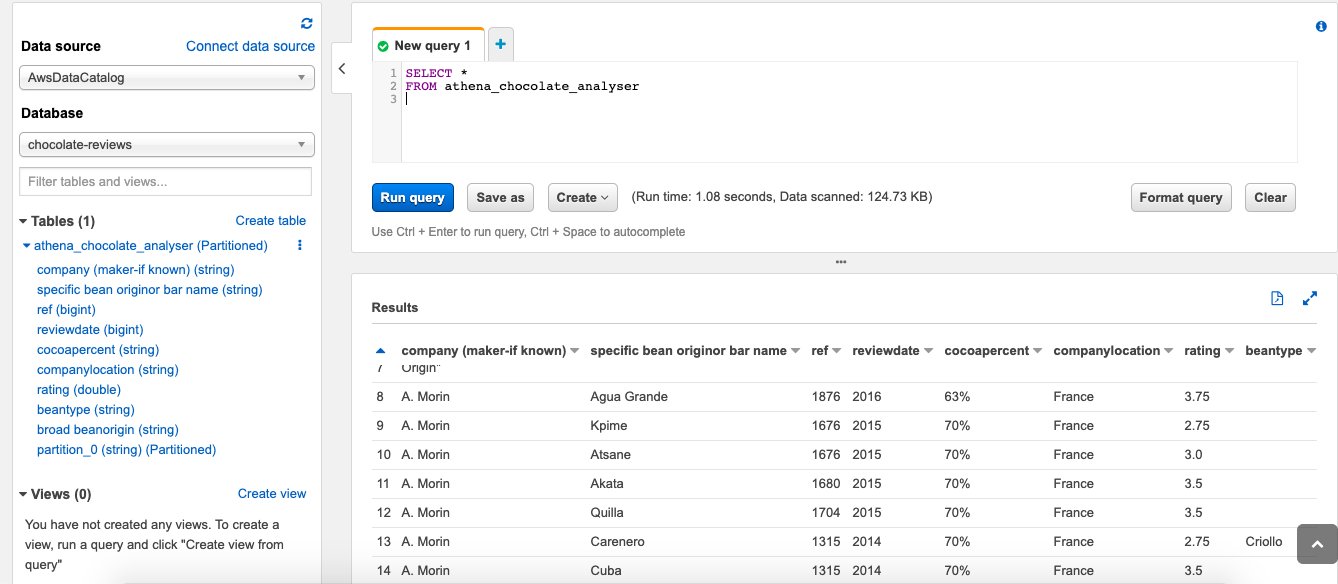
To start off I am just going to try and select all the data, just to make sure everything is set up correct and to make sure we are getting data back. To do this I am going to run the following query in the query panel:
首先,我将尝试选择所有数据,以确保所有设置均正确无误并确保我们取回数据。 为此,我将在查询面板中运行以下查询:
SELECT * FROM athena_chocolate_analyser;and we can see, everything has been set up correctly and we are receiving results back:
我们可以看到,一切都已正确设置,并且我们收到了以下结果:
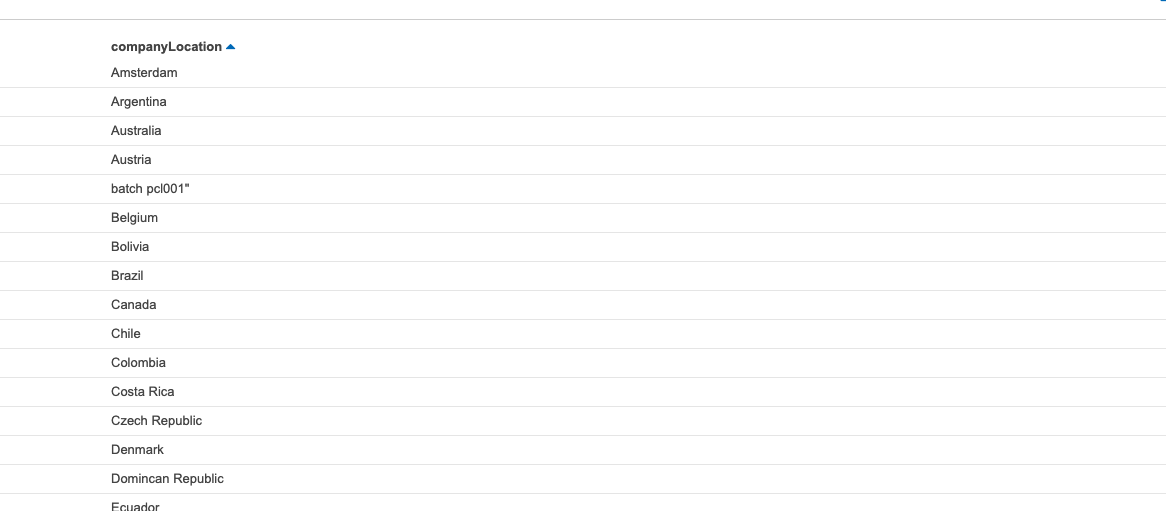
Now let’s try out some of our other queries! First up, getting a list of all the countries contained in the dataset:
现在让我们尝试其他一些查询! 首先,获取数据集中包含的所有国家/地区的列表:
SELECT DISTINCT companyLocation
FROM athena_chocolate_analyser;
Here we have also used the DISTINCT statement, to make sure that we aren’t getting back duplicates! This gives us back the following list:
在这里,我们还使用了DISTINCT语句,以确保我们不会取回重复项! 这给了我们以下列表:
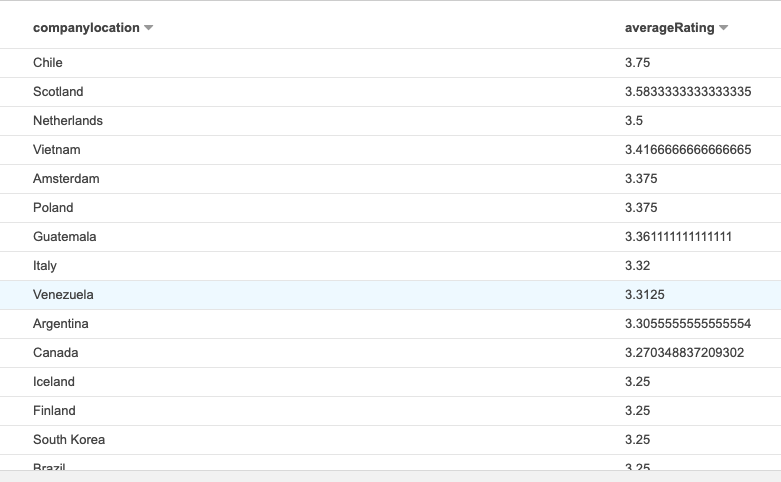
Next we want to sort countries by their ratings to see which ones produce the highest rated bars, for this I used the following query:
接下来,我们要按照国家/地区的等级对它们进行排序,以查看哪个国家/地区的评分最高,为此,我使用了以下查询:
SELECT companylocation,
         AVG(rating) AS averageRating
FROM athena_chocolate_analyser
WHERE
  companylocation IS NOT NULL AND rating IS NOT NULL
GROUP BY  companylocation
ORDER BY averageRating DESC
Here I have thrown in a couple more SQL statements for example AVG to find the average rating, ASto create a alias temporary name for a column, NOT NULL to make sure we aren’t getting any null or empty values back and then also the GROUP BY and ORDER BY statements to group and sort the data returned!
在这里,我抛出了另外一些SQL语句,例如AVG来查找平均等级, AS来创建列的别名临时名称, NOT NULL以确保我们没有得到任何null或空值,然后GROUP BY和ORDER BY语句对返回的数据进行分组和排序!
Which then brings back a list sorted by the average rating for that country, so we can see that the highest rated chocolate comes from Chile!
然后,该列表会返回按该国家/地区的平均评分排序的列表,因此我们可以看到评分最高的巧克力来自智利!
Our final query, is to try and see the relationship between the percentage of cocoa and the average rating. To do this I used the following query to find the average rating and the cocoa percentage and to group the results by the cocoa percentage:
我们的最终查询是尝试查看可可百分比与平均评分之间的关系。 为此,我使用以下查询来查找平均评分和可可百分比,并将结果按可可百分比分组:
SELECT cocoapercent,
         AVG(rating) AS averageRating
FROM athena_chocolate_analyser
WHERE
  cocoapercent IS NOT NULL AND rating IS NOT NULL
GROUP BY cocoapercent
ORDER BY averageRating DESC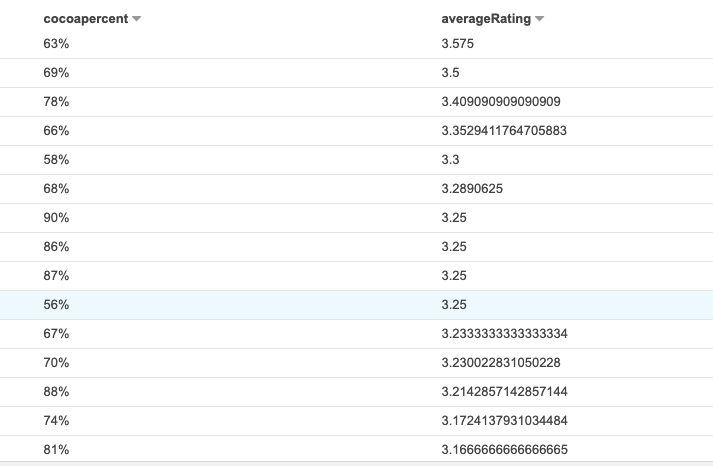
I find this all really impressive, as it’s super easy and fast to query the data to get these results!
我发现这一切确实令人印象深刻,因为查询数据以获取这些结果非常容易且快捷!
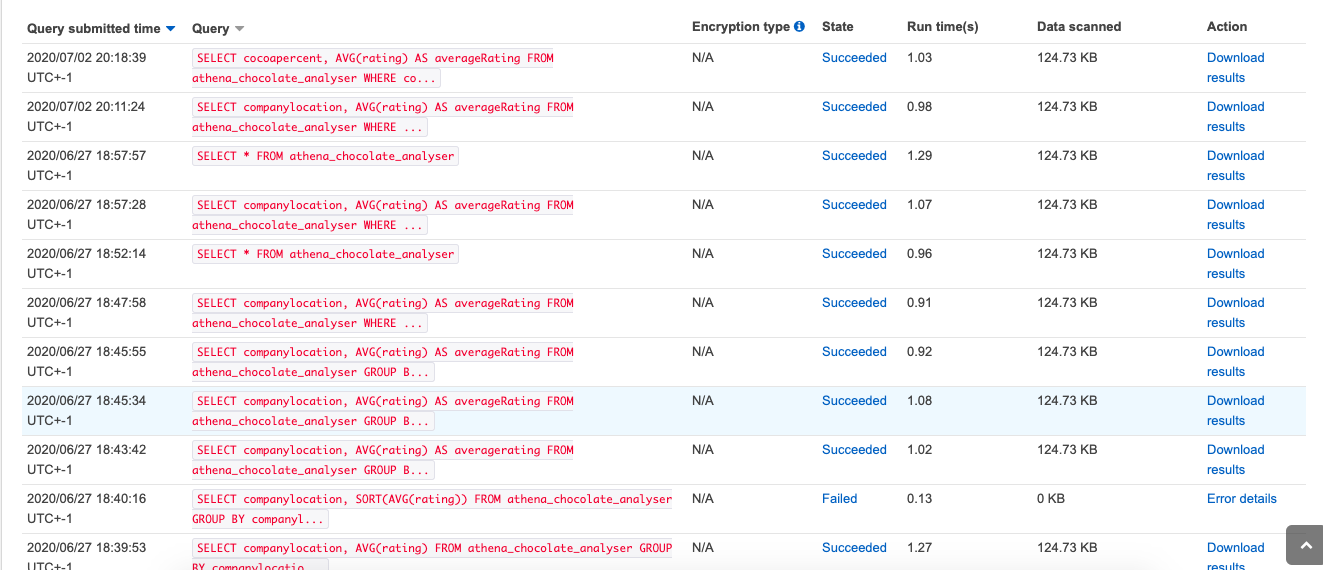
You can view the history of the query’s ran against the data here in the history tab, which is useful to look back on:
您可以在“历史记录”选项卡中的此处查看与数据相对应的查询的历史记录,这对于回顾以下内容很有用:
And if you want to save any of your query results, you can click the Save As button at the bottom of the query panel and this will save your results into the results folder you have set up in s3 — you will notice in the screen shot about that each query has a unique identifier called a Query ID. This makes it easier work with/find query result files.
而且,如果您要保存任何查询结果,则可以单击查询面板底部的“ Save As按钮,这会将您的结果保存到您在s3中设置的结果文件夹中-您会在屏幕截图中注意到关于每个查询都有一个唯一的标识符,称为Query ID 。 这样可以更轻松地使用/查找查询结果文件。
结论 (Conclusion)
I have really enjoyed my first attempt working with Athena, it seems super fast and powerful. With its ability to query data sitting in S3 and export results, I can already see so many real world use cases for example; querying billing/usage reports, to gather insights on spending.
我真的很喜欢与Athena一起工作的第一次尝试,它看起来超快速而强大。 由于它具有查询S3中的数据并导出结果的功能,因此我已经可以看到很多实际的用例。 查询帐单/使用情况报告,以收集有关支出的见解。
I plan on taking a more detailed look into it, now that I have scratched the surface, so watch this space for more blogs to come!
既然我已经摸索了一下,我打算对它进行更详细的研究,因此请留意这个空间,以便将来有更多博客!
翻译自: https://medium.com/@chloemcateer/analysing-chocolate-with-athena-69d1e11fa4f
纱织小姐雅典娜
相关文章

《雅典娜》曝中文预告片 众星潜伏场面燃爆

【观察】数智驱动+知识封装,鼎捷软件如何炼就“雅典娜”这个“新物种”?...

免费!终极ChatGPT提示+Midjourney宝藏神图,1200+图片,震撼人心
hdu4562 守护雅典娜

智慧战争女神、雅典娜

