目录
一.springboot的概念
1.什么是springboot?
二.使用springboot进行开发的优势
springboot的设计原则是什么,使用springboot进行开发具有怎样的优势?(M)
三.手把手搭建一个springboot项目
①创建项目并选择依赖
②设置热部署(部分代码改动不需要手动重新run即可生效)
四.springboot配置文件
1.前提须知
2.两种配置文件及对比
3.springboot默认扫描配置文件的位置
4.详解properties文件
1.语法规则
2.优先级
3.自定义配置以及配置信息的读取
五.springboot日志详解
1.日志的概念(包括框架)
2.日志的作用
3.日志的级别
4.日志的创建及打印
5.lombok补充
6.linux打印日志
一.springboot的概念
1.什么是springboot?
springboot与spring相同,都是一种矿建,但是springboot是基于spring框架进行开发的脚手架,对spring框架进行部分优化,从而提高项目开发的效率。
二.使用springboot进行开发的优势
springboot的设计原则是什么,使用springboot进行开发具有怎样的优势?(M)
springboot的设计原则:约定大于配置
其优越的设计原则使其具有超越springframework的优点:
①相比于springframework必须通过配置大量的xml文件来运行程序,springboot内部约定好了很多默认的配置,并提供不同的配置文件允许用户定制自定义的配置项②springboot内部约定好了众多第三方框架的配置路径(主要包括各种框架的配置信息),可以在项目启动时加载各种配置信息,实现第三方框架的快速配置
③springboot内部集成了了web容器,无需配置其他的web容器
④springboot具有更多的监控指标,能更好的了解项目运行的情况
三.手把手搭建一个springboot项目
①创建项目并选择依赖

②设置热部署(部分代码改动不需要手动重新run即可生效)


③禁用JMX:因为如果不对其进行排除会导致在项目启动时报错,虽然这个报错不影响我们项目的实现,但是规范化起见,我们还是加上

④禁用tomcat,取而代之undertow(非必须选项,换是因为undertow的效率略高于tomcat)

⑤修改编码集


四.springboot配置文件
1.前提须知
受益于springboot的设计原则:springboot会约定好(配置好)许多默认的配置,在springboot项目启动时加载,也就是说即使用户不进行任何的配置,该springboot项目也会默认加载一些配置项,同时springboot提供给用户配置文件,允许用户进行定制化的项目配置
2.两种配置文件及对比
SpringBoot 默认使用以下 2 种全局的配置文件,其文件名是固定的。
- application.properties
- application.yml
其中,application.yml 是一种使用 YAML 语言编写的文件,它与 application.properties 一样,可以在 Spring Boot 启动时被自动读取,修改 Spring Boot 自动配置的默认值。二者功能类似,都能完成Spring Boot配置(例如指定Tomcat端口,配置mybatis等),但是Properties的优先级要高于YAML。
3.springboot默认扫描配置文件的位置
springboot项目在运行时,会默认扫描以下路径,查找配置文件并对项目进行定制化的配置。
- file:./config/
- file:./config/*/
- file:./
- classpath:/config/
- classpath:/
- 注:file: 指当前项目根目录;classpath: 指当前项目的类路径,即 resources 目录。
以上所有位置的配置文件都会被加载,且它们优先级依次降低,序号越小优先级越高。其次,位于相同位置的 application.properties 的优先级高于 application.yml。
所有位置的文件都会被加载,高优先级配置会覆盖低优先级配置,形成互补配置,即:
存在相同的配置内容时,高优先级的内容会覆盖低优先级的内容;
存在不同的配置内容时,高优先级和低优先级的配置内容取并集。
4.详解properties文件
1.语法规则
key=value ,一般value不加双引号或者单引号
2.优先级
不同的文件位置,配置文件的优先级也有所不同
- file:./config/
- file:./
- classpath:/config/
- classpath:/
- 由上到下优先级逐渐降低
3.自定义配置以及配置信息的读取
通过@Value读取配置文件中的信息
配置文件中:
spring.datasource.url=jdbc:mysql://127.0.0.1:3306/testdb?characterEncoding=utf8
spring.datasource.name=root
spring.datasource.password=abc123
@Value("${spring.datasource.url}")private String url;@Value("${spring.datasource.name}")private String name;@Value("${spring.datasource.password}")private String password;通过@ConfigurationProperties(prefix = "”)获取配置类中自定义的对象
配置文件中:
# 创建自定义对象
user.username=zhangsan
user.userId=1
user.list[0]=1
user.list[1]=2
user.map.1=hhh
类中:
@ConfigurationProperties(prefix = "user")
public class User {private String username;private int userId;private List<Integer>list;private Hashtable<Integer,String>map;//使用init方法判断@PostConstructpublic void init(){System.out.println(username+userId+list+map);}
五.springboot日志详解
1.日志的概念(包括框架)
日志在程序运行时打印在控制台上的信息: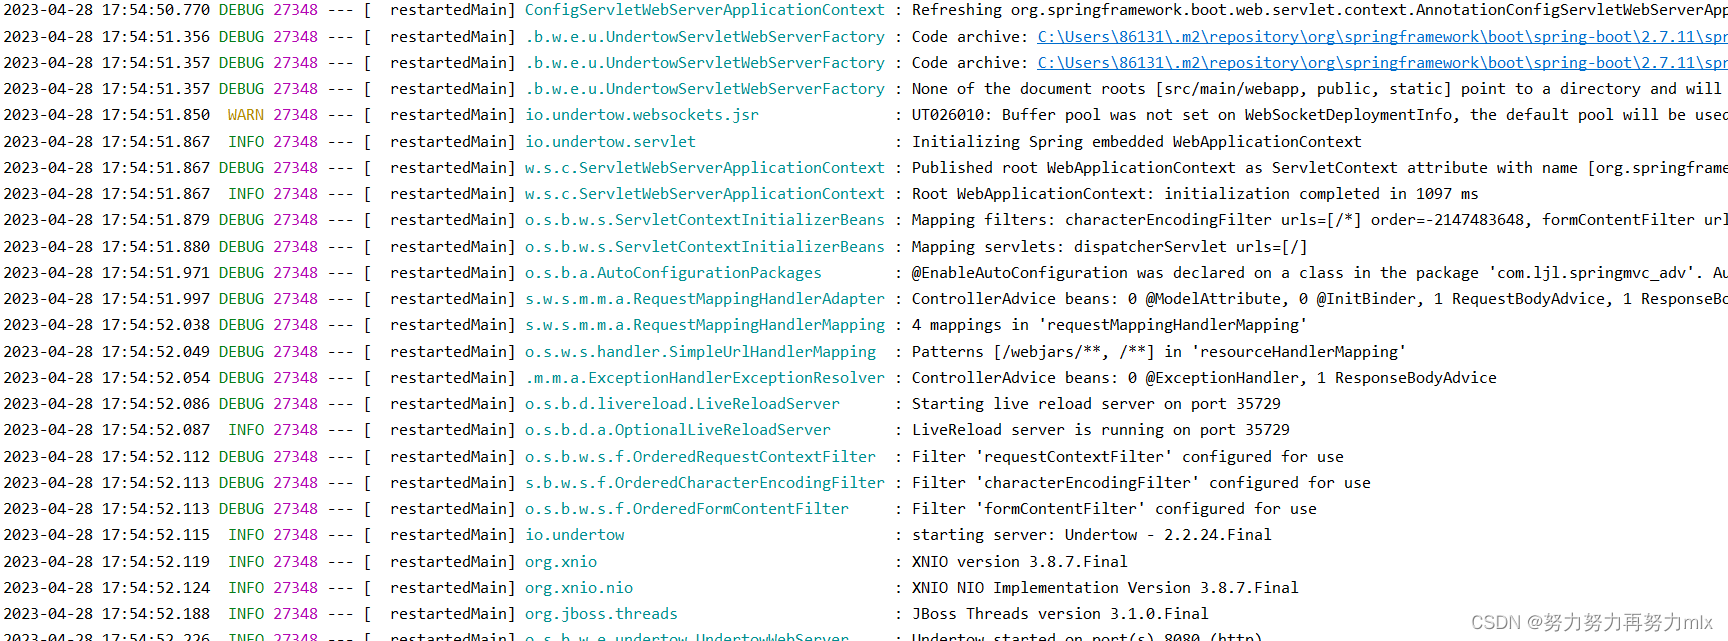 日志框架
日志框架
常见的日志框架如:log4j、logback、slf4j、jdk-logging、commons-logging......但是这些框架在使用中一旦涉及日志框架的转化,十分不方便,因此slf4j应运而生,slf4j用于日志框架的桥接,引入slf4j之后,日志的使用也比较简单了:只需要引入某个具体日志框架的依赖包+slf4j的依赖包,统一使用slf4j的配置类和方法。
2.日志的作用
- 发现和定位问题
- 记录用户的登录信息,进行大数据分析
- 记录系统的操作信息,方便数据的恢复和定位操作者
- 记录程序的执行时间,方便以后优化程序
3.日志的级别
所有项目默认的日志打印级别是info(只打印info即其以上的日志级别)
日志的级别由上到下级别逐渐变高,我们可以通过设置配置文件来修改项目的日志打印级别
# 当前项目日志的打印级别是debug
logging.level.root=debug
# 设置具体某个包下的日志打印级别
logging.level.com.ljl.springmvc_adv.controller.loginController=info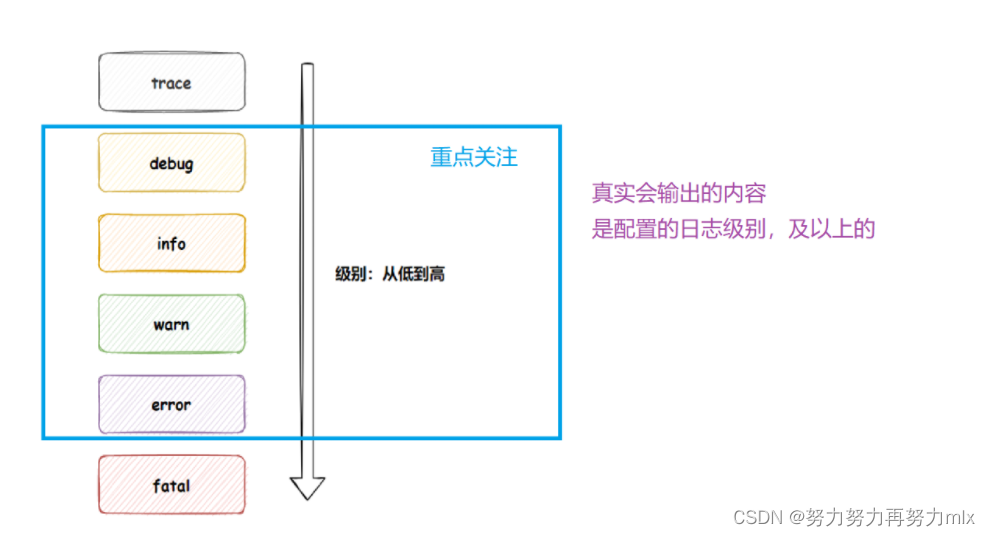
4.日志的创建及打印
使用方式如下:
package com.example.demo.Controller;@Controller
@ResponseBody
public class LoggerController {// 1. 得到日志对象private Logger logger = LoggerFactory.getLogger(LoggerController.class);// 2. 打印日志@RequestMapping("/logger")public String logger(){logger.trace("日志级别: trace");logger.debug("日志级别: degue");logger.info("日志级别: info");logger.warn("日志级别: warn");logger.error("日志级别: error");return "logger";}
}
在默认的配置下,一般只打印info及以上级别的日志
我们在引入注解(@slf4j)之后,不需要再手动获取一些日志属性了,直接进行日志的打印
@Slf4j
@Component
public class LoggerTest {public static void main(String[] args) {log.debug("这是debug级别的日志......");log.info("这是info级别的日志......");log.warn("这是warn级别的日志......");log.error("这是error级别的日志......");}
}
5.lombok补充
大家思考一个问题:为什么加入@Data注解之后,为什么很多方法为什么即使不写也会自动生成呢?
我们不妨对比一下编译前后的文件类
我们在所写的文件中的文件类是这样的:
@Data
@Repository//注入到容器
@ConfigurationProperties(prefix = "user")
public class User {private String username;private int userId;private List<Integer>list;private Hashtable<Integer,String>map;//使用init方法判断@PostConstructpublic void init(){System.out.println(username+userId+list+map);}}
编译后:
package com.example.springboot_study.test;import java.util.Hashtable;
import java.util.List;
import javax.annotation.PostConstruct;
import org.springframework.boot.context.properties.ConfigurationProperties;
import org.springframework.stereotype.Repository;@Repository
@ConfigurationProperties(prefix = "user"
)
public class User {private String username;private int userId;private List<Integer> list;private Hashtable<Integer, String> map;@PostConstructpublic void init() {System.out.println(this.username + this.userId + this.list + this.map);}public User() {}public String getUsername() {return this.username;}public int getUserId() {return this.userId;}public List<Integer> getList() {return this.list;}public Hashtable<Integer, String> getMap() {return this.map;}public void setUsername(final String username) {this.username = username;}public void setUserId(final int userId) {this.userId = userId;}public void setList(final List<Integer> list) {this.list = list;}public void setMap(final Hashtable<Integer, String> map) {this.map = map;}public boolean equals(final Object o) {if (o == this) {return true;} else if (!(o instanceof User)) {return false;} else {User other = (User)o;if (!other.canEqual(this)) {return false;} else if (this.getUserId() != other.getUserId()) {return false;} else {label49: {Object this$username = this.getUsername();Object other$username = other.getUsername();if (this$username == null) {if (other$username == null) {break label49;}} else if (this$username.equals(other$username)) {break label49;}return false;}Object this$list = this.getList();Object other$list = other.getList();if (this$list == null) {if (other$list != null) {return false;}} else if (!this$list.equals(other$list)) {return false;}Object this$map = this.getMap();Object other$map = other.getMap();if (this$map == null) {if (other$map != null) {return false;}} else if (!this$map.equals(other$map)) {return false;}return true;}}}protected boolean canEqual(final Object other) {return other instanceof User;}public int hashCode() {int PRIME = true;int result = 1;result = result * 59 + this.getUserId();Object $username = this.getUsername();result = result * 59 + ($username == null ? 43 : $username.hashCode());Object $list = this.getList();result = result * 59 + ($list == null ? 43 : $list.hashCode());Object $map = this.getMap();result = result * 59 + ($map == null ? 43 : $map.hashCode());return result;}public String toString() {return "User(username=" + this.getUsername() + ", userId=" + this.getUserId() + ", list=" + this.getList() + ", map=" + this.getMap() + ")";}
}
通过这些对比,我们可以得出以下的结论:lombok会在编译期将自己注解作用的代码加入类中,从而使注解生效。
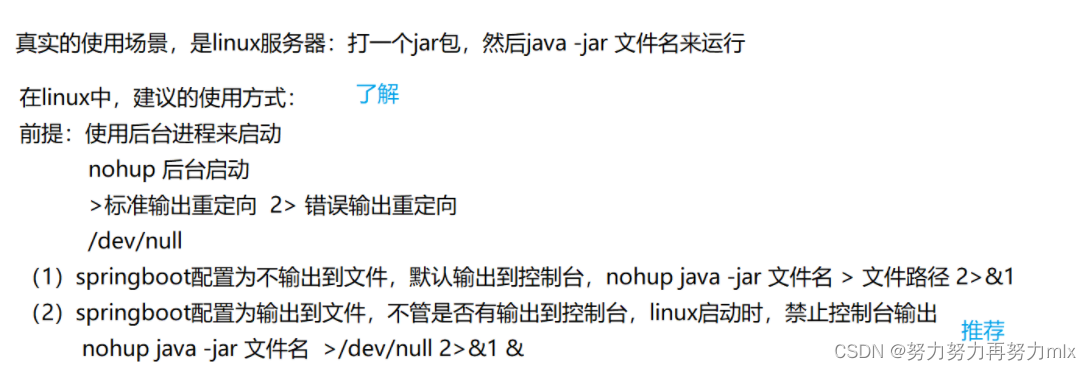
6.linux打印日志
