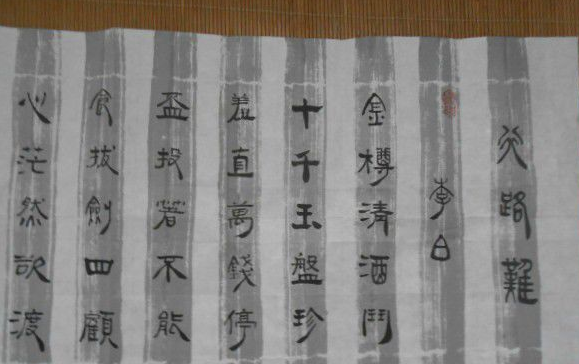
相信大家在Flash时代见过很多通过Flash动画模拟毛笔书写效果的教程,但在Flash早已停止被支持的今天,“畅想资源”便来教教大家如何通过SVG和CSS动画简单实现动画书写毛笔字效果,让访客在移动设备和不支持Flash的浏览器(即现今绝大多数浏览器
 )中也一样能看到毛笔字书写效果,为你的网站加入中国传统文化色彩。

预览
“畅想资源”个人网站首页:https://www.hesyifei.com/(或点击下方“Run”按钮预览)
一、准备毛笔字SVG源文件
1、既然要利用纯SVG+CSS动画实现动画书写毛笔字效果,我们当然首先需要一个以SVG路径(path)形式保存的毛笔字文件。
我们在这里将使用“书法迷”网站上所提供的SVG文件,大家亦可自行于纸上写完毛笔字后扫描,再将每笔的边缘转换为闭合路径并存为SVG文件。
提示:本文中为方便期间将只使用一个字(“非”)来进行教程,实际操作中可以同样方法使用更多字来制成整个动画(参见上方预览动画的原始码)。
本文所用的原始SVG文件:(下载自书法迷;书法家:黎简)
二、切分每一笔画
1、接下来我们需要将毛笔中每一笔画单独切分开来。
我们本文中将使用Adobe Illustrator CC做示范,但你也可以使用你熟悉的其它SVG工具达成相同效果。
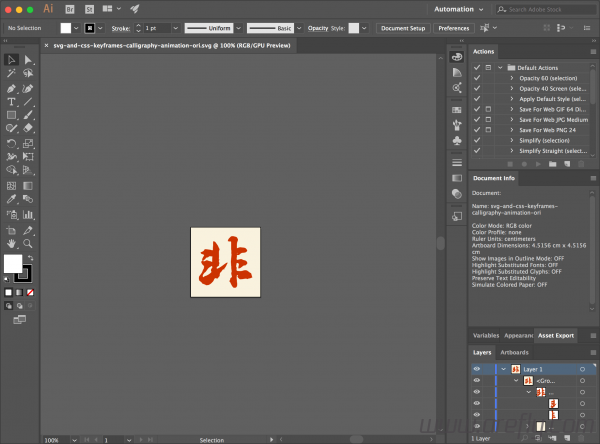
2、首先我们可以把所有背景删除,再把所有图层都移动到根部,这样可以避免SVG中保有任何 g transform 等标签,使得所有路径都清楚地保存在SVG文件中,让之后的步骤更加顺利。
(注意现在右下角只有两个图层了)
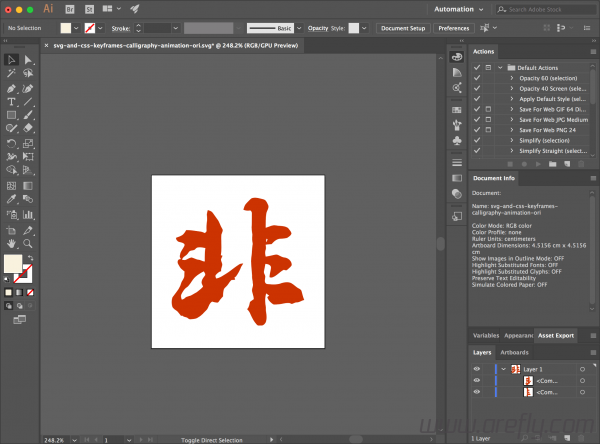
3、接着我们便可以正式开始切割笔画了,“畅想资源”找到AI中一个比较方便的“美工刀”(Knife),但大家也可能有更快更方便的方法。这里“畅想资源”就不详细介绍如何使用“美工刀”,可自行寻找AI相关教程。

4、对于没有重叠的笔画来说(即字中其它笔画不会碰到这一笔画,比如下图中“非”字的右半部份的笔画),切割十分简单,只需要将两个部分分开来即可。
5、对于有重叠部分的笔画来说(即字中其它笔画会重复覆盖这一笔画,比如下图中的“非”字的左下角那一个笔画),切割时就需要先复制(duplicate)那一图层,然后再想办法把两个重叠的笔画分开切割,从而让各自都能保留一个完整的笔画。
6、切割完成后,将每个图层命名为可以理解的名字,比如“非”的第一笔可以被叫做“fei-1”。
(注意现在右下角的图层;图层倒序排后在SVG源文件中笔画便能正序排,方便我们进行下一步)
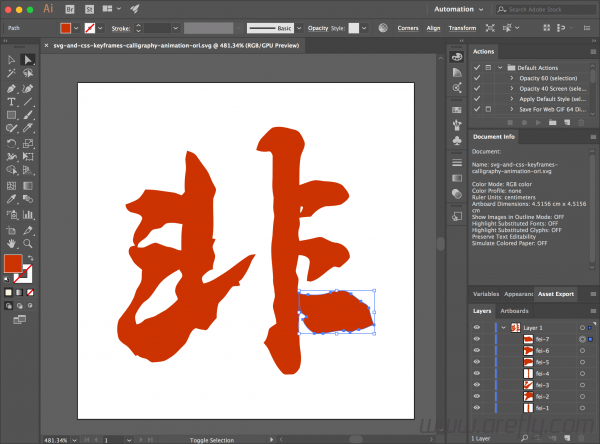
7、用纯文字编辑器打开SVG文件,检查是否整个文件是否只剩下 path 标签,没有 g 等其它标签(style 标签可以保留),如有问题请参见上方第2步。
viewBox="0 0 128 128" style="enable-background:new 0 0 128 128;" xml:space="preserve">
.st0{fill:#CC3300;}
1
2
3
4
5
6
7
8
9
10
11
12
13
14
15
16
17
18
19
20
21
22
23
24
25
26
27
28
29
30
31
32
33
34
35
36
37
38
39
40
41
42
43
44
45
46
viewBox="0 0 128 128"style="enable-background:new 0 0 128 128;"xml:space="preserve">
.st0{fill:#CC3300;}
c-0.3-1.2-0.8-2.3-1-3.5c0.3-1,0.8-1.9,1.1-2.8c-0.4-0.1-0.8-0.2-1.2-0.3c0.9-4.9,0.1-10,0.4-15c0.2-1.2,1-2.3,1.1-3.6
c-0.1-0.7-0.6-1.3-0.9-1.9c-1.1-1.8-1.5-3.8-2.7-5.5c-1.3-1.7-2.5-3.5-3.7-5.2c-0.8-1.2-2.3-1.6-3.6-2.1c-0.2,1.1-0.6,2.2-0.7,3.3
c0.1,1.5,0.4,3.1,0.1,4.7c-0.4,2.5-0.5,5.1-0.3,7.7c-0.4,0.4-0.8,0.9-1.2,1.3c-0.1,0-0.1,0-0.2-0.1l0.4,11c0.1,0,0.1,0,0.2,0
c-0.6,3.3-0.5,6.7-0.5,10c-0.1,0-0.1,0-0.2,0L38.7,71c0,0,0,0,0.1,0c0.4,1,1.4,1.8,1.1,2.9c-1,1.5-2.4,2.9-2.6,4.8
c-0.3,1.4,0.8,2.4,1,3.7c0,0-0.1,0.1-0.1,0.1l6.8,10.8c0,0,0,0,0,0c1,0.3,2,0.6,3,0.7c0.7,0.4,1.4-0.1,1.8-0.6
c0.9-1.4,2-2.6,3.1-3.9c-0.1-1.8,0.1-3.6,0.6-5.4l-5.5-7.7C48,76.4,47.9,76.4,47.9,76.4z"/>
c1.9-0.4,3.8,0,5.7,0.3l-0.4-11c-1.2-0.5-2.4-1-3.7-1.1c-3.3-0.4-6.6-1.1-10-1c-0.7,1.3-1.5,2.5-2.6,3.5c-1.5,1-3.2,1.6-4.9,2.2
c0,1.6,1.3,2.9,2.8,3.1c1.3,0.4,3.1,0.6,3.6,2.1c-0.7,2.6-3.2,4.6-3.4,7.5c-0.4,1.1,0.1,2.1,0.7,3c0,0,0,0,0,0l0.9,0.5
C22.8,60.8,24.7,60,25.9,59z"/>
c-1.4,1.5-3,2.8-4.6,4.1c-1.2,0.7-2.4,1.3-3.6,2c-1.4,0.9-3.1,0.9-4.6,1.7c-0.8,0.9-1.8,1.6-3,1.7c-0.4-1.3-0.9-2.8-0.2-4.2
c0.7-1.3,1.4-2.6,2.4-3.7c0.8-1,2.1-1.5,2.8-2.5c1.5-1.7,2.6-3.7,4-5.5c2-2.2,4.6-3.8,7.2-5.2l0.7-7.2c-1.6,0-2.9-1.1-4.5-1.2
c-1.8-0.2-3.4-1.2-5.1-1.7c-1.4,0.2-2.7,1-4,1.6c-0.9,0.4-2,0.2-2.9,0.2c0,0,0-0.1,0-0.1L21.9,62c-0.9,0.1-2,0.2-2.3,1.2
c-0.6,1.4,0.3,2.7,1,3.8c0.7,1.8,2.5,2.9,3.9,4.1c-0.2,1.1-0.1,2.1-0.2,3.2c-0.1,1.3-0.8,2.5-1.5,3.6c-1,1.4-1.1,3.1-1.9,4.6
c-1.3,2.9-3.5,5.2-5.3,7.7c-0.8,2.3-0.8,4.9,0,7.2c0.5,0.8,1.2,1.5,2,2c1.9,1,3,2.9,4.3,4.5c0.3-0.1,0.6-0.2,0.9-0.3
c0.9,1,2.2,1.1,3.4,1.5c0.9,0.5,1.7,1.6,2.9,1.2c1.9-0.1,3.9-0.2,5.5-1.4c2.2-1.2,3.9-3.2,5.7-5c2-1.8,1.9-5.2,4.5-6.5l8.6-9
c0-0.1,0.1-0.2,0.1-0.3c0.8-1.2,2-2,2.9-3.2c0.8-1.1,1.5-2.3,2.5-3.3c0.9-0.3,2-0.1,2.9-0.4c-0.2-0.5-0.4-1-0.5-1.5
c0.5-0.3,1-0.6,1.4-1.1c1.5-2,2.6-4.2,3.5-6.5c0.4-0.9,1.2-1.7,1.6-2.7C66.8,65.4,65.9,65.4,65.1,65.8z"/>
c-0.5-1.6-0.6-3.4-0.1-5c0.4-1.2,0.2-2.5,0-3.8c0,0,0,0,0.1,0l0.3-1.8c0,0,0,0-0.1,0.1c0-0.9,0.1-1.8,0.3-2.7c0,0,0,0,0,0l-0.5-8
c0,0-0.1,0-0.1,0c0-3.6-0.1-7.3,0.5-10.9c0.5-2.1,2.4-4.2,1.1-6.4c-0.5-1.1-1-2.1-1.8-3c-1-0.8-2.3-0.9-3.4-1.2
c-2.2-0.6-4.5-1-6.7-0.3c-1.4,1.1-2.6,2.4-3.8,3.7c-1.3,1.3-1.8,3-2.3,4.7c1.5,0.6,3,0.8,4.6,0.5c1-0.2,1.4,1,1.7,1.7
c0,2.8,0,5.6,0,8.4c-0.2,2.5-0.1,5,0.4,7.4c0,1.9-0.4,3.9,0.1,5.8c0.2,0.8,0.2,1.7,0,2.6c-0.4,2.9-0.4,5.9-0.9,8.8
c-0.4,4.5,0.4,8.9,0.6,13.4c-0.2,1.9,0.5,3.7,0.5,5.5c0.7,2.1-0.9,4-0.5,6c0.4,1.9,1.2,3.8,1.2,5.8c-0.9,0.7-2.1,1.2-2.8,2.1
c-0.4,1.8-0.7,3.8-2.1,5.2c0.9,0.9,1.7,2,2.3,3.2c1.3,3,2.7,6,5,8.3c0.7,0.8,1.9,0.4,2.8,0.4c1.7,0.3,2.8-1.1,3.5-2.4
c0.9-2.6,0.5-5.3,0.1-7.9c-0.3-1.5,0.1-3.1-0.3-4.6c-0.4-2.9-0.5-6,0.6-8.8c0,0,0,0,0,0l-0.5-7.5C83.2,78.5,83.9,76.9,83.9,75.5z"/>
c1.9-0.1,3.8-0.2,5.7-0.6c1.2-0.8,2.6-1.7,3.2-3.1c-0.2-1.7-1.6-2.9-2.5-4.2c-1.9-1.3-4.3-1.4-6.5-1.6c-1.3-0.1-2.6-0.5-4-0.4
c-2.1,0.2-4,1.2-6,1.8l0.5,8C85.2,47.1,85.5,47.2,85.8,47.3z"/>
c0.9-0.8,2.2,0.7,3.1-0.3c1.1-1.1,2.6-2,3.3-3.4c0.1-2.9-2.7-5.4-5.5-5.6c-1.7-0.3-3.1-1.2-4.7-1.9c-1-0.4-2-0.1-3,0.1
c-1.9,0.5-3.9,0.9-5.9,1.2c0,0,0-0.1,0-0.1l-0.3,5.3C85.7,65.6,88.2,66.2,88.3,68.2z"/>
c-2.7,1.1-5.7,1.2-8.6,0.9c-1.1-0.2-2.5,0.1-3.3-0.9c0,0,0,0,0-0.1l0.5,7.5c0.8,0.6,1.5,1.2,2.3,1.8c-0.5,0.3-1,0.7-1.5,1
c0.7,2.3,2.4,4.1,4.4,5.3c1.1,0.3,2.3,0,3.4,0c2.6-0.1,5.1-1.1,7.8-1c0.9-0.1,1.6,0.4,2.4,0.7c1.2-0.2,2.2-1,3.4-1.1
c2.1,0.1,3.8-1.4,5.8-1.8C111.8,90.1,111.3,87.9,110.8,85.7z"/>
三、加入笔序路径
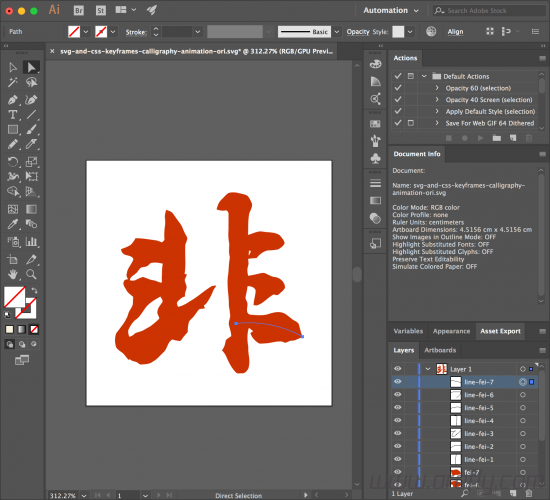
1. 在切割完成后,我们还需要让电脑知道他该按照什么路径、什么顺序来播放每一笔笔画。
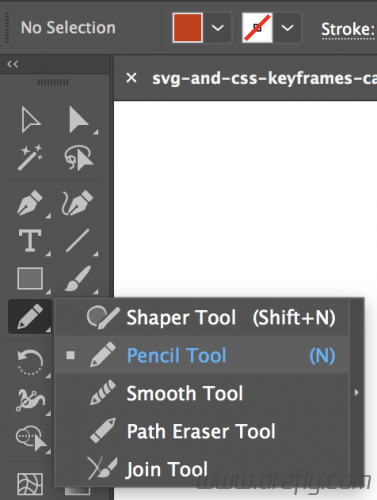
2. 首先,选取“铅笔工具”(Pencil Tool),记得在顶部把这个path的颜色调为“无”(即透明)。
3. 然后依照毛笔手写时的笔序和方向,分别画出每个笔画的路径,这一路径应在那笔笔画的正中间。
注意:这一路径最好在起点可超出最初有墨的地方,否则最后显示时那一笔的第一点将突然出现而不是渐渐加入。
提示:如果这一笔画属于刚刚“二-5”步中有重叠部分的笔画,也记得将笔画当作单独的两笔来处理。
4. 将新加入的每个图层(即每个路径)命名为可以理解的名字,比如“非”的第一笔笔序可以被叫做“line-fei-1”。
(注意现在右下角的图层)
viewBox="0 0 128 128" style="enable-background:new 0 0 128 128;" xml:space="preserve">
.st0{fill:#CC3300;}
.st1{fill:none;}
// ......(和第二部分结尾代码相同)
1
2
3
4
5
6
7
8
9
10
11
12
13
14
15
16
17
18
19
20
21
viewBox="0 0 128 128"style="enable-background:new 0 0 128 128;"xml:space="preserve">
.st0{fill:#CC3300;}
.st1{fill:none;}
// ......(和第二部分结尾代码相同)
c-1.1,2.3-2.1,4.7-2.2,7.3c0,2.6,1.1,5.3,3.5,6.4c1.7,0.8,3.8,0.6,5.6-0.2c1.8-0.8,3.3-2,4.8-3.2c2.7-2.2,5.4-4.4,8-6.6
c0.7-0.6,1.5-1.2,2.2-1.8c0.9-0.7,1.8-1.5,2.7-2.2c7.6-6.3,14.8-13,21.7-20"/>
c-0.6,17.3-0.7,34.7-0.4,52c0.1,2.5,0.1,5-0.2,7.5c-0.6,4.9-2.5,9.4-4.3,14"/>
c-2.2,2-4.4,4-6.5,6"/>
四、制作并调试动画
1、首先,我们可创建一个HTML和一个CSS文件。注意SVG源代码一定要保存在HTML页内(即inline使用),而非作为单独文件储存并使用img加入。
2、我们要将每一个笔序(即上方第三部分做出的以“line-”开头的一堆开放路径)放入一个SVG代码的根中,并给每个路径加入 class="pen line-fei-1" (这里“line-fei-1”是你那一笔序的名称)(代码是下方代码的2至12行)
2、再将每一笔画(即上方第二部分做出的一堆封闭的路径)加入SVG defs 内的每个 clipPath 中。clipPath 的ID便是你笔画的名称(比如“fei-1”)(代码是下方代码的14至67行)
1
2
3
4
5
6
7
8
9
10
11
12
13
14
15
16
17
18
19
20
21
22
23
24
25
26
27
28
29
30
31
32
33
34
35
36
37
38
39
40
41
42
43
44
45
46
47
48
49
50
51
52
53
54
55
56
57
58
59
60
61
62
63
64
65
66
67
68
c-1.1,2.3-2.1,4.7-2.2,7.3c0,2.6,1.1,5.3,3.5,6.4c1.7,0.8,3.8,0.6,5.6-0.2c1.8-0.8,3.3-2,4.8-3.2c2.7-2.2,5.4-4.4,8-6.6
c0.7-0.6,1.5-1.2,2.2-1.8c0.9-0.7,1.8-1.5,2.7-2.2c7.6-6.3,14.8-13,21.7-20"/>
c-0.6,17.3-0.7,34.7-0.4,52c0.1,2.5,0.1,5-0.2,7.5c-0.6,4.9-2.5,9.4-4.3,14"/>
c-2.2,2-4.4,4-6.5,6"/>
c-0.3-1.2-0.8-2.3-1-3.5c0.3-1,0.8-1.9,1.1-2.8c-0.4-0.1-0.8-0.2-1.2-0.3c0.9-4.9,0.1-10,0.4-15c0.2-1.2,1-2.3,1.1-3.6
c-0.1-0.7-0.6-1.3-0.9-1.9c-1.1-1.8-1.5-3.8-2.7-5.5c-1.3-1.7-2.5-3.5-3.7-5.2c-0.8-1.2-2.3-1.6-3.6-2.1c-0.2,1.1-0.6,2.2-0.7,3.3
c0.1,1.5,0.4,3.1,0.1,4.7c-0.4,2.5-0.5,5.1-0.3,7.7c-0.4,0.4-0.8,0.9-1.2,1.3c-0.1,0-0.1,0-0.2-0.1l0.4,11c0.1,0,0.1,0,0.2,0
c-0.6,3.3-0.5,6.7-0.5,10c-0.1,0-0.1,0-0.2,0L38.7,71c0,0,0,0,0.1,0c0.4,1,1.4,1.8,1.1,2.9c-1,1.5-2.4,2.9-2.6,4.8
c-0.3,1.4,0.8,2.4,1,3.7c0,0-0.1,0.1-0.1,0.1l6.8,10.8c0,0,0,0,0,0c1,0.3,2,0.6,3,0.7c0.7,0.4,1.4-0.1,1.8-0.6
c0.9-1.4,2-2.6,3.1-3.9c-0.1-1.8,0.1-3.6,0.6-5.4l-5.5-7.7C48,76.4,47.9,76.4,47.9,76.4z"/>
c1.9-0.4,3.8,0,5.7,0.3l-0.4-11c-1.2-0.5-2.4-1-3.7-1.1c-3.3-0.4-6.6-1.1-10-1c-0.7,1.3-1.5,2.5-2.6,3.5c-1.5,1-3.2,1.6-4.9,2.2
c0,1.6,1.3,2.9,2.8,3.1c1.3,0.4,3.1,0.6,3.6,2.1c-0.7,2.6-3.2,4.6-3.4,7.5c-0.4,1.1,0.1,2.1,0.7,3c0,0,0,0,0,0l0.9,0.5
C22.8,60.8,24.7,60,25.9,59z"/>
c-1.4,1.5-3,2.8-4.6,4.1c-1.2,0.7-2.4,1.3-3.6,2c-1.4,0.9-3.1,0.9-4.6,1.7c-0.8,0.9-1.8,1.6-3,1.7c-0.4-1.3-0.9-2.8-0.2-4.2
c0.7-1.3,1.4-2.6,2.4-3.7c0.8-1,2.1-1.5,2.8-2.5c1.5-1.7,2.6-3.7,4-5.5c2-2.2,4.6-3.8,7.2-5.2l0.7-7.2c-1.6,0-2.9-1.1-4.5-1.2
c-1.8-0.2-3.4-1.2-5.1-1.7c-1.4,0.2-2.7,1-4,1.6c-0.9,0.4-2,0.2-2.9,0.2c0,0,0-0.1,0-0.1L21.9,62c-0.9,0.1-2,0.2-2.3,1.2
c-0.6,1.4,0.3,2.7,1,3.8c0.7,1.8,2.5,2.9,3.9,4.1c-0.2,1.1-0.1,2.1-0.2,3.2c-0.1,1.3-0.8,2.5-1.5,3.6c-1,1.4-1.1,3.1-1.9,4.6
c-1.3,2.9-3.5,5.2-5.3,7.7c-0.8,2.3-0.8,4.9,0,7.2c0.5,0.8,1.2,1.5,2,2c1.9,1,3,2.9,4.3,4.5c0.3-0.1,0.6-0.2,0.9-0.3
c0.9,1,2.2,1.1,3.4,1.5c0.9,0.5,1.7,1.6,2.9,1.2c1.9-0.1,3.9-0.2,5.5-1.4c2.2-1.2,3.9-3.2,5.7-5c2-1.8,1.9-5.2,4.5-6.5l8.6-9
c0-0.1,0.1-0.2,0.1-0.3c0.8-1.2,2-2,2.9-3.2c0.8-1.1,1.5-2.3,2.5-3.3c0.9-0.3,2-0.1,2.9-0.4c-0.2-0.5-0.4-1-0.5-1.5
c0.5-0.3,1-0.6,1.4-1.1c1.5-2,2.6-4.2,3.5-6.5c0.4-0.9,1.2-1.7,1.6-2.7C66.8,65.4,65.9,65.4,65.1,65.8z"/>
c-0.5-1.6-0.6-3.4-0.1-5c0.4-1.2,0.2-2.5,0-3.8c0,0,0,0,0.1,0l0.3-1.8c0,0,0,0-0.1,0.1c0-0.9,0.1-1.8,0.3-2.7c0,0,0,0,0,0l-0.5-8
c0,0-0.1,0-0.1,0c0-3.6-0.1-7.3,0.5-10.9c0.5-2.1,2.4-4.2,1.1-6.4c-0.5-1.1-1-2.1-1.8-3c-1-0.8-2.3-0.9-3.4-1.2
c-2.2-0.6-4.5-1-6.7-0.3c-1.4,1.1-2.6,2.4-3.8,3.7c-1.3,1.3-1.8,3-2.3,4.7c1.5,0.6,3,0.8,4.6,0.5c1-0.2,1.4,1,1.7,1.7
c0,2.8,0,5.6,0,8.4c-0.2,2.5-0.1,5,0.4,7.4c0,1.9-0.4,3.9,0.1,5.8c0.2,0.8,0.2,1.7,0,2.6c-0.4,2.9-0.4,5.9-0.9,8.8
c-0.4,4.5,0.4,8.9,0.6,13.4c-0.2,1.9,0.5,3.7,0.5,5.5c0.7,2.1-0.9,4-0.5,6c0.4,1.9,1.2,3.8,1.2,5.8c-0.9,0.7-2.1,1.2-2.8,2.1
c-0.4,1.8-0.7,3.8-2.1,5.2c0.9,0.9,1.7,2,2.3,3.2c1.3,3,2.7,6,5,8.3c0.7,0.8,1.9,0.4,2.8,0.4c1.7,0.3,2.8-1.1,3.5-2.4
c0.9-2.6,0.5-5.3,0.1-7.9c-0.3-1.5,0.1-3.1-0.3-4.6c-0.4-2.9-0.5-6,0.6-8.8c0,0,0,0,0,0l-0.5-7.5C83.2,78.5,83.9,76.9,83.9,75.5z"/>
c1.9-0.1,3.8-0.2,5.7-0.6c1.2-0.8,2.6-1.7,3.2-3.1c-0.2-1.7-1.6-2.9-2.5-4.2c-1.9-1.3-4.3-1.4-6.5-1.6c-1.3-0.1-2.6-0.5-4-0.4
c-2.1,0.2-4,1.2-6,1.8l0.5,8C85.2,47.1,85.5,47.2,85.8,47.3z"/>
c0.9-0.8,2.2,0.7,3.1-0.3c1.1-1.1,2.6-2,3.3-3.4c0.1-2.9-2.7-5.4-5.5-5.6c-1.7-0.3-3.1-1.2-4.7-1.9c-1-0.4-2-0.1-3,0.1
c-1.9,0.5-3.9,0.9-5.9,1.2c0,0,0-0.1,0-0.1l-0.3,5.3C85.7,65.6,88.2,66.2,88.3,68.2z"/>
c-2.7,1.1-5.7,1.2-8.6,0.9c-1.1-0.2-2.5,0.1-3.3-0.9c0,0,0,0,0-0.1l0.5,7.5c0.8,0.6,1.5,1.2,2.3,1.8c-0.5,0.3-1,0.7-1.5,1
c0.7,2.3,2.4,4.1,4.4,5.3c1.1,0.3,2.3,0,3.4,0c2.6-0.1,5.1-1.1,7.8-1c0.9-0.1,1.6,0.4,2.4,0.7c1.2-0.2,2.2-1,3.4-1.1
c2.1,0.1,3.8-1.4,5.8-1.8C111.8,90.1,111.3,87.9,110.8,85.7z"/>
5、然后我们需要依次找出每个笔序的 stroke-dasharray 长度。暂时将每个笔画的相应长度记录下来即可。
在这里“畅想资源”为大家准备了一个工具,只需于下方(先点击右上角的“Edit on CodePen”)将你那个一个笔画的path路径粘贴进去并慢慢修改CSS中的 stroke-dasharray,直到那一笔画刚好显示完(即当 stroke-dasharray 加1时,笔画无变化;当 stroke-dasharray 减1时,笔画长度有减少)。
使用方法:
可以用类似以下的方法记录结果:
.line-fei-1:75
.line-fei-2:40
.line-fei-3:124
.line-fei-4:101
.line-fei-5:25
.line-fei-6:35
.line-fei-7:36
1
2
3
4
5
6
7
.line-fei-1:75
.line-fei-2:40
.line-fei-3:124
.line-fei-4:101
.line-fei-5:25
.line-fei-6:35
.line-fei-7:36
6、再接着我们便开始加入CSS keyframes动画了。
首先,创建一个 .pen 的class,其中 stroke 可修改为你想要的颜色,而 stroke-width 之后可能会需要进行微调(见第“五-2”步),animation-duration 则决定了你整个动画将要进行的时间,其它animation- 开头的选项也可进行修改(详细见相关文档)。
.pen {
fill: none;
stroke: black;
stroke-width: 12;
stroke-linecap: round;
stroke-linejoin: round;
stroke-dashoffset: 0;
animation-duration: 4s;
animation-iteration-count: 1;
animation-timing-function: ease;
}
1
2
3
4
5
6
7
8
9
10
11
12
.pen{
fill:none;
stroke:black;
stroke-width:12;
stroke-linecap:round;
stroke-linejoin:round;
stroke-dashoffset:0;
animation-duration:4s;
animation-iteration-count:1;
animation-timing-function:ease;
}
7、加入每一笔序相应的class。clip-path 里是你SVG defs 中那一笔画的ID,stroke-dasharray 是你刚刚第5步为这一笔序中测试并记录下来的数字。animation-name 是之后步骤中将会加入的你这一笔序动画的名称。
.line-fei-1 {
clip-path: url(#fei-1);
stroke-dasharray: 75;
animation-name: draw-fei-1;
}
.line-fei-2 {
clip-path: url(#fei-2);
stroke-dasharray: 40;
animation-name: draw-fei-2;
}
// ...以此类推...
.line-fei-7 {
clip-path: url(#fei-7);
stroke-dasharray: 36;
animation-name: draw-fei-7;
}
1
2
3
4
5
6
7
8
9
10
11
12
13
14
15
16
17
18
19
20
21
22
.line-fei-1{
clip-path:url(#fei-1);
stroke-dasharray:75;
animation-name:draw-fei-1;
}
.line-fei-2{
clip-path:url(#fei-2);
stroke-dasharray:40;
animation-name:draw-fei-2;
}
// ...以此类推...
.line-fei-7{
clip-path:url(#fei-7);
stroke-dasharray:36;
animation-name:draw-fei-7;
}
8. 将所有笔序都加入完成后,便可开始加入CSS keyframes。0%时那个 stroke-dashoffset 和你上方该笔序的 stroke-dasharray 是同一个值,每个动画中上方的百分比代表开始时时间(即你第6步中设置的 animation-duration)的百分比,下方的百分比代表结束时时间的百分比。
@keyframes draw-fei-1 {
0% {
stroke-dashoffset: 75;
}
10% {
stroke-dashoffset: 0;
}
}
@keyframes draw-fei-2 {
0%, 10% {
stroke-dashoffset: 40;
}
20% {
stroke-dashoffset: 0;
}
}
// ...以此类推...
@keyframes draw-fei-7 {
0%, 90% {
stroke-dashoffset: 36;
}
100% {
stroke-dashoffset: 0;
}
}
1
2
3
4
5
6
7
8
9
10
11
12
13
14
15
16
17
18
19
20
21
22
23
24
25
26
27
28
29
30
@keyframesdraw-fei-1{
0%{
stroke-dashoffset:75;
}
10%{
stroke-dashoffset:0;
}
}
@keyframesdraw-fei-2{
0%,10%{
stroke-dashoffset:40;
}
20%{
stroke-dashoffset:0;
}
}
// ...以此类推...
@keyframesdraw-fei-7{
0%,90%{
stroke-dashoffset:36;
}
100%{
stroke-dashoffset:0;
}
}
9、现在尝试访问你的网页,应该整体动画流程都已成形,接下来便可开始微调和优化部分。
五、微调与优化
1、首先,尝试不同的keyframes时间百分比以找到你觉得最好的每个笔画的书写时间。
2、其次,打开浏览器的开发者工具,尝试定位并修改 .pen class中 stroke-width 值,看看会不会因为这个值调大了而显示了更完整的笔画。如果是可尝试于CSS中进行修改并查看效果。
3、可尝试于每个笔序class中(比如 .line-fei-1)加入一个 !important 的 animation-timing-function 来修改动画的细节速度,比如可调整为 ease-in、ease-out、linear等等。详细请参见:CSS animation-timing-function Property
4、加入各个浏览器的prefix,比如一个笔画的动画可能需要加入以下浏览器prefix:
.line-fei-1 {
clip-path: url("#fei-1");
stroke-dasharray: 73;
-webkit-animation: draw-fei-1 5s ease;
-moz-animation: draw-fei-1 5s ease;
-ms-animation: draw-fei-1 5s ease;
animation: draw-fei-1 5s ease;
}
@-webkit-keyframes draw-fei-1 {
0%,
60% {
stroke-dashoffset: 73;
}
68% {
stroke-dashoffset: 0;
}
}
@-moz-keyframes draw-fei-1 {
0%,
60% {
stroke-dashoffset: 73;
}
68% {
stroke-dashoffset: 0;
}
}
@-ms-keyframes draw-fei-1 {
0%,
60% {
stroke-dashoffset: 73;
}
68% {
stroke-dashoffset: 0;
}
}
@-o-keyframes draw-fei-1 {
0%,
60% {
stroke-dashoffset: 73;
}
68% {
stroke-dashoffset: 0;
}
}
@keyframes draw-fei-1 {
0%,
60% {
stroke-dashoffset: 73;
}
68% {
stroke-dashoffset: 0;
}
}
1
2
3
4
5
6
7
8
9
10
11
12
13
14
15
16
17
18
19
20
21
22
23
24
25
26
27
28
29
30
31
32
33
34
35
36
37
38
39
40
41
42
43
44
45
46
47
48
49
50
51
52
53
.line-fei-1{
clip-path:url("#fei-1");
stroke-dasharray:73;
-webkit-animation:draw-fei-15sease;
-moz-animation:draw-fei-15sease;
-ms-animation:draw-fei-15sease;
animation:draw-fei-15sease;
}
@-webkit-keyframesdraw-fei-1{
0%,
60%{
stroke-dashoffset:73;
}
68%{
stroke-dashoffset:0;
}
}
@-moz-keyframesdraw-fei-1{
0%,
60%{
stroke-dashoffset:73;
}
68%{
stroke-dashoffset:0;
}
}
@-ms-keyframesdraw-fei-1{
0%,
60%{
stroke-dashoffset:73;
}
68%{
stroke-dashoffset:0;
}
}
@-o-keyframesdraw-fei-1{
0%,
60%{
stroke-dashoffset:73;
}
68%{
stroke-dashoffset:0;
}
}
@keyframesdraw-fei-1{
0%,
60%{
stroke-dashoffset:73;
}
68%{
stroke-dashoffset:0;
}
}
4、但很明显那样加起来会太过复杂了,所以推荐使用less等其它工具来简化代码。以下是“畅想资源”自己用less写出的一个简化版本,可供参考:
@animation-duration: 5s;
@animation-timing-function: ease;
.pen {
fill: none;
stroke: rgb(199, 182, 160);
stroke-width: 20;
stroke-linecap: round;
stroke-linejoin: round;
stroke-dashoffset: 0;
}
.do-calligraphy-animation(@name, @strokeDasharray, @startPct, @endPct, @timingFunction: @animation-timing-function) {
.p-@{name} {
clip-path: url("#@{name}");
stroke-dasharray: @strokeDasharray;
.animation(~'draw-@{name}', @animation-duration, @timingFunction);
}
.keyframes(~'draw-@{name}', {
0%, @{startPct} {
stroke-dashoffset: @strokeDasharray;
}
@{endPct} {
stroke-dashoffset: 0;
}
});
}
.do-calligraphy-animation(fei-1, 73, 0%, 20%);
.do-calligraphy-animation(fei-2, 25, 20%, 25%);
.do-calligraphy-animation(fei-3, 127, 25%, 40%, ease-in);
.do-calligraphy-animation(fei-4, 106, 40%, 75%);
.do-calligraphy-animation(fei-5, 28, 75%, 82.5%);
.do-calligraphy-animation(fei-6, 37, 82.5%, 90%);
.do-calligraphy-animation(fei-7, 38, 90%, 100%);
1
2
3
4
5
6
7
8
9
10
11
12
13
14
15
16
17
18
19
20
21
22
23
24
25
26
27
28
29
30
31
32
33
34
35
36
37
@animation-duration:5s;
@animation-timing-function:ease;
.pen{
fill:none;
stroke:rgb(199,182,160);
stroke-width:20;
stroke-linecap:round;
stroke-linejoin:round;
stroke-dashoffset:0;
}
.do-calligraphy-animation(@name,@strokeDasharray,@startPct,@endPct,@timingFunction:@animation-timing-function){
.p-@{name}{
clip-path:url("#@{name}");
stroke-dasharray:@strokeDasharray;
.animation(~'draw-@{name}',@animation-duration,@timingFunction);
}
.keyframes(~'draw-@{name}',{
0%,@{startPct}{
stroke-dashoffset:@strokeDasharray;
}
@{endPct}{
stroke-dashoffset:0;
}
});
}
.do-calligraphy-animation(fei-1,73,0%,20%);
.do-calligraphy-animation(fei-2,25,20%,25%);
.do-calligraphy-animation(fei-3,127,25%,40%,ease-in);
.do-calligraphy-animation(fei-4,106,40%,75%);
.do-calligraphy-animation(fei-5,28,75%,82.5%);
.do-calligraphy-animation(fei-6,37,82.5%,90%);
.do-calligraphy-animation(fei-7,38,90%,100%);
5、欢迎提供更多意见...

参考资料
How to animate handwriting text on the web page using SVG?(特别感谢这一回答,它是网上很少几个解答了如何在动画中显示路径上的clipPath而非路径本身的问题,才让我们可以实现动画中最重要的一部分)
本文的英文版本已发表于本站的英文博客上。
历史上的今天

