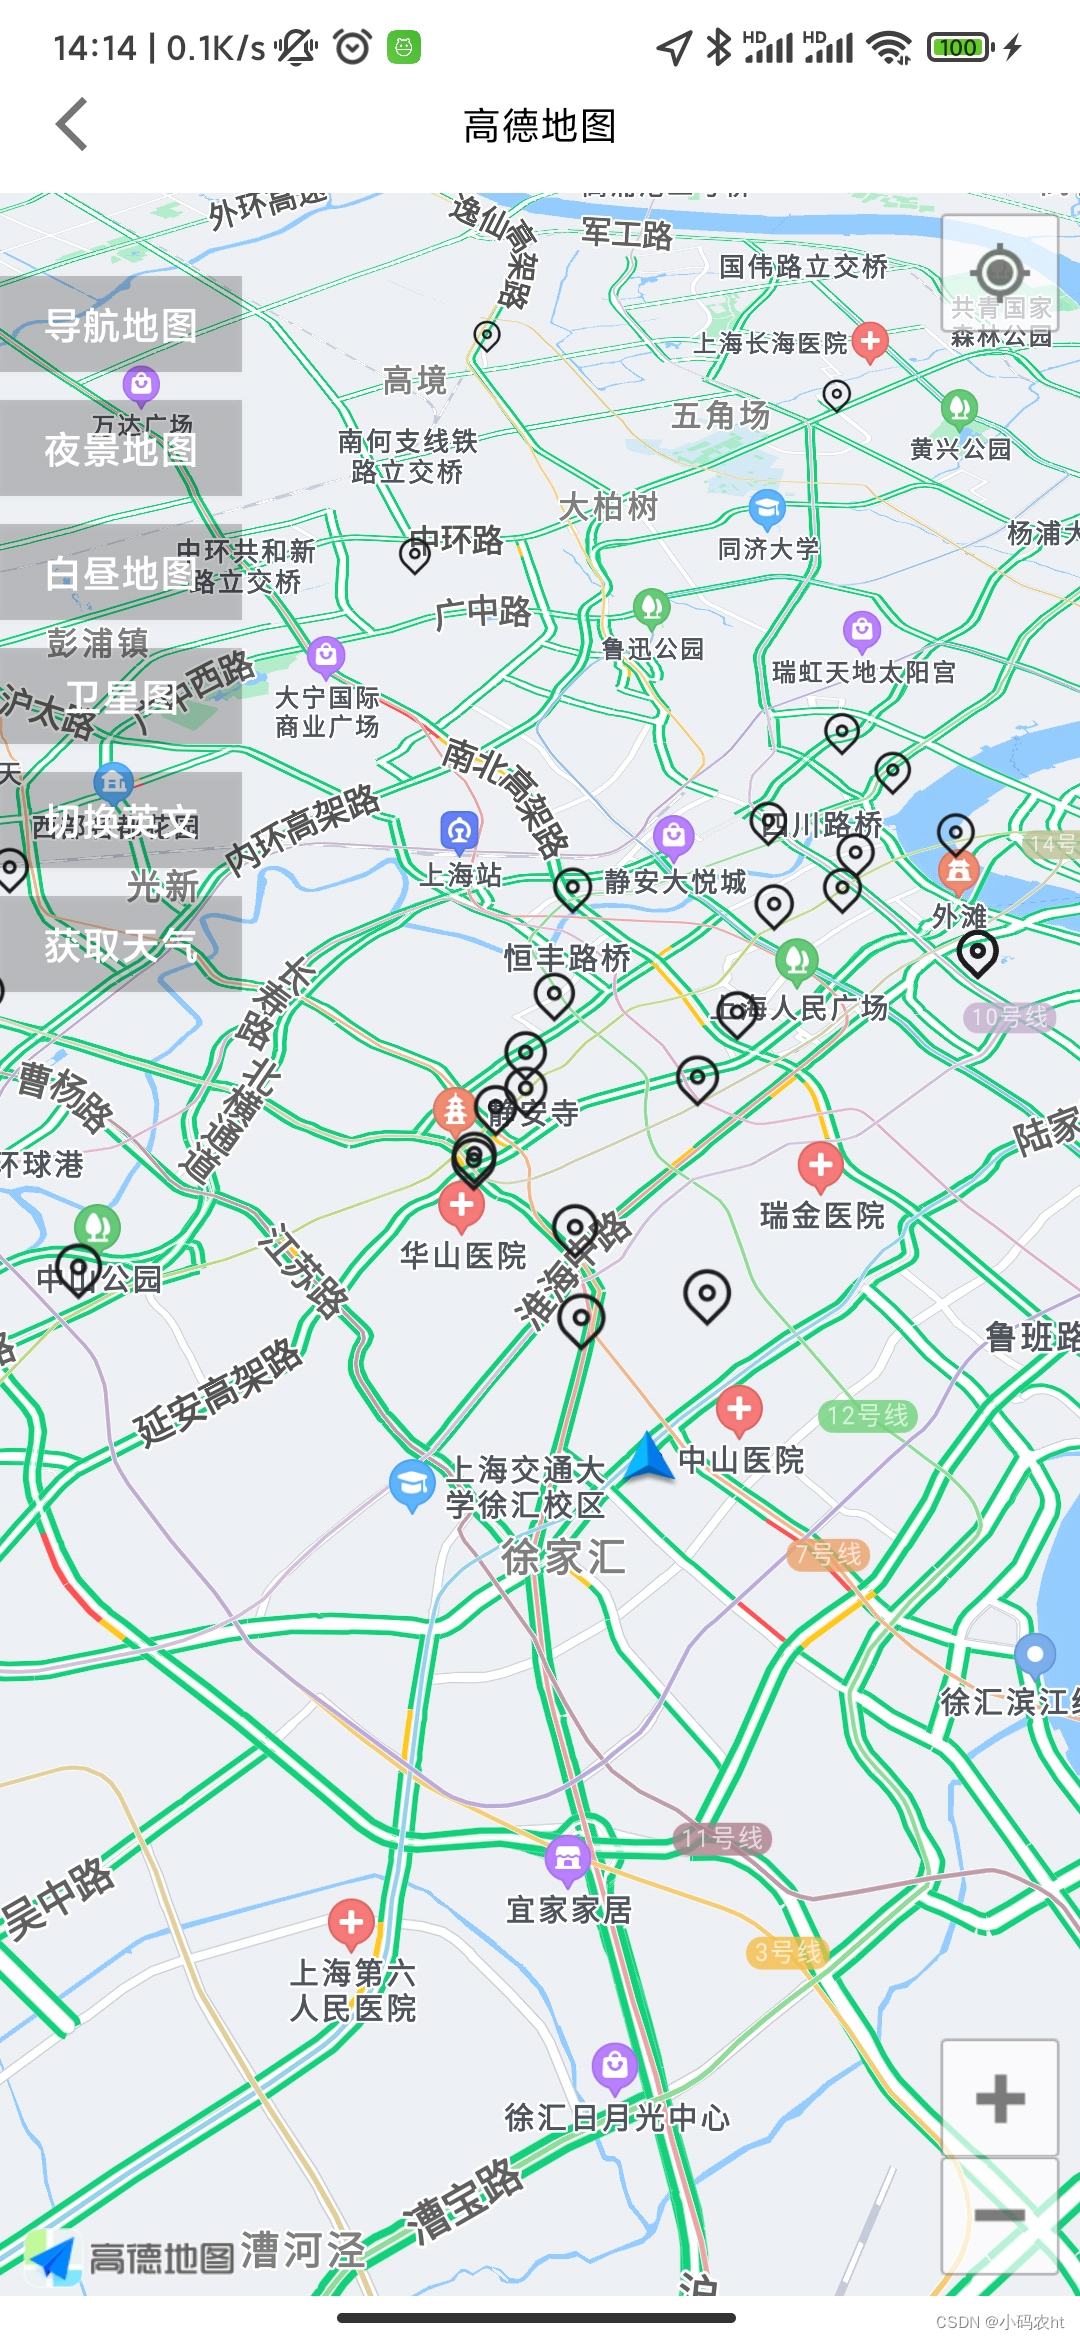
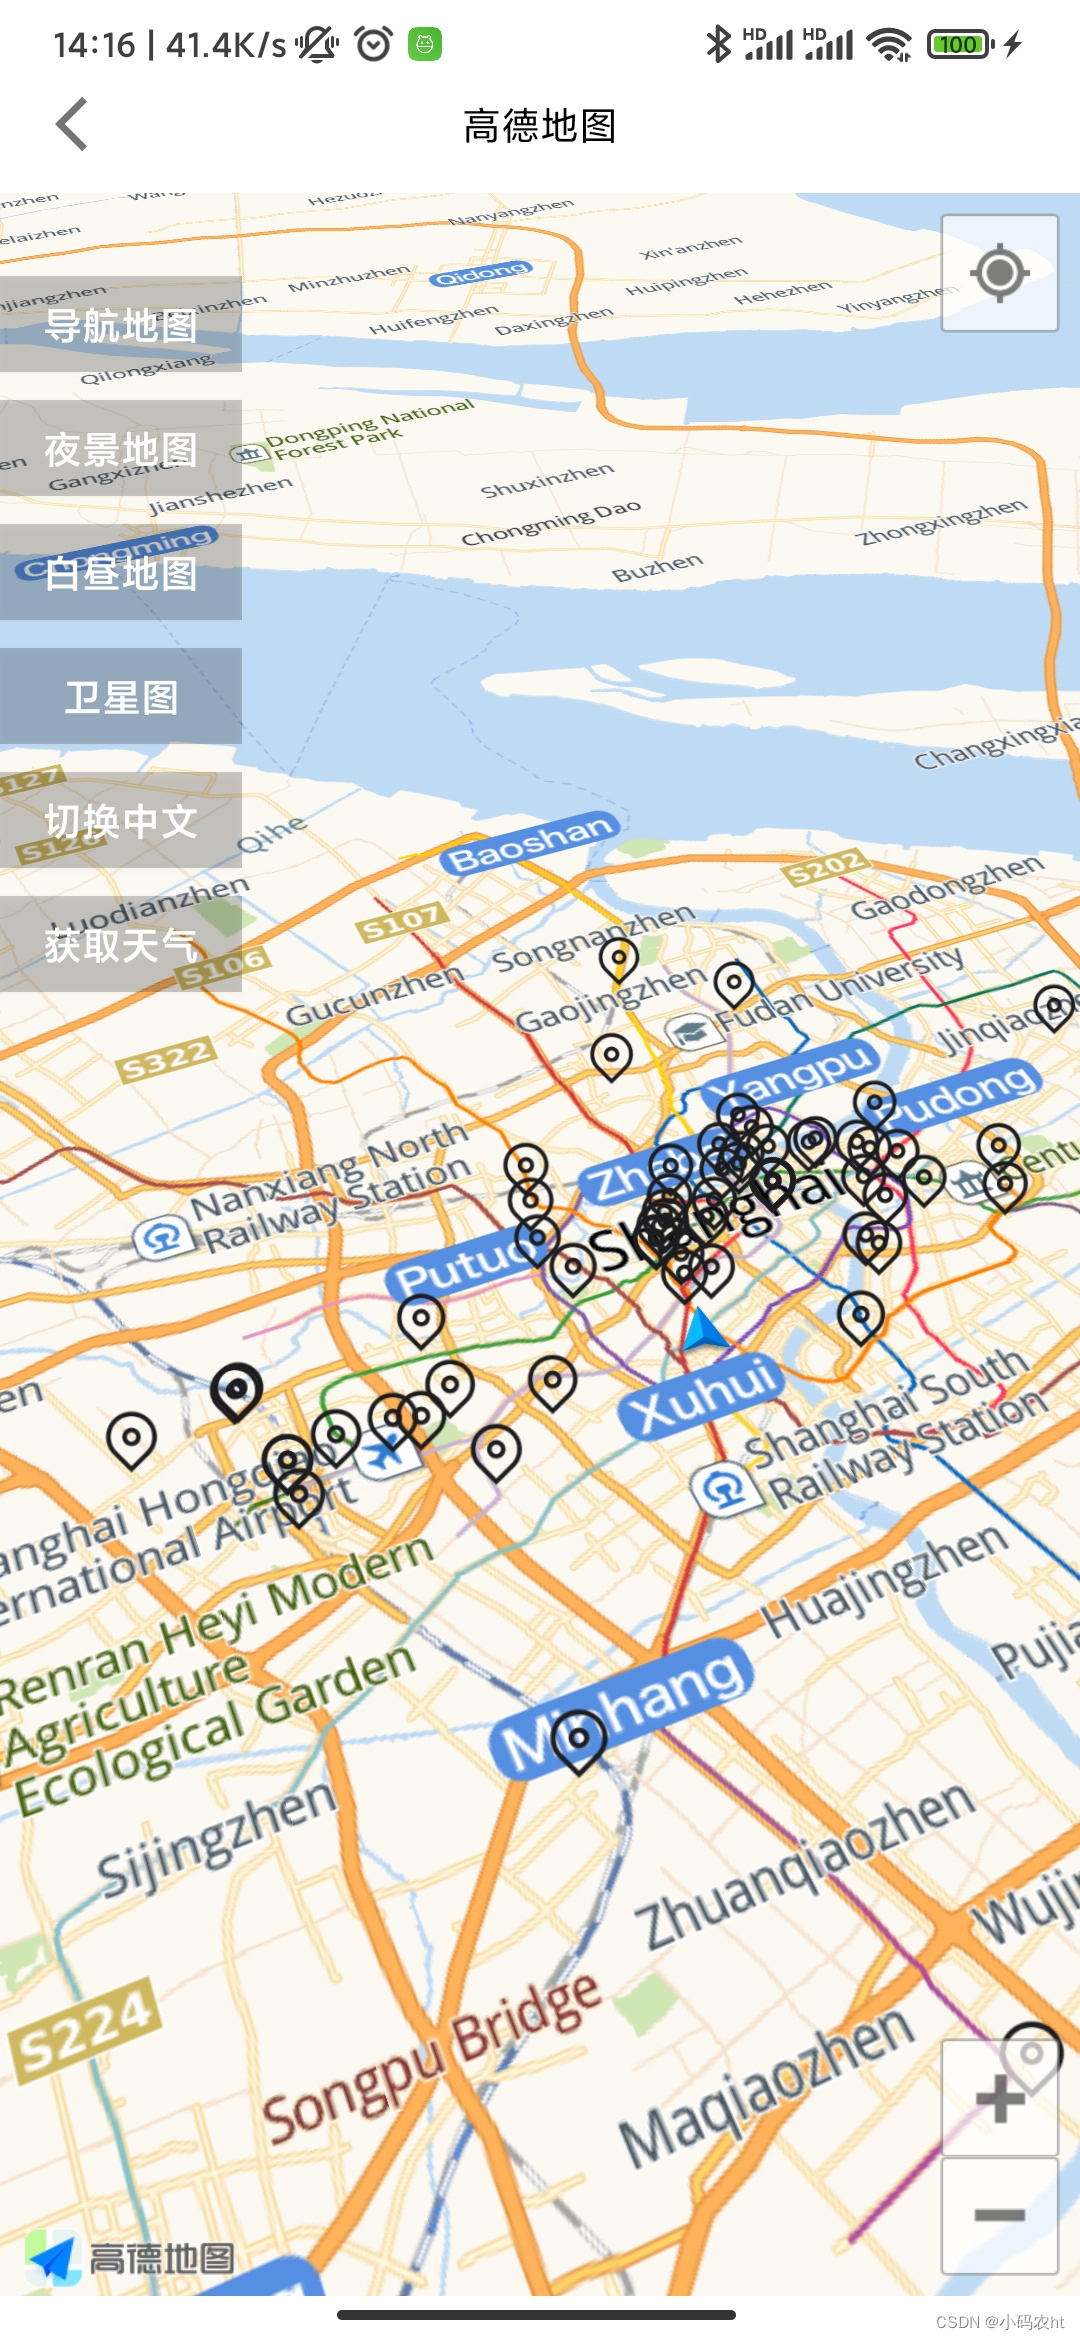

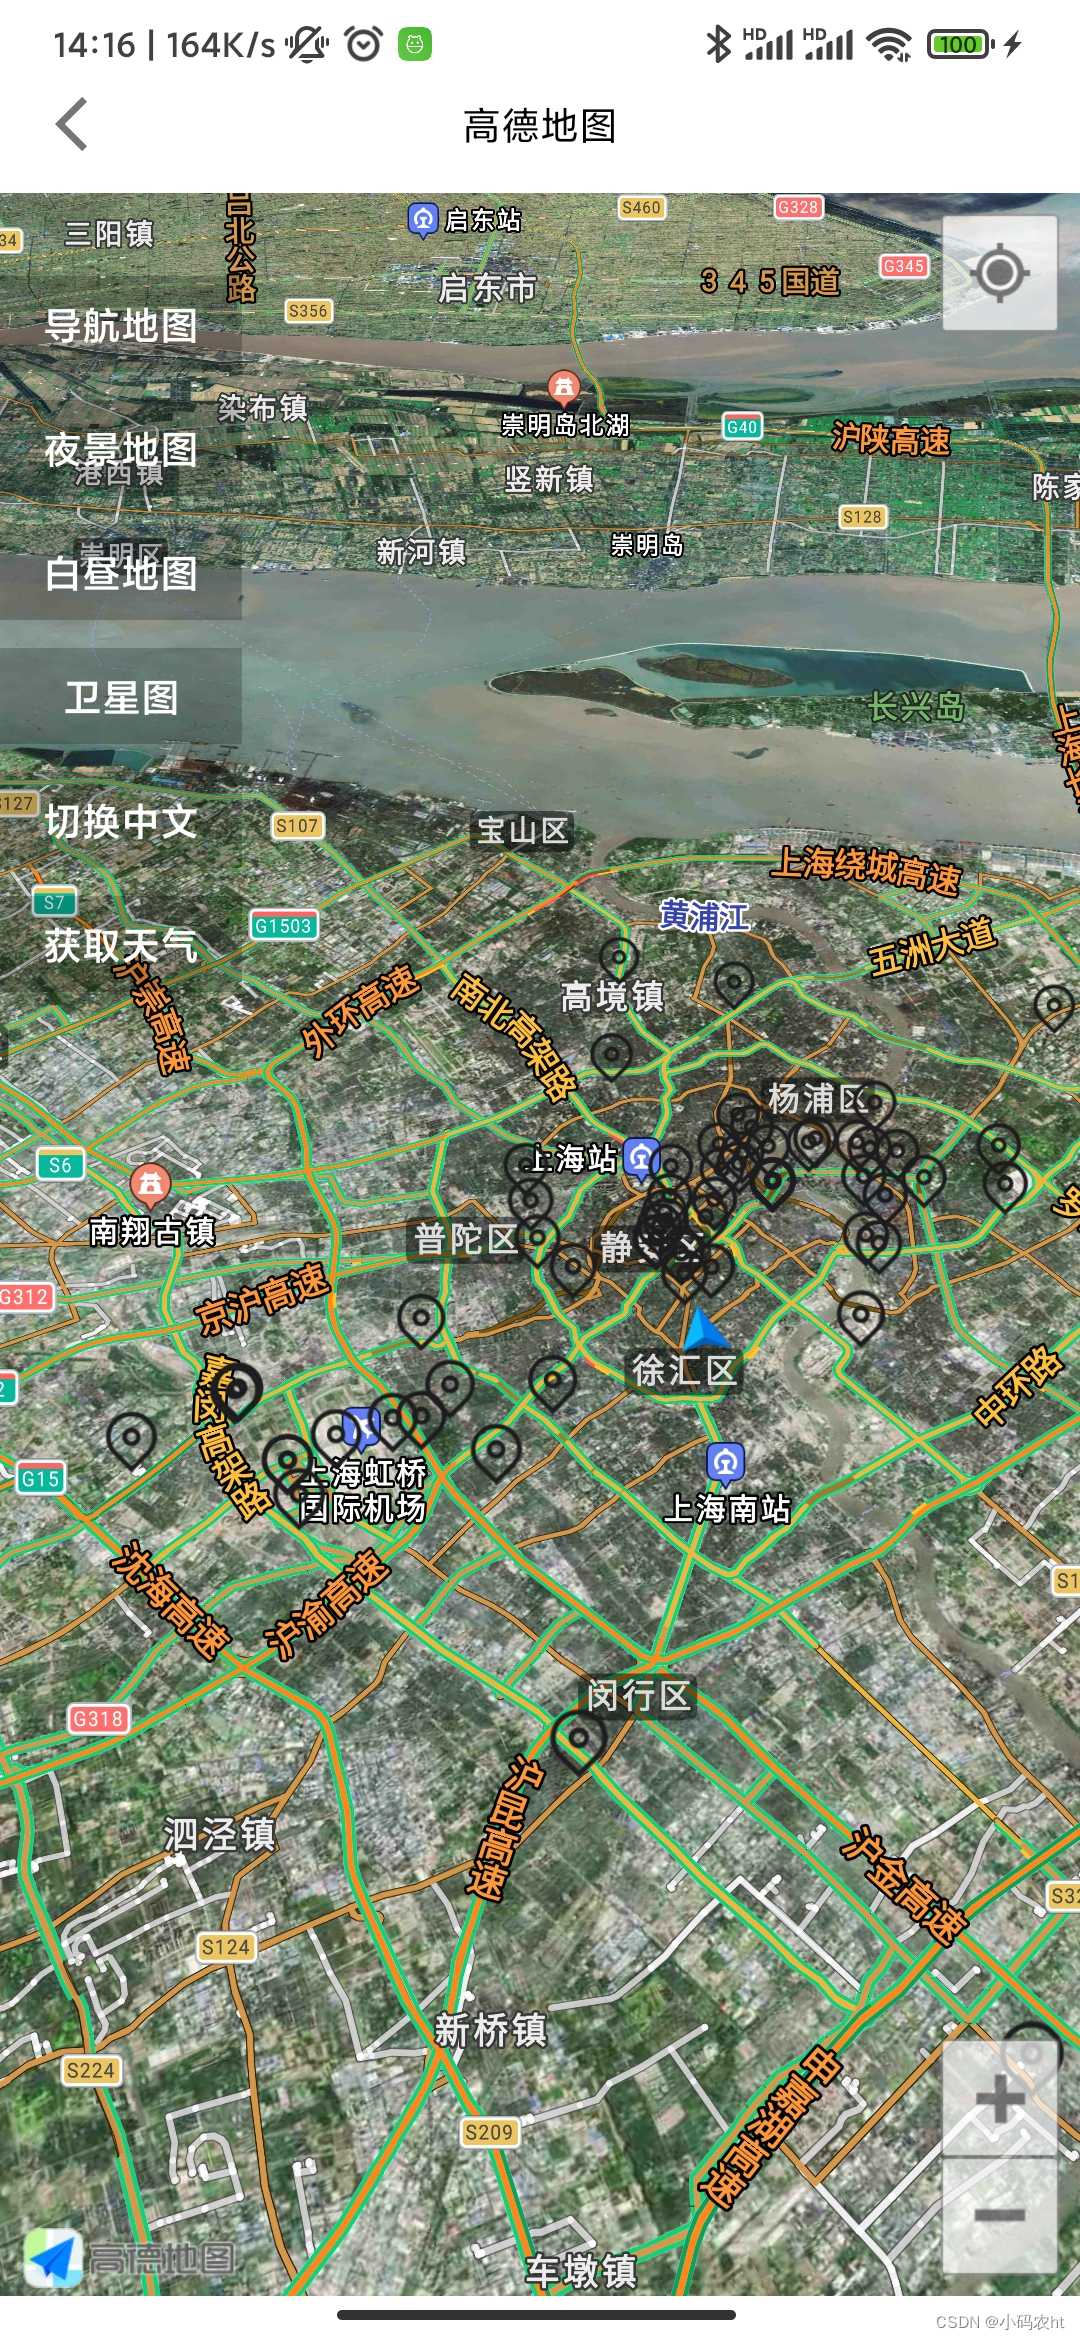
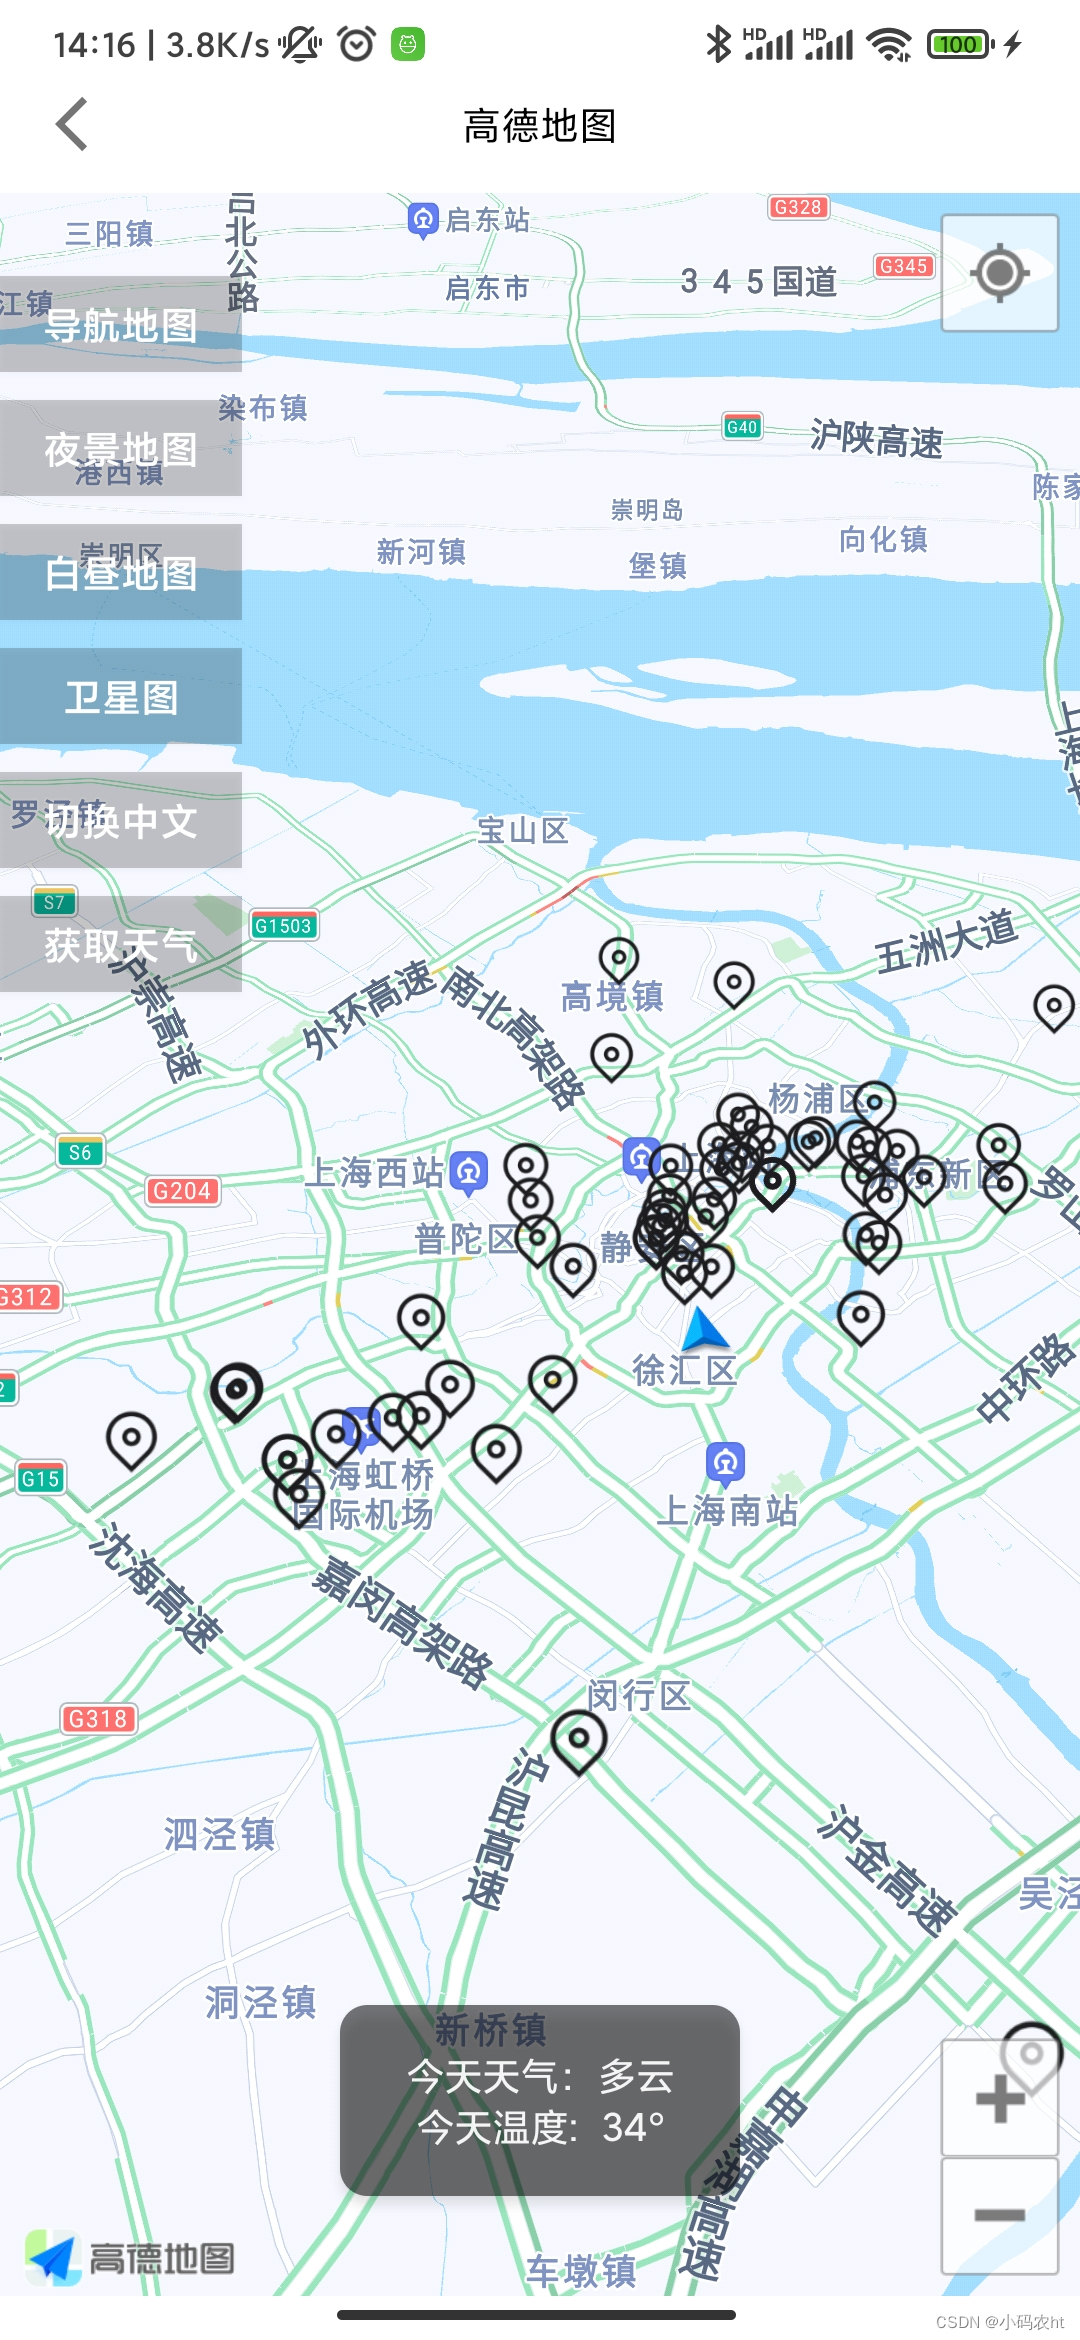
上图为实现后效果 默认+地图标点> 英文>夜景地图>卫星地图>获取当前天气
接下来我们集成地图
1.我们去高德地图开放平台注册(高德开放平台 | 高德地图API)申请key(可以用QQ ,邮箱等注册登录)

在这里创建应用会让你输入名字和应用类型(自己看需求填写 测试的话没什么特殊要求)完成后如图:

我们点击添加添加
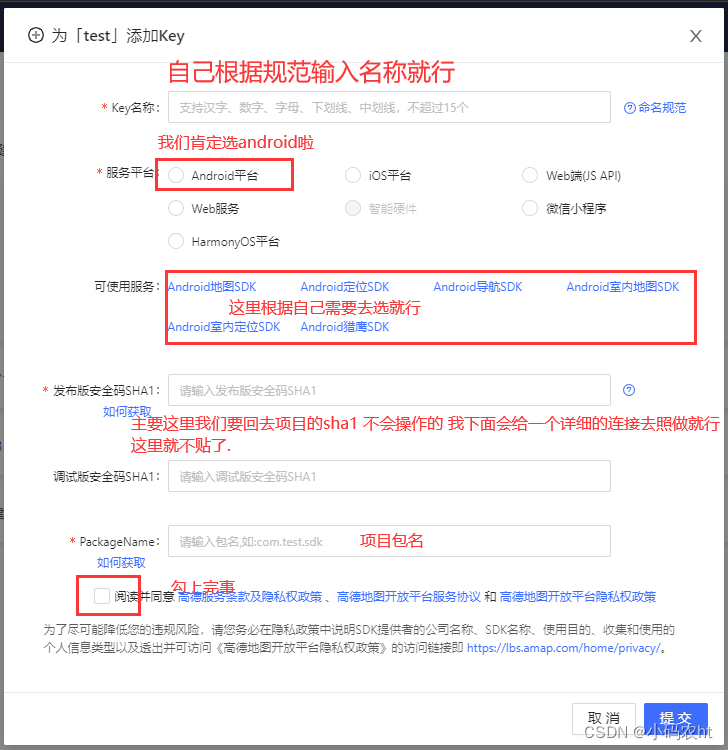
获取sha1
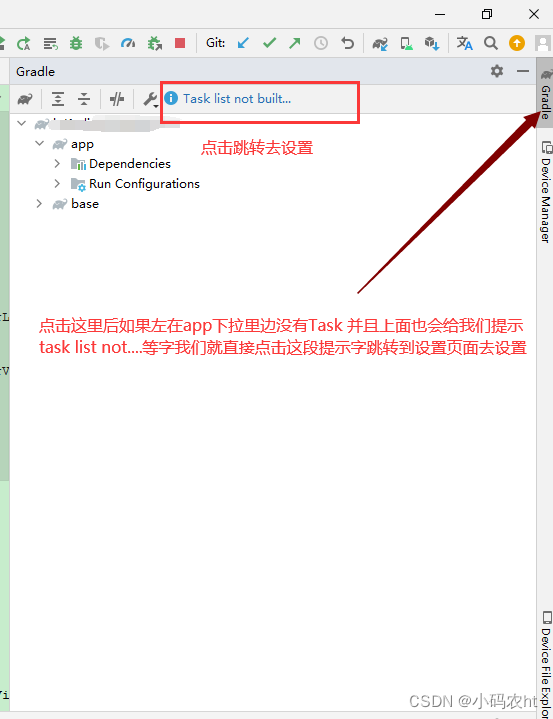

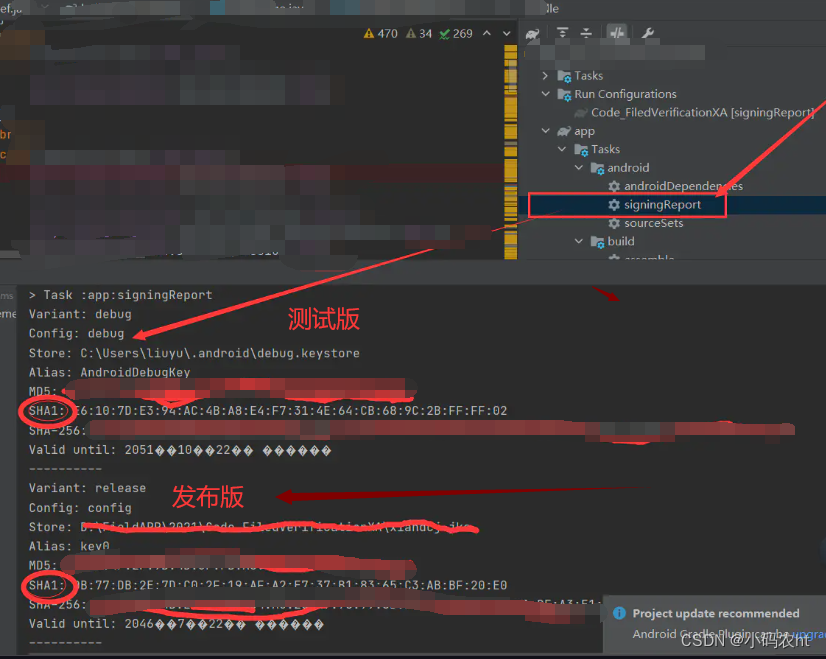 这样我就吧对应的sha1复制到高德key申请页面确定后会生成对应的key 如图

2.在代码中添加高德地图配置
具体配置看高德开发文档吧:Android Studio 配置工程-创建工程-开发指南-Android 地图SDK | 高德地图API:
3.代码实现主要功能
3.1地图基础设置
private val mLocationClient:AMapLocationClient by lazy { AMapLocationClient(this) }
private val mLocationOption:AMapLocationClientOption by lazy {AMapLocationClientOption()}/*** 地图基础设置*/private fun mapBasicSettings() {//设置定位回调监听mLocationClient.setLocationListener(this)//设置为高精度定位模式mLocationOption.locationMode = AMapLocationMode.Hight_Accuracy//设置定位参数mLocationClient.setLocationOption(mLocationOption)// 此方法为每隔固定时间会发起一次定位请求,为了减少电量消耗或网络流量消耗,// 注意设置合适的定位时间的间隔(最小间隔支持为2000ms),并且在合适时间调用stopLocation()方法来取消定位请求// 在定位结束后,在合适的生命周期调用onDestroy()方法// 在单次定位情况下,定位无论成功与否,都无需调用stopLocation()方法移除请求,定位sdk内部会移除mLocationClient.startLocation() //启动定位val myLocationStyle = MyLocationStyle()//连续定位、且将视角移动到地图中心点,定位点依照设备方向旋转,并且会跟随设备移动。(1秒1次定位)如果不设置myLocationType,默认也会执行此种模式。myLocationStyle.myLocationType(MyLocationStyle.LOCATION_TYPE_MAP_ROTATE_NO_CENTER)//设置连续定位模式下的定位间隔,只在连续定位模式下生效,单次定位模式下不会生效。单位为毫秒。myLocationStyle.interval(2000)//设置定位蓝点的StylemyLocationStyle.isMyLocationShowingmBindingView.mapView.map.myLocationStyle = myLocationStyle// 显示实时交通状况mBindingView.mapView.map.isTrafficEnabled = true//true:显示室内地图;false:不显示;mBindingView.mapView.map.showIndoorMap(true)//设置默认定位按钮是否显示,非必需设置。mBindingView.mapView.map.uiSettings.isMyLocationButtonEnabled = true// 设置为true表示启动显示定位蓝点,false表示隐藏定位蓝点并不进行定位,默认是false。mBindingView.mapView.map.isMyLocationEnabled = true}
3.2 实现上图中左侧点击后功能
/*** 点击事件*/private fun setListener() {//导航地图mBindingView.tvNavigation.setOnClickListener {mBindingView.mapView.map.mapType = AMap.MAP_TYPE_NAVI}//夜景地图mBindingView.tvNightView.setOnClickListener {mBindingView.mapView.map.mapType = AMap.MAP_TYPE_NIGHT}//白昼地图(即普通地图)mBindingView.tvDay.setOnClickListener {mBindingView.mapView.map.mapType = AMap.MAP_TYPE_NORMAL}//卫星图mBindingView.tvSatellite.setOnClickListener {mBindingView.mapView.map.mapType = AMap.MAP_TYPE_SATELLITE}//获取当前定位城市天气mBindingView.tvWeather.setOnClickListener {lifecycleScope.launch {searchWeather(mLocation?.city.toString())}}//切换中英文mBindingView.tvLanguage.text = getString(R.string.switch_english)mBindingView.tvLanguage.setOnClickListener {if (mBindingView.tvLanguage.text.toString() == getString(R.string.switch_english)) {mBindingView.mapView.map.setMapLanguage("en")mBindingView.tvLanguage.text = getString(R.string.switch_chinese)} else {mBindingView.mapView.map.setMapLanguage("zh_cn")mBindingView.tvLanguage.text = getString(R.string.switch_english)}}}//检索参数为城市和天气类型,实况天气为WEATHER_TYPE_LIVE、天气预报为WEATHER_TYPE_FORECASTprivate fun searchWeather(text: String) {val mQuery = WeatherSearchQuery(text, WeatherSearchQuery.WEATHER_TYPE_LIVE)val mWeatherSearch = WeatherSearch(this)mWeatherSearch.setOnWeatherSearchListener(this)mWeatherSearch.query = mQuery//异步搜索mWeatherSearch.searchWeatherAsyn()}/*** 获取天气查询结果*/override fun onWeatherLiveSearched(p0: LocalWeatherLiveResult?, p1: Int) {if (p1 == 1000) {if (p0 != null) {val weatherLive = p0.liveResulttoast("今天天气: " + weatherLive.weather + "\n今天温度: " + weatherLive.getTemperature() + "°")} else {toast("获取天气数据出错:$p0")}}}override fun onWeatherForecastSearched(p0: LocalWeatherForecastResult?, p1: Int) {}3.3实现地图标点
/*** 地图绘制* markerLocation数据是经纬度的一个list集合*/private fun mapping() {//绘制markerif (markerLocation.size > 0) {mBindingView.mapView.map.moveCamera(CameraUpdateFactory.changeLatLng(LatLng(markerLocation[0].Laitude!!,markerLocation[0].Longitude!!)))for (map in 0 until markerLocation.size) {mBindingView.mapView.map.addMarker(MarkerOptions().position(LatLng(markerLocation[map].Laitude!!,markerLocation[map].Longitude!!)).title(markerLocation[map].HotelName).snippet(markerLocation[map].HotelAddress + "\n" + "维度:" + markerLocation[map].Laitude + "/" + "经度:" + markerLocation[map].Longitude).icon(BitmapDescriptorFactory.fromBitmap(BitmapFactory.decodeResource(resources,R.mipmap.icon_site))).draggable(true))}}// 绘制曲线mBindingView.mapView.map.addPolyline(PolylineOptions().add(LatLng(43.828, 87.621), LatLng(45.808, 126.55)).geodesic(true).color(Color.RED))}部分功能其实很简单 主要代码也就贴在上面了下面我把全部代码贴出来
GaoDeMapActivity.kt
import android.graphics.BitmapFactory
import android.graphics.Color
import android.os.Bundle
import androidx.lifecycle.lifecycleScope
import com.amap.api.location.AMapLocation
import com.amap.api.location.AMapLocationClient
import com.amap.api.location.AMapLocationClientOption
import com.amap.api.location.AMapLocationClientOption.AMapLocationMode
import com.amap.api.location.AMapLocationListener
import com.amap.api.maps.AMap
import com.amap.api.maps.CameraUpdateFactory
import com.amap.api.maps.model.*
import com.amap.api.services.core.ServiceSettings
import com.amap.api.services.weather.LocalWeatherForecastResult
import com.amap.api.services.weather.LocalWeatherLiveResult
import com.amap.api.services.weather.WeatherSearch
import com.amap.api.services.weather.WeatherSearchQuery
import kotlinx.coroutines.launch/*** 高德地图基础功能* @author ht 2021/12/16 14:00*/
class GaoDeMapActivity : BaseActivity<ActivityGaodeMapBinding>(),AMapLocationListener, WeatherSearch.OnWeatherSearchListener {private var markerLocation = ArrayList<MapMarkerLocation>()private var mLocation: AMapLocation? = nullprivate val mLocationClient: AMapLocationClient by lazy { AMapLocationClient(this) }private val mLocationOption: AMapLocationClientOption by lazy { AMapLocationClientOption() }private var isOne = falseoverride fun initIntent() {markerLocation = intent.extras?.getParcelableArrayList(Constant.GAODEMAP)!!}override fun initView(savedInstanceState: Bundle?) {ServiceSettings.updatePrivacyShow(this, true, true)ServiceSettings.updatePrivacyAgree(this, true)mBindingView.mapView.onCreate(savedInstanceState) // 此方法必须重写mapBasicSettings()mapping()setListener()}/*** 点击事件*/private fun setListener() {//导航地图mBindingView.tvNavigation.setOnClickListener {mBindingView.mapView.map.mapType = AMap.MAP_TYPE_NAVI}//夜景地图mBindingView.tvNightView.setOnClickListener {mBindingView.mapView.map.mapType = AMap.MAP_TYPE_NIGHT}//白昼地图(即普通地图)mBindingView.tvDay.setOnClickListener {mBindingView.mapView.map.mapType = AMap.MAP_TYPE_NORMAL}//卫星图mBindingView.tvSatellite.setOnClickListener {mBindingView.mapView.map.mapType = AMap.MAP_TYPE_SATELLITE}//获取当前定位城市天气mBindingView.tvWeather.setOnClickListener {lifecycleScope.launch {searchWeather(mLocation?.city.toString())}}//切换中英文mBindingView.tvLanguage.text = getString(R.string.switch_english)mBindingView.tvLanguage.setOnClickListener {if (mBindingView.tvLanguage.text.toString() == getString(R.string.switch_english)) {mBindingView.mapView.map.setMapLanguage("en")mBindingView.tvLanguage.text = getString(R.string.switch_chinese)} else {mBindingView.mapView.map.setMapLanguage("zh_cn")mBindingView.tvLanguage.text = getString(R.string.switch_english)}}}/*** 地图基础设置*/private fun mapBasicSettings() {mBindingView.title.tvCenter.text = getString(R.string.gaod_map)//设置定位回调监听mLocationClient.setLocationListener(this)//设置为高精度定位模式mLocationOption.locationMode = AMapLocationMode.Hight_Accuracy//设置定位参数mLocationClient.setLocationOption(mLocationOption)// 此方法为每隔固定时间会发起一次定位请求,为了减少电量消耗或网络流量消耗,// 注意设置合适的定位时间的间隔(最小间隔支持为2000ms),并且在合适时间调用stopLocation()方法来取消定位请求// 在定位结束后,在合适的生命周期调用onDestroy()方法// 在单次定位情况下,定位无论成功与否,都无需调用stopLocation()方法移除请求,定位sdk内部会移除mLocationClient.startLocation() //启动定位val myLocationStyle = MyLocationStyle()//连续定位、且将视角移动到地图中心点,定位点依照设备方向旋转,并且会跟随设备移动。(1秒1次定位)如果不设置myLocationType,默认也会执行此种模式。myLocationStyle.myLocationType(MyLocationStyle.LOCATION_TYPE_MAP_ROTATE_NO_CENTER)//设置连续定位模式下的定位间隔,只在连续定位模式下生效,单次定位模式下不会生效。单位为毫秒。myLocationStyle.interval(2000)//设置定位蓝点的StylemyLocationStyle.isMyLocationShowingmBindingView.mapView.map.myLocationStyle = myLocationStyle// 显示实时交通状况mBindingView.mapView.map.isTrafficEnabled = true//true:显示室内地图;false:不显示;mBindingView.mapView.map.showIndoorMap(true)//设置默认定位按钮是否显示,非必需设置。mBindingView.mapView.map.uiSettings.isMyLocationButtonEnabled = true// 设置为true表示启动显示定位蓝点,false表示隐藏定位蓝点并不进行定位,默认是false。mBindingView.mapView.map.isMyLocationEnabled = true}/*** 地图绘制* markerLocation数据是经纬度的一个list集合*/private fun mapping() {//绘制markerif (markerLocation.size > 0) {mBindingView.mapView.map.moveCamera(CameraUpdateFactory.changeLatLng(LatLng(markerLocation[0].Laitude!!,markerLocation[0].Longitude!!)))for (map in 0 until markerLocation.size) {mBindingView.mapView.map.addMarker(MarkerOptions().position(LatLng(markerLocation[map].Laitude!!,markerLocation[map].Longitude!!)).title(markerLocation[map].HotelName).snippet(markerLocation[map].HotelAddress + "\n" + "维度:" + markerLocation[map].Laitude + "/" + "经度:" + markerLocation[map].Longitude).icon(BitmapDescriptorFactory.fromBitmap(BitmapFactory.decodeResource(resources,R.mipmap.icon_site))).draggable(true))}}// 绘制曲线mBindingView.mapView.map.addPolyline(PolylineOptions().add(LatLng(43.828, 87.621), LatLng(45.808, 126.55)).geodesic(true).color(Color.RED))}//检索参数为城市和天气类型,实况天气为WEATHER_TYPE_LIVE、天气预报为WEATHER_TYPE_FORECASTprivate fun searchWeather(text: String) {val mQuery = WeatherSearchQuery(text, WeatherSearchQuery.WEATHER_TYPE_LIVE)val mWeatherSearch = WeatherSearch(this)mWeatherSearch.setOnWeatherSearchListener(this)mWeatherSearch.query = mQuery//异步搜索mWeatherSearch.searchWeatherAsyn()}/*** 定位回调*/override fun onLocationChanged(p0: AMapLocation?) {mLocation = p0if (markerLocation.size == 0 && p0 != null && !isOne) {mBindingView.mapView.map.moveCamera(CameraUpdateFactory.changeLatLng(LatLng(p0.latitude,p0.longitude)))isOne = true}}/*** 获取天气查询结果*/override fun onWeatherLiveSearched(p0: LocalWeatherLiveResult?, p1: Int) {if (p1 == 1000) {if (p0 != null) {val weatherLive = p0.liveResulttoast("今天天气: " + weatherLive.weather + "\n今天温度:  " + weatherLive.getTemperature() + "°")} else {toast("获取天气数据出错:$p0")}}}override fun onWeatherForecastSearched(p0: LocalWeatherForecastResult?, p1: Int) {}override fun onDestroy() {super.onDestroy()mBindingView.mapView.onDestroy()mLocationClient.onDestroy()}override fun onResume() {super.onResume()mBindingView.mapView.onResume()}override fun onPause() {super.onPause()mBindingView.mapView.onPause()}}


