项目背景
紧接上文,我们已经完成了 SpringBoot中集成Spring Security,并且用户名帐号和密码都是从数据库中获取。但是这种方式还是不能满足现在的开发需求。
使用JWT的好处:
- 无状态认证:JWT本身包含了认证信息和声明,服务器不需要在会话中保存任何状态。这样使得应用程序可以更加容易的扩展,并且更适合分布式部署和微服务架构。
- 跨域支持:由于JWT在HTTP头部中进行传输,因此它可以轻松的支持跨域请求。
- 灵活性:JWT可以包含任意数量的声明,这些声明可以用来传递用户、角色、或者其他相关的元数据。这些数据可以在服务器端和客户端之间共享,从而简化了授权和访问控制管理。
- 安全性:JWT使用数字签名或者加密算法来验证其完整性和真实性。这确保了JWT在传输过程中不会被篡改或伪造。
JWT(Json Web Tokens)
JSON Web Token (JWT) is an open standard (RFC 7519) that defines a compact and self-contained way for securely transmitting information between parties as a JSON object. This information can be verified and trusted because it is digitally signed. JWTs can be signed using a secret (with the HMAC algorithm) or a public/private key pair using RSA or ECDS
翻译:JSON Web Token (JWT) 是一个开放标准 (RFC 7519),它定义了一种紧凑且自包含的方式,用于在各方之间安全地传输信息作为 JSON 对象。 此信息可以验证和信任,因为它是数字签名的。 JWT 可以使用密钥(使用 HMAC 算法)或使用 RSA 或 ECDSA 的公钥/私钥对进行签名。
JWT组成
- header: 存放签名的生成算法。
- payload:存放用户名、token的生成时间和过期时间。
- signature:以header和payload生成的签名,一旦header和payload被篡改,验证将失败。
可以在该网站上进行解析:https://jwt.io/

Spring Security集成JWT
maven引入
<dependency><groupId>io.jsonwebtoken</groupId><artifactId>jjwt</artifactId><version>0.9.0</version></dependency>
首先不论是不是Spring Security中集成JWT,我们得先有个工具类。这个工具类的主要内容是什么呢?
创建JWT、验证JWT、 解析JWT
步骤一:
JwtUtils工具类
/*** jwt工具类** @author caojing* @since 2023/6/14*/
public class JwtUtils {/*** token过期时间*/public static final long EXPIRE = 1000 * 60 * 60 * 24;/*** 秘钥*/public static final String APP_SECRET = "ukc8BDbRigUDaY6pZFfWus2jZWLPHO";/*** 生成token字符串的方法** @param id* @param nickname* @return*/public static String getJwtToken(String id, String nickname) {String jwtToken = Jwts.builder().setHeaderParam("typ", "JWT").setHeaderParam("alg", "HS256").setSubject("guli-user").setIssuedAt(new Date()).setExpiration(new Date(System.currentTimeMillis() + EXPIRE))//设置token主体部分 ,存储用户信息.claim("id", id).claim("nickname", nickname).signWith(SignatureAlgorithm.HS256, APP_SECRET).compact();return jwtToken;}/*** 判断token是否存在与有效** @param jwtToken* @return*/public static boolean checkToken(String jwtToken) {if (StringUtils.isEmpty(jwtToken)) {return false;}try {Jwts.parser().setSigningKey(APP_SECRET).parseClaimsJws(jwtToken);} catch (Exception e) {e.printStackTrace();return false;}return true;}/*** 判断token是否存在与有效** @param request* @return*/public static boolean checkToken(HttpServletRequest request) {try {String jwtToken = request.getHeader("Authorization");if (StringUtils.isEmpty(jwtToken)) {return false;}Jwts.parser().setSigningKey(APP_SECRET).parseClaimsJws(jwtToken);} catch (Exception e) {e.printStackTrace();return false;}return true;}/*** 根据token字符串获取会员id** @param request* @return*/public static String getUserIdByJwtToken(HttpServletRequest request) {String jwtToken = request.getHeader("Authorization");if (StringUtils.isEmpty(jwtToken)) {return "";}Jws<Claims> claimsJws = Jwts.parser().setSigningKey(APP_SECRET).parseClaimsJws(jwtToken);Claims claims = claimsJws.getBody();return (String) claims.get("id");}/*** 验证jwt*/public static Claims verifyJwt(String token) {Claims claims;try {//得到DefaultJwtParserclaims = Jwts.parser()//设置签名的秘钥.setSigningKey(APP_SECRET).parseClaimsJws(token).getBody();} catch (Exception e) {e.printStackTrace();claims = null;}//设置需要解析的jwtreturn claims;}
}
我们可以设想下这么一个流程:
前端在请求头中设置 Authorization参数,后台再进入到controller之前,会走一个过滤器对header中的Authorization参数进行校验,也就是利用JWTUtils对token进行解析。
1.通过校验:模拟 spring Security 登录成功,把token值塞到一个变量里面。
2.未通过校验:继续走spring Security的验证流程(理论上会抛出异常)
注意以上我们分析的关键字:过滤器
因此,我们新建一个JwtAuthenticationTokenFilter 类继承OncePerRequestFilter 。
继承 OncePerRequestFilter 的原因:
- 确保在一次请求中只执行一次过滤操作。OncePerRequestFilter是Spring框架提供的一个过滤器基类,它确保每个请求只通过一次,而不会重复执行过滤逻辑。
- 当客户端发送请求时,过滤器链会按照配置的顺序对请求进行过滤。如果一个过滤器没有继承OncePerRequestFilter,它可能会在请求链中的多个位置执行,导致重复处理请求的问题。
- 继承OncePerRequestFilter可以确保JwtAuthenticationTokenFilter在整个过滤器链中的每个请求中只执行一次,避免了多次处理同一个请求的问题。这对于执行基于JWT的身份验证和授权逻辑非常重要,因为它确保只有在一次请求中进行一次JWT的验证和解析,避免了不必要的性能开销和潜在的安全问题。
总结来说,JwtAuthenticationTokenFilter继承OncePerRequestFilter是为了保证它在过滤器链中的每个请求中只执行一次,避免了重复处理请求的问题,确保了JWT身份验证和授权逻辑的准确性和性能。
步骤二
将jwtFilter添加到Spring Security 过滤器中
JwtAuthenticationTokenFilter 类
/*** token过滤器 验证token有效性* 判断用户是否有效走 MyUserDetailService的 loadUserByUsername 方法** @author caojing*/
@Slf4j
@Component
public class JwtAuthenticationTokenFilter extends OncePerRequestFilter {@Autowiredprivate RedisUtils redisUtils;@Overrideprotected void doFilterInternal(HttpServletRequest request, HttpServletResponse response, FilterChain chain)throws ServletException, IOException {// 从请求头中获取tokenString authToken = request.getHeader("Authorization");// 截取tokenif (authToken != null) {//验证token,获取token中的usernameClaims claims = JwtUtils.verifyJwt(authToken);if (claims == null) {throw new ServletException("token异常,请重新登录");}//从redis 获取缓存String redisKey = JwtUtils.getUserIdByJwtToken(request);UserBean userBean = redisUtils.getCacheObject(redisKey);//重新设置token的失效时间redisUtils.setCacheObject(redisKey, userBean, 30, TimeUnit.MINUTES);if (userBean != null && SecurityContextHolder.getContext().getAuthentication() == null) {//获取到值,相当于手动把session值设置到此次request中,后续就会认为已经登录,不做登录校验UsernamePasswordAuthenticationToken authenticationToken =new UsernamePasswordAuthenticationToken(userBean, null, userBean.getAuthorities());authenticationToken.setDetails(new WebAuthenticationDetailsSource().buildDetails(request));SecurityContextHolder.getContext().setAuthentication(authenticationToken);}}//继续下一个过滤器chain.doFilter(request, response);}
}
JwtAuthenticationTokenFilter添加到ScurityConfig类中
/*** Spring Security 配置类** @author caojing* @since 2023/6/14*/
@Configuration
public class SecurityConfig extends WebSecurityConfigurerAdapter {@Autowiredprivate MyUserDetailService userDetailService;@Autowiredprivate JwtAuthenticationTokenFilter JwtAuthenticationTokenFilter;@Overrideprotected void configure(HttpSecurity http) throws Exception {http// 基于token,所以不需要session.sessionManagement().sessionCreationPolicy(SessionCreationPolicy.STATELESS).and().addFilterBefore(JwtAuthenticationTokenFilter, UsernamePasswordAuthenticationFilter.class);}@Overrideprotected void configure(AuthenticationManagerBuilder auth) throws Exception {//BCryptPasswordEncoder encoder = new BCryptPasswordEncoder();
//        auth.inMemoryAuthentication()
//                .passwordEncoder(new BCryptPasswordEncoder())
//                .withUser("user").password(encoder.encode("123456")).roles("USER");auth.userDetailsService(userDetailService).passwordEncoder(new BCryptPasswordEncoder());}
}
说明:利用addFilterBefore方法,把jwt认证放到UsernamePasswordAuthenticationFilter过滤器之前。为什么要放到这里,我们下一篇文章会说。
步骤三
怎么把验证交给Spring Security
基本工作已经做完。我们还剩下一个获取token的controller。
想一想这个controller应该有什么功能?
没有使用spring Security之前,我们是不是在login获取用户输入的帐号名和密码,然后根据帐号名从数据库查询出来对应的用户信息。然后对比密码(加密后)是否正确。
使用了Spring Security之后,思考一下,哪些能用,哪些需要替换。
- 帐号名密码的获取肯定是要继续用的。
- 认证移动到了MyUserDetailService中认证,也就是使用Spring Security的
DaoAuthenticationProvider进行认证。所以原先的认证需要删除替换成DaoAuthenticationProvider认证。
上面第一个问题好解决,那么第二个问题该如何实现呢?
先说结果:
使用AuthenticationManager的authenticate方法进行认证。
如何找到这个入口?
我们现在已知的类是DaoAuthenticationProvider,所以先从这个类开始。先看下这个类是实现AuthenticationProvider接口。先说一下这个接口的2个方法构成:
// ~ Methods// ========================================================================================================/*** Performs authentication with the same contract as* {@link org.springframework.security.authentication.AuthenticationManager#authenticate(Authentication)}* .* * @param authentication the authentication request object.** @return a fully authenticated object including credentials. May return* <code>null</code> if the <code>AuthenticationProvider</code> is unable to support* authentication of the passed <code>Authentication</code> object. In such a case,* the next <code>AuthenticationProvider</code> that supports the presented* <code>Authentication</code> class will be tried.** @throws AuthenticationException if authentication fails.*/Authentication authenticate(Authentication authentication)throws AuthenticationException;/*** Returns <code>true</code> if this <Code>AuthenticationProvider</code> supports the* indicated <Code>Authentication</code> object.* <p>* Returning <code>true</code> does not guarantee an* <code>AuthenticationProvider</code> will be able to authenticate the presented* instance of the <code>Authentication</code> class. It simply indicates it can* support closer evaluation of it. An <code>AuthenticationProvider</code> can still* return <code>null</code> from the {@link #authenticate(Authentication)} method to* indicate another <code>AuthenticationProvider</code> should be tried.* </p>* <p>* Selection of an <code>AuthenticationProvider</code> capable of performing* authentication is conducted at runtime the <code>ProviderManager</code>.* </p>* * @param authentication** @return <code>true</code> if the implementation can more closely evaluate the* <code>Authentication</code> class presented*/boolean supports(Class<?> authentication);
这边重点注意2句话:
Performs authentication with the same contract as * {@link org.springframework.security.authentication.AuthenticationManager#authenticate(Authentication)}
翻译:
执行的身份认证和AuthenticationManager#authenticate这个方法具有相同的合同?
黑人问号脸?换个说人话的:
合同 = 契约。
软件开发中 contract一般都翻译成契约的意思。而且契约在软件开发中特制:定义了功能、接口或方法应该具有的行为和特征的规范。当两个功能或组件具有相同的契约时,它们在执行特定操作时遵循相同的规则和约定。也就是俗称约定。
人话:
这个方法和AuthenticationManager#authenticate(Authentication) 具有相同的认证规则和约定Selection of an AuthenticationProvider capable of performing authentication is conducted at runtime the ProviderManager.
翻译:
选择一个AuthenticationProvider能够执行身份校验是在ProviderManager运行执行期间?
人话:
在ProviderManager运行执行期间来使用该方法判断AuthenticationProvider是否能执行身份校验
这2个方法都提到了一个类:ProviderManager。所以下一步我们看看这个类。
有点长。。。。。。。。
直接看AuthenticationManager这个接口吧:
/*** Processes an {@link Authentication} request.** @author Ben Alex*/
public interface AuthenticationManager {// ~ Methods// ========================================================================================================/*** Attempts to authenticate the passed {@link Authentication} object, returning a* fully populated <code>Authentication</code> object (including granted authorities)* if successful.* <p>* An <code>AuthenticationManager</code> must honour the following contract concerning* exceptions:* <ul>* <li>A {@link DisabledException} must be thrown if an account is disabled and the* <code>AuthenticationManager</code> can test for this state.</li>* <li>A {@link LockedException} must be thrown if an account is locked and the* <code>AuthenticationManager</code> can test for account locking.</li>* <li>A {@link BadCredentialsException} must be thrown if incorrect credentials are* presented. Whilst the above exceptions are optional, an* <code>AuthenticationManager</code> must <B>always</B> test credentials.</li>* </ul>* Exceptions should be tested for and if applicable thrown in the order expressed* above (i.e. if an account is disabled or locked, the authentication request is* immediately rejected and the credentials testing process is not performed). This* prevents credentials being tested against disabled or locked accounts.** @param authentication the authentication request object** @return a fully authenticated object including credentials** @throws AuthenticationException if authentication fails*/Authentication authenticate(Authentication authentication)throws AuthenticationException;
}
该类只有一个方法:authenticate。
解释:
尝试对传递的 Authentication 对象进行身份验证,如果成功则返回一个完全填充的 Authentication 对象(包括授予的权限)。。。。。。。。。
人话:
对我们传入的Authentication对象进行身份认证,通过以后会返回Authentication 对象。
简而言之。这个类AuthenticationManager 就是我们具体身份认证的入口了,但这是一个接口,具体的实现类是通过默认的ProviderManager实现。
继续看ProviderManager中的authenticate方法:
public Authentication authenticate(Authentication authentication)throws AuthenticationException {Class<? extends Authentication> toTest = authentication.getClass();AuthenticationException lastException = null;AuthenticationException parentException = null;Authentication result = null;Authentication parentResult = null;boolean debug = logger.isDebugEnabled();for (AuthenticationProvider provider : getProviders()) {if (!provider.supports(toTest)) {continue;}if (debug) {logger.debug("Authentication attempt using "+ provider.getClass().getName());}try {result = provider.authenticate(authentication);if (result != null) {copyDetails(authentication, result);break;}}catch (AccountStatusException | InternalAuthenticationServiceException e) {prepareException(e, authentication);// SEC-546: Avoid polling additional providers if auth failure is due to// invalid account statusthrow e;} catch (AuthenticationException e) {lastException = e;}}
......
}
我这里只贴出来部分代码:我们可以看到代码的主要结构是一个for循环。循环的内容是啥呢?是AuthenticationProvider的实现类。循环干什么呢?
- 根据
AuthenticationProvider中的provider方法判断是否支持验证当前的authentication,具体行:189行。 - 判断具体的身份权限交给
AuthenticationProvider的authenticate方法,具体行:199行
解释一下第一句话:
AuthenticationProvider和authentication 都是接口,并不是具体的实现类,所以看来比较抽象。因此,我就拿用户名密码登录方式举例。
在用户名和密码登录模式中 AuthenticationProvider的具体实现类AbstractUserDetailsAuthenticationProvider
authentication 的具体实现类是UsernamePasswordAuthenticationToken。那么验证身份流程就变成了
ProviderManager#authentication -> AbstractUserDetailsAuthenticationProvider#supports->AbstractUserDetailsAuthenticationProvider#authenticate->return UsernamePasswordAuthenticationToken
具体时序图如下所示:

基于以上的流程,我们不难知道在login中需要调用authenticationManager#authenticate方法进行认证了
如何引入AuthenticationManager?
看下配置类中继承的类WebSecurityConfigurerAdapter
其中有个方法:
/*** Override this method to expose the {@link AuthenticationManager} from* {@link #configure(AuthenticationManagerBuilder)} to be exposed as a Bean. For* example:** <pre>* @Bean(name name="myAuthenticationManager")* @Override* public AuthenticationManager authenticationManagerBean() throws Exception {* return super.authenticationManagerBean();* }* </pre>** @return the {@link AuthenticationManager}* @throws Exception*/public AuthenticationManager authenticationManagerBean() throws Exception {return new AuthenticationManagerDelegator(authenticationBuilder, context);}
这很好理解吧,不需要翻译了。
Logservice 代码如下:
/*** 登录接口** @author caojing* @since 2023/6/15*/
@Slf4j
@Service
public class LoginService {@Autowiredprivate AuthenticationManager authenticationManager;@Autowiredprivate RedisUtils redisUtils;public ResponseBean<String> login(String username, String password) {UsernamePasswordAuthenticationToken usernamePasswordAuthenticationToken = new UsernamePasswordAuthenticationToken(username, password);Authentication authentication = authenticationManager.authenticate(usernamePasswordAuthenticationToken);//这边可以获取用户信息.这里getPrincipal和 JwtAuthenticationTokenFilter类中 完成token验证之后//new UsernamePasswordAuthenticationToken 塞进去的值UserBean userBean = (UserBean) authentication.getPrincipal();log.info("用户信息:{}", JSON.toJSONString(userBean));String token = JwtUtils.getJwtToken(String.valueOf(userBean.getId()), username);//每次登录都获取最新的值,redisUtils.setCacheObject(String.valueOf(userBean.getId()), userBean, 30, TimeUnit.MINUTES);return new ResponseBean<>(HttpStatus.OK.value(), "获取成功", token);}
}
SecurityConfig配置类增加
/*** Spring Security 配置类** @author caojing* @since 2023/6/14*/
@Configuration
public class SecurityConfig extends WebSecurityConfigurerAdapter {
//......................@Override@Beanpublic AuthenticationManager authenticationManagerBean() throws Exception {return super.authenticationManagerBean();}
}
启动项目
访问地址:http://127.0.0.1:8889/token

测试一下token值是否有效。
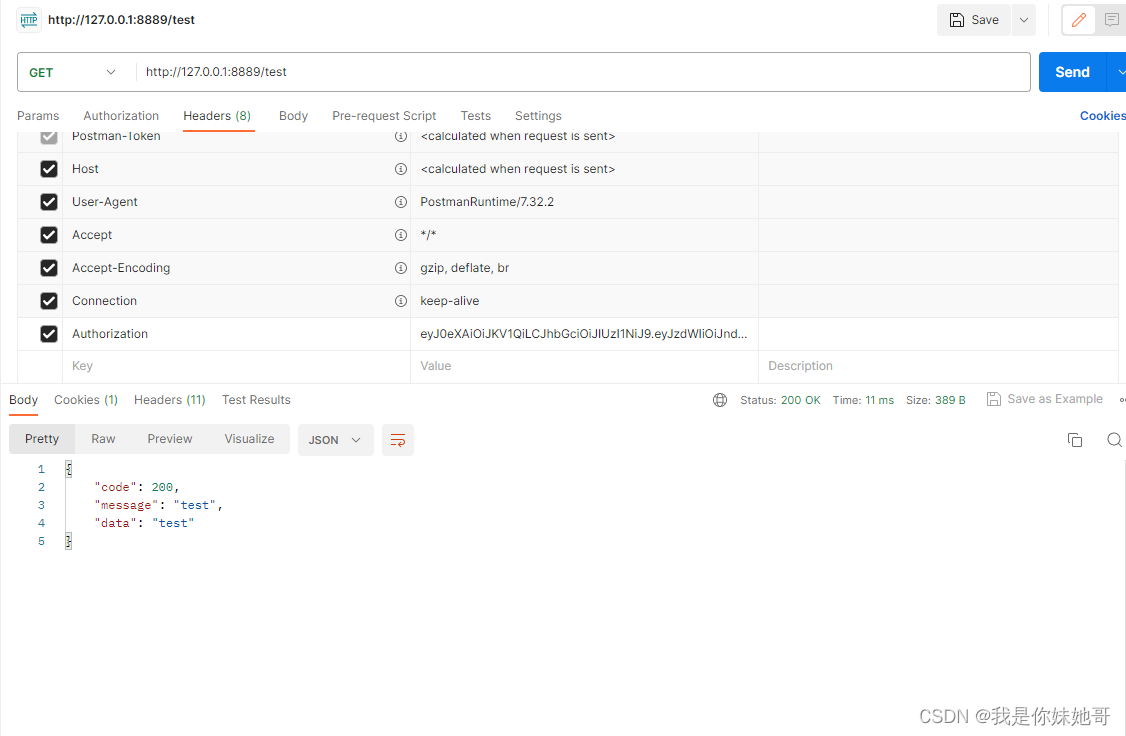
先测试不带Authorization的请求:http://127.0.0.1:8889/test

带Authorization的请求:http://127.0.0.1:8889/test
总结
思路:
整体思路分2个部分:
-
登录认证获取token
提供一个controller,将controller的地址加到spring Security 的config中不做权限控制,访问该controller,将用户名和密码的判断交给spring Security 的userDetailService处理,根据处理的返回结果决定是否生成对应的token值。- 如何交给Spring Security 处理认证过程:
authenticationManager.authenticate()。具体是怎么找到这个入口的,详情可以看步骤三。
- 如何交给Spring Security 处理认证过程:
-
接口认证token值
- 加入JWT生成的工具类
- Spring Security 提供多种认证方式,但我们需要熟悉的是
UsernamePasswordAuthenticationFilter。剩下的认证方式了解即可。 - 在了解了Spring Security的几种认证方式之后,我们需要考虑将自定义的jwtFilter加入到Srping Security的过滤器中。对应上面的步骤二。
- 步骤二完成以后,当token值存在的时候,会把用户信息转化成
UsernamePasswordAuthenticationToken,其实也不是非要这个类,任何一个实现Authentication即接口的类都可以。然后通过SecurityContextHolder.getContext().setAuthentication()方法,将用户信息设置到SecurityContextHolder中
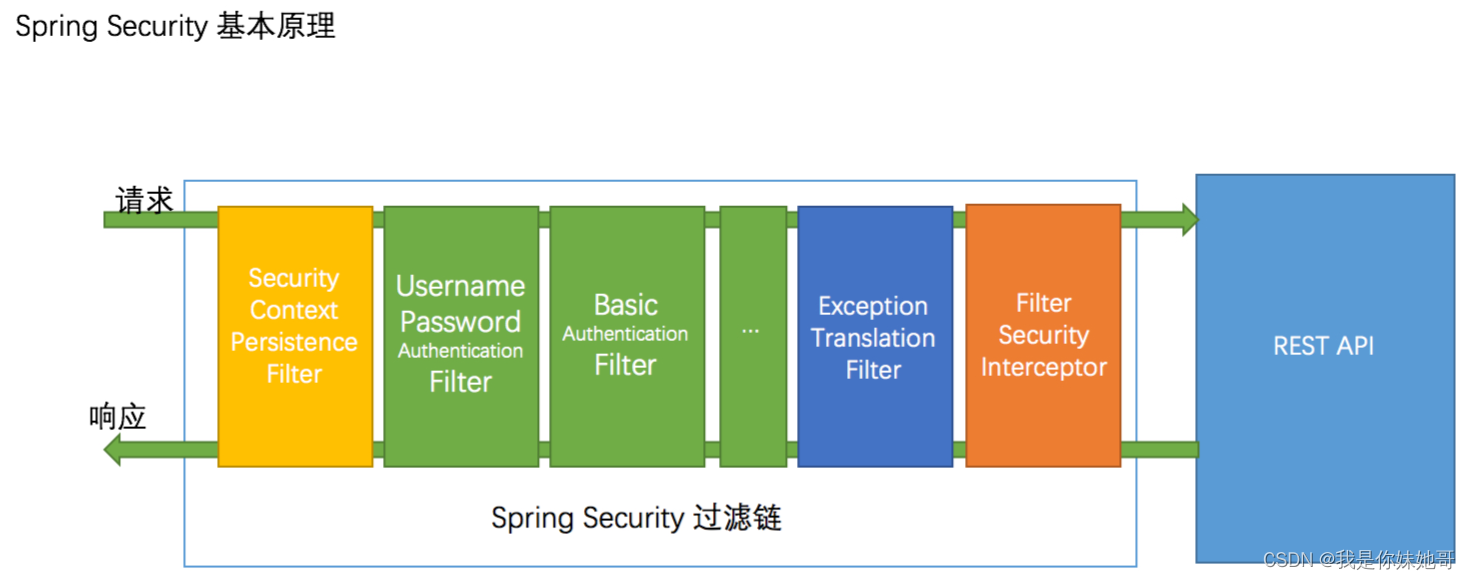
下面是一张Spring Security的过滤器的链路图,基本上Spring Security 都是围绕着这几个过滤器进行一些功能。比如后续的异常、权限控制(选举策略)都是在过滤器中实现。具体内容咱们下个章节继续聊。
习题:
- 为什么通过
SecurityContextHolder.getContext().setAuthentication()方法就可以实现登录了。或者说SecurityContextHolder到底有什么用。 - Spring Security中主要分为权限和认证,认证已经讲过了,那么权限是如何控制的?(提示:也是过滤器,涉及的几个类
SecurityMetadataSource、GrantedAuthority、AccessDecisionManager) - 能否找到Spring Security中的大部分的过滤器?
下一篇主要内容是稍微介绍下Spring Security的源码,顺带解决习题中的几个问题。
上一篇文章地址:SpringBoot2.3集成Spring Security(一)