Flow之所以用起来香,Flow便捷的操作符功不可没,而想要熟练使用更复杂的操作符,那么需要厘清Flow和Channel的关系。
本篇文章构成:
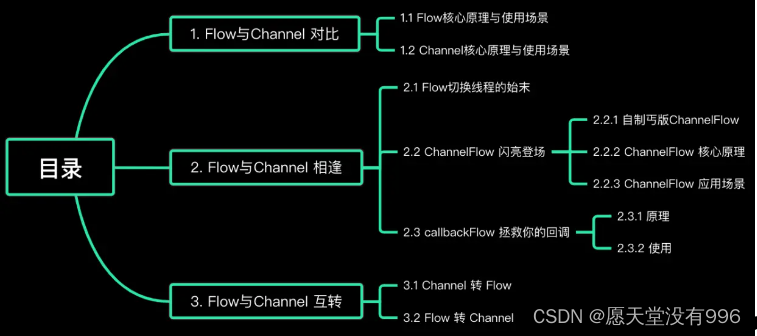
1. Flow与Channel 对比
1.1 Flow核心原理与使用场景
原理
先看最简单的Demo:
fun test0() {runBlocking {//构造flowval flow = flow {//下游emit("hello world ${Thread.currentThread()}")}//收集flowflow.collect {//下游println("collect:$it ${Thread.currentThread()}")}}}
打印结果:
collect:hello world Thread[main,5,main] Thread[main,5,main]
说明下游和上游运行在同一线程里。
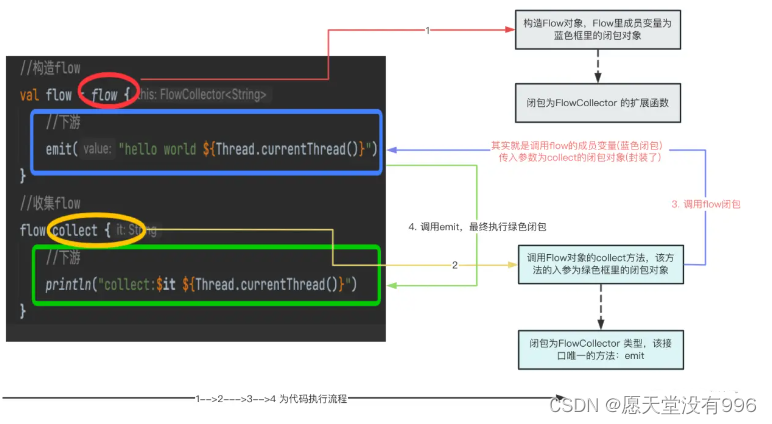
一个最基本的flow包含如下几个元素:
- 操作符,也即是函数
- 上游,通过构造操作符创建
- 下游,通过末端操作符构建
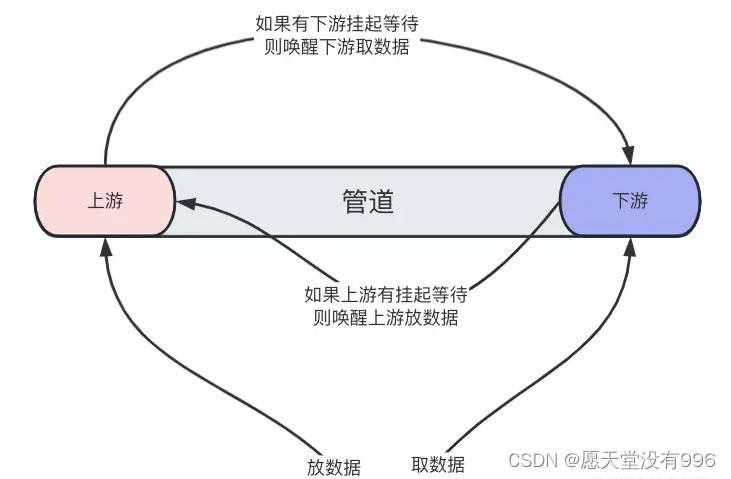
我们可以类比流在管道里流动
上游早就准备好了,只是下游没有发出指令,此时上下游是没有建立起关联的,只有当下游渴了,需要水了才会通知上游放水,这个时候上下游才关联起来,管道就建好了。
因此我们认为Flow是冷流。
更多kotlin细节请移步:Kotlin Flow啊,你将流向何方?
使用
基于Flow的特性,通常将其用在提供数据的场景,比如生产数据的模块将生产过程封装到flow的上游里,最终创建了flow对象。
而使用数据的模块就可以通过该flow对象去收集上游的数据,如下:
//提供数据的模块
class StudentInfo {fun getInfoFlow() : Flow<String> {return flow {//假装构造数据Thread.sleep(2000)emit("name=fish age=18")}}
}//消费数据的模块fun test1() {runBlocking {val flow = StudentInfo().getInfoFlow()flow.collect {println("studentInfo:$it")}}}
1.2 Channel核心原理与使用场景
原理
由上可知,Flow比较被动,在没有收集数据之前,上下游是互不感知的,管道并没有建起来。
而现在我们有个场景:
需要将管道提前建起来,在任何时候都可以在上游生产数据,在下游取数据,此时上下游是可以感知的
先看最简单的Demo:
fun test2() {//提前建立通道/管道val channel = Channel<String>()GlobalScope.launch {//上游放数据(放水)delay(200)val data = "放水啦"println("上游:data=$data ${Thread.currentThread()}")channel.send(data)}GlobalScope.launch {val data = channel.receive()println("下游收到=$data ${Thread.currentThread()}")}}
一个最基本的Channel包含如下几个元素:
- 创建Channel
- 往Channel里放数据(生产)
- 从Channel里取数据(消费)
使用
可以看出与Flow不同的是,生产者、消费者都可以往Channel里存放/取出数据,只是能否进行有效的存放,能否成功取出数据需要根据Channel的状态确定。
Channel最大的特点:
- 生产者、消费者访问Channel是线程安全的,也就是说不管生产者和消费者在哪个线程,它们都能安全的存取数据
- 数据只能被消费一次,上游发送了1条数据,只要有1个下游消费了数据,则其它下游将不会拿到此数据
2. Flow与Channel 相逢
2.1 Flow切换线程的始末
思考一种场景:需要在flow里进行耗时操作(比如网络请求),外界拿到flow对象后等待收集数据即可。 很容易我们就想到如下写法:
fun test3() {runBlocking {//构造flowval flow = flow {//下游//模拟耗时thread { Thread.sleep(3000)emit("hello world ${Thread.currentThread()}")}}}}可惜的是编译不通过:

因为emit是挂起函数,需要在协程作用域里调用。
当然,添加一个协程作用域也很简单:
fun test4() {runBlocking {//构造flowval flow = flow {//下游val coroutineScope = CoroutineScope(Job() + Dispatchers.IO)coroutineScope.launch {//模拟耗时,在子线程执行Thread.sleep(3000)emit("hello world ${Thread.currentThread()}")}}flow.collect {println("collect:$it")}}}编译没有报错,满心欢喜执行,等待3s后,事与愿违:

意思是"检测到了在另一个线程里发射数据,这种行为不是线程安全的因此被禁止了"。
查看源码发现:

在emit之前会检测emit所在的协程与collect所在协程是否一致,不一致就抛出异常。
显然在我们上面的Demo里,collect属于runBlocking协程,而emit属于我们新开的协程,当然不一样了。
2.2 ChannelFlow 闪亮登场
2.2.1 自制丐版ChannelFlow
既然是线程安全问题,我们很容易想到使用Channel来解决,在此之前需要对Flow进行封装:
//参数为SendChannel扩展函数
class MyFlow(private val block: suspend SendChannel<String>.() -> Unit) : Flow<String> {//构造Channelprivate val channel = Channel<String>()override suspend fun collect(collector: FlowCollector<String>) {val coroutineScope = CoroutineScope(Job() + Dispatchers.IO)coroutineScope.launch {//启动协程//模拟耗时,在子线程执行Thread.sleep(3000)//把Channel对象传递出去block(channel)}//获取数据val data = channel.receive()//发射collector.emit(data)}
}
如上,重写了Flow的collect函数,当外界调用flow.collect时:
- 先启动一个协程
- 从channel里读取数据,没有数据则挂起当前协程
- 1里的协程执行,调用flow的闭包执行上游逻辑
- 拿到数据后进行发射,最终传递到collect的闭包
外界使用flow:
fun test5() {runBlocking {//构造flowval myFlow = MyFlow {send("hello world emit 线程: ${Thread.currentThread()}")}myFlow.collect {println("下游收到=$it collect 线程: ${Thread.currentThread()}")}}}最终打印:
下游收到=hello world emit 线程: Thread[DefaultDispatcher-worker-1,5,main] collect 线程: Thread[main,5,main]
可以看出,上游、下游在不同的协程里执行,也在不同的线程里执行。
如此一来就满足了需求。
2.2.2 ChannelFlow 核心原理
上面重写的Flow没有使用泛型,也没有对Channel进行关闭,还有其它的点没有完善。
还好官方已经提供了完善的类和操作符,得益于此我们很容易就完成如上需求。
fun test6() {runBlocking {//构造flowval channelFlow = channelFlow<String> {send("hello world emit 线程: ${Thread.currentThread()}")}channelFlow.collect {println("下游收到=$it collect 线程: ${Thread.currentThread()}")}}}接着来简单分析其原理:
#ChannelFlow.kt
private open class ChannelFlowBuilder<T>(//闭包对象private val block: suspend ProducerScope<T>.() -> Unit,context: CoroutineContext = EmptyCoroutineContext,//Channel模式capacity: Int = Channel.BUFFERED,//Buffer满之后的处理方式,此处是挂起onBufferOverflow: BufferOverflow = BufferOverflow.SUSPEND
) : ChannelFlow<T>(context, capacity, onBufferOverflow) {//...override suspend fun collectTo(scope: ProducerScope<T>) =//调用闭包block(scope)//...
}public abstract class ChannelFlow<T>(// upstream context@JvmField public val context: CoroutineContext,// buffer capacity between upstream and downstream context@JvmField public val capacity: Int,// buffer overflow strategy@JvmField public val onBufferOverflow: BufferOverflow
) : FusibleFlow<T> {//produceImpl 开启的新协程会调用这internal val collectToFun: suspend (ProducerScope<T>) -> Unitget() = { collectTo(it) }public open fun produceImpl(scope: CoroutineScope): ReceiveChannel<T> =//创建Channel协程,返回Channel对象scope.produce(context, produceCapacity, onBufferOverflow, start = CoroutineStart.ATOMIC, block = collectToFun)//重写collect函数override suspend fun collect(collector: FlowCollector<T>): Unit =//开启协程coroutineScope {//发射数据collector.emitAll(produceImpl(this))}
}
produceImpl函数并不耗时,仅仅只是开启了新的协程。
接着来看collector.emitAll:
#Channels.kt
private suspend fun <T> FlowCollector<T>.emitAllImpl(channel: ReceiveChannel<T>, consume: Boolean) {ensureActive()var cause: Throwable? = nulltry {//循环从Channel读取数据while (true) {//从Channel获取数据val result = run { channel.receiveCatching() }if (result.isClosed) {//如果Channel关闭了,也就是上游关闭了,则退出循环result.exceptionOrNull()?.let { throw it }break // returns normally when result.closeCause == null}//发射数据emit(result.getOrThrow())}} catch (e: Throwable) {cause = ethrow e} finally {//关闭Channelif (consume) channel.cancelConsumed(cause)}
}
从源码可能无法一眼厘清其流程,老规矩上图就会清晰明了。
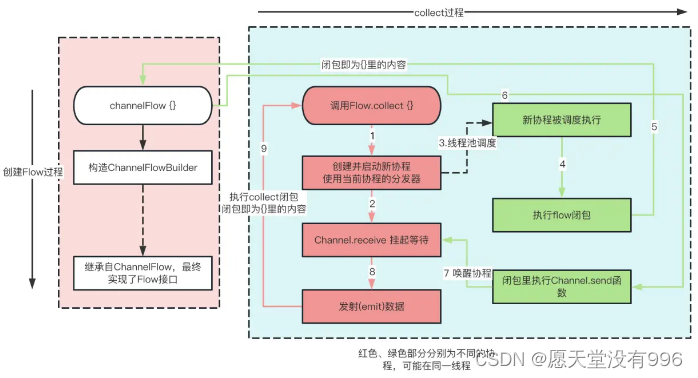
上一小结丐版的实现就是参照channelFlow,若是了解了丐版,再来了解官方豪华版就比较容易。
2.2.3 ChannelFlow 应用场景
查看ChannelFlow衍生的子类:

这些子类是Flow里各种复杂操作符的基础,如:
buffer、flowOn、flatMapLatest、flatMapMerge等。
因此掌握了ChannelFlow再来看各种操作符就会豁然开朗。
2.3 callbackFlow 拯救你的回调
2.3.1 原理
使用channelFlow {},虽然能够在新的协程里执行闭包,但由于新协程的调度器是使用collect所在协程调度器不够灵活:
fun test6() {runBlocking {//构造flowval channelFlow = channelFlow<String> {send("hello world emit 线程: ${Thread.currentThread()}")}channelFlow.collect {println("下游收到=$it collect 线程: ${Thread.currentThread()}")}}}collect所在的协程为runBlocking协程,而send函数虽然在新的协程里,但它的协程调度器使用的是collect协程的,因此send函数与collect函数所运行的线程是同一个线程。
虽然我们可以更改外层的调度器使之运行在不同的线程如:
fun test6() {GlobalScope.launch {//构造flowval channelFlow = channelFlow<String> {send("hello world emit 线程: ${Thread.currentThread()}")}channelFlow.collect {println("下游收到=$it collect 线程: ${Thread.currentThread()}")}}}但终归不灵活,从设计的角度来说,Flow(对象)的提供者并不关心使用者在什么样的环境下进行collect操作。
还是以网络请求为例:
fun getName(callback:NetResult<String>) {thread {//假装从网络获取Thread.sleep(2000)callback.onSuc("I'm fish")}
}interface NetResult<T> {fun onSuc(t:T)fun onFail(err:String)
}
如上,存在这样一个网络请求,在子线程里进行网络请求,并通过回调通知外部调用者。
很典型的一个请求回调,该怎么把它封装为Flow呢?尝试用channelFlow进行封装:
fun test7() {runBlocking {//构造flowval channelFlow = channelFlow {getName(object : NetResult<String> {override fun onSuc(t: String) {println("begin send")trySend("hello world emit 线程: ${Thread.currentThread()}")println("stop send")}override fun onFail(err: String) {}})}channelFlow.collect {println("下游收到=$it collect 线程: ${Thread.currentThread()}")}}}看似美好,实则却收不到数据,明明"begin send"和"stop send"都打印了,为啥collect闭包里没有打印呢?
getName函数内部开启了线程,因此它本身并不是耗时操作,由此可知channelFlow闭包很快就执行完成了。
由ChannelFlow源码可知:CoroutineScope.produce的闭包执行结束后会关闭Channel:
既然channel都关闭了,当子线程里回调onSuc并执行trySend并不会再往channel发送数据,collect当然就收不到了。
要解决这个问题也很简单:不让协程关闭channel,换句话说只要协程没有结束,那么channel就不会被关闭。而让协程不结束,最直接的方法就是在协程里调用挂起函数。
刚好,官方也提供了相应的挂起函数:
fun test7() {runBlocking {//构造flowval channelFlow = channelFlow {getName(object : NetResult<String> {override fun onSuc(t: String) {println("begin send")trySend("hello world emit 线程: ${Thread.currentThread()}")println("stop send")//关闭channel,触发awaitClose闭包执行close()}override fun onFail(err: String) {}})//挂起函数awaitClose {//走到此,channel关闭println("awaitClose")}}channelFlow.collect {println("下游收到=$it collect 线程: ${Thread.currentThread()}")}}}
相较上个Demo而言,增加了2点:
- awaitClose 挂起协程,该协程不结束,则channel不被关闭
- channel使用完成后需要释放资源,主动调用channel的close函数,该函数最终会触发awaitClose闭包执行,在闭包里做一些释放资源的操作
你可能会说以上用法不太友好,如果不知道有awaitClose这函数,都无法排查为啥没收到数据。 嗯,这官方也考虑到了,那就是callbackFlow。
2.3.2 使用
和channelFlow的使用一模一样:
    fun test8() {runBlocking {//构造flowval channelFlow = callbackFlow {getName(object : NetResult<String> {override fun onSuc(t: String) {println("begin send")trySend("hello world emit 线程: ${Thread.currentThread()}")println("stop send")//关闭channel,触发awaitClose闭包执行
//                        close()}override fun onFail(err: String) {}})//挂起函数awaitClose {//走到此,channel关闭println("awaitClose")}}channelFlow.collect {println("下游收到=$it collect 线程: ${Thread.currentThread()}")}}}
有了callbackFlow,我们就可以优雅的将回调转为Flow提供给外部调用者使用。
3. Flow与Channel 互转
3.1 Channel 转 Flow
Flow和Channel相遇,碰撞出了ChannelFlow,ChannelFlow顾名思义,既是Channel也是Flow,因此可以作为中介对Flow与Channel进行转换。
fun test9() {runBlocking {val channel = Channel<String>()val flow = channel.receiveAsFlow()GlobalScope.launch {flow.collect {println("collect:$it")}}delay(200)channel.send("hello fish")}}
channel通过send,flow通过collect收集。
3.2 Flow 转 Channel
fun test10() {runBlocking {val flow = flow {emit("hello fish")}val channel = flow.produceIn(this)val data = channel.receive()println("data:$data")}}
flow.produceIn(this) 触发collect操作,进而执行flow闭包,emit将数据放到channel里,最后通过channel.receive()取数据。
