本次实例涉及三个项目
核心项目工程unify_authorization_server(认证授权登录)
资源服务器项目unify_resource_server
测试项目是前面几篇写的项目 这里没有改动直接用来测试实例项目
(一)unify_authorization_server
pom相关依赖 我采用的是spring-boot 2.6.3
<?xml version="1.0" encoding="UTF-8"?>
<project xmlns="http://maven.apache.org/POM/4.0.0" xmlns:xsi="http://www.w3.org/2001/XMLSchema-instance"xsi:schemaLocation="http://maven.apache.org/POM/4.0.0 https://maven.apache.org/xsd/maven-4.0.0.xsd"><modelVersion>4.0.0</modelVersion><parent><groupId>org.springframework.boot</groupId><artifactId>spring-boot-starter-parent</artifactId><version>2.6.3</version><relativePath/> <!-- lookup parent from repository --></parent><groupId>com.xql</groupId><artifactId>unify_authorization_server</artifactId><version>0.0.1-SNAPSHOT</version><packaging>war</packaging><name>unify_authorization_server</name><description>unify_authorization_server</description><properties><maven.compiler.source>8</maven.compiler.source><maven.compiler.target>8</maven.compiler.target><project.build.sourceEncoding>UTF-8</project.build.sourceEncoding><spring-boot-version>2.6.3</spring-boot-version><java.version>1.8</java.version><mysql.version>8.0.28</mysql.version><fastjson.version>1.2.83</fastjson.version><oauth2.version>2.1.2.RELEASE</oauth2.version><servlet.version>3.1.0</servlet.version><spring-cloud-version>2021.0.4</spring-cloud-version><security-jwt.version>1.0.10.RELEASE</security-jwt.version><lombok.version>1.18.8</lombok.version><hutool.version>5.8.16</hutool.version><mybatis.version>2.2.2</mybatis.version><swagger2.version>2.9.2</swagger2.version><swagger2.annotations.version>1.5.24</swagger2.annotations.version><swagger2.bootstrapui.version>1.9.3</swagger2.bootstrapui.version><swagger2.models.version>1.5.24</swagger2.models.version></properties><dependencyManagement><dependencies><dependency><groupId>org.springframework.boot</groupId><artifactId>spring-boot-dependencies</artifactId><version>${spring-boot-version}</version><type>pom</type><scope>import</scope></dependency><dependency><groupId>org.springframework.cloud</groupId><artifactId>spring-cloud-dependencies</artifactId><version>${spring-cloud-version}</version><type>pom</type><scope>import</scope></dependency><dependency><groupId>javax.servlet</groupId><artifactId>javax.servlet-api</artifactId><version>${servlet.version}</version></dependency><dependency><groupId>mysql</groupId><artifactId>mysql-connector-java</artifactId><version>${mysql.version}</version></dependency><dependency><groupId>com.alibaba</groupId><artifactId>fastjson</artifactId><version>${fastjson.version}</version></dependency><dependency><groupId>org.springframework.security</groupId><artifactId>spring-security-jwt</artifactId><version>${security-jwt.version}</version></dependency><dependency><groupId>org.springframework.security.oauth.boot</groupId><artifactId>spring-security-oauth2-autoconfigure</artifactId><version>${oauth2.version}</version></dependency><dependency><groupId>org.springframework.cloud</groupId><artifactId>spring-cloud-starter-security</artifactId><version>${oauth2.version}</version></dependency><dependency><groupId>org.springframework.cloud</groupId><artifactId>spring-cloud-starter-oauth2</artifactId><version>${oauth2.version}</version></dependency></dependencies></dependencyManagement><dependencies><dependency><groupId>org.springframework.boot</groupId><artifactId>spring-boot-starter-web</artifactId></dependency><!-- aop 切面编程--><dependency><groupId>org.aspectj</groupId><artifactId>aspectjrt</artifactId><version>1.8.6</version></dependency><dependency><groupId>org.aspectj</groupId><artifactId>aspectjweaver</artifactId><version>1.8.6</version></dependency><dependency><groupId>com.google.code.gson</groupId><artifactId>gson</artifactId><version>2.10.1</version></dependency><!--redis依赖--><dependency><groupId>org.springframework.boot</groupId><artifactId>spring-boot-starter-data-redis</artifactId></dependency><dependency><groupId>org.springframework.cloud</groupId><artifactId>spring-cloud-starter-security</artifactId></dependency><dependency><groupId>org.springframework.cloud</groupId><artifactId>spring-cloud-starter-oauth2</artifactId></dependency><dependency><groupId>org.springframework.security</groupId><artifactId>spring-security-jwt</artifactId></dependency><dependency><groupId>javax.interceptor</groupId><artifactId>javax.interceptor-api</artifactId><version>1.2</version></dependency><dependency><groupId>com.alibaba</groupId><artifactId>fastjson</artifactId></dependency><dependency><groupId>mysql</groupId><artifactId>mysql-connector-java</artifactId></dependency><dependency><groupId>org.mybatis.spring.boot</groupId><artifactId>mybatis-spring-boot-starter</artifactId><version>2.2.2</version></dependency><dependency><groupId>org.projectlombok</groupId><artifactId>lombok</artifactId><version>${lombok.version}</version></dependency><dependency><groupId>cn.hutool</groupId><artifactId>hutool-all</artifactId><version>${hutool.version}</version></dependency><dependency><groupId>org.springframework.security</groupId><artifactId>spring-security-jwt</artifactId></dependency><!--jwt依赖--><dependency><groupId>io.jsonwebtoken</groupId><artifactId>jjwt</artifactId><version>0.9.0</version></dependency><!--使内嵌的tomcat支持解析jsp--><dependency><groupId>org.apache.tomcat.embed</groupId><artifactId>tomcat-embed-jasper</artifactId><version>9.0.69</version></dependency><!--引入jsp的支持--><dependency><groupId>jstl</groupId><artifactId>jstl</artifactId><version>1.2</version></dependency><dependency><groupId>javax.servlet</groupId><artifactId>javax.servlet-api</artifactId><version>4.0.1</version></dependency><dependency><groupId>io.springfox</groupId><artifactId>springfox-swagger2</artifactId><version>${swagger2.version}</version><exclusions><exclusion><artifactId>swagger-annotations</artifactId><groupId>io.swagger</groupId></exclusion></exclusions></dependency><dependency><groupId>io.springfox</groupId><artifactId>springfox-swagger-ui</artifactId><version>${swagger2.version}</version></dependency><dependency><groupId>io.swagger</groupId><artifactId>swagger-annotations</artifactId><version>${swagger2.annotations.version}</version></dependency><dependency><groupId>io.swagger</groupId><artifactId>swagger-models</artifactId><version>${swagger2.models.version}</version></dependency><dependency><groupId>com.github.xiaoymin</groupId><artifactId>swagger-bootstrap-ui</artifactId><version>${swagger2.bootstrapui.version}</version></dependency><dependency><groupId>javax.validation</groupId><artifactId>validation-api</artifactId><!-- 版本号可根据具体需要进行指定,这里以2.0.1.Final为例 --><version>2.0.1.Final</version></dependency></dependencies><build><finalName>unify_authorization_server</finalName><resources><resource><directory>${basedir}/src/main/webapp</directory><!--注意此次必须要放在此目录下才能被访问到--><targetPath>META-INF/resources</targetPath><includes><include>**/**</include></includes></resource><resource><directory>${basedir}/src/main/resources</directory><includes><include>**/**</include></includes></resource></resources><plugins><plugin><groupId>org.springframework.boot</groupId><artifactId>spring-boot-maven-plugin</artifactId><version>1.4.2.RELEASE</version><configuration><fork>true</fork><mainClass>com.xql.unify_authorization_server.UnifyAuthorizationServerApplication</mainClass></configuration></plugin></plugins></build></project>
application.properties
spring.application.name=uaa-service
server.port=53020
spring.main.allow-bean-definition-overriding=true
server.servlet.context-path=/uaa-service
spring.mvc.throw-exception-if-no-handler-found=true
spring.web.resources.add-mappings=false
management.endpoints.web.exposure.include=refresh,health,info,env#mysql???
spring.datasource.river-class-name=com.mysql.cj.jdbc.Driver
spring.datasource.url= jdbc:mysql://xxxxxxxxxxxx:3307/oauth?useUnicode=true&characterEncoding=utf8
spring.datasource.username= root
spring.datasource.password= xxxxxx
# ?????????????????????????????????''
spring.main.allow-circular-references=truespring.redis.host=xxxxxxxxxxxx
spring.redis.port=6379
spring.redis.password=xxxxxxxxxxx
mybatis.type-aliases-package= com.xql.unify_authorization_server.entitymybatis.mapper-locations= classpath:mapper/*Mapper.xml
#???????
spring.mvc.view.prefix= /
spring.mvc.view.suffix= .jsp
spring.mvc.pathmatch.matching-strategy=ant_path_matcher#
jwt.signing.key=xuzilv
启动类
package com.xql.unify_authorization_server;import org.mybatis.spring.annotation.MapperScan;
import org.springframework.boot.SpringApplication;
import org.springframework.boot.autoconfigure.SpringBootApplication;
import org.springframework.security.oauth2.config.annotation.web.configuration.EnableAuthorizationServer;@SpringBootApplication(scanBasePackages={"com.xql.unify_authorization_server.*"})
@MapperScan(basePackages = {"com.xql.unify_authorization_server.dao"})
@EnableAuthorizationServer
public class UnifyAuthorizationServerApplication {public static void main(String[] args) {SpringApplication.run(UnifyAuthorizationServerApplication.class, args);}}
配置配置SpringSecurity
package com.xql.unify_authorization_server.config;import com.xql.unify_authorization_server.service.UserService;
import org.springframework.beans.factory.annotation.Autowired;
import org.springframework.context.annotation.Bean;
import org.springframework.context.annotation.Configuration;
import org.springframework.security.authentication.AuthenticationManager;
import org.springframework.security.config.annotation.authentication.builders.AuthenticationManagerBuilder;
import org.springframework.security.config.annotation.web.builders.HttpSecurity;
import org.springframework.security.config.annotation.web.configuration.WebSecurityConfigurerAdapter;
import org.springframework.security.config.http.SessionCreationPolicy;
import org.springframework.security.core.userdetails.UserDetailsService;
import org.springframework.security.crypto.bcrypt.BCryptPasswordEncoder;
import org.springframework.security.crypto.password.PasswordEncoder;
import org.springframework.security.web.access.AccessDeniedHandler;
import org.springframework.security.web.authentication.UsernamePasswordAuthenticationFilter;
import org.springframework.security.web.savedrequest.HttpSessionRequestCache;/*** @description: 配置SpringSecurity* @author xuqinglei* @date 2023/06/19 15:53* @version 1.0*/
@Configuration
public class SecurityConfig extends WebSecurityConfigurerAdapter {@Autowiredprivate UserService userService;@AutowiredJwtAuthenticationTokenFilter jwtAuthenticationTokenFilter;//    @Autowired
//    private AuthenticationEntryPoint authenticationEntryPoint;@Autowiredprivate AccessDeniedHandler accessDeniedHandler;@Beanpublic HttpSessionRequestCache httpSessionRequestCache() {return new HttpSessionRequestCache();}protected void configure(HttpSecurity http) throws Exception {http//关闭csrf.csrf().disable()//不通过Session获取SecurityContext.sessionManagement().sessionCreationPolicy(SessionCreationPolicy.STATELESS).and().authorizeRequests()// 对于登录接口 允许匿名访问.antMatchers("/login/oauth", "/login/in", "/images/**", "/css/**","/oauth/authorize","/js/**","/static/**","/resources/**","/oauth/token").permitAll().and().requestCache()// 添加 HttpSessionRequestCache 对象.requestCache(httpSessionRequestCache()).and().formLogin().loginPage("/login/oauth").permitAll();//把token校验过滤器添加到过滤器链中http.addFilterBefore(jwtAuthenticationTokenFilter, UsernamePasswordAuthenticationFilter.class);http.exceptionHandling()
//                .authenticationEntryPoint(authenticationEntryPoint).accessDeniedHandler(accessDeniedHandler);//允许跨域http.cors().disable();}@Bean@Overridepublic AuthenticationManager authenticationManagerBean() throws Exception {return super.authenticationManagerBean();}@Beanpublic MyAuthenticationProvider myAuthenticationProvider() {return new MyAuthenticationProvider();}@Overrideprotected void configure(AuthenticationManagerBuilder auth) throws Exception {auth.authenticationProvider(myAuthenticationProvider());auth.userDetailsService(userService);}@Bean@Overrideprotected UserDetailsService userDetailsService() {return userService;}@Beanpublic PasswordEncoder passwordEncoder() {return new BCryptPasswordEncoder();}}
配置MyAuthenticationProvider
package com.xql.unify_authorization_server.config;import cn.hutool.core.util.StrUtil;
import com.xql.unify_authorization_server.entity.LoginUser;
import org.springframework.beans.factory.annotation.Autowired;
import org.springframework.security.authentication.AuthenticationProvider;
import org.springframework.security.authentication.UsernamePasswordAuthenticationToken;
import org.springframework.security.core.Authentication;
import org.springframework.security.core.AuthenticationException;
import org.springframework.security.core.GrantedAuthority;
import org.springframework.security.core.userdetails.UserDetails;
import org.springframework.security.core.userdetails.UserDetailsService;import java.util.Collection;
import java.util.Optional;/*** @description: MyAuthenticationProvider 是一个实现了 AuthenticationProvider 接口的类,* 用于自定义用户认证逻辑。在 Spring Security 中,AuthenticationProvider* 负责根据用户提供的身份信息进行认证,并返回一个 Authentication 对象,* 表示认证成功后的用户身份信息。在 MyAuthenticationProvider 中,* 你可以实现自己的用户认证逻辑,例如从数据库中查询用户信息并进行密码比对等操作。* 当用户尝试进行身份认证时,Spring Security 会自动调用 MyAuthenticationProvider 中的 authenticate* 方法进行认证。如果认证成功,authenticate 方法应该返回一个 Authentication 对象,* 表示认证成功后的用户身份信息;如果认证失败,authenticate 方法应该抛出一个 AuthenticationException 异常,* 表示认证失败的原因。* @author xuqinglei* @date 2023/06/19 14:28* @version 1.0*/
public class MyAuthenticationProvider implements AuthenticationProvider {@Autowiredprivate UserDetailsService userDetailsService;@Overridepublic Authentication authenticate(Authentication authentication) throws AuthenticationException {Optional<Authentication> optional = Optional.ofNullable(authentication);String userAccount = optional.map(Authentication::getPrincipal).map(String::valueOf).orElse("");if (StrUtil.isNotBlank(userAccount)){UserDetails details = userDetailsService.loadUserByUsername(userAccount);LoginUser loginUser = Optional.ofNullable(details).map(key -> (LoginUser) key).orElse(null);Collection<? extends GrantedAuthority> authorities = Optional.ofNullable(loginUser).map(LoginUser::getAuthorities).orElse(null);return new UsernamePasswordAuthenticationToken(loginUser, authentication.getCredentials(), authorities);}return null;}@Overridepublic boolean supports(Class<?> authentication) {return authentication.equals(UsernamePasswordAuthenticationToken.class);}}
配置JwtAuthenticationTokenFilter
package com.xql.unify_authorization_server.config;import cn.hutool.core.util.StrUtil;import com.xql.unify_authorization_server.commons.SystemConstant;
import com.xql.unify_authorization_server.entity.LoginUser;
import com.xql.unify_authorization_server.enums.RedisEnums;
import com.xql.unify_authorization_server.utils.JwtUtil;
import io.jsonwebtoken.Claims;
import org.springframework.beans.factory.annotation.Autowired;
import org.springframework.security.authentication.UsernamePasswordAuthenticationToken;
import org.springframework.security.core.context.SecurityContextHolder;
import org.springframework.stereotype.Component;
import org.springframework.util.AntPathMatcher;
import org.springframework.util.Assert;
import org.springframework.web.filter.OncePerRequestFilter;
import javax.servlet.FilterChain;
import javax.servlet.ServletException;
import javax.servlet.http.HttpServletRequest;
import javax.servlet.http.HttpServletResponse;
import java.io.IOException;
import java.util.Objects;
import java.util.Optional;/*** @description:JwtAuthenticationTokenFilter 是一个继承了 OncePerRequestFilter 的过滤器,* 用于在每个请求中验证 JWT Token。OncePerRequestFilter 是 Spring 提供的一个过滤器基类,* 它可以确保在同一个请求中只会被调用一次。在 JwtAuthenticationTokenFilter 中,* 我们可以实现 JWT Token 的验证逻辑,并将认证后的用户信息存储在 SecurityContextHolder 中,* 以便在后续的请求中进行访问控制。通常情况下,JwtAuthenticationTokenFilter* 会被配置在 Spring Security 的过滤器链中,以确保在每个请求中都会被调用。* @author xuqinglei* @date 2023/06/19 14:27* @version 1.0*/
@Component
public class JwtAuthenticationTokenFilter extends OncePerRequestFilter {@Autowiredprivate RedisCache redisCache;@Overrideprotected void doFilterInternal(HttpServletRequest request, HttpServletResponse response, FilterChain filterChain) throws ServletException, IOException {// 获取请求路径String requestURI = request.getRequestURI();// 判断是否是登录请求AntPathMatcher pathMatcher = new AntPathMatcher();if (pathMatcher.match(SystemConstant.Jwt.NO_JWT_TOKEN_MATCHER_ONE, requestURI)) {filterChain.doFilter(request, response);return;}String authorization = request.getHeader(SystemConstant.Jwt.Authorization);if (pathMatcher.match(SystemConstant.Jwt.NO_JWT_TOKEN_MATCHER_TWO, requestURI)) {authorization = Optional.ofNullable(redisCache.getCacheObject(request.getParameter(SystemConstant.Jwt.STATE))).map(String::valueOf).orElse("");}if (StrUtil.isBlank(authorization)) {filterChain.doFilter(request, response);return;}authorization = Optional.ofNullable(authorization).map(token->token.replace(SystemConstant.Jwt.BEARER, "")).orElse("");//解析tokenString userId;try {Claims claims = JwtUtil.parseJWT(authorization);userId = claims.getSubject();} catch (Exception e) {e.printStackTrace();throw new RuntimeException(authorization+"非法authorization");}//从redis中获取用户信息LoginUser user = redisCache.getCacheObject(RedisEnums.login(userId));request.setAttribute(SystemConstant.Jwt.USER_BEAN, user);request.setAttribute(SystemConstant.Jwt.AUTHORIZATION_TOKEN, authorization);Assert.isTrue(Objects.nonNull(user),"用户未登录");//存入SecurityContextHolder//TODO 获取权限信息封装到Authentication中UsernamePasswordAuthenticationToken authenticationToken =new UsernamePasswordAuthenticationToken(user,null,user.getAuthorities());SecurityContextHolder.getContext().setAuthentication(authenticationToken);//放行filterChain.doFilter(request, response);}}
OAUTH2配置类
package com.xql.unify_authorization_server.config;import com.xql.unify_authorization_server.commons.SystemConstant;
import com.xql.unify_authorization_server.service.impl.MyAuthorizationCodeServices;
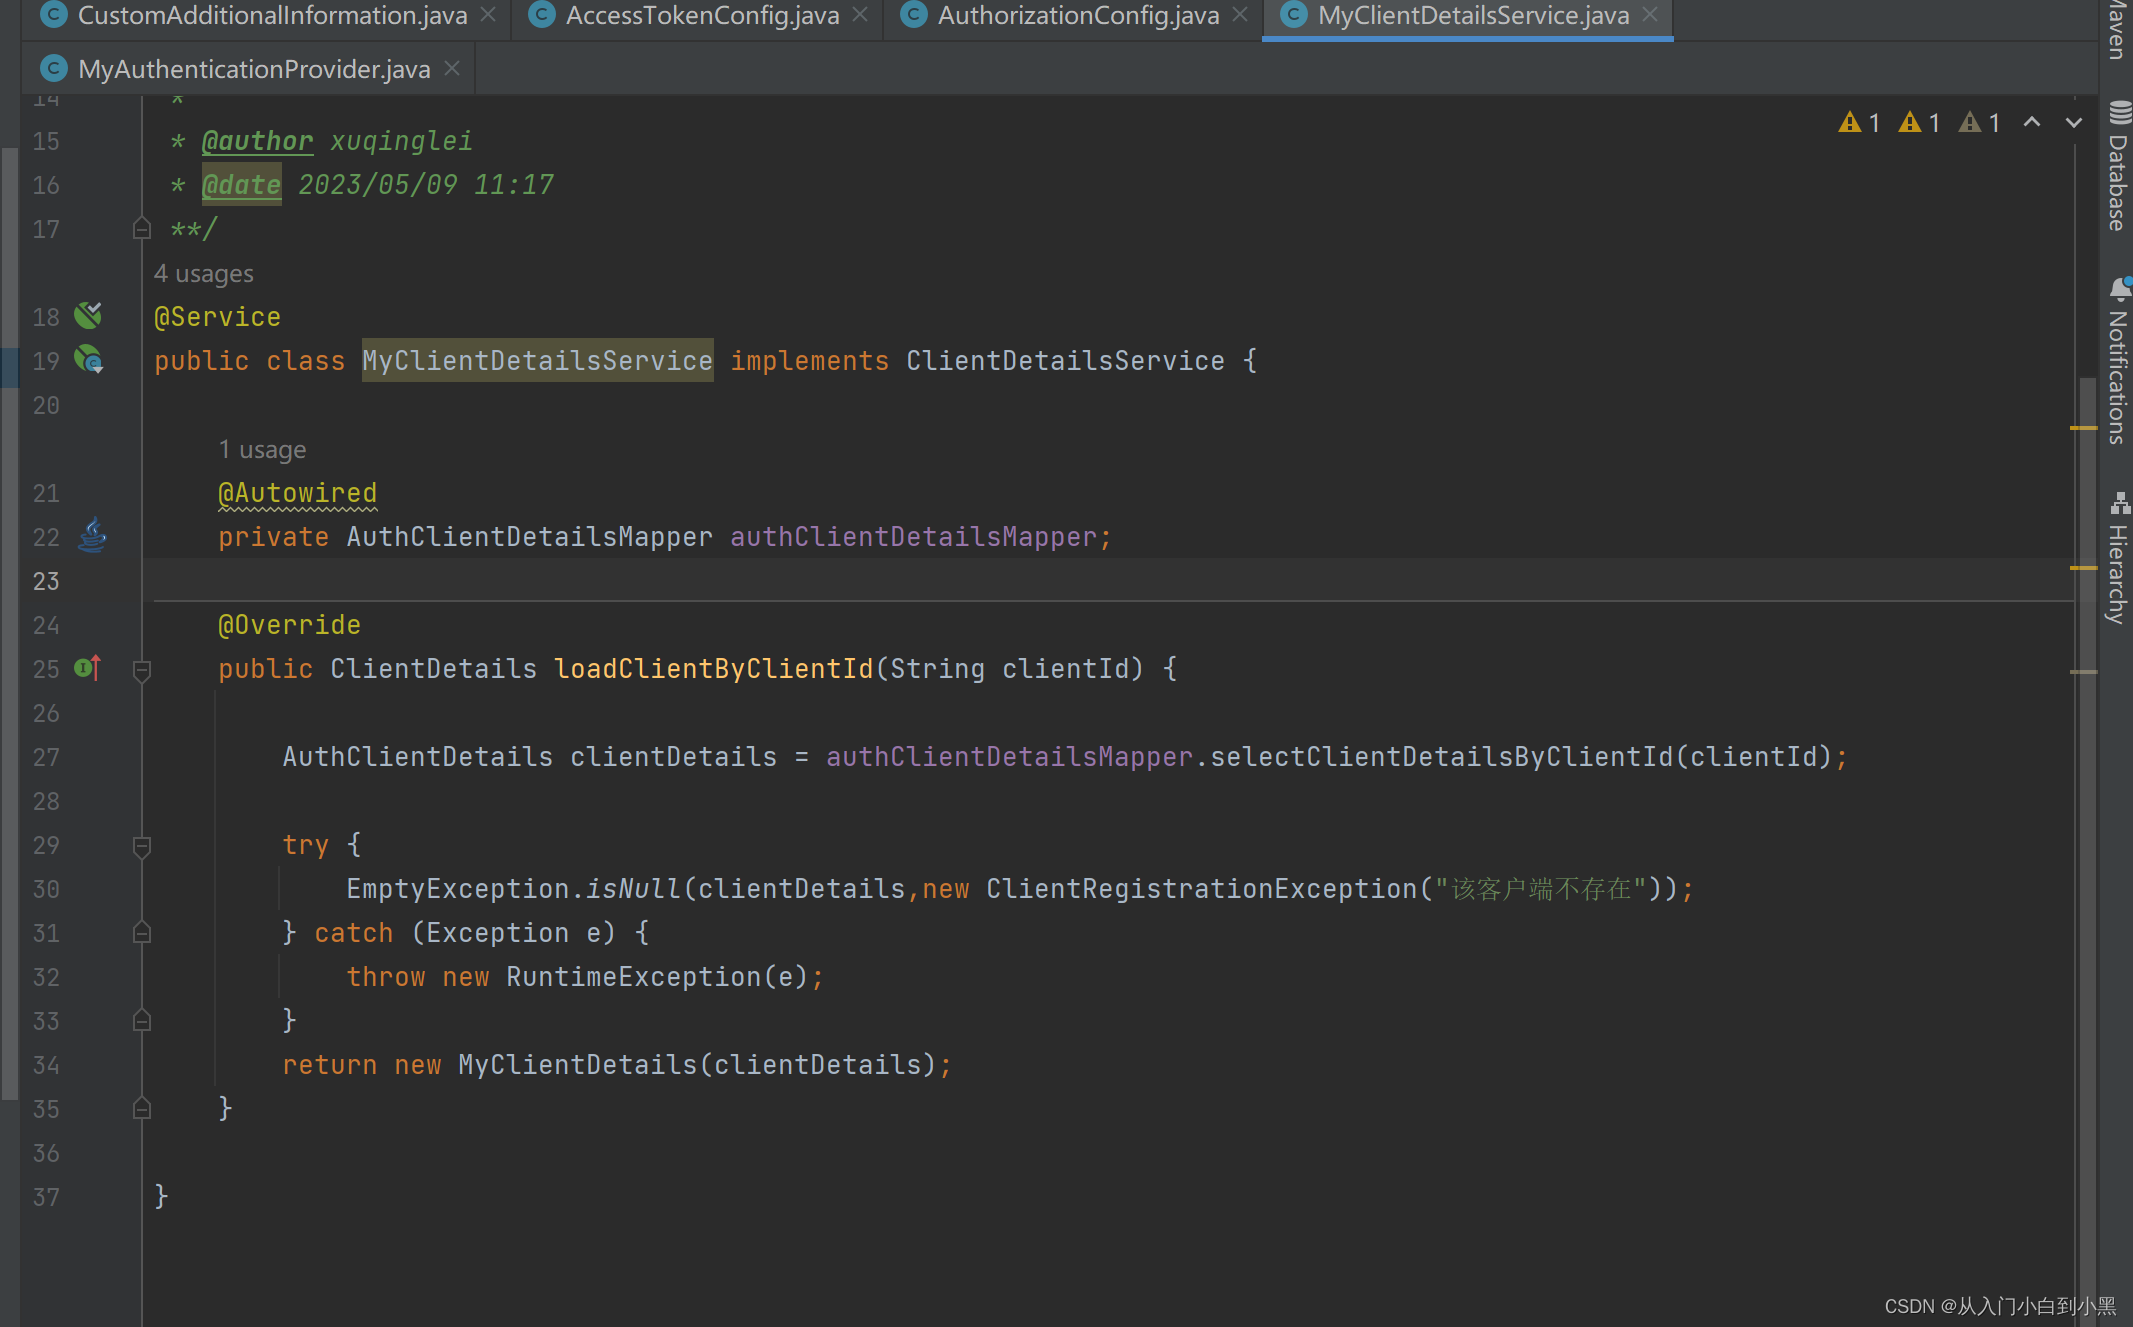
import com.xql.unify_authorization_server.service.impl.MyClientDetailsService;
import org.springframework.beans.factory.annotation.Autowired;
import org.springframework.context.annotation.Configuration;
import org.springframework.security.authentication.AuthenticationManager;
import org.springframework.security.oauth2.config.annotation.configurers.ClientDetailsServiceConfigurer;
import org.springframework.security.oauth2.config.annotation.web.configuration.AuthorizationServerConfigurerAdapter;
import org.springframework.security.oauth2.config.annotation.web.configurers.AuthorizationServerEndpointsConfigurer;
import org.springframework.security.oauth2.config.annotation.web.configurers.AuthorizationServerSecurityConfigurer;
import org.springframework.security.oauth2.provider.token.AuthorizationServerTokenServices;/*** @description: OAUTH2配置类* @author xuqinglei* @date 2023/06/19 14:23* @version 1.0*/
@Configuration
public class AuthorizationConfig extends AuthorizationServerConfigurerAdapter {@AutowiredAuthenticationManager authenticationManager;@Autowiredprivate AuthorizationServerTokenServices authorizationServerTokenServices;@Autowiredprivate MyClientDetailsService clientDetailsService;@Autowiredprivate MyAuthorizationCodeServices authorizationCodeServices;/*** 用来配置令牌端点的安全约束.* 用来配置令牌端点的安全约束,也就是这个端点谁能访问,谁不能访问。* checkTokenAccess 是指一个 Token 校验的端点,这个端点我们设置为可以直接访问* (在后面,当资源服务器收到 Token 之后,需要去校验 Token 的合法性,就会访问这个端点)。**/@Overridepublic void configure(AuthorizationServerSecurityConfigurer security) throws Exception {//tokenKeyAccess oauth/token_key公开//checkTokenAccess oauth/check_token公开security.tokenKeyAccess(SystemConstant.Oauth.PERMIT_ALL).checkTokenAccess(SystemConstant.Oauth.PERMIT_ALL).allowFormAuthenticationForClients(); // 表单认证,申请令牌}@Overridepublic void configure(ClientDetailsServiceConfigurer clients) throws Exception {clients.withClientDetails(clientDetailsService);}@Overridepublic void configure(AuthorizationServerEndpointsConfigurer endpoints) throws Exception {endpoints.authorizationCodeServices(authorizationCodeServices).authenticationManager(authenticationManager).tokenServices(authorizationServerTokenServices).pathMapping(SystemConstant.Oauth.CONFIRM_ACCESS,SystemConstant.Oauth.MY_CONFIRM_ACCESS);}
}
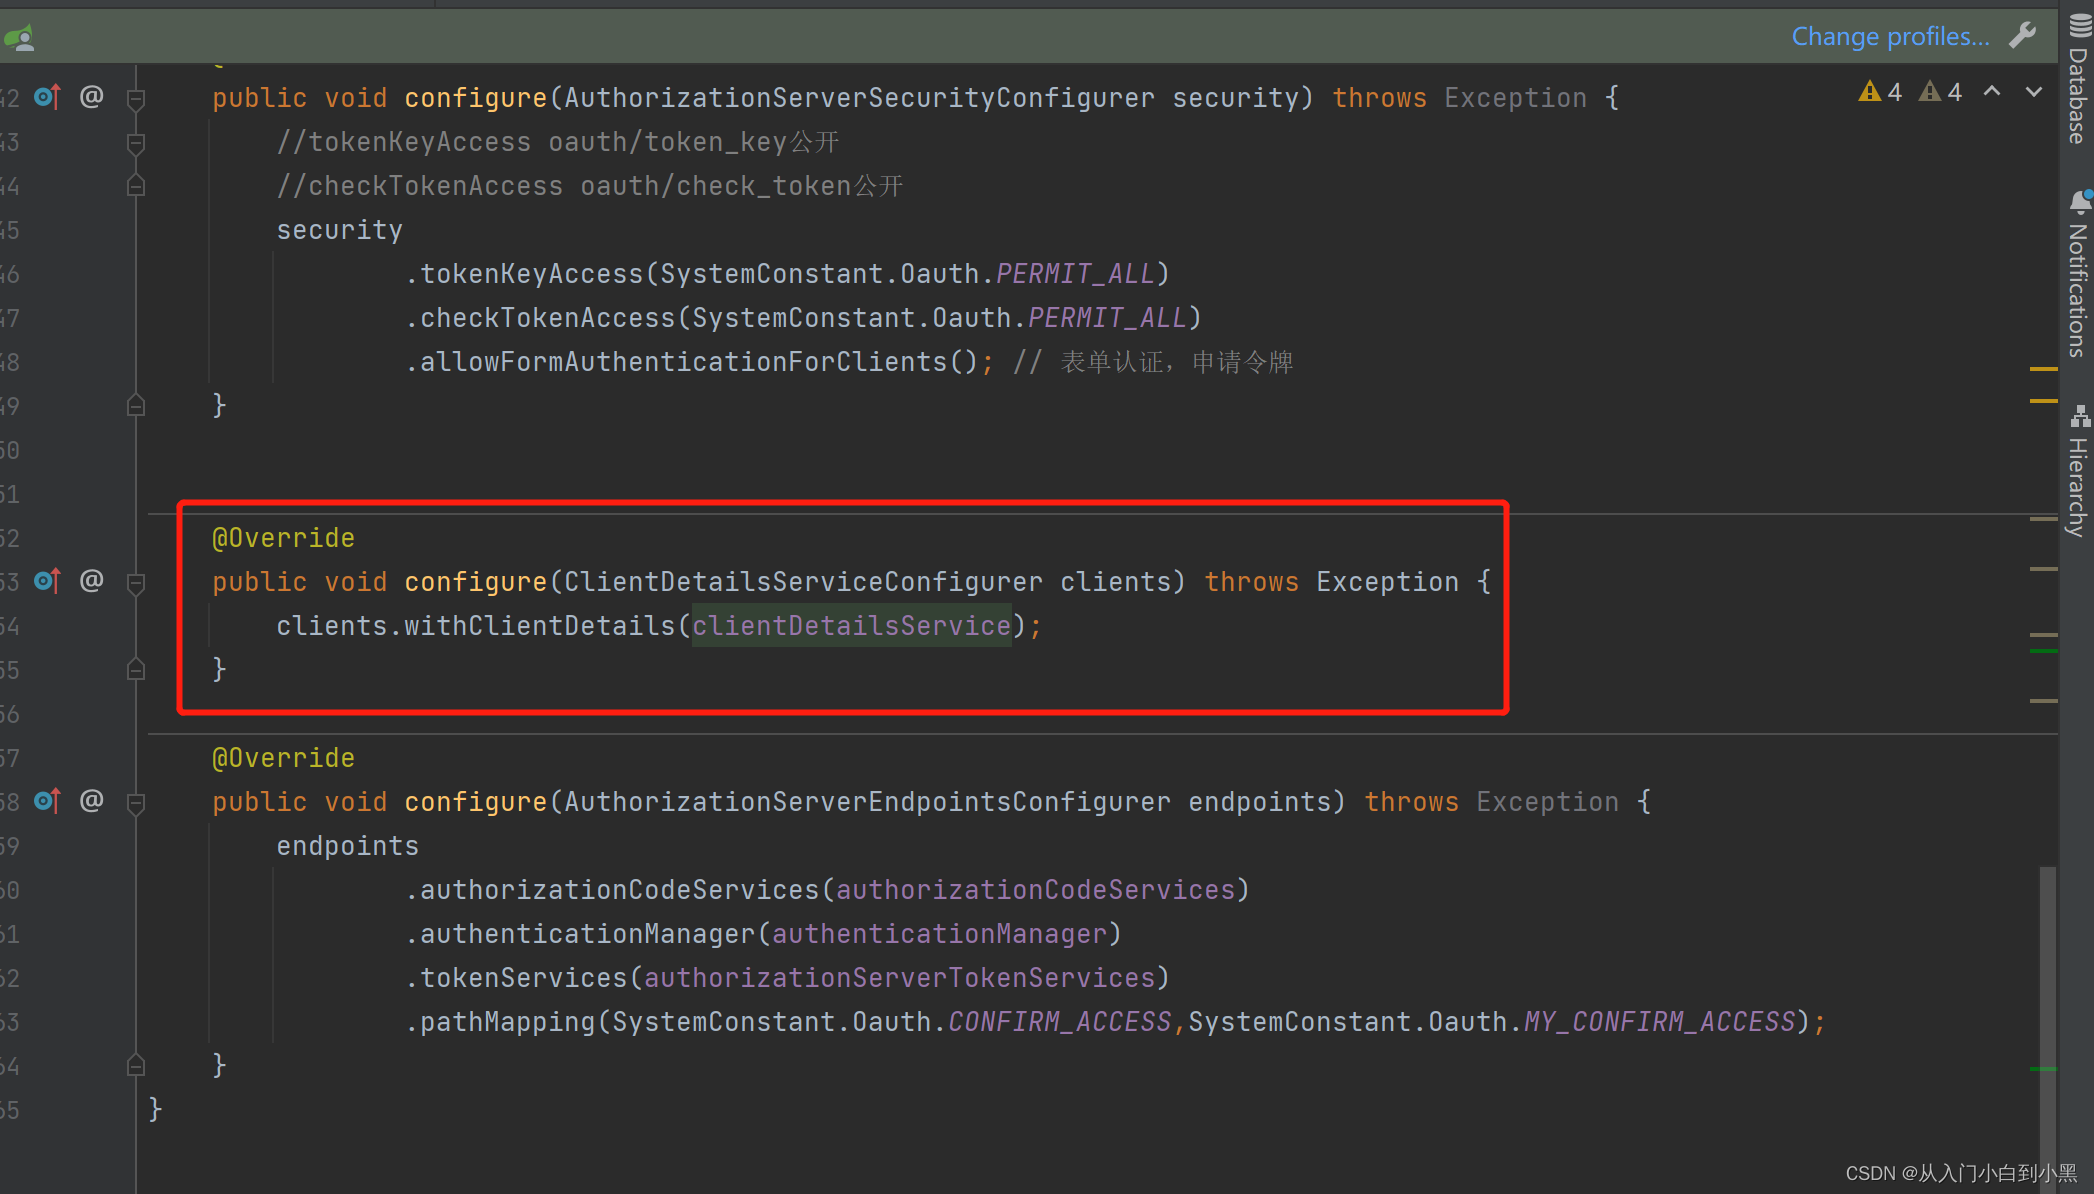
其中这个配置是去自定义数据库查询客户端信息
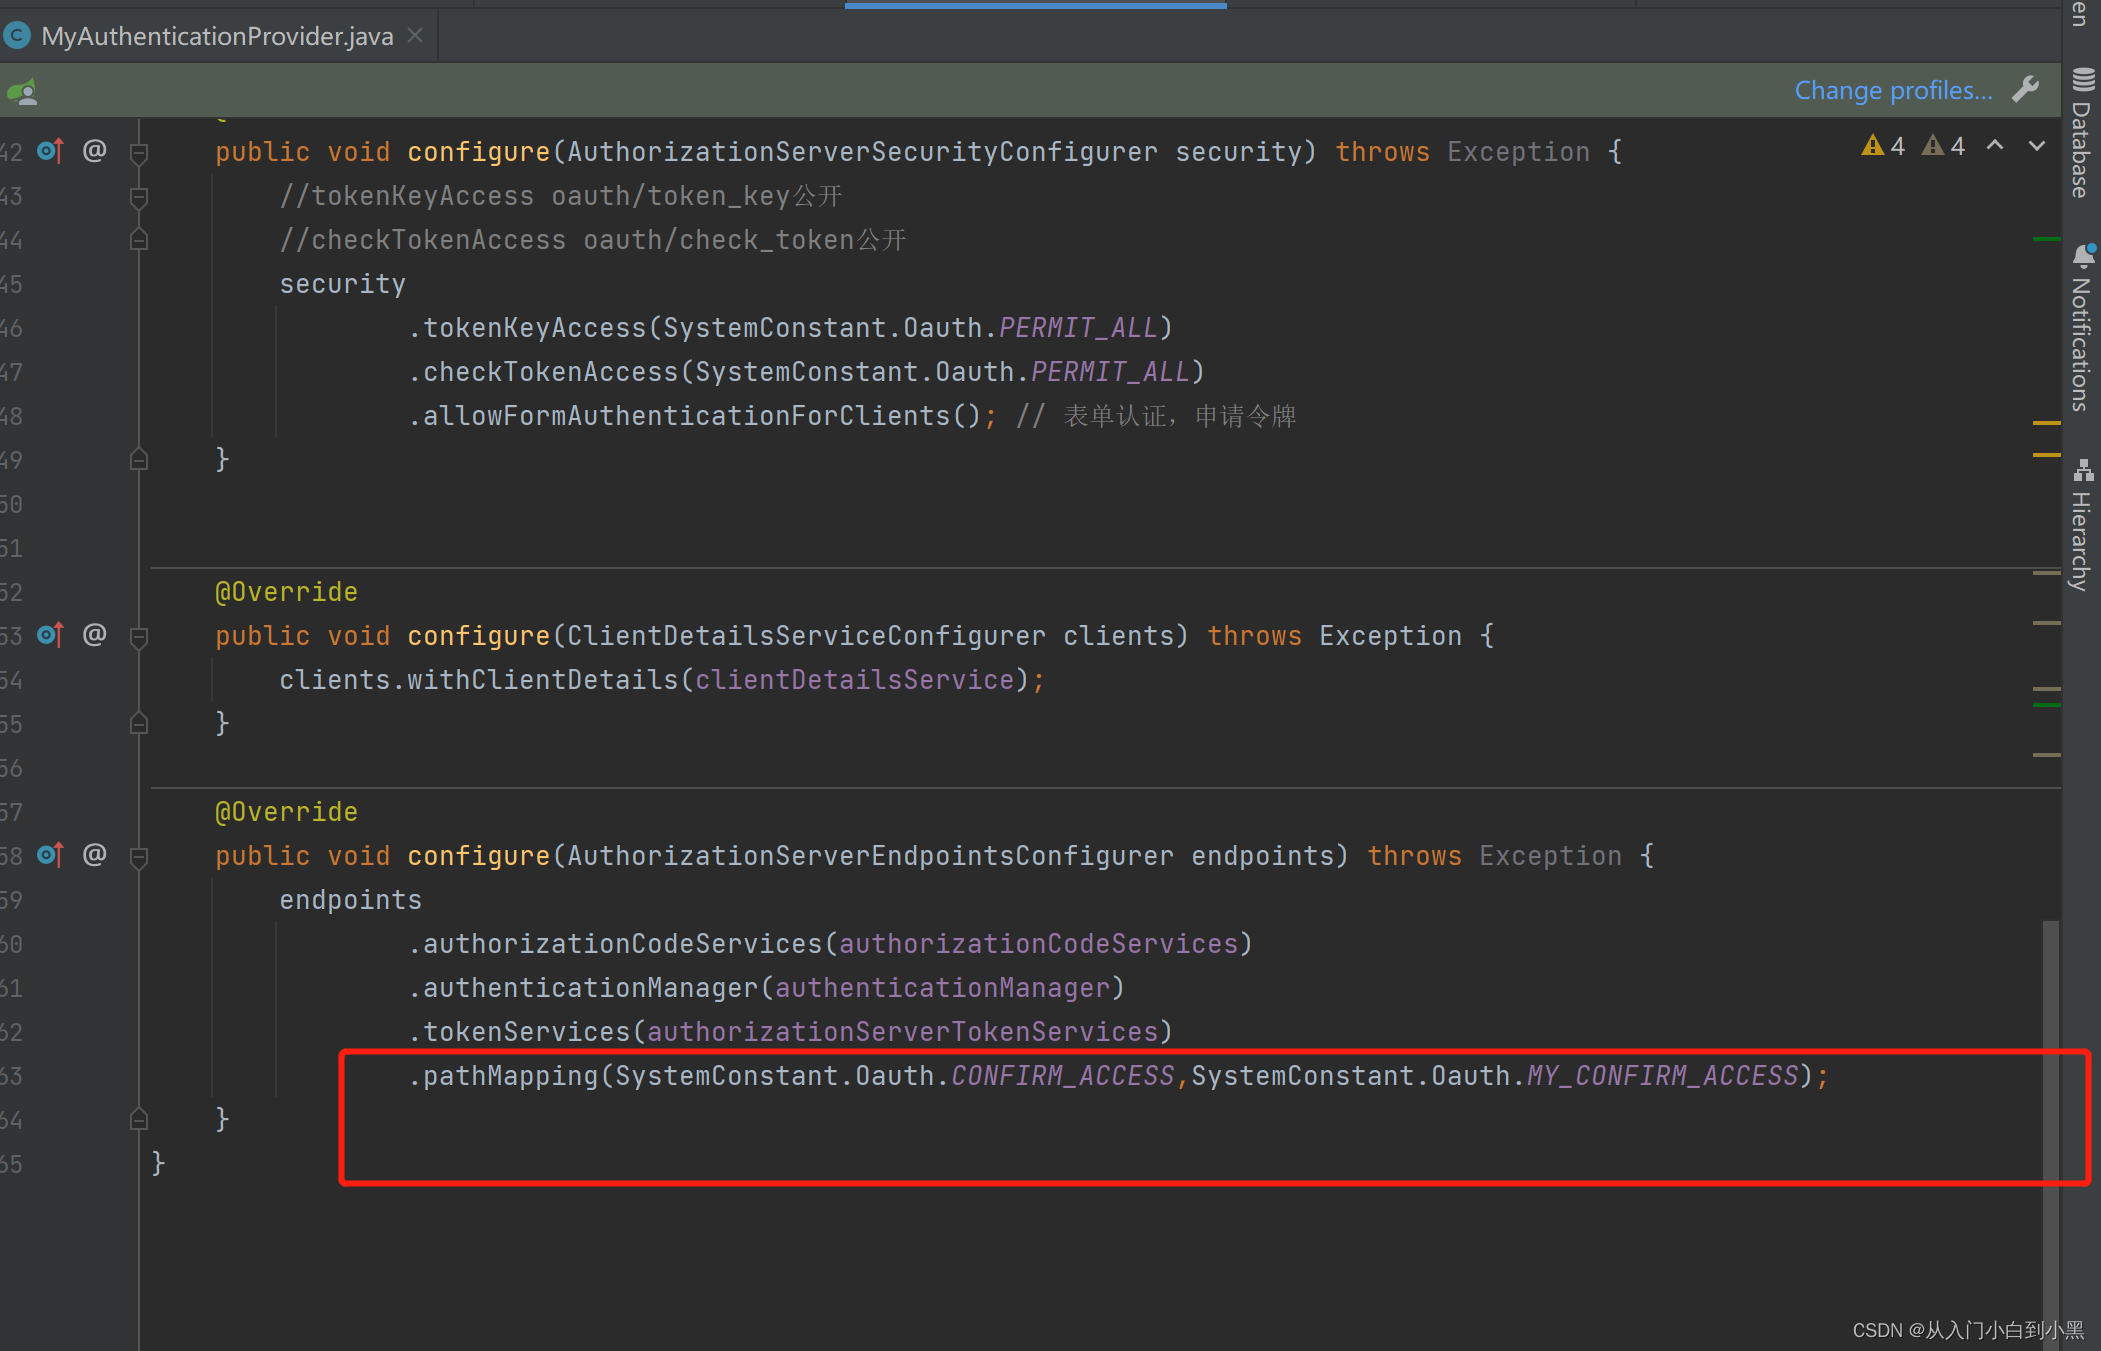
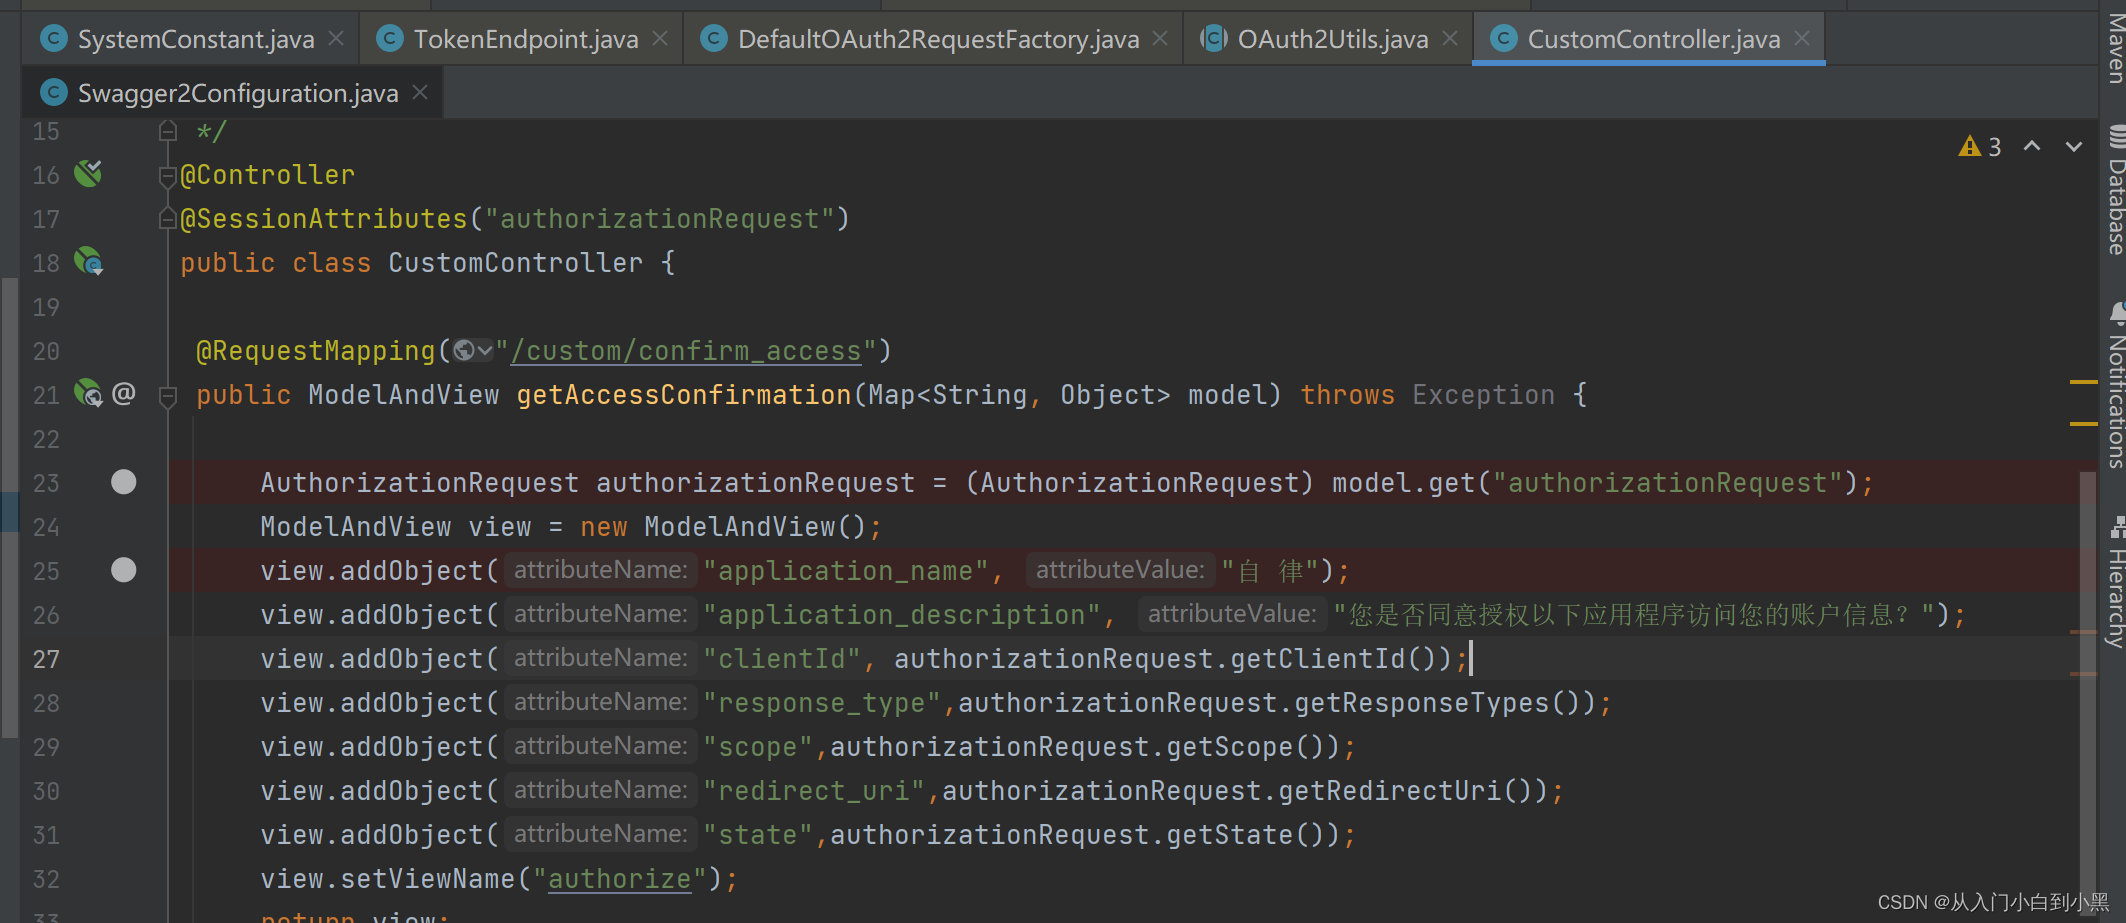
这个地方可以替换映射的路径 ,这里我们替换了自定义授权页面接口从原来默认的/oauth/confirm_access变成了我们自己的/custom/confirm_access
AccessToken
package com.xql.unify_authorization_server.config;import com.xql.unify_authorization_server.service.impl.MyAccessToken;
import org.springframework.beans.factory.annotation.Value;
import org.springframework.context.annotation.Bean;
import org.springframework.context.annotation.Configuration;
import org.springframework.security.oauth2.provider.token.TokenStore;
import org.springframework.security.oauth2.provider.token.store.JwtAccessTokenConverter;
import org.springframework.security.oauth2.provider.token.store.JwtTokenStore;/*** @description: 自定义AccessToken* @author xuqinglei* @date 2023/06/19 14:23* @version 1.0*/
@Configuration
public class AccessTokenConfig {@Value("${jwt.signing.key}")private String SIGNING_KEY;@BeanTokenStore tokenStore() {return new JwtTokenStore(jwtAccessTokenConverter());}@BeanJwtAccessTokenConverter jwtAccessTokenConverter() {JwtAccessTokenConverter converter = new MyAccessToken();converter.setSigningKey(SIGNING_KEY);return converter;}
}
package com.xql.unify_authorization_server.bean;import com.xql.unify_authorization_server.config.CustomAdditionalInformation;
import com.xql.unify_authorization_server.service.impl.MyClientDetailsService;
import org.springframework.beans.factory.annotation.Autowired;
import org.springframework.context.annotation.Bean;
import org.springframework.context.annotation.Configuration;
import org.springframework.security.oauth2.provider.token.AuthorizationServerTokenServices;
import org.springframework.security.oauth2.provider.token.DefaultTokenServices;
import org.springframework.security.oauth2.provider.token.TokenEnhancerChain;
import org.springframework.security.oauth2.provider.token.TokenStore;
import org.springframework.security.oauth2.provider.token.store.JwtAccessTokenConverter;import java.util.Arrays;/*** @author xuqinglei* @date 2023/04/21 08:37**/
@Configuration
public class AuthorizationBean {@Autowiredprivate TokenStore tokenStore;@Autowiredprivate MyClientDetailsService clientDetailsService;@AutowiredJwtAccessTokenConverter jwtAccessTokenConverter;@AutowiredCustomAdditionalInformation customAdditionalInformation;/*** 这个 Bean 主要用来配置 Token 的一些基本信息,* 例如 Token 是否支持刷新、Token 的存储位置、Token 的有效期以及刷新 Token 的有效期等等。* Token 有效期这个好理解,刷新 Token 的有效期我说一下,当 Token 快要过期的时候,* 我们需要获取一个新的 Token,在获取新的 Token 时候,需要有一个凭证信息,* 这个凭证信息不是旧的 Token,而是另外一个 refresh_token,这个 refresh_token 也是有有效期的。*/@Beanpublic AuthorizationServerTokenServices authorizationServerTokenServices() {DefaultTokenServices services = new DefaultTokenServices();//客户端详情服务services.setClientDetailsService(clientDetailsService);//允许令牌自动刷新services.setSupportRefreshToken(true);//令牌存储策略-JWTservices.setTokenStore(tokenStore);TokenEnhancerChain tokenEnhancerChain = new TokenEnhancerChain();tokenEnhancerChain.setTokenEnhancers(Arrays.asList(jwtAccessTokenConverter, customAdditionalInformation));services.setTokenEnhancer(tokenEnhancerChain);return services;}
}
配置完成上面信息我们来书写自定义登录页面
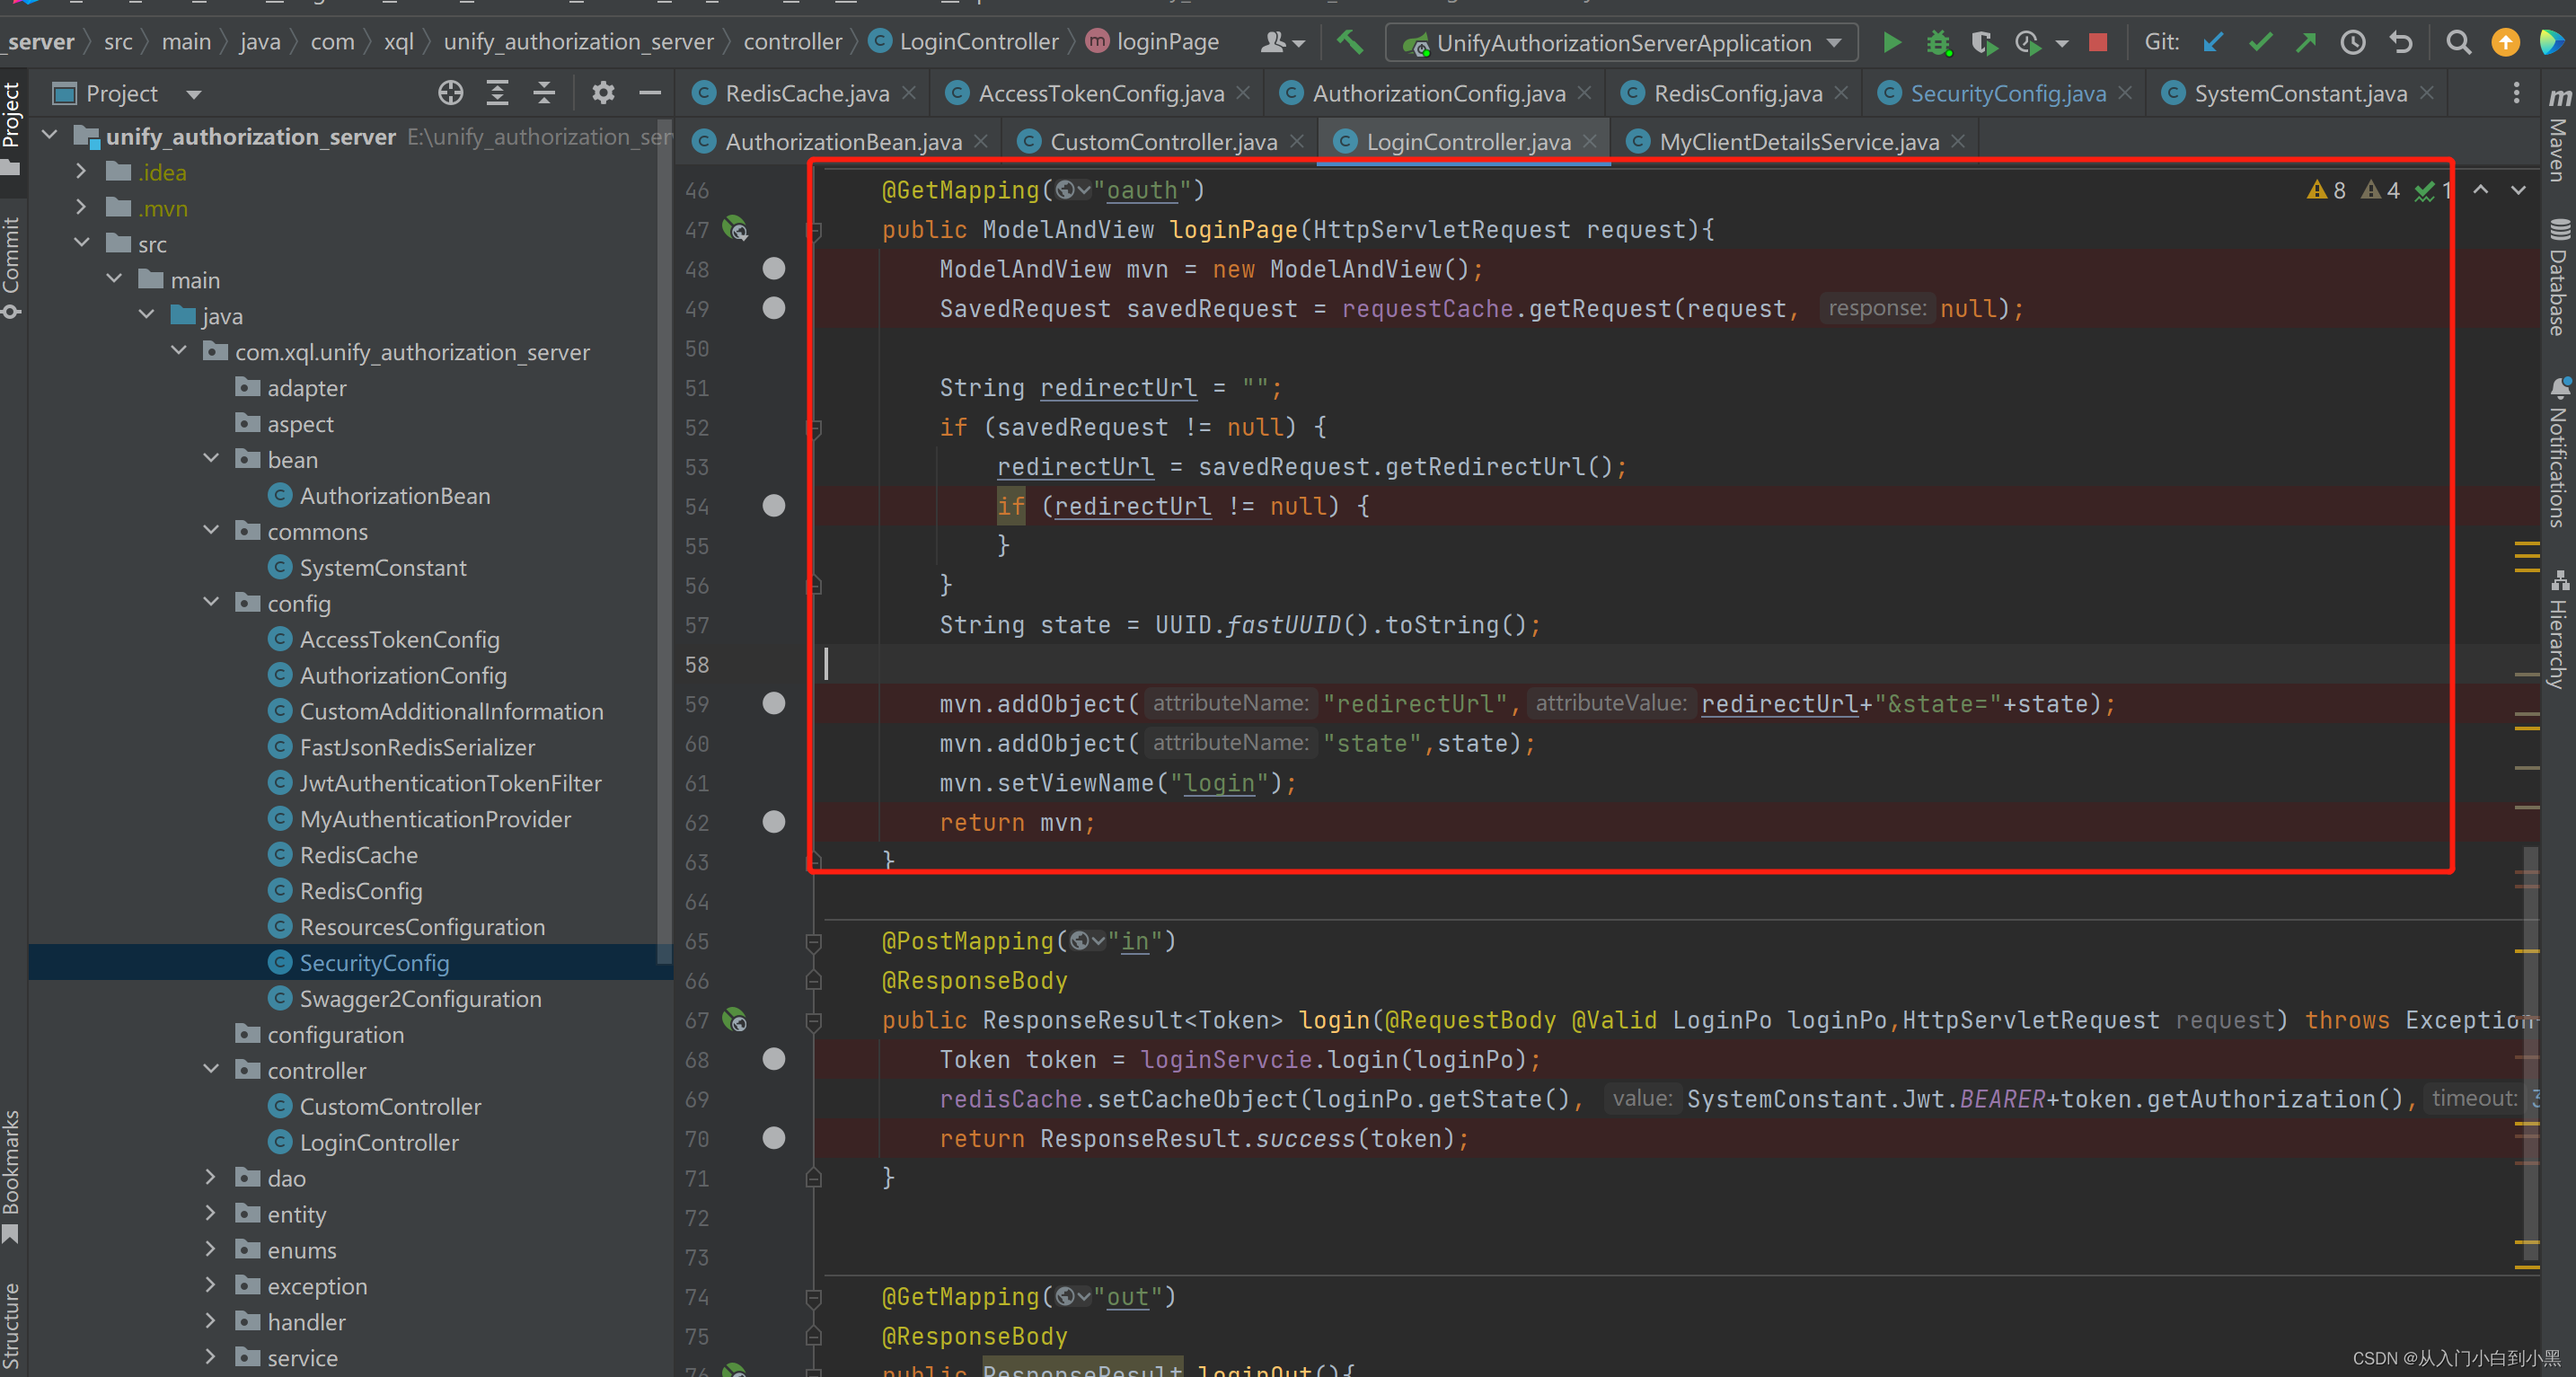
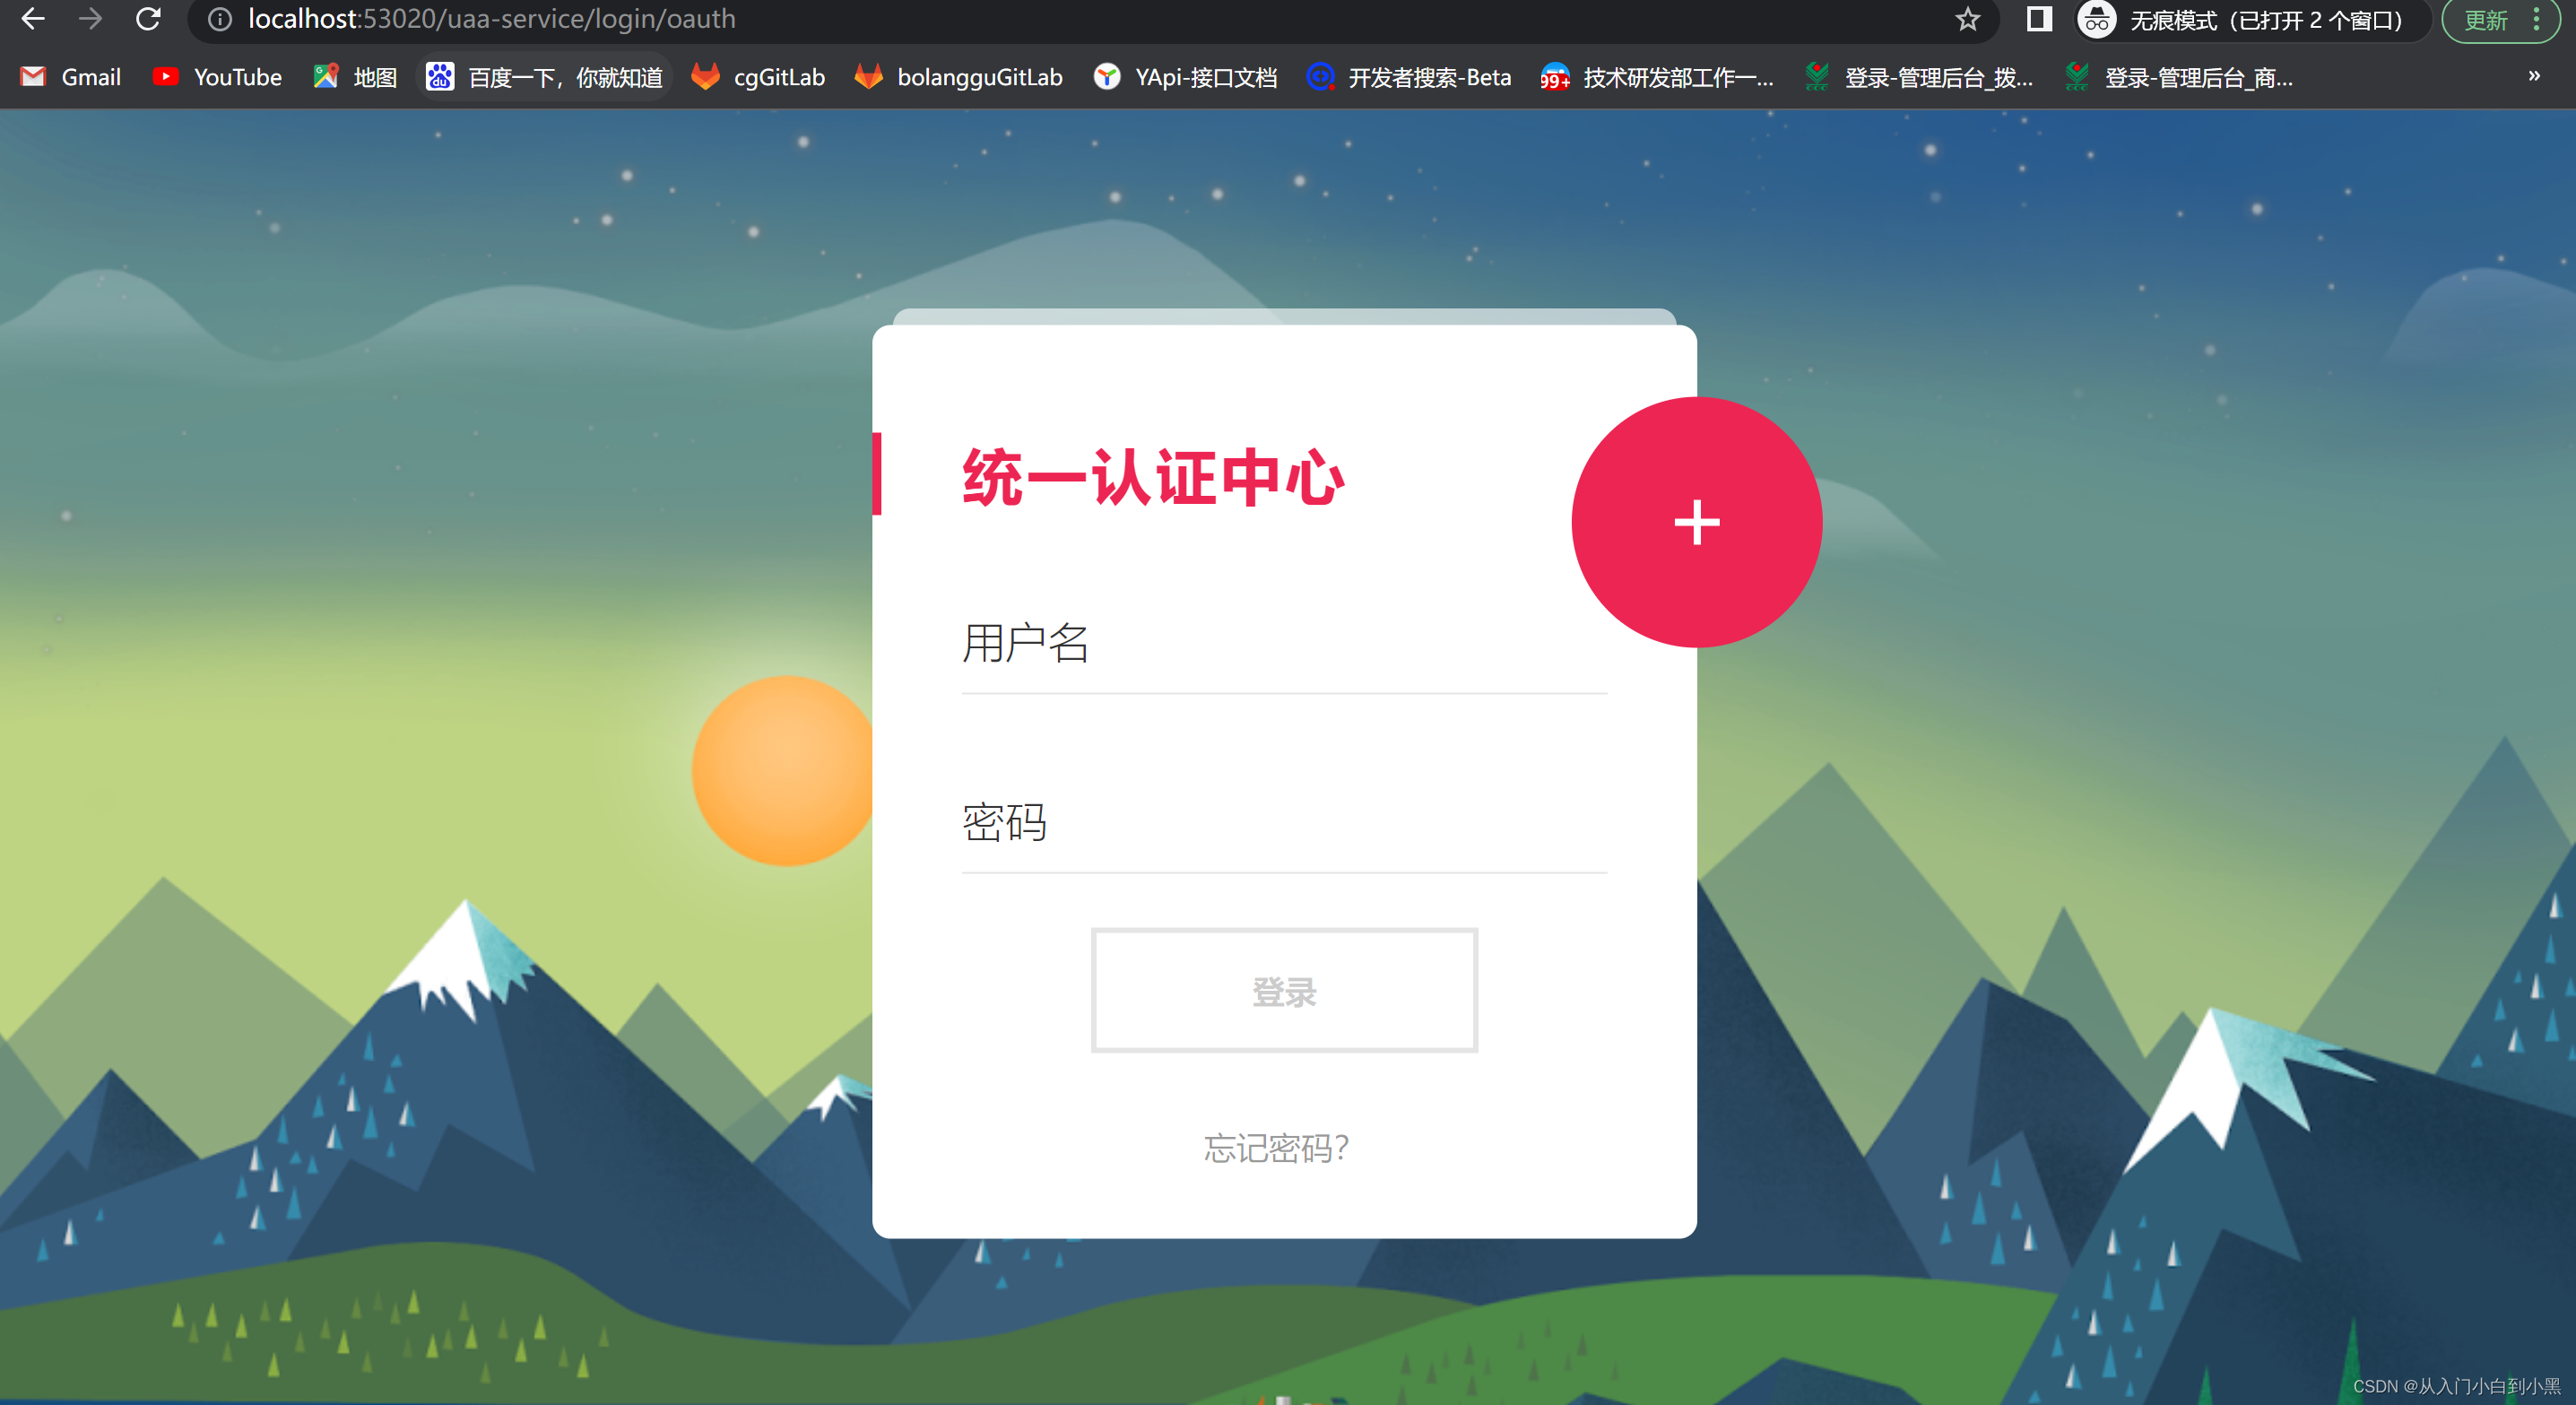
我们在controller写一个去登录页面的接口 这里从HttpSessionRequestCache获取本次请求的客户端拦截路径跳转到login.jsp
<%@ page contentType="text/html;charset=UTF-8" language="java" isELIgnored="false" %>
<%@ taglib prefix="c" uri="http://java.sun.com/jsp/jstl/core" %>
<c:set var="path" value="${pageContext.request.contextPath}"></c:set>
<%@ taglib prefix="fmt" uri="http://java.sun.com/jsp/jstl/fmt" %>
<!DOCTYPE html>
<html lang="zh-CN">
<head><meta charset="UTF-8"><title>xql</title><link rel="stylesheet" href="${path}/css/font-awesome-4.7.0/css/font-awesome.min.css"><link rel="stylesheet" href="${path}/css/style.css"></head>
<body><div class="materialContainer"><div class="box"><div class="title">统一认证中心</div><form action="" method="post" id="loginForm"><input type="hidden" name="state" value="${state}"><div class="input"><label for="name">用户名</label><input type="text" name="userName" id="name"><span class="spin"></span></div><div class="input"><label for="pass">密码</label><input type="password" name="password" id="pass"><span class="spin"></span></div><div class="button login"><button type="button" id="logdl"><span>登录</span><i class="fa fa-check"></i></button></div></form><a href="javascript:" class="pass-forgot">忘记密码?</a></div><div class="overbox"><div class="material-button alt-2"><span class="shape"></span></div><div class="title">注册</div><div class="input"><label for="regname">用户名</label><input type="text" name="userName" id="regname"><span class="spin"></span></div><div class="input"><label for="regpass">密码</label><input type="password" name="password" id="regpass"><span class="spin"></span></div><div class="input"><label for="reregpass">确认密码</label><input type="password" name="reregpass" id="reregpass"><span class="spin"></span></div><div class="button"><button><span>注册</span></button></div></div></div><script src="${path}/js/jquery.min.js"></script>
<script src="${path}/js/index.js"></script>
<script src="${path}/js/jquery-1.8.3.min.js"></script><script type="text/javascript">$(function () {$("#logdl").click(function () {var data1 = {};var t = $('#loginForm').serializeArray();$.each(t, function() {data1[this.name] = this.value;});$.ajax({type:"post",contentType: "application/json; charset=utf-8",//必须项url:"${path}/login/in",data:JSON.stringify(data1),success:function(result){window.location.href="${redirectUrl}";},error:function(){alert("异常");}})});});
</script>
</body>
</html>
我们的登陆成功 window.location.href=“${redirectUrl}”;跳转到我们刚刚拦截的路径
因为正常情况下我们应该是
- 访问"http://localhost:53020/uaa-service/oauth/authorize?client_id=xql&response_type=code&scope=all&redirect_uri=http://localhost:8089/goods/index" 但是未登录,被拦截跳转到了统一登录认证页面
- 我们在login页面输入账户密码点击登录
- 登陆成功应该继续访问"http://localhost:53020/uaa-service/oauth/authorize?client_id=xql&response_type=code&scope=all&redirect_uri=http://localhost:8089/goods/index"我们刚刚被拦截的路径
- 这个时候访问需要在head里面携带Authorization
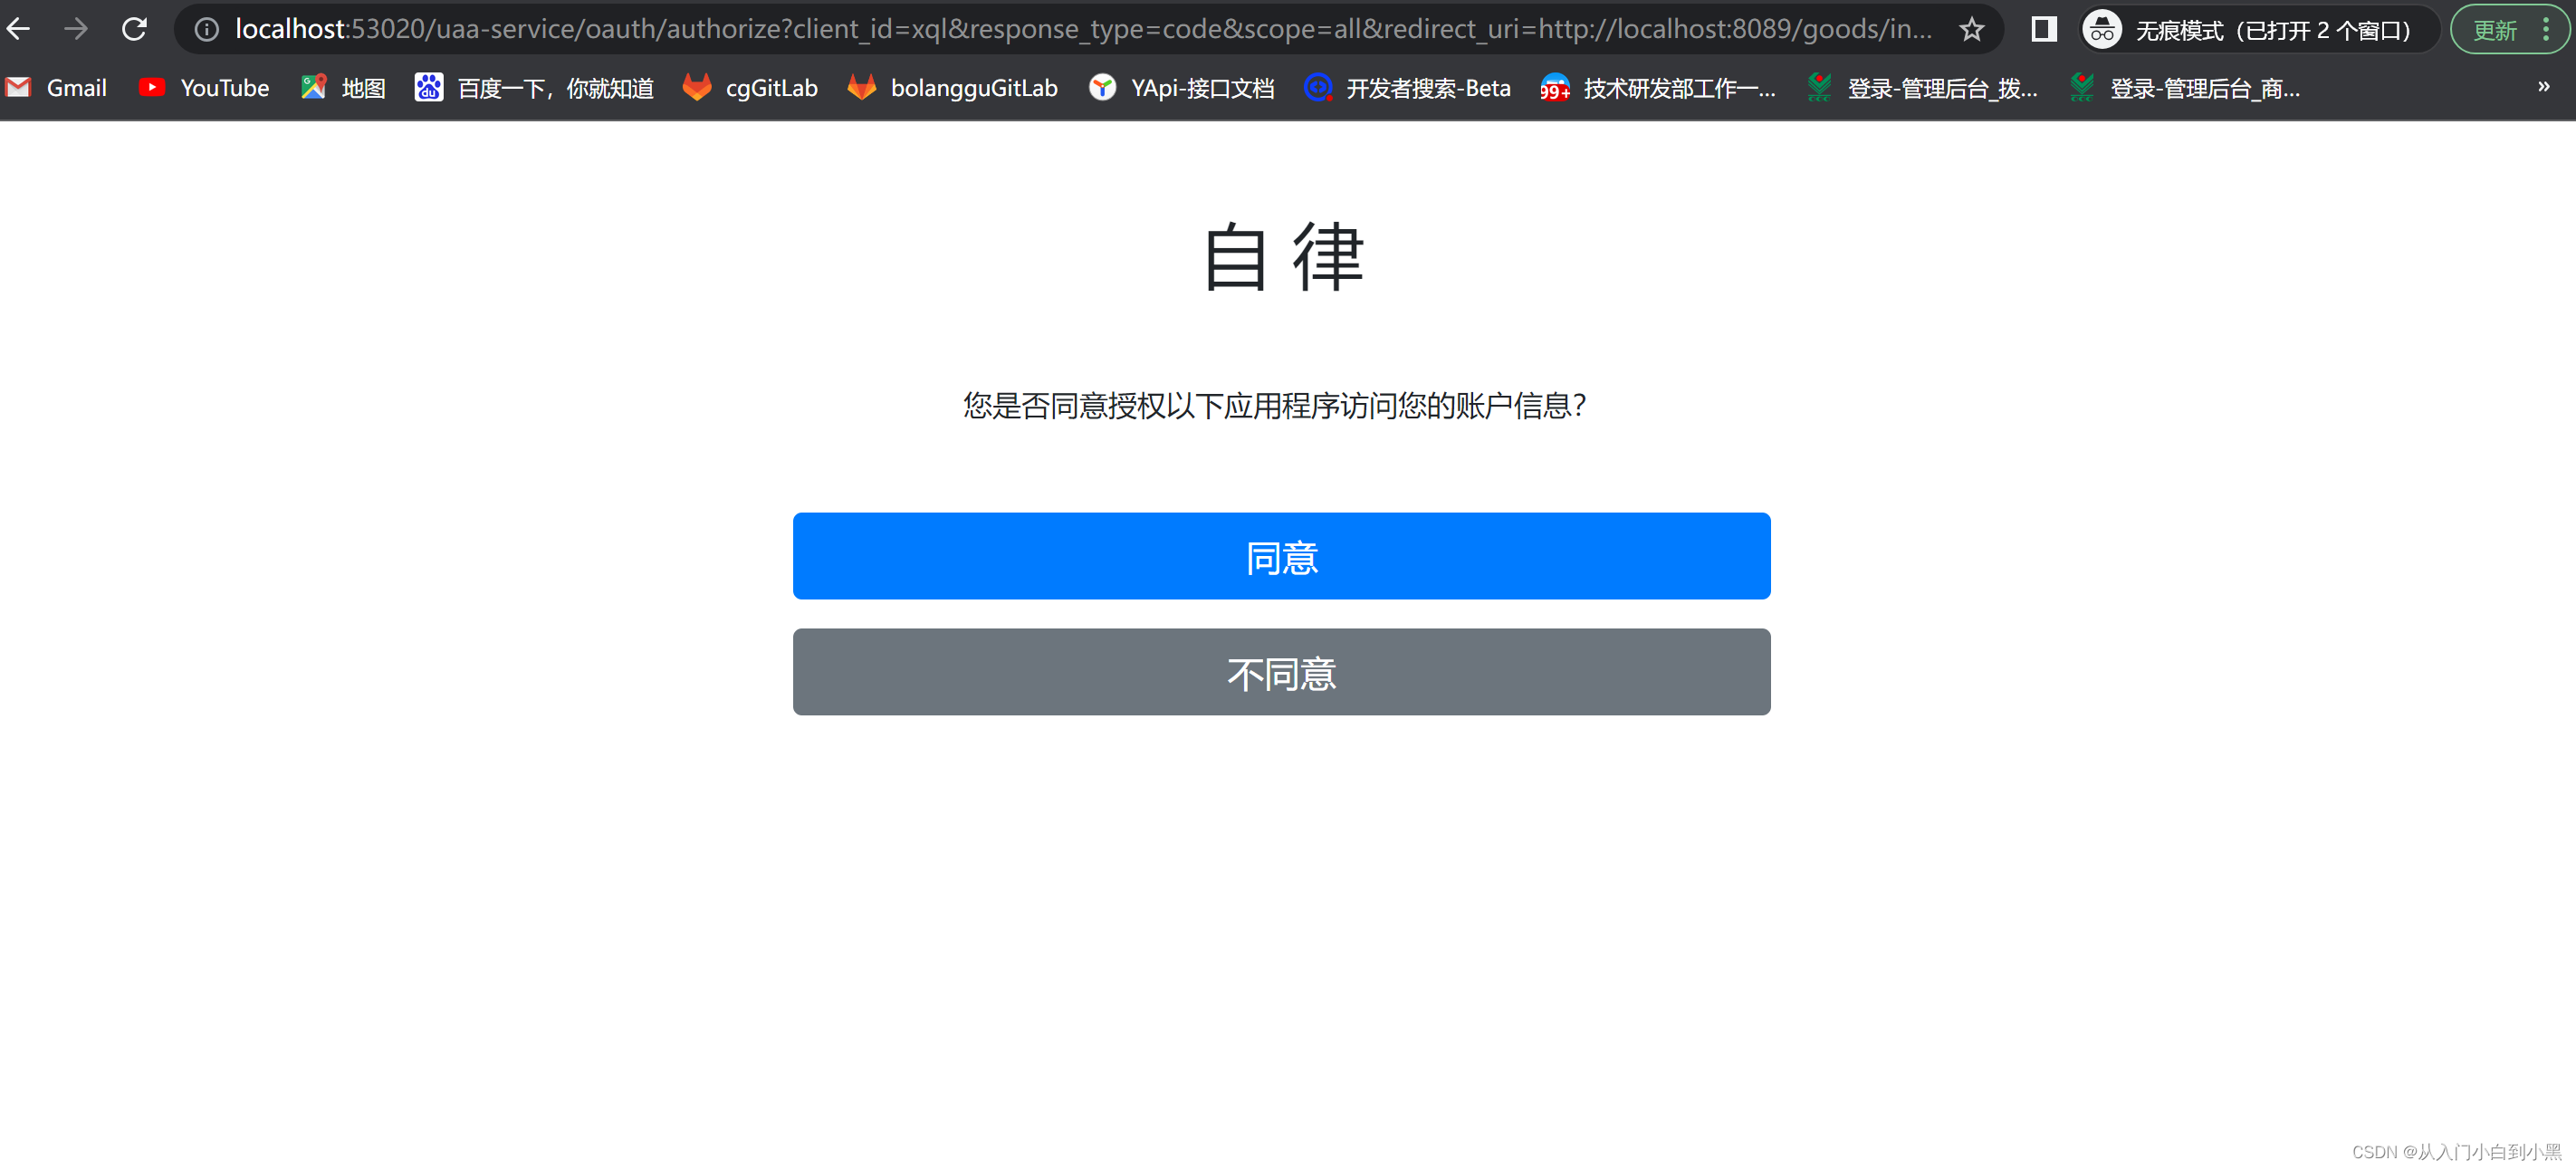
- 这个时候如果是授权码模式会跳转到自定义授权页面/custom/confirm_access
- 我们点击同意授权会携带scope.xxx=true的参数访问/oauth/authorize
- 这个时候会回调我们参数里面的redirect_uri的路径在后面拼接http://localhost:8089/goods/index?code=6vIGkWryTK&state=17fa6782-3d1d-4c0f-b168-1e336fd7c370随机的code和state
- 接下来就和前几篇讲的一样了那code去获取access_token,然后携带access_token去访问资源
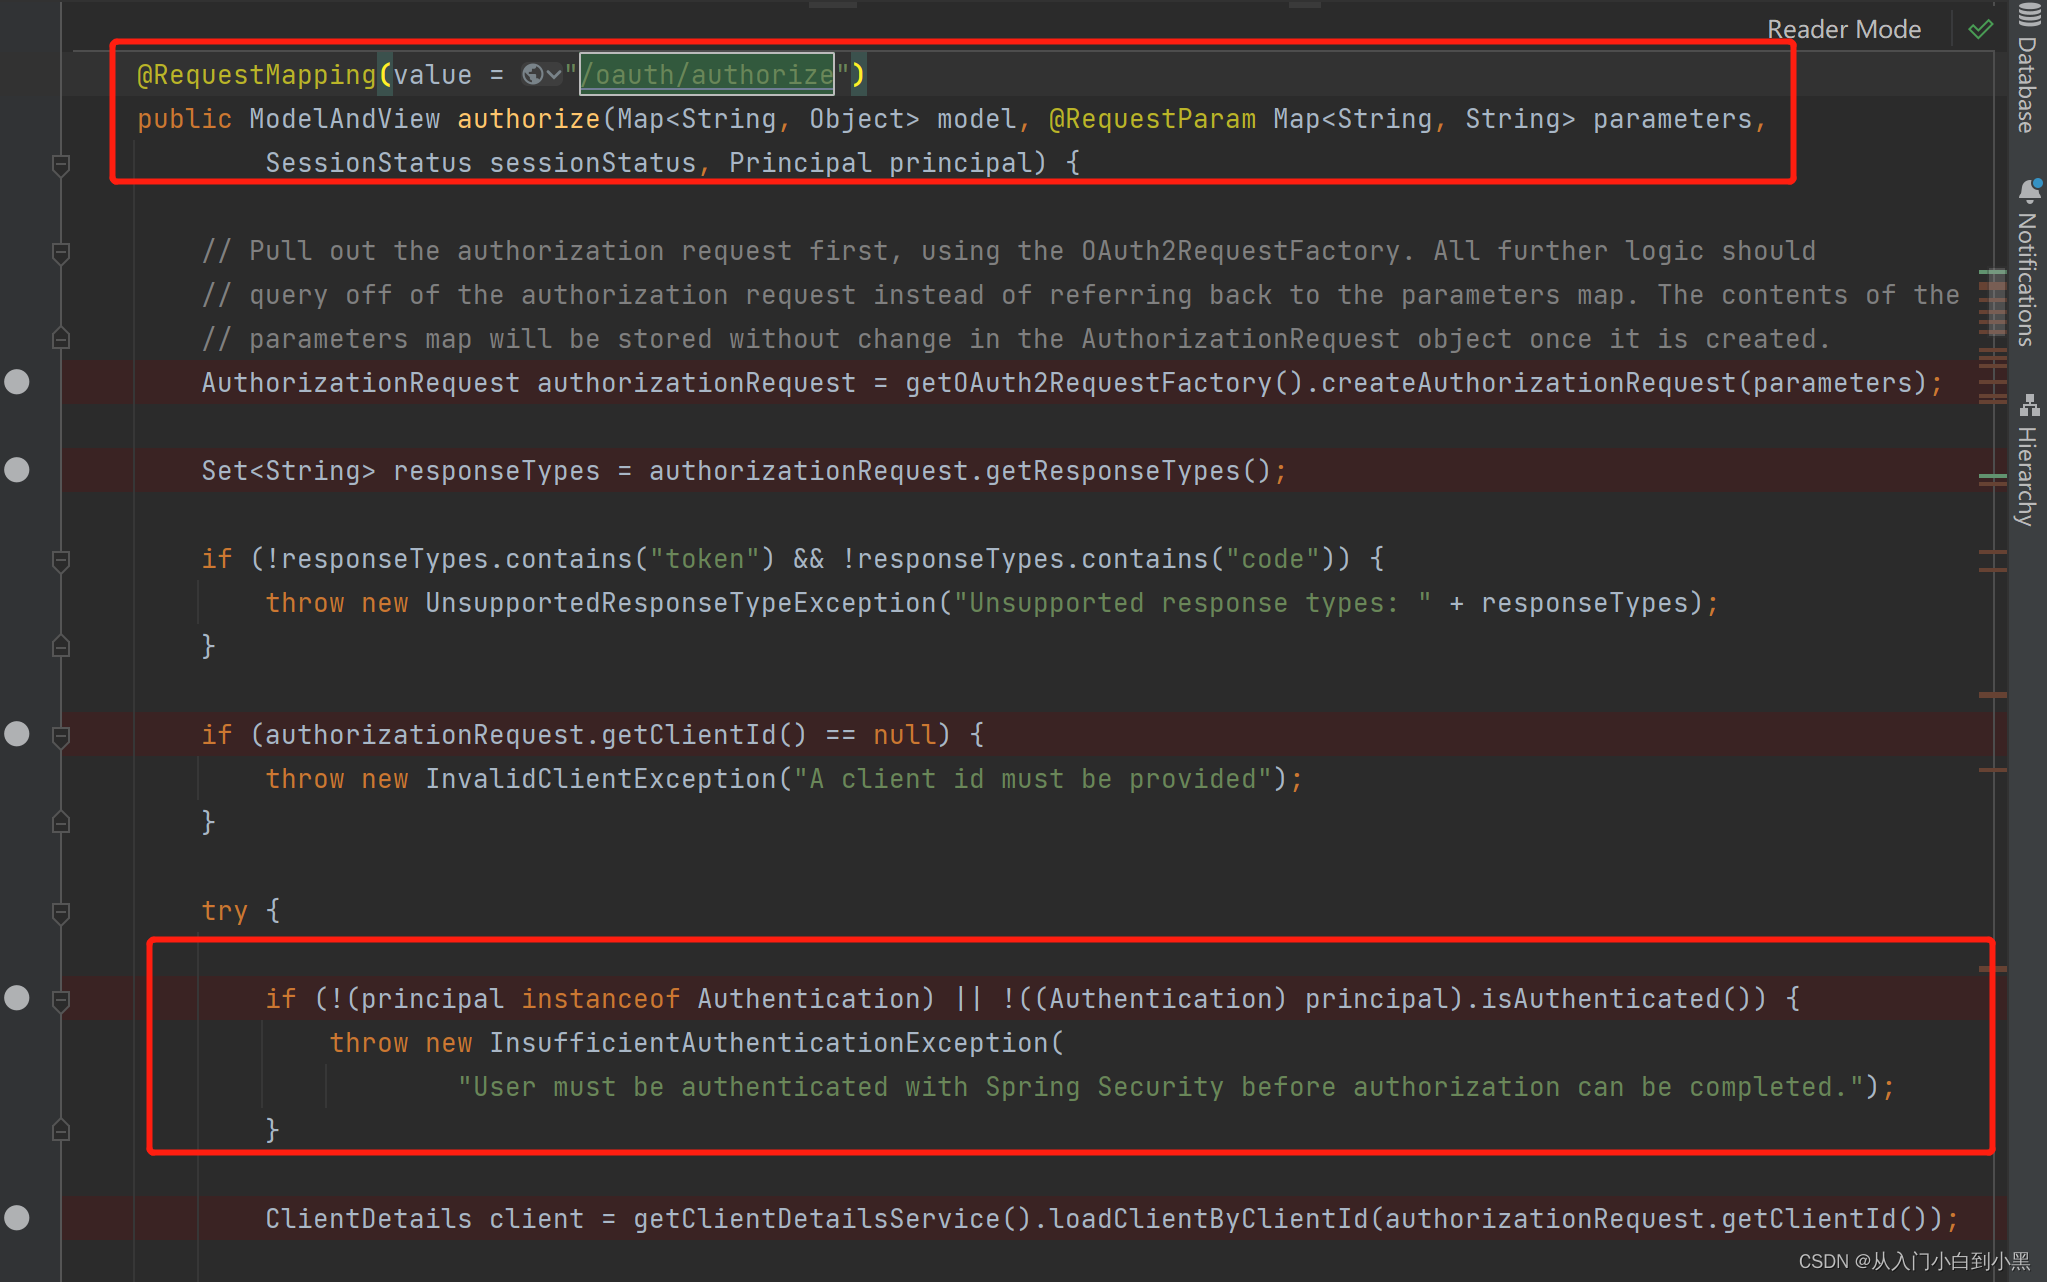
/oauth/authorize接口源码
类路径位于org.springframework.security.oauth2.provider.endpoint.AuthorizationEndpoint
当然我们也可以自定义在上面替换授权接口一样pathMapping映射都可以了
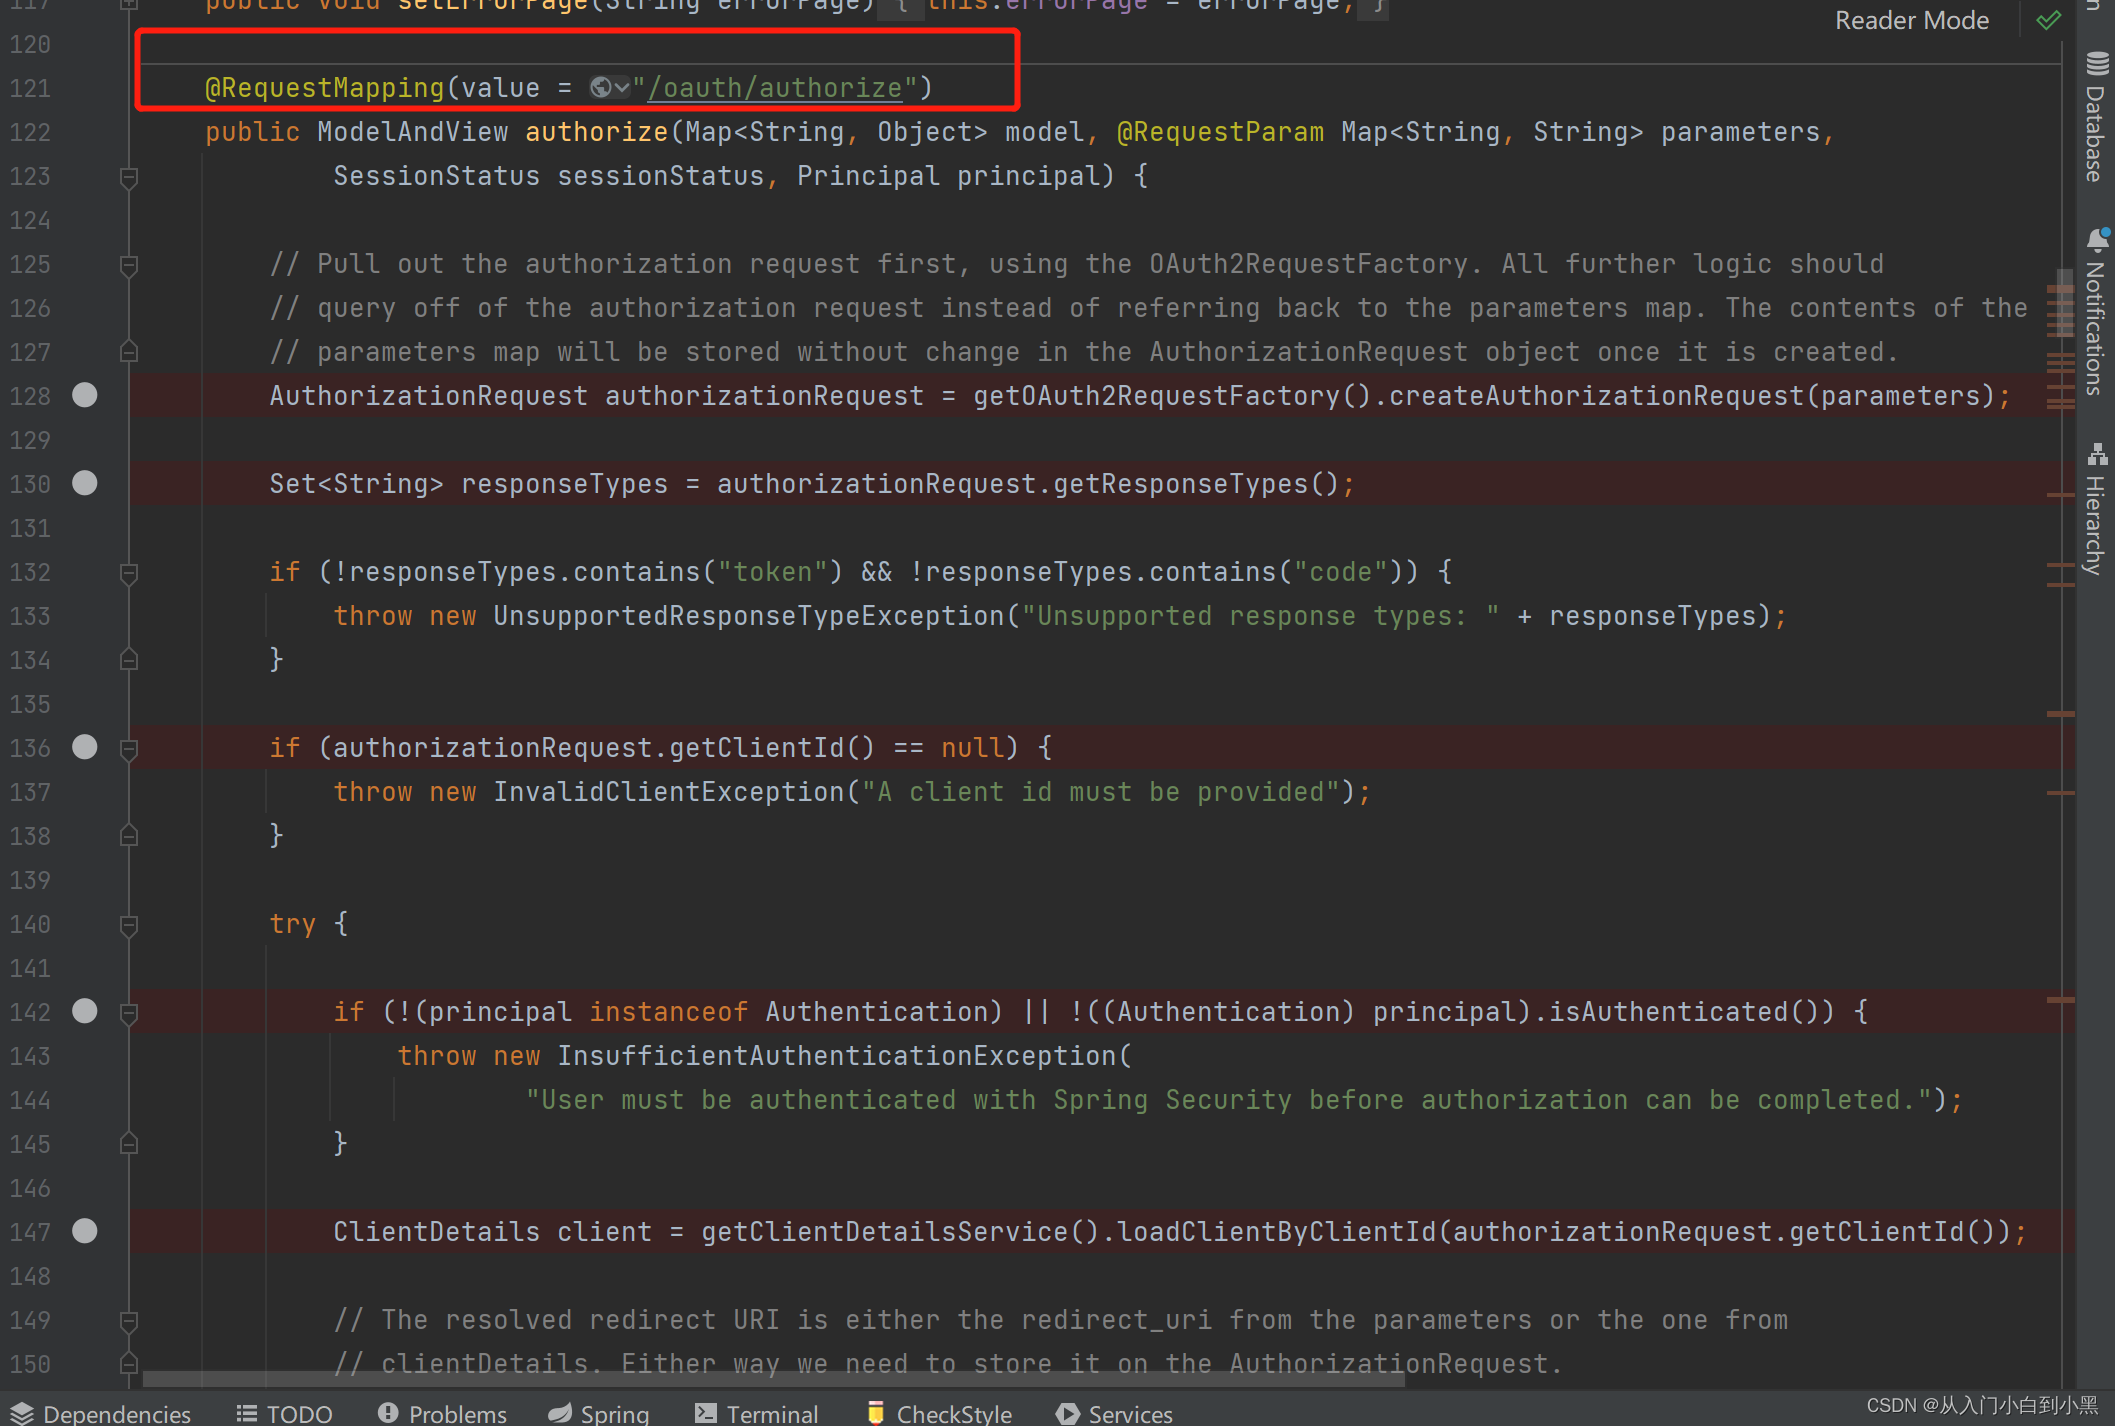
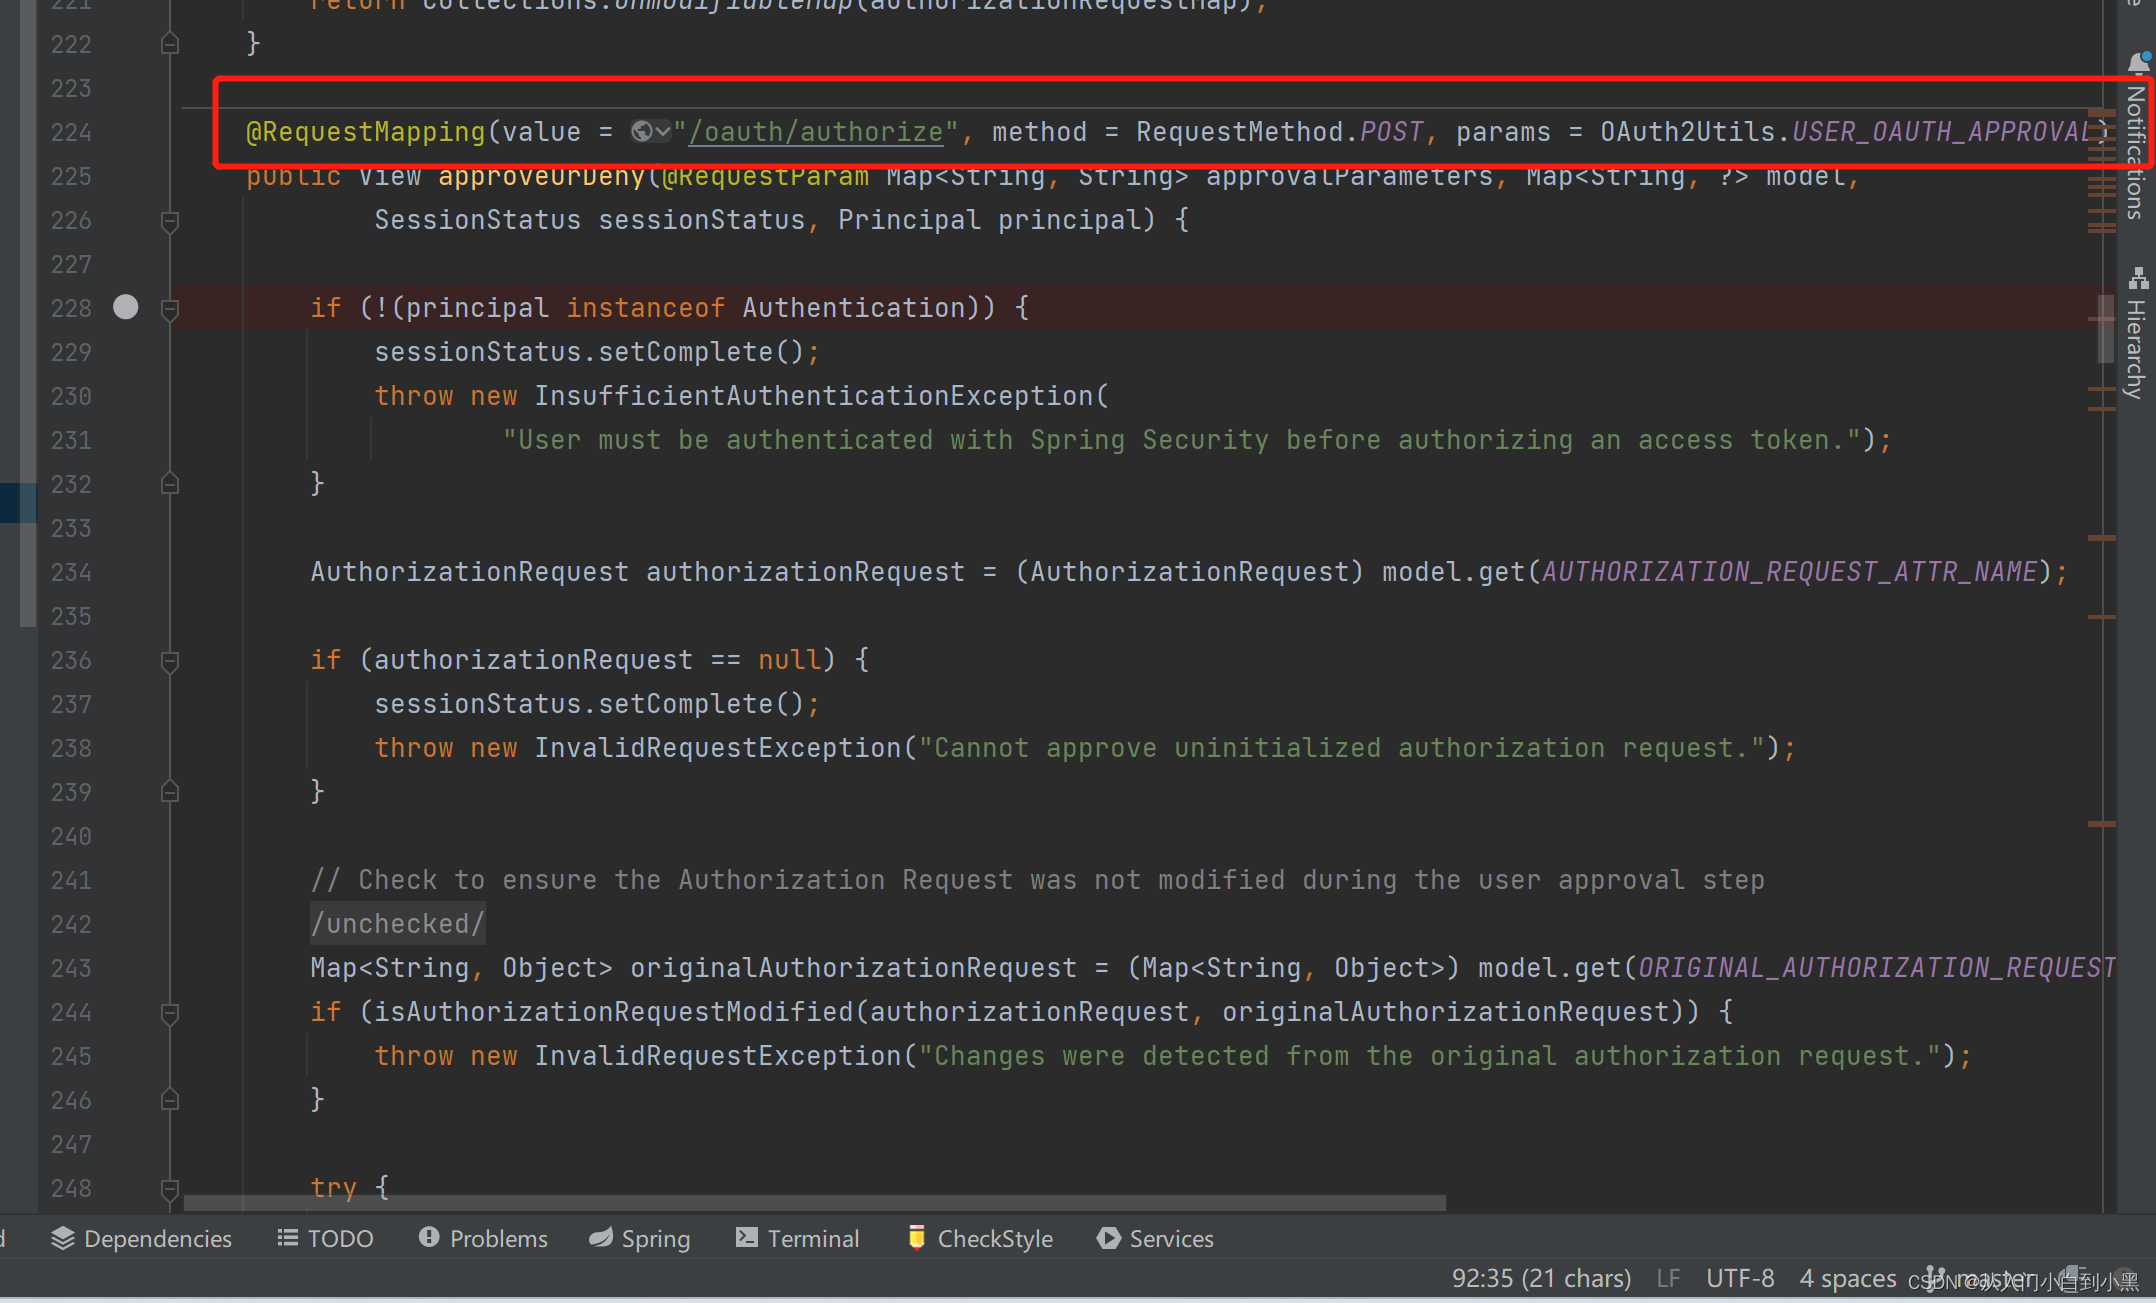
我们发现在这个类有两个这个接口路径,一个是post请求并且参数携带user_oauth_approval
一个方法名是authorize,一个是approveOrDeny肯定授权之后请求的接口
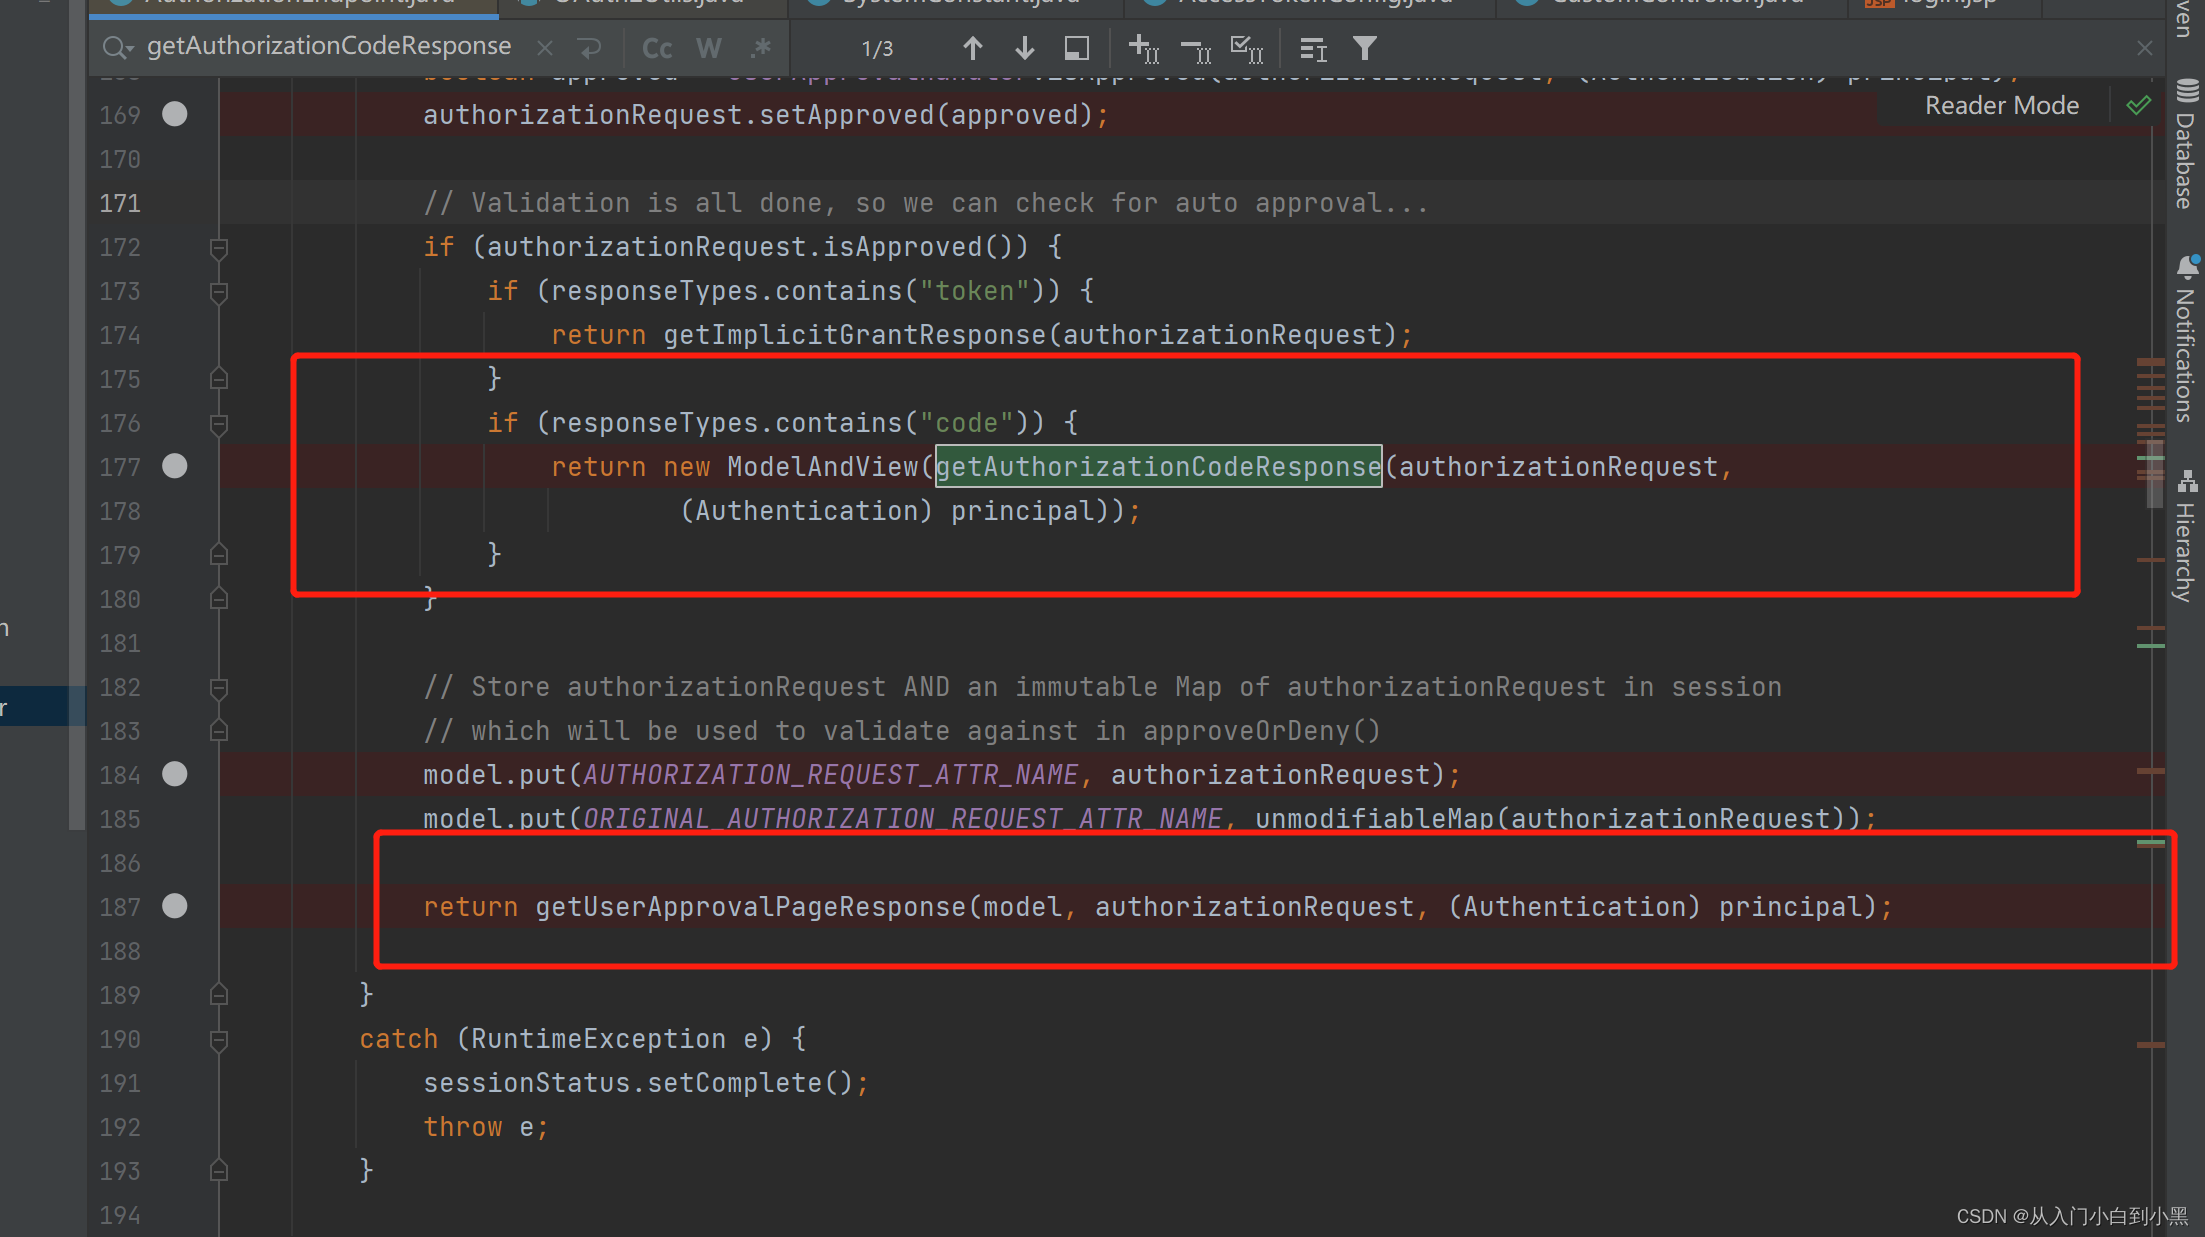

我们发现其实两个方法的有getAuthorizationCodeResponse返回授权码回调redirect_uri
那么大致流程应该是这样的
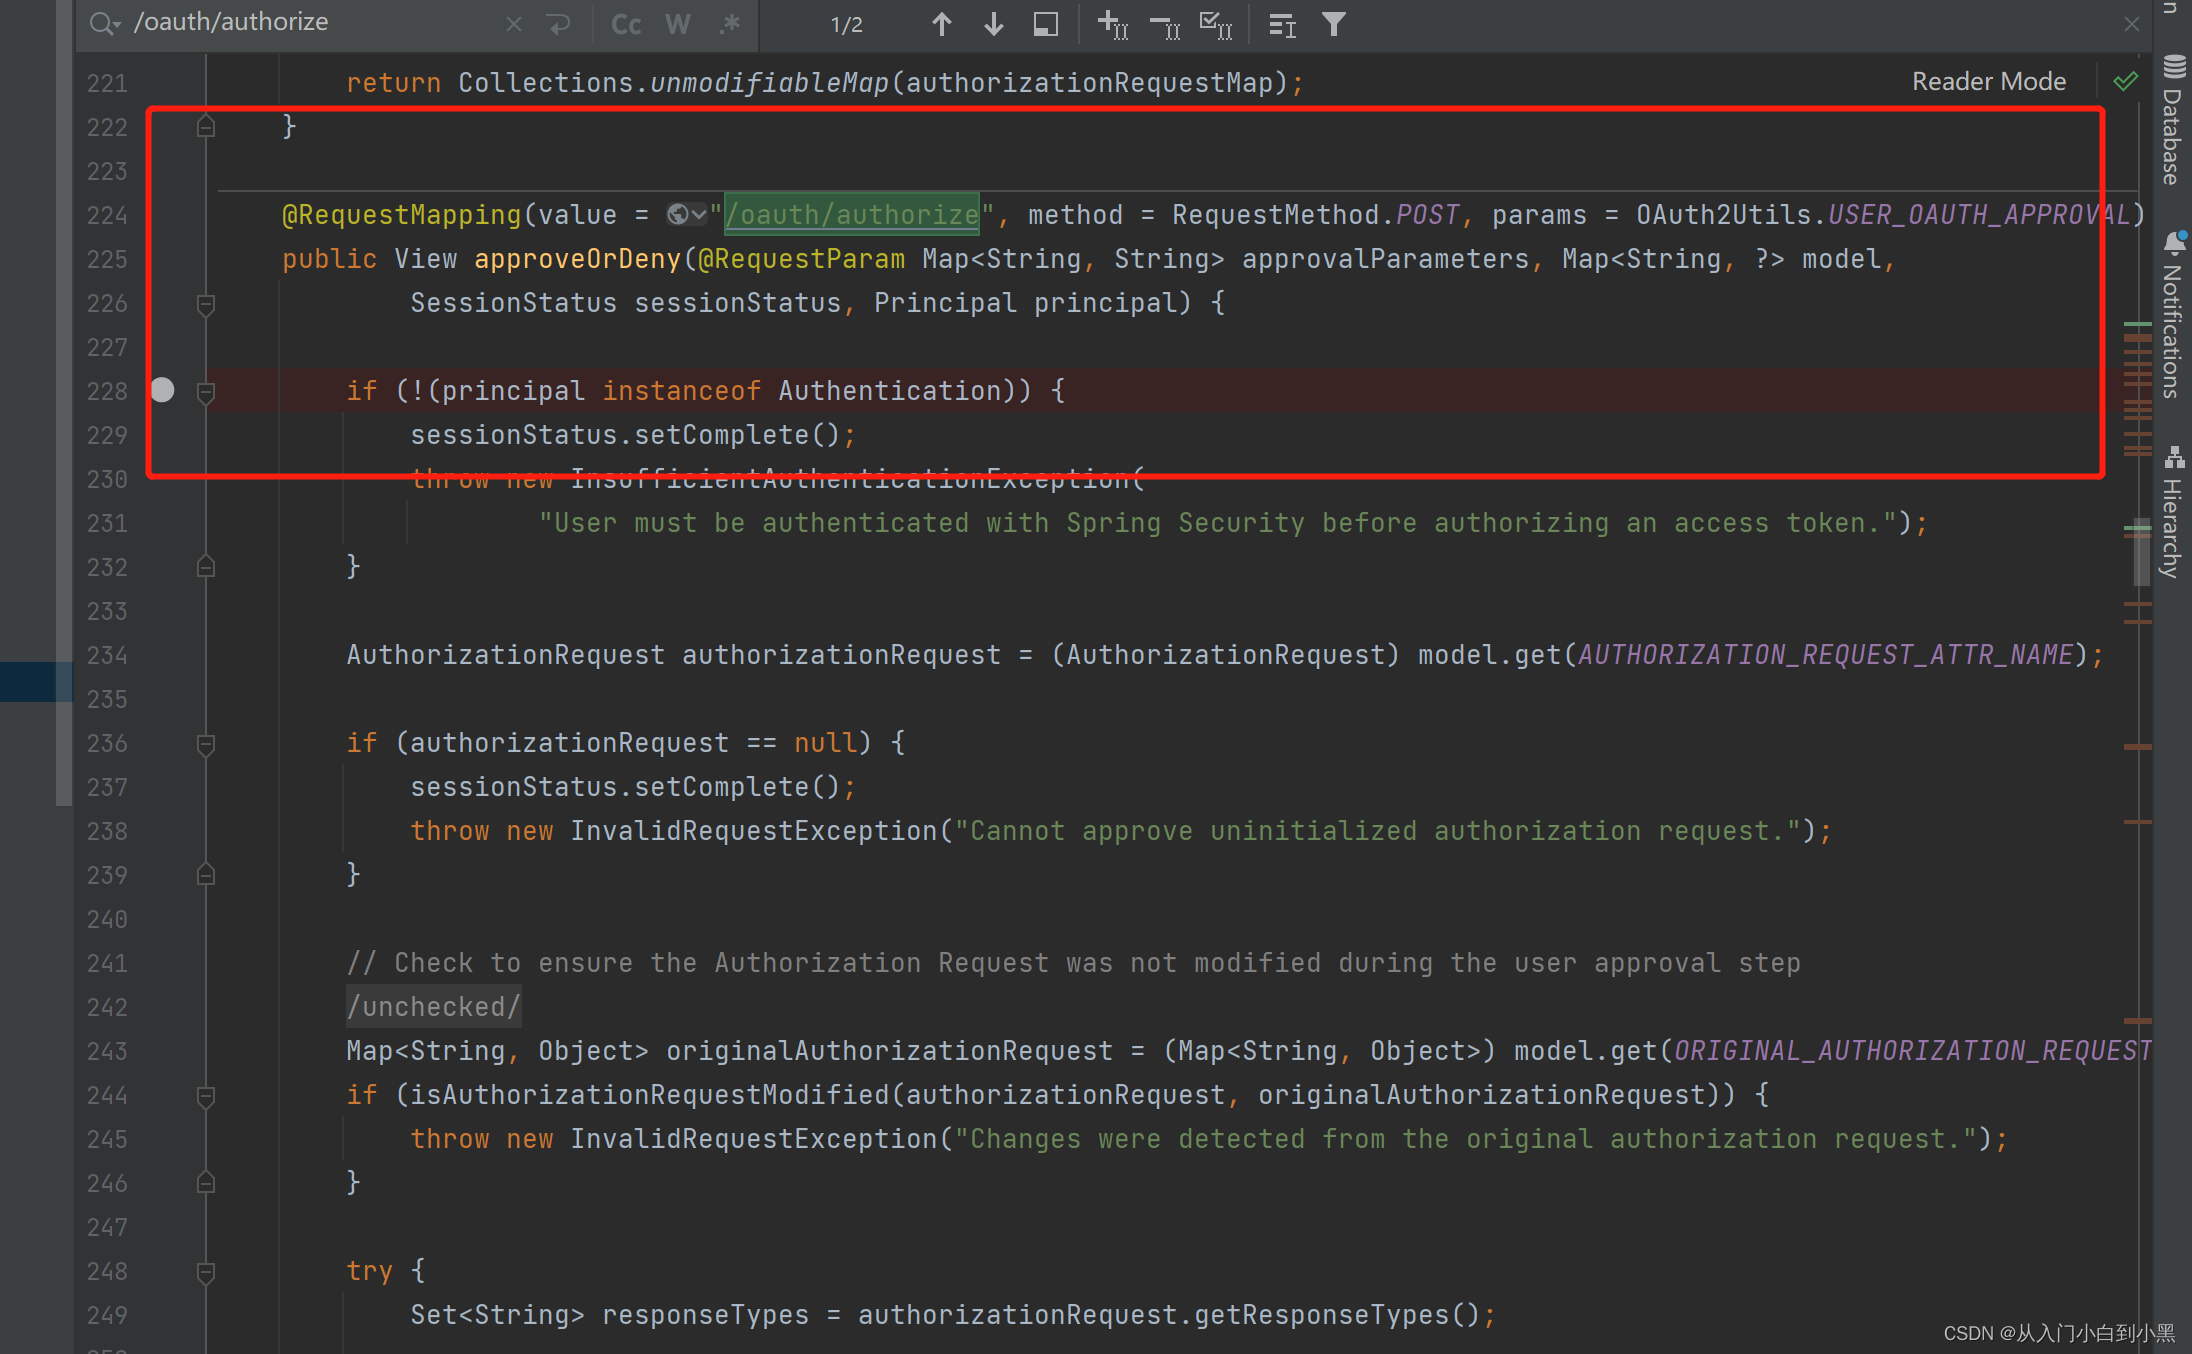
1.当我们第一次访问"http://localhost:53020/uaa-service/oauth/authorize?client_id=xql&response_type=code&scope=all&redirect_uri=http://localhost:8089/goods/index" 我们请求的应该是
但是我们在下面这一块,没有身份信息,所以被拦截了抛出异常去了我们自定义的登录页面
2.我们在登录页面登录完成,我们继续访问"http://localhost:53020/uaa-service/oauth/authorize?client_id=xql&response_type=code&scope=all&redirect_uri=http://localhost:8089/goods/index"这个时候请求的还是这个方法,

这个时候返回到了我们自定义授权页面接口或者系统默认的授权页面
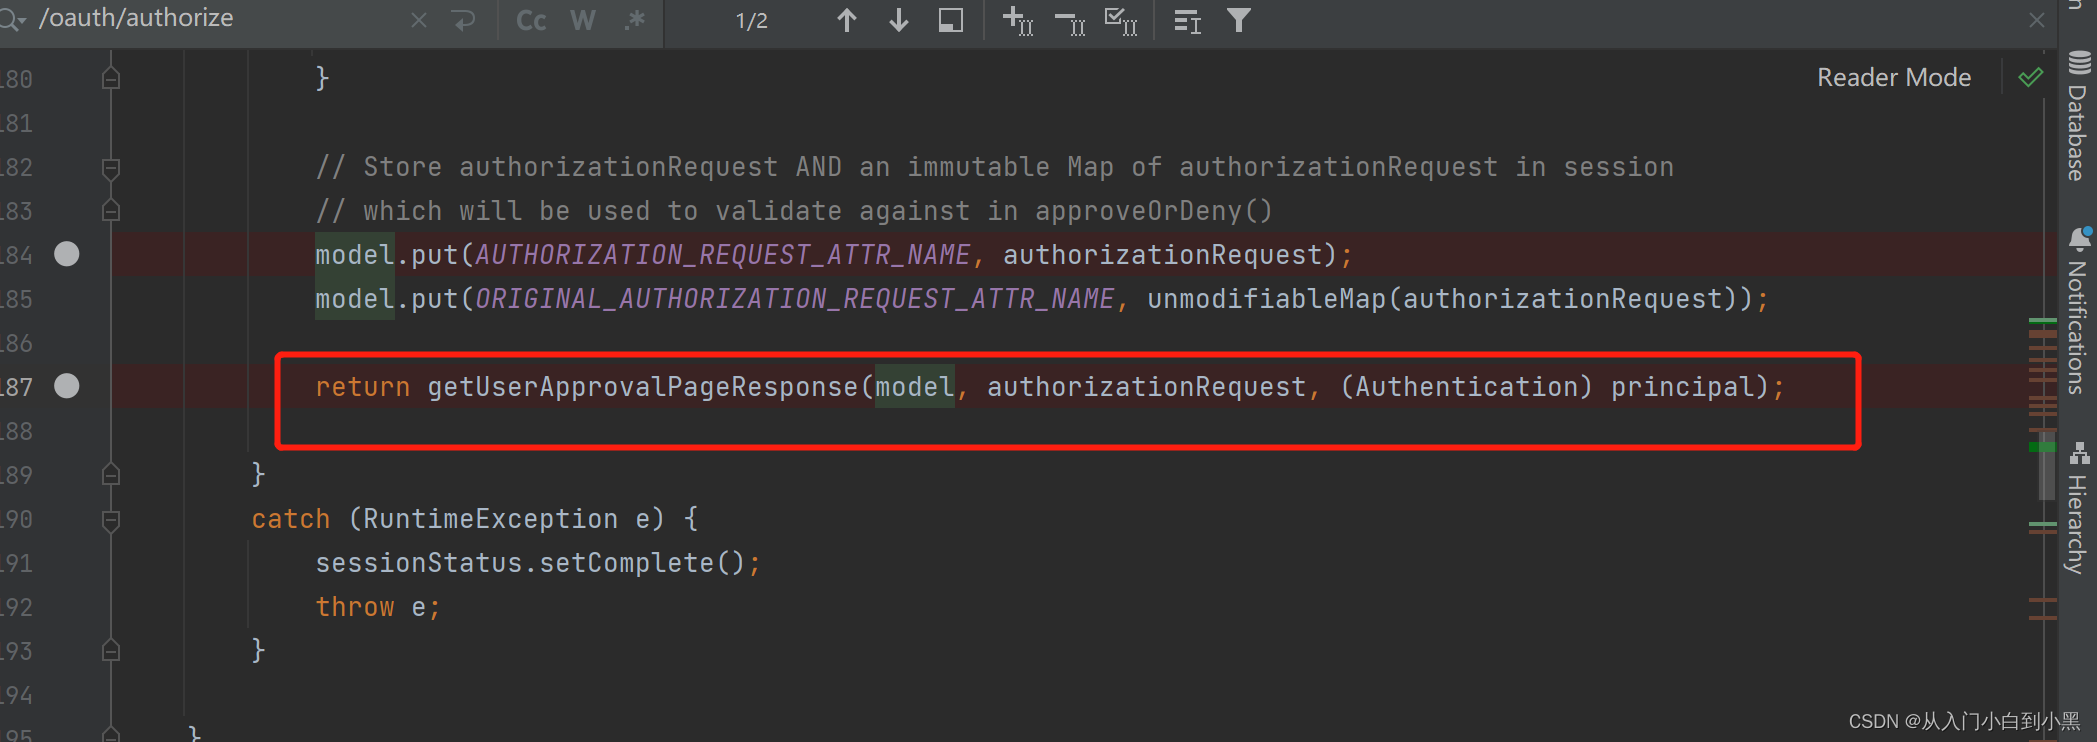
3.当我们在授权页面点击同意之后,页面携带了scope.all=true和一些参数请求/oauth/authorize这个时候请求的才是post的接口

这个时候getAuthorizationCodeResponse(authorizationRequest, (Authentication) principal)会去生成授权码code回调redirect_uri。
这个时候拿到了code,接下来我们应该请求
@GetMapping("/index")public String hello(String code, Model model) {if (code != null) {MultiValueMap<String, String> map = new LinkedMultiValueMap<>();map.add("code", code);map.add("client_id", "xql");map.add("client_secret", "xql123");map.add("redirect_uri", "http://localhost:8089/goods/index");map.add("grant_type", "authorization_code");Map<String,String> resp = restTemplate.postForObject("http://localhost:53020/uaa-service/oauth/token", map, Map.class);String access_token = resp.get("access_token");System.out.println(access_token);HttpHeaders headers = new HttpHeaders();headers.add("Authorization", "Bearer " + access_token);HttpEntity<Object> httpEntity = new HttpEntity<>(headers);ResponseEntity<String> entity = restTemplate.exchange("http://localhost:53021/resource-service/admin/hello", HttpMethod.GET, httpEntity, String.class);model.addAttribute("msg", entity.getBody());}return "index";}
我们应该根据code获取token访问的是/oauth/token接口
/oauth/token
org.springframework.security.oauth2.provider.endpoint包中的TokenEndpoint.java文件中
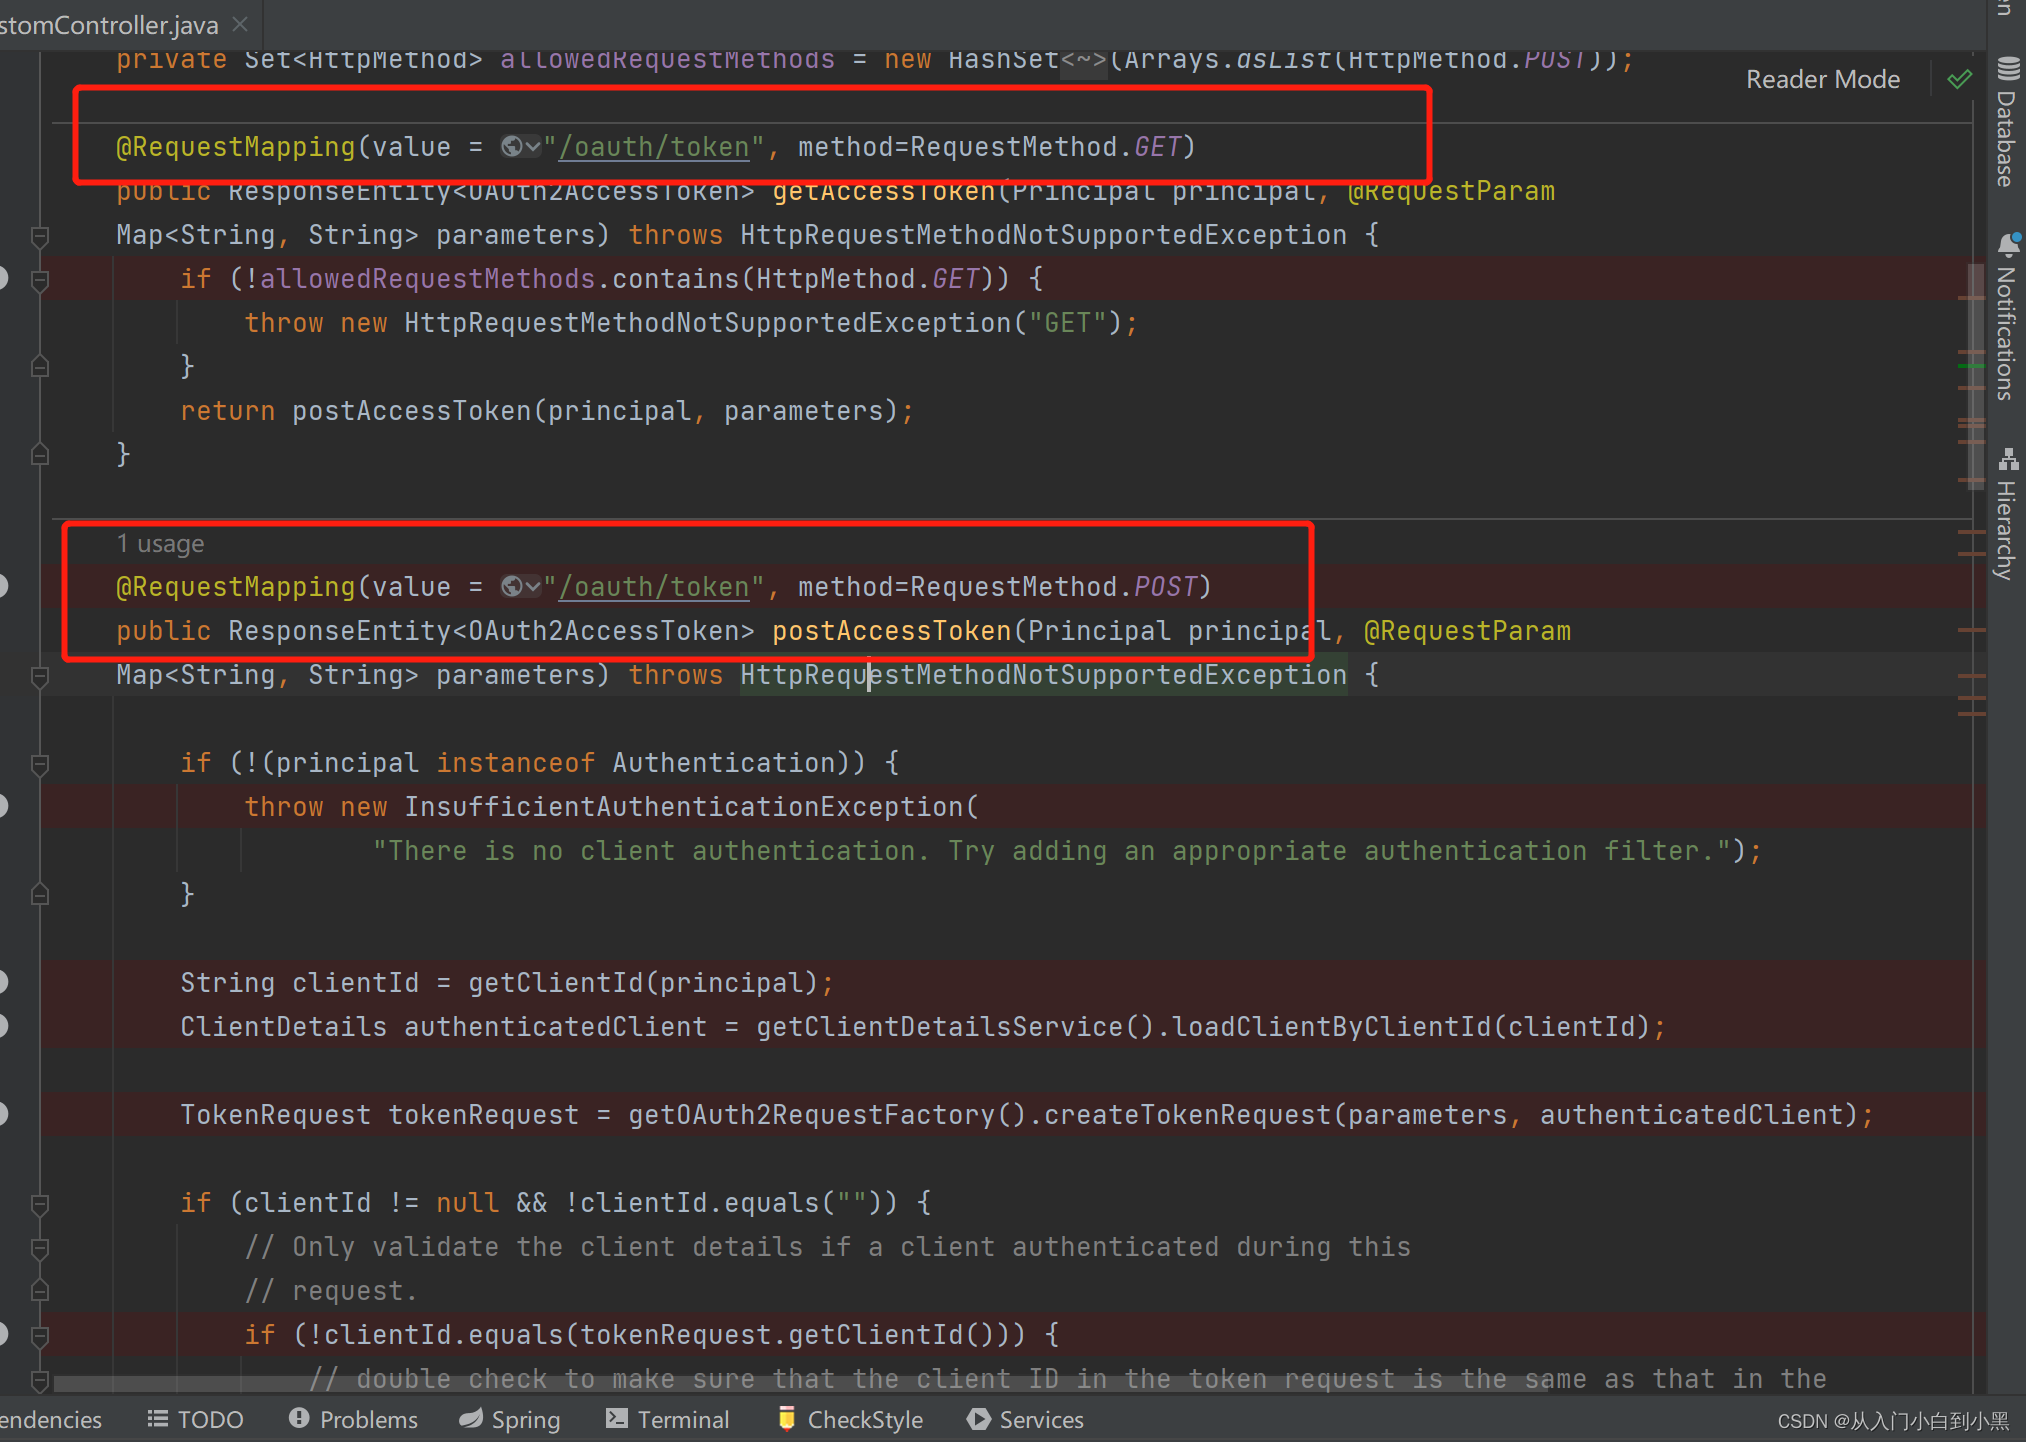
有一个get一个post,但是最早get还是去调post
返回accss——token
自定义授权页面
<%@ page contentType="text/html;charset=UTF-8" language="java" isELIgnored="false" %>
<%@ taglib prefix="c" uri="http://java.sun.com/jsp/jstl/core" %>
<c:set var="path" value="${pageContext.request.contextPath}"></c:set>
<%@ taglib prefix="fmt" uri="http://java.sun.com/jsp/jstl/fmt" %>
<!DOCTYPE html>
<html lang="en">
<head><meta charset="UTF-8"><meta name="viewport" content="width=device-width, initial-scale=1.0"><meta http-equiv="X-UA-Compatible" content="ie=edge"><title>授权页面</title><link rel="stylesheet" href="https://cdn.bootcdn.net/ajax/libs/twitter-bootstrap/4.6.0/css/bootstrap.min.css">
</head>
<body>
<div class="container"><div class="row justify-content-center"><div class="col-md-6"><h1 class="text-center my-5">${application_name}</h1><p class="text-center">${application_description}</p><form action="${path}/oauth/authorize" method="post"><input type="hidden" name="client_id" value="${clientId}"><input type="hidden" name="state" value="${state}"><input type="hidden" name="response_type" value="${response_type}"><input type="hidden" name="scope" value="${scope}"><input type="hidden" name="redirect_uri" value="${redirect_uri}"><input type="hidden" name="user_oauth_approval" value="true"><c:forEach items="${scope}" var="sc"><input type="hidden" name="scope.${sc}" value="true"></c:forEach><div class="form-group mt-5"><button type="submit" class="btn btn-primary btn-lg btn-block">同意</button></div></form><form action="${path}/oauth/authorize" method="post"><input type="hidden" name="error" value="access_denied"><input type="hidden" name="user_oauth_approval" value="false"><input type="hidden" name="approve" value="false"><div class="form-group mt-3"><button type="submit" class="btn btn-secondary btn-lg btn-block">不同意</button></div></form></div></div>
</div>
<!-- Bootstrap JS -->
<script src="https://cdn.bootcdn.net/ajax/libs/jquery/3.6.0/jquery.min.js"></script>
<script src="https://cdn.bootcdn.net/ajax/libs/popper.js/2.9.3/umd/popper.min.js"></script>
<script src="https://cdn.bootcdn.net/ajax/libs/twitter-bootstrap/4.6.0/js/bootstrap.min.js"></script>
</body>
</html>
我们来测试看一下效果


我们也可以测试之前几篇的其他案例也是可以通的
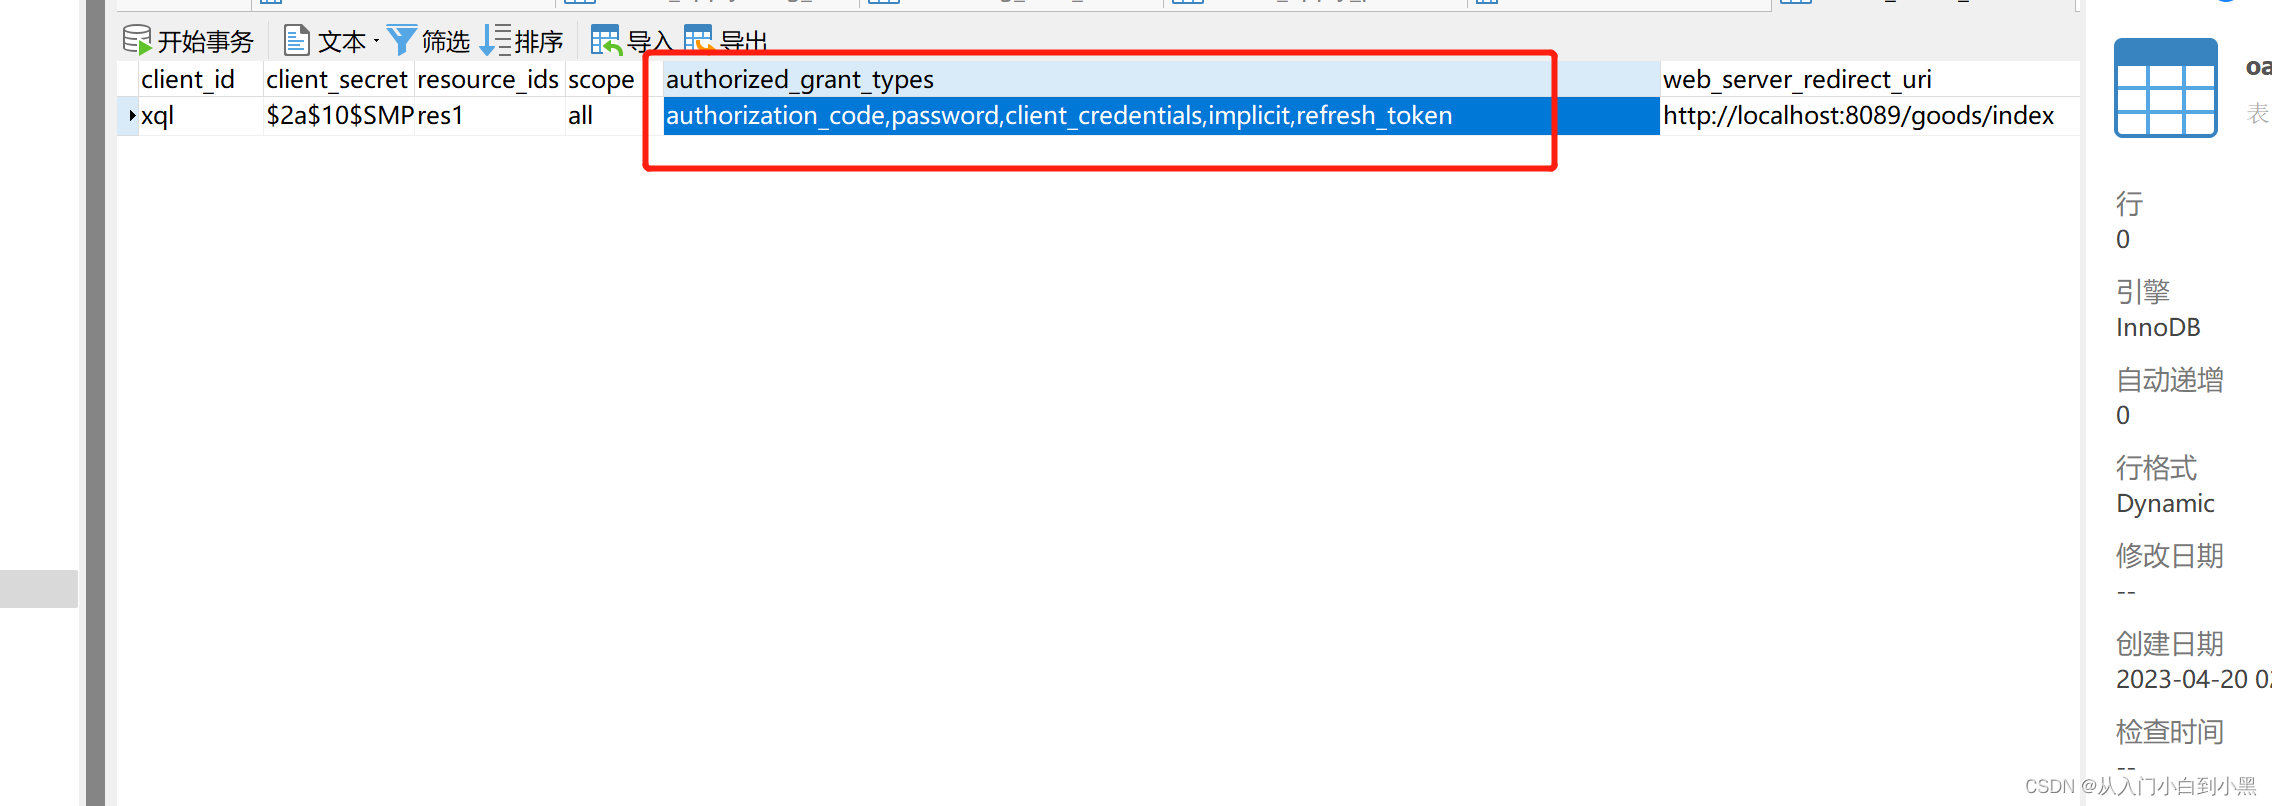
但是数据库需要配置这个客户端支持其他模式
本次数据库表
/*Navicat Premium Data TransferSource Server         : 121.199.2.55-8Source Server Type    : MySQLSource Server Version : 80027Source Host           : 121.199.2.55:3307Source Schema         : oauthTarget Server Type    : MySQLTarget Server Version : 80027File Encoding         : 65001Date: 19/06/2023 16:37:27
*/SET NAMES utf8mb4;
SET FOREIGN_KEY_CHECKS = 0;-- ----------------------------
-- Table structure for user
-- ----------------------------
DROP TABLE IF EXISTS `user`;
CREATE TABLE `user`  (`id` varchar(20) CHARACTER SET utf8mb4 COLLATE utf8mb4_0900_ai_ci NOT NULL COMMENT '主键',`user_name` varchar(64) CHARACTER SET utf8mb4 COLLATE utf8mb4_0900_ai_ci NOT NULL DEFAULT 'NULL' COMMENT '账号',`nick_name` varchar(64) CHARACTER SET utf8mb4 COLLATE utf8mb4_0900_ai_ci NOT NULL DEFAULT 'NULL' COMMENT '昵称',`salt` varchar(255) CHARACTER SET utf8mb4 COLLATE utf8mb4_0900_ai_ci NULL DEFAULT NULL COMMENT '盐值',`password` varchar(64) CHARACTER SET utf8mb4 COLLATE utf8mb4_0900_ai_ci NOT NULL DEFAULT 'NULL' COMMENT '密码',`status` char(1) CHARACTER SET utf8mb4 COLLATE utf8mb4_0900_ai_ci NULL DEFAULT '0' COMMENT '账号状态(0正常 1停用)',`email` varchar(64) CHARACTER SET utf8mb4 COLLATE utf8mb4_0900_ai_ci NULL DEFAULT NULL COMMENT '邮箱',`head` varchar(255) CHARACTER SET utf8mb4 COLLATE utf8mb4_0900_ai_ci NULL DEFAULT NULL COMMENT '头像',`phonenumber` varchar(32) CHARACTER SET utf8mb4 COLLATE utf8mb4_0900_ai_ci NULL DEFAULT NULL COMMENT '手机号',`sex` char(1) CHARACTER SET utf8mb4 COLLATE utf8mb4_0900_ai_ci NULL DEFAULT NULL COMMENT '用户性别(0男,1女,2未知)',`user_type` char(1) CHARACTER SET utf8mb4 COLLATE utf8mb4_0900_ai_ci NOT NULL DEFAULT '1' COMMENT '用户类型(0管理员,1普通用户)',`user_role` varchar(32) CHARACTER SET utf8mb4 COLLATE utf8mb4_0900_ai_ci NULL DEFAULT NULL COMMENT '用户权限',`create_by` varchar(20) CHARACTER SET utf8mb4 COLLATE utf8mb4_0900_ai_ci NULL DEFAULT NULL COMMENT '创建人',`create_time` timestamp(0) NULL DEFAULT NULL COMMENT '创建时间',`update_by` varchar(20) CHARACTER SET utf8mb4 COLLATE utf8mb4_0900_ai_ci NULL DEFAULT NULL COMMENT '更新人',`update_time` timestamp(0) NULL DEFAULT NULL COMMENT '更新时间',`del_flag` int(0) NULL DEFAULT 0 COMMENT '删除标志(0代表未删除,1代表已删除)',PRIMARY KEY (`id`) USING BTREE
) ENGINE = InnoDB CHARACTER SET = utf8mb4 COLLATE = utf8mb4_0900_ai_ci COMMENT = '用户表' ROW_FORMAT = Dynamic;SET FOREIGN_KEY_CHECKS = 1;/*Navicat Premium Data TransferSource Server         : 121.199.2.55-8Source Server Type    : MySQLSource Server Version : 80027Source Host           : 121.199.2.55:3307Source Schema         : oauthTarget Server Type    : MySQLTarget Server Version : 80027File Encoding         : 65001Date: 19/06/2023 16:37:14
*/SET NAMES utf8mb4;
SET FOREIGN_KEY_CHECKS = 0;-- ----------------------------
-- Table structure for oauth_client_details
-- ----------------------------
DROP TABLE IF EXISTS `oauth_client_details`;
CREATE TABLE `oauth_client_details`  (`client_id` varchar(256) CHARACTER SET utf8 COLLATE utf8_general_ci NOT NULL COMMENT '客户端ID,唯一标识',`client_secret` varchar(256) CHARACTER SET utf8 COLLATE utf8_general_ci NOT NULL COMMENT '客户端访问秘钥,BCryptPasswordEncoder加密算法加密',`resource_ids` varchar(256) CHARACTER SET utf8 COLLATE utf8_general_ci NOT NULL COMMENT '可访问资源id(英文逗号分隔)',`scope` varchar(256) CHARACTER SET utf8 COLLATE utf8_general_ci NOT NULL COMMENT '授权范围(英文逗号分隔)',`authorized_grant_types` varchar(256) CHARACTER SET utf8 COLLATE utf8_general_ci NOT NULL COMMENT '授权类型(英文逗号分隔)',`web_server_redirect_uri` varchar(256) CHARACTER SET utf8 COLLATE utf8_general_ci NOT NULL COMMENT '重定向uri',`authorities` varchar(256) CHARACTER SET utf8 COLLATE utf8_general_ci NULL DEFAULT NULL COMMENT '@PreAuthorize(\"hasAuthority(\'admin\')\")可以在方法上标志 用户或者说client 需要说明样的权限\r\n\n\n指定客户端所拥有的Spring Security的权限值\r\n(英文逗号分隔)',`access_token_validity` int(0) NOT NULL COMMENT '令牌有效期(单位:秒)',`refresh_token_validity` int(0) NOT NULL COMMENT '刷新令牌有效期(单位:秒)',`additional_information` varchar(4096) CHARACTER SET utf8 COLLATE utf8_general_ci NULL DEFAULT NULL COMMENT '预留字段,在Oauth的流程中没有实际的使用(JSON格式数据)',`autoapprove` varchar(256) CHARACTER SET utf8 COLLATE utf8_general_ci NULL DEFAULT NULL COMMENT '设置用户是否自动Approval操作, 默认值为 \'false\'\r\n可选值包括 \'true\',\'false\', \'read\',\'write\'.\r\n该字段只适用于grant_type=\"authorization_code\"的情况,当用户登录成功后,若该值为\'true\'或支持的scope值,则会跳过用户Approve的页面, 直接授权',`create_time` datetime(0) NULL DEFAULT CURRENT_TIMESTAMP(0) COMMENT '创建时间',`update_time` datetime(0) NULL DEFAULT NULL ON UPDATE CURRENT_TIMESTAMP(0) COMMENT '更新时间',PRIMARY KEY (`client_id`) USING BTREE
) ENGINE = InnoDB CHARACTER SET = utf8 COLLATE = utf8_general_ci ROW_FORMAT = Dynamic;-- ----------------------------
-- Records of oauth_client_details
-- ----------------------------
INSERT INTO `oauth_client_details` VALUES ('xql', '$2a$10$SMP8P9hRmdTFzMfZBXksuuDNBm7AV9q1SFomvqc9FR38e/MMR7XiC', 'res1', 'all', 'authorization_code,password,client_credentials,implicit,refresh_token', 'http://localhost:8089/goods/index', NULL, 259200, 7200, NULL, 'false', '2023-05-06 01:14:19', '2023-06-19 02:51:04');SET FOREIGN_KEY_CHECKS = 1;
其他的代码可以下载

源码可以在我的资源免费下载或者私信我