机器环境
CPU:Intel® Xeon® Platinum 8358p CPU @ 2.60GHz
GPU:NVIDIA A800-SXM4-80GB *8
操作系统:CentOS Linux release 7.3.1611
内核版本:5.4.54.std7.el7.x86_64 11.4
CUDA:11.4
驱动及工具安装记录
写在前面:wget https://developer.download.nvidia.com/compute/cuda/x.x.x/local_installers/cuda_*_linux.run 使用这种runfile文件的方式十分方便,一劳永逸(driver、cuda一次性安装),强烈推荐。
注意系统根分区一定要大,推荐100G,否则都不知道哪里报错
来这里挑选需要的版本:https://developer.nvidia.com/cuda-toolkit-archive
nouveau
- lsmod确认nouveau是否加载
- 关闭系统自带GPU驱动nouveau
cat /etc/modprobe.d/blacklist-nouveau.conf
blacklist nouveau
options nouveau modeset=0
- 重启机器生效
driver
- 官网下载相关驱动及工具:https://www.nvidia.com/Download/index.aspx?lang=en-us
- wget https://cn.download.nvidia.com/tesla/470.182.03/nvidia-driver-local-repo-rhel7-470.182.03-1.0-1.x86_64.rpm
- 安装rpm包:rpm -ivh nvidia-driver-local-repo-rhel7-470.182.03-1.0-1.x86_64.rpm,主要是安装的NVIDIA的驱动及工具源,使用yum安装
- yum install cuda-drivers -y 安装驱动程序
安装时可能会有依赖报错,记录我这边遇到的问题:vulkan-filesystem缺失
Centos packages下载安装包:wget http://mirror.centos.org/centos/7/os/x86_64/Packages/vulkan-filesystem-1.1.97.0-1.el7.noarch.rpm
rpm -ivh vulkan-filesystem-1.1.97.0-1.el7.noarch.rpm
CUDA
- 上面安装完源以后,相关的工具都会包含在库里面,查询:yum list |grep ‘cuda’(此次安装的是cuda-11-4,其他版本可以从官网下载,过程一致:https://www.nvidia.com/Download/index.aspx?lang=en-us)
- 安装:yum install cuda-11-4.x86_64
安装时yum源里面没有cuda,需要安装在线源:wget https://developer.download.nvidia.com/compute/cuda/repos/rhel7/x86_64/cuda-rhel7.repo
安装时可能会有依赖报错,记录我这边遇到的问题:libxkbcommon-x11问题
根据系统版本下载相关软件
wget https://mirrors.ustc.edu.cn/centos/7.9.2009/os/x86_64/Packages/libxkbcommon-0.7.1-3.el7.x86_64.rpm
wget https://mirrors.ustc.edu.cn/centos/7.9.2009/os/x86_64/Packages/libxkbcommon-x11-0.7.1-3.el7.x86_64.rpm
rpm -ivh libxkbcommon-0.7.1-3.el7.x86_64.rpm && rpm -ivh libxkbcommon-x11-0.7.1-3.el7.x86_64.rpm
- 验证cuda安装结果:默认安装到/usr/local/cuda-11.4
ll /usr/local/cuda-11.4
total 252
drwxr-xr-x  3 root root  4096 Apr 19 16:55 bin
drwxr-xr-x  4 root root  4096 Apr 19 16:54 compute-sanitizer
-rw-r--r--  1 root root 63037 Aug 27  2021 CUDA_Toolkit_Release_Notes.txt
-rw-r--r--  1 root root   160 Aug 27  2021 DOCS
-rw-r--r--  1 root root 61369 Aug 27  2021 EULA.txt
drwxr-xr-x  5 root root  4096 Apr 19 16:54 extras
drwxr-xr-x  4 root root  4096 Apr 19 16:54 gds
lrwxrwxrwx  1 root root    28 Apr 19 16:54 include -> targets/x86_64-linux/include
lrwxrwxrwx  1 root root    24 Apr 19 16:54 lib64 -> targets/x86_64-linux/lib
drwxr-xr-x  7 root root  4096 Apr 19 16:55 libnvvp
-rw-r--r--  1 root root 61369 Aug 27  2021 LICENSE
drwxr-xr-x  3 root root  4096 Apr 19 16:54 man
drwxr-xr-x  2 root root  4096 Apr 19 16:55 nsightee_plugins
drwxr-xr-x  3 root root  4096 Apr 19 16:53 nvml
drwxr-xr-x  7 root root  4096 Apr 19 16:54 nvvm
-rw-r--r--  1 root root   524 Aug 27  2021 README
drwxr-xr-x 12 root root  4096 Apr 23 10:54 samples
drwxr-xr-x  3 root root  4096 Apr 19 16:54 share
drwxr-xr-x  2 root root  4096 Apr 19 16:54 src
drwxr-xr-x  3 root root  4096 Aug 16  2021 targets
drwxr-xr-x  2 root root  4096 Apr 19 16:54 tools
-r--r--r--  1 root root  3041 Jan 28  2022 version.json
- /usr/local/cuda-11.4/samples/*:下面是cuda的相关样本库,其中有带宽测试的部分,以此部分为例,验证功能
#此部分也可以直接通过git下载最新版本(cuda12中已经变更为:cd /usr/local/cuda-12.0/extras/demo_suite/这个):git clone https://github.com/NVIDIA/cuda-samples.git
ll /usr/local/cuda-11.4/samples/1_Utilities/
total 24
drwxr-xr-x 3 root root 4096 Apr 19 16:54 bandwidthTest
drwxr-xr-x 3 root root 4096 Apr 19 16:54 deviceQuery
drwxr-xr-x 3 root root 4096 Apr 19 16:54 deviceQueryDrv
drwxr-xr-x 3 root root 4096 Apr 23 10:54 p2pBandwidthLatencyTest
drwxr-xr-x 3 root root 4096 Apr 19 16:54 topologyQuery
drwxr-xr-x 3 root root 4096 Apr 19 16:54 UnifiedMemoryPerf
- 选取此部分中p2pBandwidthLatencyTest安装相关二进制执行文件
#cd /usr/local/cuda-11.4/samples/1_Utilities/p2pBandwidthLatencyTest/
#make
#ls
Makefile           p2pBandwidthLatencyTest.o
NsightEclipse.xml  p2pBandwidthLatencyTest.cu  readme.txt
此过程涉及GNU Make安装,GNU Make是一个工具,它可以控制从程序的源文件生成可执行文件和其他非源文件
GCC升级(需求5.0以上版本)
binutils
bison
- GCC升级
wget https://ftp.gnu.org/gnu/gcc/gcc-10.2.0/gcc-10.2.0.tar.xztar -xvf gcc-10.2.0.tar.xzcd gcc-10.2.0/./contrib/download_prerequisites
yum install -y kernel-devel libtool libatomic libcurl-devel texinfo./configure --prefix=/usr/local/gcc-10.2.0 --enable-bootstrap --enable-languages=c,c++ --enable-threads=posix --enable-checking=release --enable-multilib --with-system-zlibmake && make installmv /usr/lib64/libstdc++.so.6 /usr/lib64/libstdc++.so.6.bak
mv /usr/bin/gcc /usr/bin/gcc485
mv /usr/bin/g++ /usr/bin/g++485
mv /usr/bin/c++ /usr/bin/c++485
mv /usr/bin/cc /usr/bin/cc485
ln -s /usr/local/gcc-10.2.0/bin/gcc /usr/bin/gcc
ln -s /usr/local/gcc-10.2.0/bin/g++ /usr/bin/g++
ln -s /usr/local/gcc-10.2.0/bin/c++ /usr/bin/c++
ln -s /usr/local/gcc-10.2.0/bin/gcc /usr/bin/cc
ln -s /usr/local/gcc-10.2.0/lib64/libstdc++.so.6.0.28 /usr/lib64/libstdc++.so.6gcc --version
gcc (GCC) 10.2.0
Copyright (C) 2020 Free Software Foundation, Inc.
This is free software; see the source for copying conditions.  There is NO
warranty; not even for MERCHANTABILITY or FITNESS FOR A PARTICULAR PURPOSE.
- binutils安装
wget https://ftp.gnu.org/gnu/binutils/binutils-2.40.tar.gz
tar -zxf binutils-2.40.tar.gz
cd binutils-2.40/
./configure
make && make install
- bison安装
wget https://ftp.gnu.org/gnu/bison/bison-3.8.tar.gz
tar -zxf bison-3.8.tar.gz
cd bison-3.8/
./configure
make && make installbison -V
bison (GNU Bison) 3.8
Written by Robert Corbett and Richard Stallman.
nvidia-dcgm
- 下载最新的工具,安装方法可以参考官网:https://developer.nvidia.com/dcgm#Downloads
- 工具介绍文档:https://docs.nvidia.com/datacenter/dcgm/3.1/user-guide/index.html
wget https://developer.download.nvidia.com/compute/cuda/repos/rhel8/x86_64/cuda-rhel8.repo
#或者使用wget https://developer.download.nvidia.com/compute/cuda/repos/rhel7/x86_64/cuda-rhel7.repo
yum install datacenter-gpu-manager
systemctl restart nvidia-dcgm.service && systemctl enable nvidia-dcgm.service
nvidia-fabricmanager
- 从 DCGM 2.0 开始,NVSwitch 系统的 Fabric Manager (FM) 不再与 DCGM 包捆绑在一起。FM 是一个单独的工件,可以使用 CUDA 网络存储库进行安装。
- 下载最新的工具,安装方法可以参考官网:https://docs.nvidia.com/datacenter/tesla/fabric-manager-user-guide/index.html
wget https://developer.download.nvidia.cn/compute/cuda/repos/rhel7/x86_64/nvidia-fabric-manager-470.182.03-1.x86_64.rpm
rpm -ivh nvidia-fabric-manager-470.182.03-1.x86_64.rpm
systemctl restart nvidia-fabricmanager.service && systemctl enable nvidia-fabricmanager.service
注意nvidia-fabric-manager版本需要和驱动driver版本保持一致
gpu-burn
- gpu-burn是GPU压力测试工具:https://github.com/wilicc/gpu-burn
- 下载:wget https://github.com/wilicc/gpu-burn/archive/refs/heads/master.zip
- 安装:unzip master.zip && cd gpu-burn-master/ && make
- 生成:gpu_burn二进制执行文件
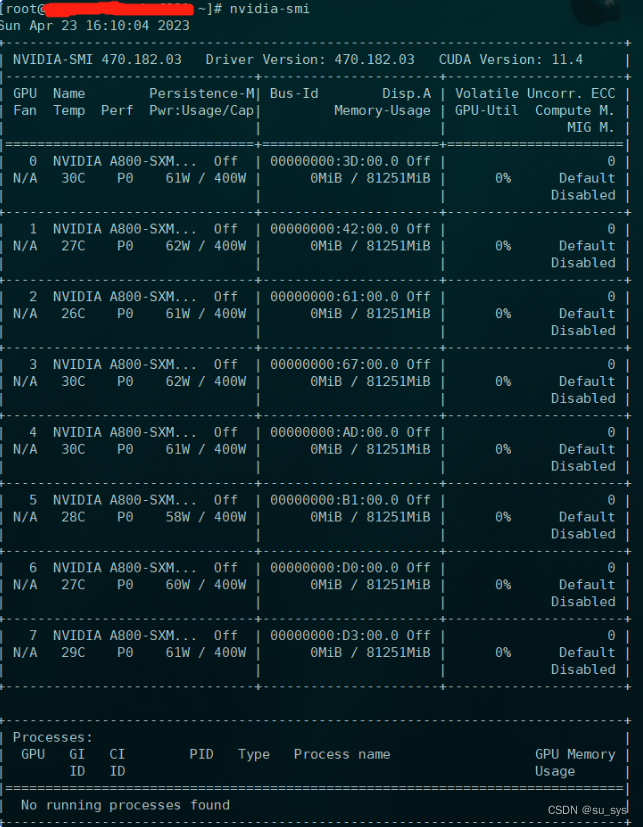
确认驱动及工具安装结果
GPU信息
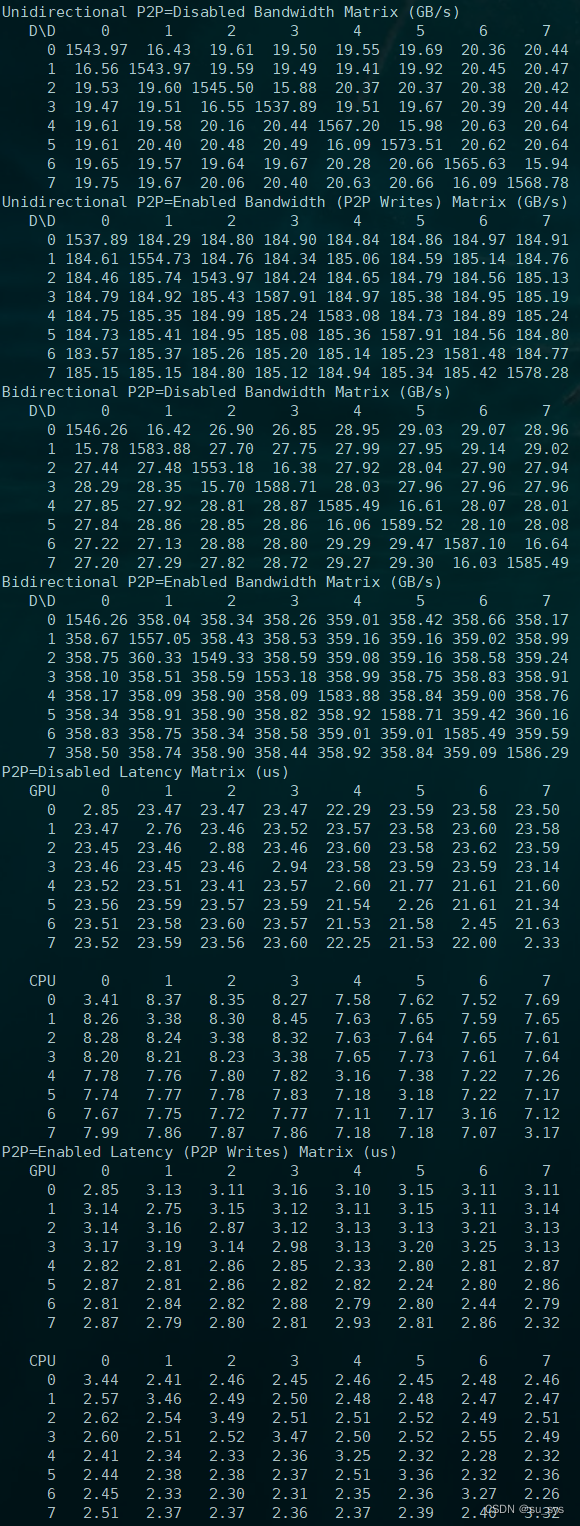
cuda工具库验证(可执行文件./p2pBandwidthLatencyTest)
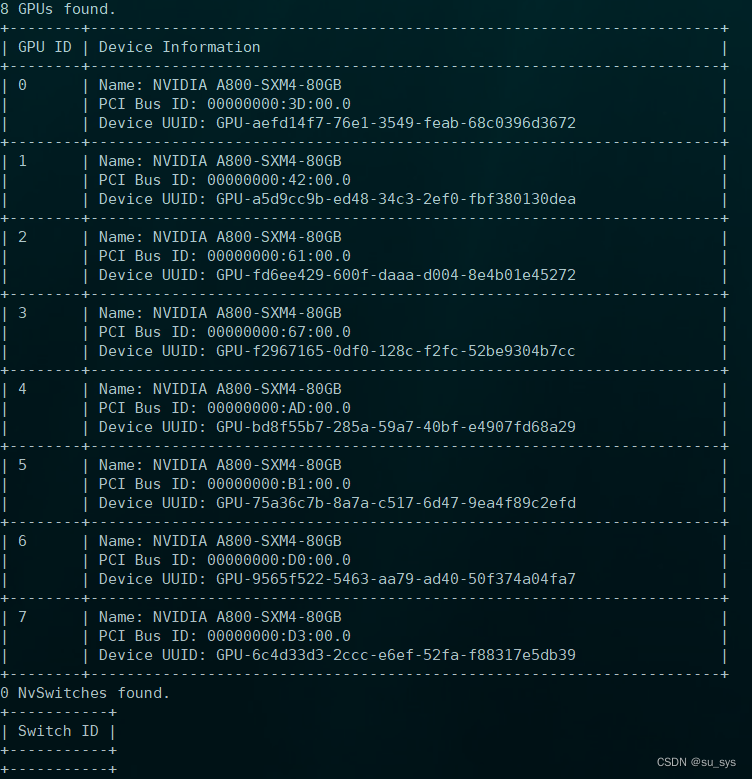
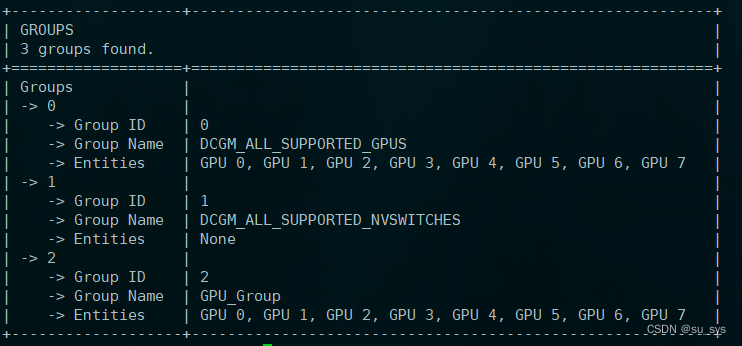
dcgm使用
#常用命令
dcgmi discovery -l #展示GPU信息
dcgmi group -c GPU_Group #创建GROUP
dcgmi group -g 1 -a 0,1,2,3,4,5,6,7 #将对应GPU加入GROUP
GPU测试
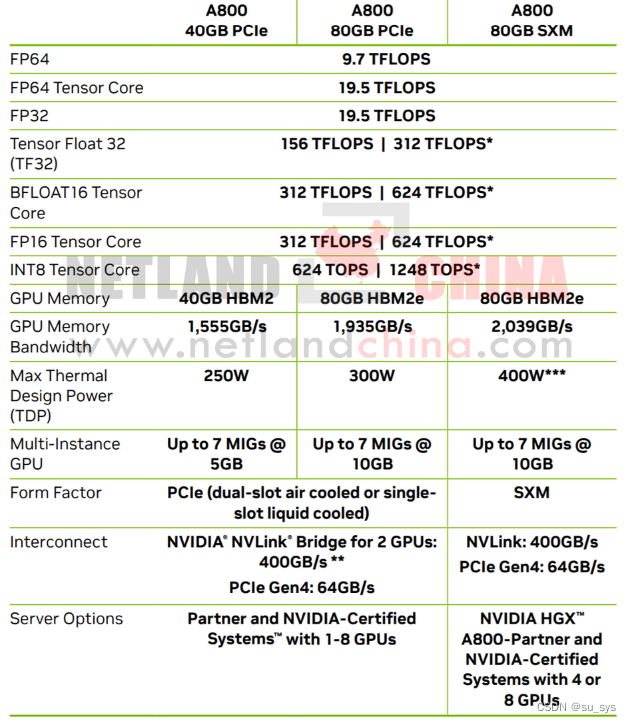
GPU参数信息
基础性能及功耗测试
1. ./p2pBandwidthLatencyTest:NVLink带宽测试
2. ./gpu_burn:默认单精度矩阵运算,参数 “-d”(双精度),./gpu_burn 100 性能测试
3. dcgmi diag -r "targeted power" -p "targeted power.target_power=400;targeted power.test_duration=60" :设置功耗最大400,观察GPU运行状态,执行结果会有GPU健康状态报告
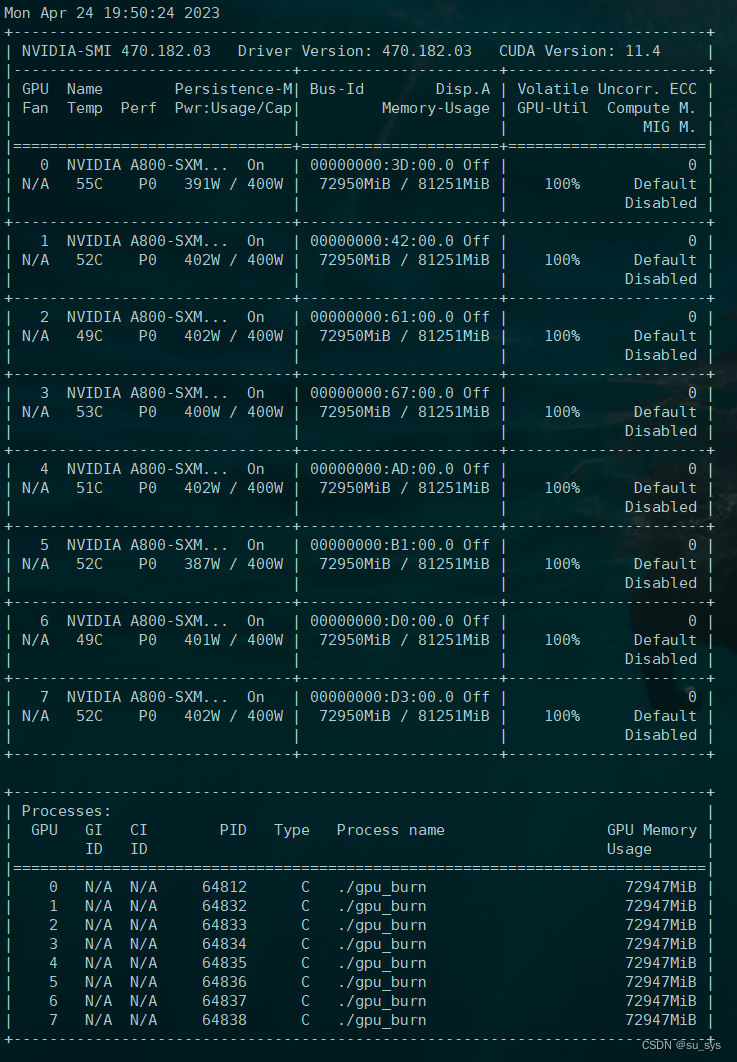
gpu_burn:测试过程及结果可以观察:GPU状态、温度、功耗
dcgmi:使用之前需要执行:nvidia-smi -i 0,1,2,3,4,5,6,7 -pm 1,开启Persistence mode模式,否则结果会有缺失
稳定性测试
1. ./gpu_burn 500:稳定性长时间压测
结果截图
nvidia-smi:显示功耗及利用率信息
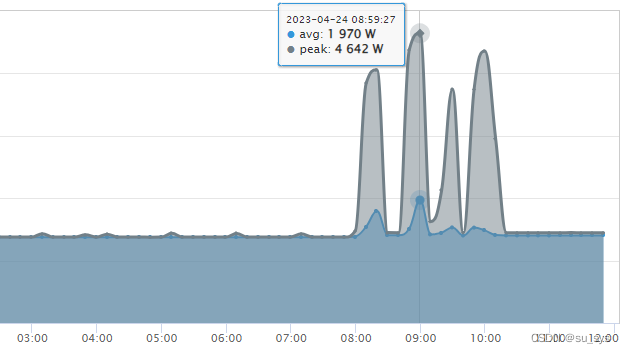
服务器BMC功耗监控
引用
NVIDIA官网:https://www.nvidia.com/
GPU-burn:https://github.com/wilicc/gpu-burn
GNU:https://www.gnu.org/
