目录
- 概述
- 1.效果展示
- 2.使用原始Html+CSS实现
- 3.使用Vue.js进行组件化
- 3.1 Header部分组件实现
- 3.1.1图标的展示
- 3.1.2 定义Vue调试的名称
- 3.1.3 使用scoped隔离组件间的css影响
- 3.2 附近店铺部分实现
- 3.3 底部导航栏组件的实现
- 3.4 将组件组成一个整体页面
- 4.代码地址
概述
本人是一个从事Android开发5年的程序员,对各大优秀的编程语言都很感兴趣,Vue.js为啥会引起我的注意并且想学好它呢?一是因为Vue.js的理念和Android的Compose UI相似,可以对比学习,取长补短;其次,我想学习web应用的开发来做一些Web应用辅助Android的开发。实际上在Android开发中,多人开发的时候,不管是版本发布,还是自动打包,还是组件化,都离不开Maven仓库,打包服务器,还有邮件的折磨,在大公司里面,这一套都会有各种平台,比如京东的主站打包有一个专门的界面友好的Web页面,加上集成的CI/CD工具,程序员可以使用最少的沟通成本去完成自己组件的发布和打包。开发完的需求也可以通过一个web页面实时的提交到测试的系统,这些都离不开前端友好界面交互的支持。另外:本文适合有Vue基础的小伙伴学习,若是不熟悉Vue的小伙伴,看了本文后请先去学习基础知识,再来看一遍,然后下载源码动手实践一遍
以前因为前端页面都是Html5+CSS+JS开发,比较难维护,理念也和Android和IOS这类的大前端不太符合,以前的Html5+CSS+JS开发完成后,还需要交给后端去渲染数据,然后整个项目放到服务器上,每次我们打开浏览器,都是把整个页面加载到本地然后展示出来,这和Android,IOS这种拿到服务器端接口,自己渲染数据的方式不太相同。随着Vue.js的出现,我们发现好像Web的开发好像和Android,IOS 的开发比较相似了,前后端分离了,即我们可以用Vue.js编写一个前端的页面后,直接拿到服务器端提供的接口,自己进行渲染数据了。和Android,IOS一样,甚至可以共用接口了。而且Vue的设计理念和Android最近推崇的ComposeUI比较相似,可以对比学习,取长补短。下面我们就一起看下Vue.js有啥魔力吧。
1.效果展示
比如我们仿造一个京东到家的小程序页面,效果图如下
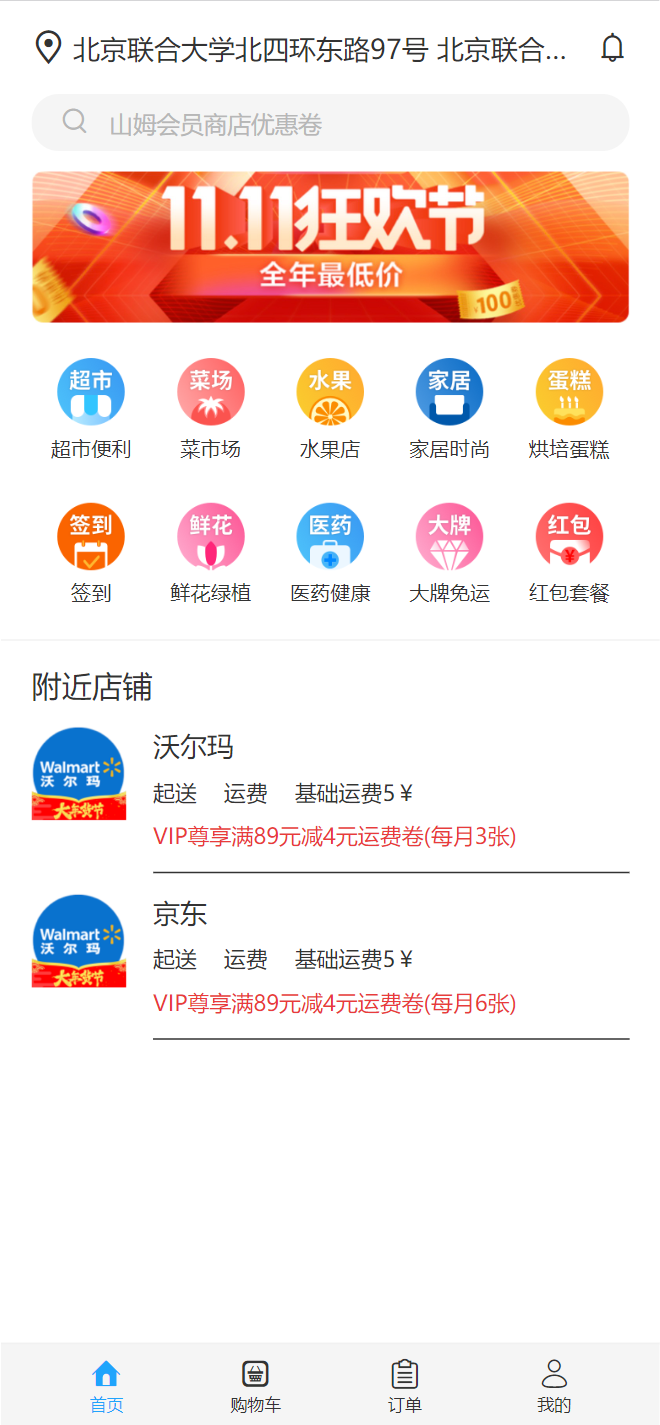
我们分别使用原始的Html+Css方式实现和用Vue.js的方式来实现,对比下Vue.js带来的好处。
2.使用原始Html+CSS实现
<div><div class="wrapper"><div class="position"><span class="iconfont position__icon"></span>北京联合大学北四环东路97号<span class="iconfont position__notice"></span></div><div class="search"><span class="iconfont"></span><span class="search__text">山姆会员商店优惠卷</span></div><div class="banner"><imgclass="banner__img"src="http://www.dell-lee.com/imgs/vue3/banner.jpg"/></div><div class="icons"><div class="icons__item"><imgsrc="http://www.dell-lee.com/imgs/vue3/超市.png"class="icons__item__img"/><p class="icons__item__desc">超市便利</p></div><div class="icons__item"><imgsrc="http://www.dell-lee.com/imgs/vue3/菜市场.png"class="icons__item__img"/><p class="icons__item__desc">菜市场</p></div><div class="icons__item"><imgsrc="http://www.dell-lee.com/imgs/vue3/水果店.png"class="icons__item__img"/><p class="icons__item__desc">水果店</p></div><div class="icons__item"><imgsrc="http://www.dell-lee.com/imgs/vue3/家居.png"class="icons__item__img"/><p class="icons__item__desc">家居时尚</p></div><div class="icons__item"><imgsrc="http://www.dell-lee.com/imgs/vue3/蛋糕.png"class="icons__item__img"/><p class="icons__item__desc">烘培蛋糕</p></div><div class="icons__item"><imgsrc="http://www.dell-lee.com/imgs/vue3/签到.png"class="icons__item__img"/><p class="icons__item__desc">签到</p></div><div class="icons__item"><imgsrc="http://www.dell-lee.com/imgs/vue3/鲜花.png"class="icons__item__img"/><p class="icons__item__desc">鲜花绿植</p></div><div class="icons__item"><imgsrc="http://www.dell-lee.com/imgs/vue3/医药健康.png"class="icons__item__img"/><p class="icons__item__desc">医药健康</p></div><div class="icons__item"><imgsrc="http://www.dell-lee.com/imgs/vue3/大牌免运.png"class="icons__item__img"/><p class="icons__item__desc">大牌免运</p></div><div class="icons__item"><imgsrc="http://www.dell-lee.com/imgs/vue3/红包.png"class="icons__item__img"/><p class="icons__item__desc">红包套餐</p></div></div><div class="gap"></div><div class="nearby"><h3 class="nearby__title">附近店铺</h3><div class="nearby__item"><imgclass="nearby__item__img"src="http://www.dell-lee.com/imgs/vue3/near.png"/><div class="nearby__content"><div class="nearby__content__title">沃尔玛</div><div class="nearby__content__tags"><span class="nearby__content__tag">月售1万+</span><span class="nearby__content__tag">月售1万+</span><span class="nearby__content__tag">月售1万+</span></div><p class="nearby__content__highlight">VIP尊享满89元减4元运费卷(每月3张)</p></div></div><div class="nearby__item"><imgclass="nearby__item__img"src="http://www.dell-lee.com/imgs/vue3/near.png"/><div class="nearby__content"><div class="nearby__content__title">沃尔玛</div><div class="nearby__content__tags"><span class="nearby__content__tag">月售1万+</span><span class="nearby__content__tag">月售1万+</span><span class="nearby__content__tag">月售1万+</span></div><p class="nearby__content__highlight">VIP尊享满89元减4元运费卷(每月3张)</p></div></div>// 省略部分重复代码……</div><div class="spacer"></div></div><div class="docker"><div class="docker__item docker__item--active"><div class="iconfont"></div><div class="docker__title">首页</div></div><div class="docker__item"><div class="iconfont"></div><div class="docker__title">购物车</div></div><div class="docker__item"><div class="iconfont"></div><div class="docker__title">订单</div></div><div class="docker__item"><div class="iconfont"></div><div class="docker__title">我的</div></div></div></div>
</template><style lang="scss">
//省略CSS部分代码
<style>
}
上面的代码就是使用Html+CSS实现的仿京东到家主页的代码,还特意把部分CSS代码和部分重复的代码删掉,因为太多了。而且这里的代码看起来就不想维护,因为很乱,我要修改底部导航栏就得找很久,而且假设哪一个div标签每注意给删了,整个界面都会乱套。
3.使用Vue.js进行组件化
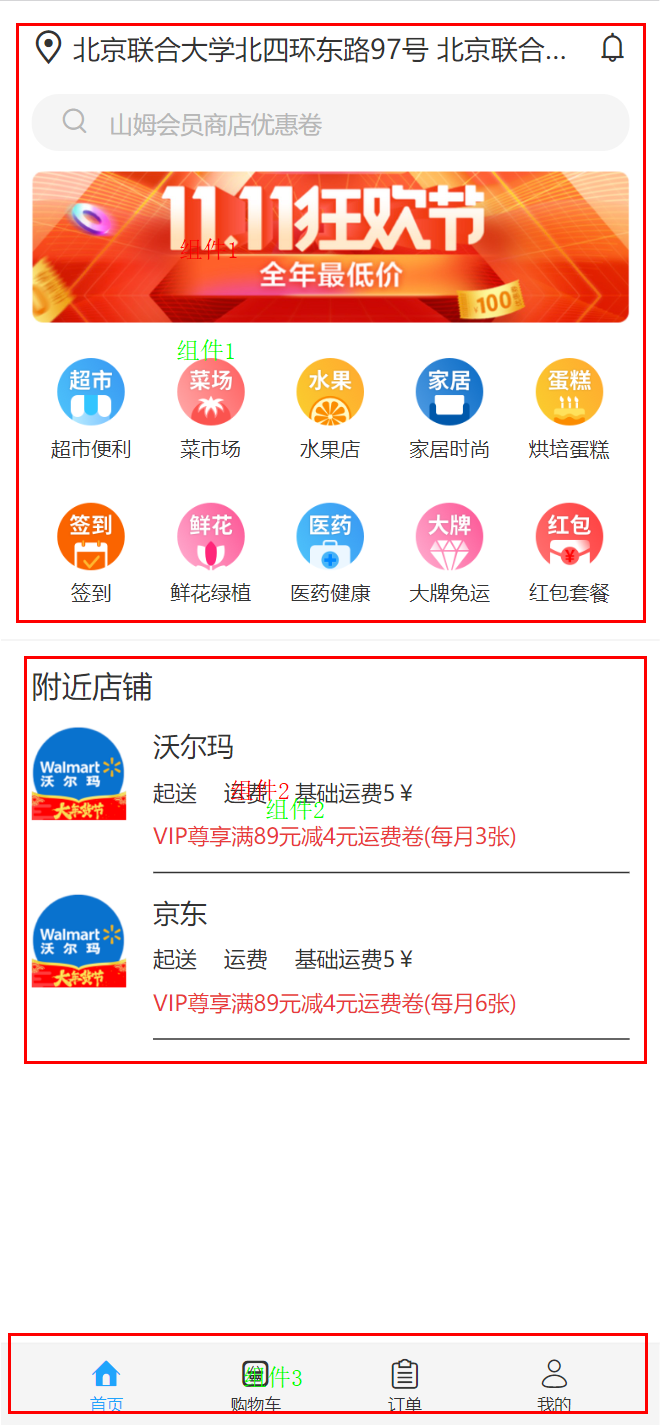
我们仔细观察京东到家的主页是可以给分块的,比如我们可以将主页划分成几个不同的组件,然后组合成一个页面,这里就要用到Vue中的组件相关的内容了。如下图:
3.1 Header部分组件实现
我们可以把图中标记出的组件1Header部分做成一个组件,代码如下所示:
<template><div class="position"><span class="iconfont position__icon"></span>北京联合大学北四环东路97号<span class="iconfont position__notice"></span></div><div class="search"><span class="iconfont"></span><span class="search__text">山姆会员商店优惠卷</span></div><div class="banner"><imgclass="banner__img"src="http://www.dell-lee.com/imgs/vue3/banner.jpg"/></div><div class="icons"><divclass="icons__item"v-for="item in iconList":key="item.desc"><img:src="`http://www.dell-lee.com/imgs/vue3/${item.imgName}.png`"class="icons__item__img"/><p class="icons__item__desc">{{ item.desc }}</p></div></div><div class="gap"></div>
</template>
<script>
export default {name: 'Header',setup () {const iconList = [{ imgName: '超市', desc: '超市便利' },{ imgName: '菜市场', desc: '菜市场' },{ imgName: '水果店', desc: '水果店' },{ imgName: '家居', desc: '家居时尚' },{ imgName: '蛋糕', desc: '烘培蛋糕' },{ imgName: '签到', desc: '签到' },{ imgName: '鲜花', desc: '鲜花绿植' },{ imgName: '医药健康', desc: '医药健康' },{ imgName: '大牌免运', desc: '大牌免运' },{ imgName: '红包', desc: '红包套餐' }]return { iconList }}
}
</script>
<style lang="scss" scoped>
@import "../../style/viriable.scss";
@import "../../style/mixins.scss";
.position {position: relative;@include ellipsis;padding: 0.16rem 0.24rem 0.16rem 0;line-height: 0.22rem;font-size: 0.16rem;color: $content-font-color;.position__icon {position: relative;top: 0.01rem;font-size: 0.2rem;}.position__notice {position: absolute;right: 0;top: 0.17rem;font-size: 0.2rem;}
}
.search {margin-bottom: 0.12rem;line-height: 0.32rem;background: #f5f5f5;color: #b7b7b7;border-radius: 0.16rem;font-size: 0.14rem;.iconfont {display: inline-block;padding: 0 0.1rem 0 0.16rem;font-size: 0.2rem;}&__text {display: inline-block;}
}
.banner {height: 0;overflow: hidden;padding-bottom: 25.4%; //计算图片的高度,&__img {width: 100%;}
}
.icons {display: flex;flex-wrap: wrap;margin-top: 0.16rem;&__item {width: 20%;padding: 0.05rem 0 0.05rem 0;&__img {display: block;width: 0.4rem;height: 0.4rem;margin: 0 auto;}&__desc {margin: 0.06rem 0 0.16rem 0;text-align: center;color: $content-font-color;}}
}
.gap {margin: 0 -0.18rem;height: 0.01rem;background: $content-bgColor;
}
</style>上面的代码就是使用Vue.js抽取出来的Header部分代码,有几点需要解释下
3.1.1图标的展示
例如:<span class="iconfont position__icon"></span> 是配置的阿里图标库里面对应的图标值。阿里图标库地址,创建一个项目后,想要的图标直接点击添加到购物车,然后添加到项目,进入你自己的项目中就会看到如下的内容:
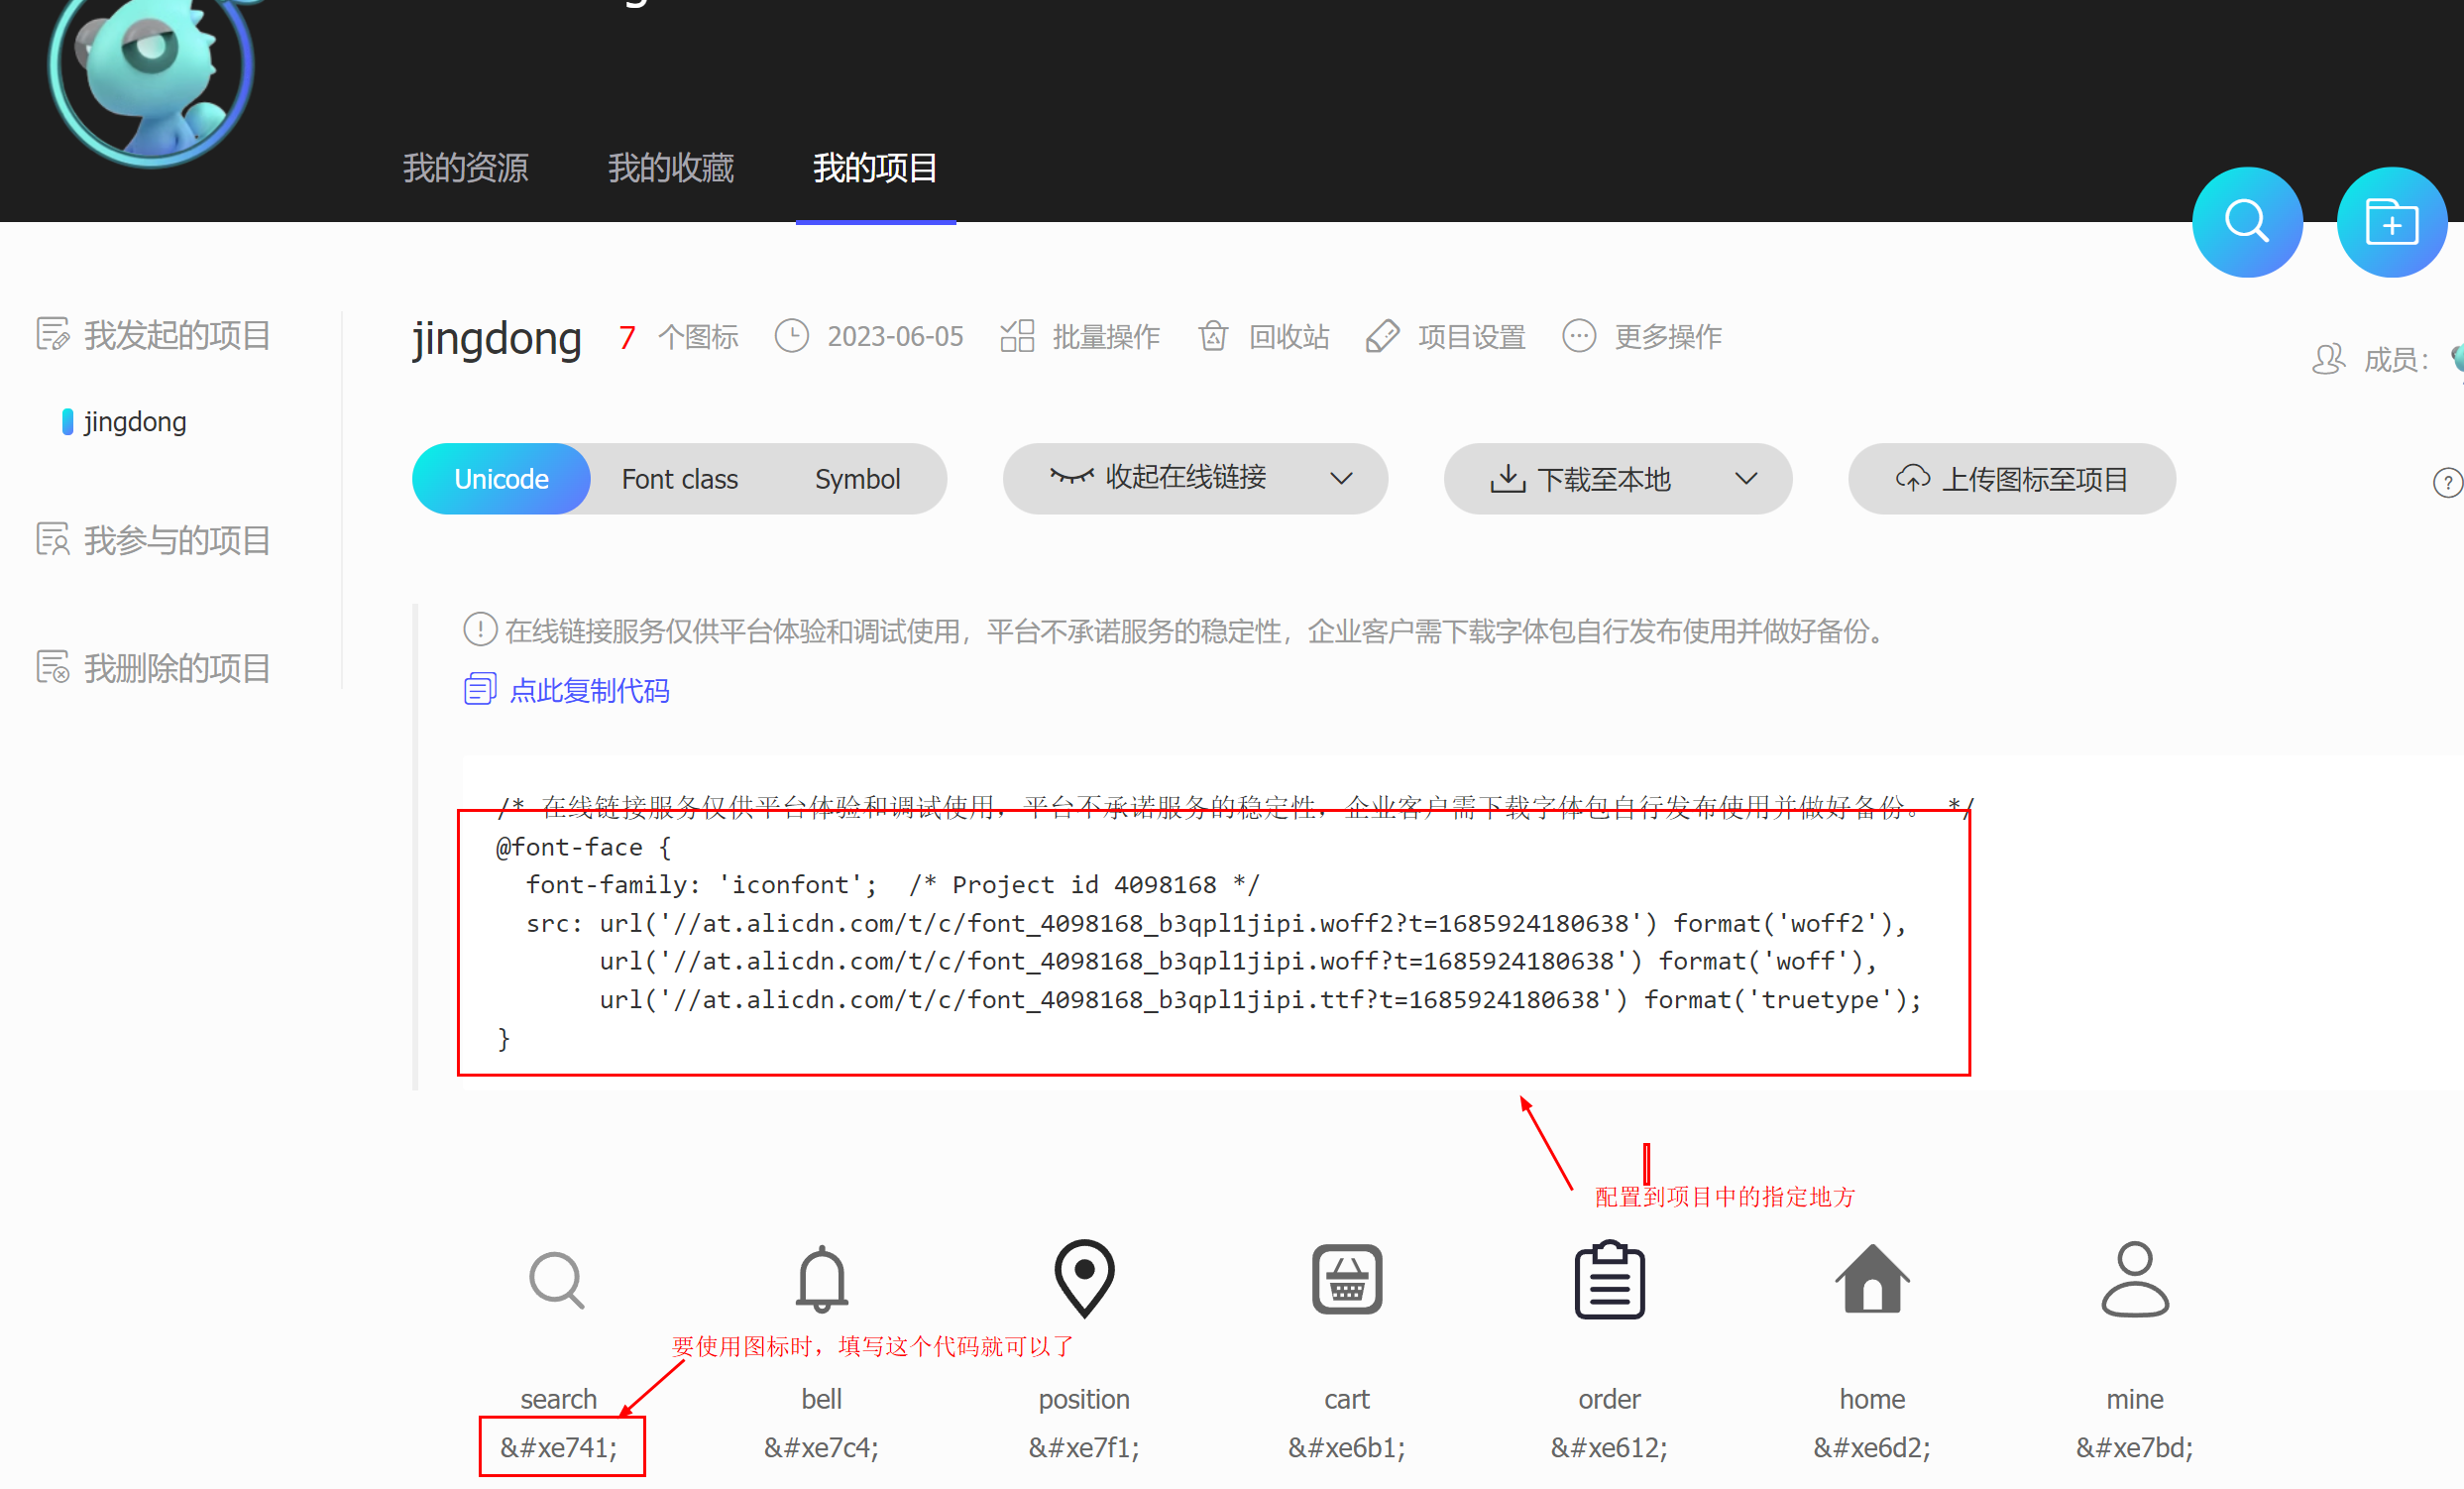 复制上面标记出的代码后,在项目的style目录下新建一个iconfont.css文件,粘贴上我们在阿里图标库中的配置就行了,如下所示:

注意,新添加的图标会导致配置文件改变,所以每新添加一次图标,都需要重新复制粘贴下最新的配置
3.1.2 定义Vue调试的名称
在组件中我们还发现这样的代码
export default {name: 'Header',}
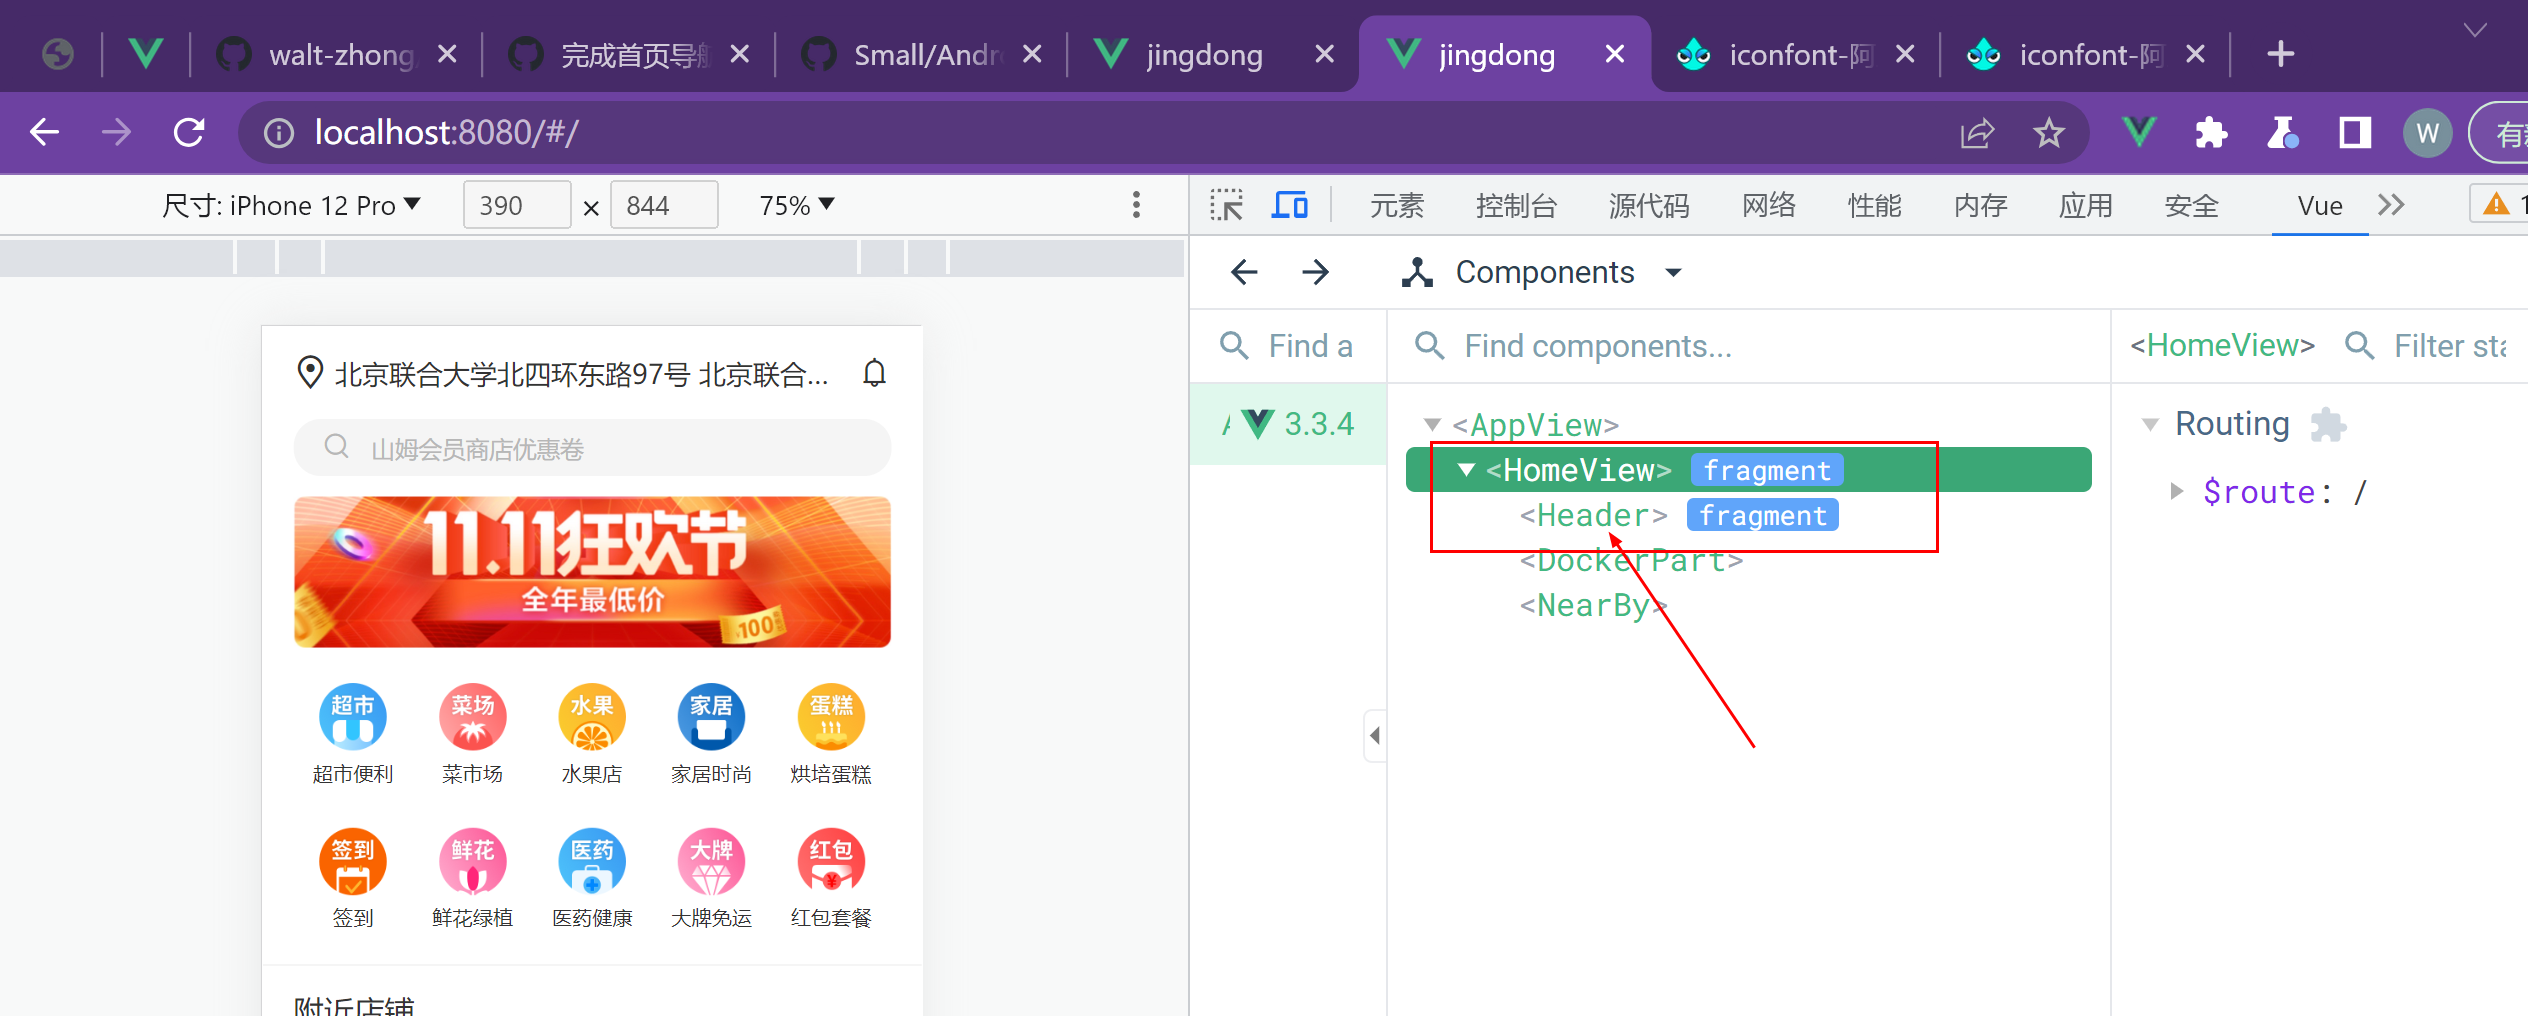
这个 name: 'Header'实际上是使用Vue调试工具时便于我们调试的,我们需要安装一个Vue dev tools扩展程序到chrome浏览器中,具体的安装方法大家可以自行去查,这里不多说了。我们看下最终的效果:
3.1.3 使用scoped隔离组件间的css影响
我们可以试想下,假设我们的两个组件间拥有相同的类名,任何一个组件修改了这个相同类名的CSS样式后,另一个组件具有相同类名的dom元素也会收到影响,所以为了解决这个问题,我们需要在样式的标签中添加一个scoped关键字,消除组件间的CSS相互影响,如下所示:
<style lang="scss" scoped>
//省略部分代码……
<style>
3.2 附近店铺部分实现
附近店铺,也就是图中标出的组件2部分,这里只贴代码:
<template><div class="nearby"><h3 class="nearby__title">附近店铺</h3><div class="nearby__item"v-for="item in nearByList":key="item.id"><img class="nearby__item__img" :src="item.imgurl"/><div class="nearby__content"><div class="nearby__content__title">{{ item.title }}</div><div class="nearby__content__tags"><spanclass="nearby__content__tag"v-for="(innerItem,index) in item.tags":key="index">{{ innerItem }}</span></div><p class="nearby__content__highlight">{{ item.desc }}</p></div></div></div>
</template><script>
export default {name: 'NearBy',setup () {const nearByList = [{id: 1,title: '沃尔玛',imgurl: 'http://www.dell-lee.com/imgs/vue3/near.png',tags: ['起送', '运费', '基础运费5¥'],desc: 'VIP尊享满89元减4元运费卷(每月3张)'},{id: 2,title: '京东',imgurl: 'http://www.dell-lee.com/imgs/vue3/near.png',tags: ['起送', '运费', '基础运费5¥'],desc: 'VIP尊享满89元减4元运费卷(每月6张)'}]return { nearByList }}
}
</script><style lang="scss" scoped>
@import "../../style/viriable.scss";
.nearby {&__title {margin: 0.16rem 0 0.02rem 0;font-size: 0.18rem;color: $content-font-color;font-weight: normal;}&__item {display: flex;padding-top: 0.12rem;&__img {width: 0.56rem;height: 0.56rem;}}&__content {padding-bottom: 0.12rem;border-bottom: 1px solid $content-font-color;margin-left: 0.16rem;flex: 1;&__title {line-height: 0.22rem;font-size: 0.16rem;color: $content-font-color;}&__tags {margin-top: 0.08rem;line-height: 0.18rem;font-size: 0.13rem;color: $content-font-color;}&__tag {margin-right: 0.16rem;}&__highlight {margin: 0.08rem 0 0 0;line-height: 0.18rem;font-size: 0.13rem;color: #e93b3b;}}
}
</style>
3.3 底部导航栏组件的实现
图中标出的组件3部分为底部导航栏,代码如下:
<template><div class="docker"><divv-for="(item, index) in dockerList":class="{'docker__item':true,'docker__item--active': index === 0}":key="item.icon"><!--需要使用 v-html来展示图标,否则图标会被转义导致无法显示 --><div class="iconfont" v-html="item.icon" /><div class="docker__title">{{ item.text }}</div></div></div>
</template>
<script>
export default {name: 'DockerPart',setup () {const dockerList = [{ icon: '', text: '首页' },{ icon: '', text: '购物车' },{ icon: '', text: '订单' },{ icon: '', text: '我的' }]return { dockerList }}
}
</script>
<style lang="scss" scoped>
@import "../../style/viriable.scss";
.docker {display: flex;box-sizing: border-box;padding: 0 0.18rem;position: absolute;left: 0;bottom: 0;width: 100%;height: 0.49rem;background: #f5f5f5;border-top: 0.01rem solid $content-bgColor;color: $content-font-color;// docer 下的item元素&__item {flex: 1;text-align: center;.iconfont {margin: 0.07rem 0 0.02rem 0;font-size: 0.18rem;}&--active {color: #1fa4fc;}}&__title {font-size: 0.2rem;transform: scale(0.5, 0.5);transform-origin: center top;}
}
</style>
3.4 将组件组成一个整体页面
上面就是拆分好的三个组件,我们要组成一个主页时,只需要拼接三个组件即可,如下:
<template><div class="wrapper"><Header/> // 头部组件<NearBy /> // 附近店铺组件<div class="spacer"></div></div><DockerPart /> // 底部导航栏组件
</template><script>
import StaticPart from './Header.vue'
import NearBy from './NearBy.vue'
import DockerPart from './DockerPart.vue'
export default {name: 'HomeView',components: { Header, NearBy, DockerPart }
}
</script><style lang="scss" scoped>
.wrapper {overflow-y: scroll;position: absolute;left: 0;top: 0;bottom: 0.05rem;right: 0;padding: 0 0.18rem 0.3rem 0.18rem;
}
.spacer {height: 0.4rem;width: 100%;
}
</style>
上面描述的就是使用Vue去实现一个主页的过程,将主页拆成不同的组件不仅可以使代码更容易维护吗,而且还可以提高代码的可复用性,比如我们要再写一个新的其他项目,底部导航栏完全可以改下图标和标题就能使用了。是不是非常方便,上面的例子只是为了介绍Vue拆分组件的过程,不能直接运行,读者想要体验的可以在末尾拿到所有源码的地址
4.代码地址
为了更好的体验vue带来的便利性,建议读者下载完整源码跟着练习一遍,有条件的可以去买一节完整的课跟着学,很简单的。
源码地址

