xv6 6.S081 Lab7: Lock
- 写在前面
- 实验介绍
- 开始!
- Memory Allocator
- Buffer Cache
lock代码在这里。本次实验理解起来简单,做起来也容易
写在前面
老样子,在我的博客OS实验xv6 6.S081 开坑中给出了一些有用的参考资料,大家也可以一并参考。
实验介绍
这里是实验指导书。
本次实验主要还是学习内存分配,不过需要注意的是,本实验会和多CPU打交道,因此在内存分配的时候,锁的存在就十分必要了。
本实验主要分为两个部分:
- 基于多CPU的内存分配器(Memory Allocator),主要修改
kalloc.c; - 基于多CPU的磁盘缓冲器(Buffer Cache),主要修改
bio.c;
开始!
Memory Allocator
指导书说得很清楚了:
The program user/kalloctest stresses xv6’s memory allocator: three processes grow and shrink their address spaces, resulting in many calls to kalloc and kfree. kalloc and kfree obtain kmem.lock. kalloctest prints the number of test-and-sets that did not succeed in acquiring the kmem lock (and some other locks), which is a rough measure of contention:
在kalloctest中,三个进程不断通过调用kalloc和kfree来增长或释放它们的内存空间,然而在kalloc和kfree中只有一个锁kmem.lock可以保证这三个进程的访问不冲突,这样一来,导致了大量的无效锁请求
我们来解释这句话:lock: kmem: #test-and-set 161724 #acquire() 433008,kmem.lock共被请求了433008次,仅成功了161724次,这就导致了lock contention(意为争吵,很形象了),故本次实验的任务就是解决多锁contention问题。
如何解决lock contention呢?官方给出了一种解决方案:
The root cause of lock contention in kalloctest is that kalloc() has a single free list, protected by a single lock. To remove lock contention, you will have to redesign the memory allocator to avoid a single lock and list. The basic idea is to maintain a free list per CPU, each list with its own lock. Allocations and frees on different CPUs can run in parallel, because each CPU will operate on a different list. The main challenge will be to deal with the case in which one CPU’s free list is empty, but another CPU’s list has free memory; in that case, the one CPU must “steal” part of the other CPU’s free list. Stealing may introduce lock contention, but that will hopefully be infrequent.
不妨为大家做一下翻译官:
出现lock contention的根本原因是kalloc()中只有一个free list,该free list只被一个lock保护。为了消除lock contention,我们必须想办法避免单free list、单lock问题。最基本的思想就是为每一个CPU都维护一个free list,并且每一个free list都有一个独自的lock。这样一来,不同的CPU就能并行地利用kalloc()与kfree()分配或释放内存了,因为每个CPU都只会操作不同的free list。在实现这个方案的过程中,最具挑战的就是: 当一个CPU的free list为空,但是另一个CPU的free list还有空闲块时,我们就应该从有空闲free list的CPU处“偷”一个空闲内存块。
下面的代码就是出现lock contention的根本原因
struct kmem {struct spinlock lock;struct run *freelist;
} kmem;
接下来,我们分析官方给出的Hints:
- You can use the constant NCPU from kernel/param.h
- The function cpuid returns the current core number, but it’s only safe to call it and use its result when interrupts are turned off. You should use push_off() and pop_off() to turn interrupts off and on.
- Let freerange give all free memory to the CPU running freerange.
解释如下:
- 在
kernel/param.h中有一个NCPU宏,它定义了可用CPU数量; - 可以通过函数
cpuid()来获取当前运行的CPU号,为了安全起见,最好的调用方式如下:push_off(); int cpuid = cpuid(); pop_off(); - 一定要调用
freerange()来初始化free list
那么,首先我们需要实现一个多free list的初始化,相关代码如下:
struct kmem {struct spinlock lock;struct run *freelist;
} kmem;struct kmem kmems[NCPU];......void
kinit()
{/*** 为每个CPU分配Kmem*/push_off();int currentid = cpuid();pop_off();/*** 仅0号CPU调用*/printf("# cpuId:%d \n",currentid);/* 初始化NCPU个🔒 */for (int i = 0; i < NCPU; i++){initlock(&kmems[i].lock, "kmem");}  //initlock(&kmem.lock, "kmem");freerange(end, (void*)PHYSTOP);printf("# kinit end:%d \n",currentid);
}
接下来,通过阅读源码,我们可以知道kalloc.c中对free list的操作是头插法,原理见下图:

那么,为了方便,我们可以将free list的插入push()和弹出pop()操作先封装为函数,方便调用。注意,由于这里我们有多个kmem,因此要用kmems[id].freelist获取相应的free list
struct run* trypopr(int id){struct run *r;r = kmems[id].freelist;if(r)kmems[id].freelist = r->next;return r;
}void trypushr(int id, struct run* r){if(r){r->next = kmems[id].freelist;kmems[id].freelist = r;}else{panic("cannot push null run");}
}
接下俩,我们先完成最简单的kfree(),调用cpuid()获取相应的id,然后将被释放的块插入相应的free list就好:
void
kfree(void *pa)
{struct run *r;if(((uint64)pa % PGSIZE) != 0 || (char*)pa < end || (uint64)pa >= PHYSTOP)panic("kfree");// Fill with junk to catch dangling refs.memset(pa, 1, PGSIZE);r = (struct run*)pa;push_off();int currentid = cpuid();pop_off();acquire(&kmems[currentid].lock);trypushr(currentid, r);release(&kmems[currentid].lock);
}
最后,完成具有挑战性的kalloc()。首先,如果当前CPU的free list不为空,那就直接pop一个run出来,将之初始化后,返回给调用者;如果当前CPU对应的free list为空,就需要去查询其它CPU对应的free list,找到空闲的块r后,按照如下步骤操作:
- 将
r插入自己的free list中; - 将
r从自己的free list中弹出,将之初始化,返回给调用者;
这就完成了“偷”的过程。当然在操作free list的过程中要注意lock的使用,代码实现如下:
void *
kalloc(void)
{struct run *r;int issteal = 0;/** 标识是否为偷盗 */push_off();int currentid = cpuid();pop_off();acquire(&kmems[currentid].lock);r = trypopr(currentid);/*** 将id的一块free page卸下,然后给currentid* 这个过程中经历了:* * 1.卸下id的free page* 2.为current id的freelist添加该page* 3.将current id的freelist中的该page卸载掉* 4.返回该page* * 整个过程完成了current id偷盗id的free page的行为*/if(!r){//printf("oops out of memory\n");for (int id = 0; id < NCPU; id++){/* steal first run */if(id != currentid){/** 锁住id的freelist,此时不让其他cpu访问  */if(kmems[id].freelist){acquire(&kmems[id].lock);/** 卸下id的free page */r = trypopr(id);/** 为currentid的freelist添加一个run */trypushr(currentid, r);issteal = 1;release(&kmems[id].lock);break;}} //printf("\n");}}/** 如果是偷盗的,则把currentid的freelist释放出来  */if(issteal)r = trypopr(currentid);release(&kmems[currentid].lock);if(r){//printf("currentid: %d, r: %p\n", currentid, r);memset((char*)r, 5, PGSIZE); // fill with junk}/** 返回该page  *///printf("issteal: %d \n", issteal);return (void*)r;
}
至此,我们就完成了Memory Allocator
Buffer Cache
Buffer Cache出现的问题和Memory Allocator中的问题其实类似,只不过这里是管理磁盘缓存。试想这样一个情况:三个进程大量读写磁盘,而磁盘缓存只有一个lock,这就导致三个进程的竞争异常激烈。本任务就是要解决这个问题。
如何解决问题呢?官方的意思是用哈希桶来实现。什么是哈希桶呢?就是产生哈希碰撞后在后面接一个链表……算了还是画图解释吧:

好了,官方要求实现一个大小为13的哈希桶,为什么选择13呢?因为13产生的哈希碰撞率似乎低一点……
观察bio.c中对bcache.head的操作,可以发现这是一个双向循环链表,照猫画狐地写就完事了。
首先修改bcache,以使其支持哈希桶结构:
struct {struct spinlock lock;struct buf buf[NBUF]; // block[30]/** 实则循环双向链表 */// Linked list of all buffers, through prev/next. // head.next is most recently used.//struct buf head;struct buf buckets[NBUKETS];struct spinlock bucketslock[NBUKETS];} bcache;
其次初始化bcache:
void
binit(void)
{struct buf *b;/** 在head头插入b  */initlock(&bcache.lock, "bcache");for (int i = 0; i < NBUKETS; i++){initlock(&bcache.bucketslock[i], "bcache.bucket");bcache.buckets[i].prev = &bcache.buckets[i];bcache.buckets[i].next = &bcache.buckets[i];}for (b = bcache.buf; b < bcache.buf + NBUF; b++){int hash = getHb(b);b->time_stamp = ticks;b->next = bcache.buckets[hash].next;b->prev = &bcache.buckets[hash];initsleeplock(&b->lock, "buffer");bcache.buckets[hash].next->prev = b;bcache.buckets[hash].next = b;}
}
然后完成bget(),其实完成这一部分完全就是将原代码改写为支持哈希桶即可。需要注意的是:
If there is no cached buffer for the given sector, bget must make one, possibly reusing a buffer that held a different sector. It scans the buffer list a second time, looking for a buffer that is not in use
这里的意思当在自己的哈希桶中没有找到相应的扇区时,应该从别的哈希桶处“偷”,这就和Memroy Allocator做的事情一样了。另外,在Hints中我们看到了一个关于时间戳的Hint:
Remove the list of all buffers (bcache.head etc.) and instead time-stamp buffers using the time of their last use (i.e., using ticks in kernel/trap.c). With this change brelse doesn’t need to acquire the bcache lock, and bget can select the least-recently used block based on the time-stamps.
于是我们顺便记录了一下每个buf的时间戳timestamp,也许这在brelse中可以用到。
static struct buf*
bget(uint dev, uint blockno)
{int hash = getH(blockno);struct buf *b;/*** * My modification*/acquire(&bcache.bucketslock[hash]);for(b = bcache.buckets[hash].next; b != &bcache.buckets[hash]; b = b->next){if(b->dev == dev && b->blockno == blockno){b->time_stamp = ticks;b->refcnt++;//printf("## end has \n");release(&bcache.bucketslock[hash]);acquiresleep(&b->lock);return b;}}// If there is no cached buffer for the given sector, bget must make one, possibly reusing a buffer// that held a different sector. It scans the buffer list a second time, looking for a buffer that // is not in use// (b->refcnt = 0); any such buffer can be used. Bget edits the buffer metadata to record the new// device and sector number and acquires its sleep-lock. Note that the assignment b->valid = 0// ensures that bread will read the block data from disk rather than incorrectly using the buffer’s// previous contents.// Not cached; recycle an unused buffer./*** * My modification*/for (int i = 0; i < NBUKETS; i++){if(i != hash){acquire(&bcache.bucketslock[i]);for(b = bcache.buckets[i].prev; b != &bcache.buckets[i]; b = b->prev){if(b->refcnt == 0){b->time_stamp = ticks;b->dev = dev;b->blockno = blockno;b->valid = 0;     //important  b->refcnt = 1;/** 将b脱出  */b->next->prev = b->prev;b->prev->next = b->next;/** 将b接入  */b->next = bcache.buckets[hash].next;b->prev = &bcache.buckets[hash];bcache.buckets[hash].next->prev = b;bcache.buckets[hash].next = b;//printf("## end alloc: hash: %d, has: %d\n", hash,i);release(&bcache.bucketslock[i]);release(&bcache.bucketslock[hash]);acquiresleep(&b->lock);return b;}}release(&bcache.bucketslock[i]);}}panic("bget: no buffers");
}
接下来,我们实现brelse()。可以看到,我们在实现过程中没有采用任何lock,完全利用时间戳机制就能解决问题。原理是什么呢?
我们仅叙述极限情况:设想两个进程在一个微小的时间节点先后来到第二行,他们都想要release同一个b。若进程一到达时的ticks为t,则进程二到达时的ticks为t+δ,那么此时b->time_stamp=max(t,t+δ)。我们假设进程一、进程二同时来到if(b->time_stamp == ticks)那么,忽略b->time_stamp = ticks;与if(b->time_stamp == ticks)的执行时间,则此时ticks也一定为max(t,t+δ)。也就是说,当两个进程竞争b时,必定只有一个进程能够获得b的控制权,此进程为max(t,t+δ)时刻到达的进程。
void
brelse(struct buf *b)
{//printf("#---------------------------------------- brelse! ----------------------------------------\n");if(!holdingsleep(&b->lock))panic("brelse");releasesleep(&b->lock);int blockno = getHb(b);b->time_stamp = ticks;if(b->time_stamp == ticks){b->refcnt--;if(b->refcnt == 0){/** 将b脱出  */b->next->prev = b->prev;b->prev->next = b->next;/** 将b接入  */b->next = bcache.buckets[blockno].next;b->prev = &bcache.buckets[blockno];bcache.buckets[blockno].next->prev = b;bcache.buckets[blockno].next = b;}}
}
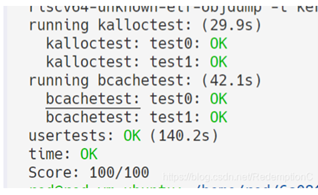
好了,这下看来我们并不需要在bget中记录timestamp,不过也无妨,也许我还没有真正参透timestamp的妙用。最后看结果,这种方法的bcachetest耗时惊人的低。

再来对比一下这位老哥RedemptionC的运行结果,在bcachetest上提升了三倍的速率。

更新一下,在brelse中不用锁好像存在一些问题,不过不知道这个问题为啥没有在测试中显现出来……建议大家还是用锁机制,这个timestamp应该不是这么用的……


