文章目录
- 一、前言
- 二、运行截图与功能说明
- 三、知识点与参考
- 1.数据库的操作
- 2.显示月日历
- 3.给TextView添加点击事件
- 四、完整代码
- 1.数据库有关的类MySQLiteOpenHelper
- 2.activity_main.xml
- 3.MainActivity
- 4.用于删除和修改的Activity的布局activity_edit_schedule.xml
- 5.EditScheduleActivity
一、前言
这次也没啥新的内容,本来准备用service的,但是接下去想做个打地鼠玩玩,这个就随便写了写。service的内容等之后有机会写吧。
二、运行截图与功能说明
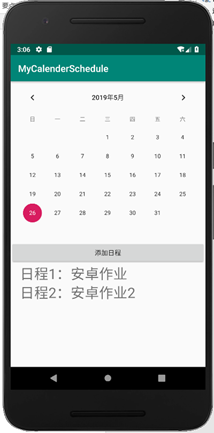
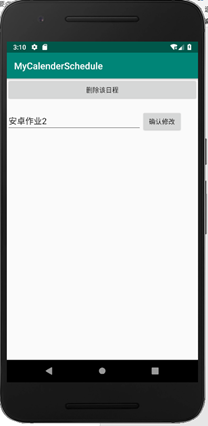
功能主要实现:对日程的增删改查
大概就长这样:点击添加日程可以直接在该界面添加日程,点击某个日程则会跳转到另一个界面,可以进行删除和修改。


三、知识点与参考
1.数据库的操作
看我之前的一篇文章安卓之数据库(SQLite)
2.显示月日历
①布局文件中设置一个CalendarView
<CalendarViewandroid:id="@+id/calendarViewId"android:layout_width="match_parent"android:layout_height="match_parent"/>
②覆写setOnDateChangeListener
参考:日历视图(Calendarview)
3.给TextView添加点击事件
①设定TextView的clickable属性为true
xml文件中设置:android:clickable=“true”
java代码中设置:textView.setClickable(true);
②setOnClickListener
参考:Android 给TextView添加点击事件
四、完整代码
1.数据库有关的类MySQLiteOpenHelper
package com.example.yogi.mycalenderschedule;import android.content.Context;
import android.database.sqlite.SQLiteDatabase;
import android.database.sqlite.SQLiteOpenHelper;
import android.view.View;public class MySQLiteOpenHelper extends SQLiteOpenHelper{private static final String db_name = "MySchedule";//自定义的数据库名;private static final int version = 1;//版本号public MySQLiteOpenHelper(Context context) {super(context, db_name, null, version);}// 该方法会自动调用,首先系统会检查该程序中是否存在数据库名为‘MySchedule’的数据库// 如果存在则不会执行该方法,如果不存在则会执行该方法。@Overridepublic void onCreate(SQLiteDatabase db) {String  sql ="create table schedules(" +"id Integer primary key autoincrement," +     //id自增,只支持integer不支持int"scheduleDetail varchar(50)," +"time varchar(30)" +")";db.execSQL(sql);}//数据库版本更新时执行该方法,如果表已存在则先删除再调用onCreate重新创建@Overridepublic void onUpgrade(SQLiteDatabase db, int oldVersion, int newVersion) {db.execSQL("drop table if exists schedules");onCreate(db);}}
2.activity_main.xml
<?xml version="1.0" encoding="utf-8"?>
<android.support.constraint.ConstraintLayout xmlns:android="http://schemas.android.com/apk/res/android"xmlns:app="http://schemas.android.com/apk/res-auto"xmlns:tools="http://schemas.android.com/tools"android:layout_width="match_parent"android:layout_height="match_parent"tools:context=".MainActivity"><LinearLayoutandroid:layout_width="match_parent"android:layout_height="wrap_content"android:orientation="vertical"><CalendarViewandroid:id="@+id/calendar"android:layout_width="match_parent"android:layout_height="wrap_content"></CalendarView><ScrollViewandroid:layout_width="match_parent"android:layout_height="match_parent"><LinearLayoutandroid:layout_width="match_parent"android:layout_height="wrap_content"android:orientation="vertical"><Buttonandroid:id="@+id/addSchedule"android:layout_width="match_parent"android:layout_height="wrap_content"android:text="添加日程" /><LinearLayoutandroid:layout_width="match_parent"android:layout_height="wrap_content"android:orientation="horizontal"><EditTextandroid:id="@+id/scheduleDetailInput"android:layout_width="290dp"android:layout_height="wrap_content"android:hint="请输入具体日程"android:visibility="gone"/><Buttonandroid:id="@+id/checkAdd"android:layout_width="wrap_content"android:layout_height="wrap_content"android:text="确认添加"android:visibility="gone"/></LinearLayout><TextViewandroid:id="@+id/schedule1"android:layout_width="match_parent"android:layout_height="wrap_content"android:visibility="gone"android:clickable="true"android:textSize="30dp"android:layout_marginLeft="20dp"/><TextViewandroid:id="@+id/schedule2"android:layout_width="match_parent"android:layout_height="wrap_content"android:visibility="gone"android:clickable="true"android:textSize="30dp"android:layout_marginLeft="20dp"/><TextViewandroid:id="@+id/schedule3"android:layout_width="match_parent"android:layout_height="wrap_content"android:visibility="gone"android:clickable="true"android:textSize="30dp"android:layout_marginLeft="20dp"/><TextViewandroid:id="@+id/schedule4"android:layout_width="match_parent"android:layout_height="wrap_content"android:visibility="gone"android:clickable="true"android:textSize="30dp"android:layout_marginLeft="20dp"/><TextViewandroid:id="@+id/schedule5"android:layout_width="match_parent"android:layout_height="wrap_content"android:visibility="gone"android:clickable="true"android:textSize="30dp"android:layout_marginLeft="20dp"/></LinearLayout></ScrollView></LinearLayout></android.support.constraint.ConstraintLayout>
3.MainActivity
package com.example.yogi.mycalenderschedule;import android.content.ContentValues;
import android.content.Context;
import android.content.Intent;
import android.database.Cursor;
import android.database.sqlite.SQLiteDatabase;
import android.support.v7.app.AppCompatActivity;
import android.os.Bundle;
import android.util.Log;
import android.view.View;
import android.widget.Button;
import android.widget.CalendarView;
import android.widget.EditText;
import android.widget.TextView;
import android.widget.Toast;import java.util.Calendar;public class MainActivity extends AppCompatActivity  implements View.OnClickListener{private CalendarView calendarView;private EditText scheduleInput;private Context context;private Button addSchedule,checkAdd;private String dateToday;//用于记录今天的日期private MySQLiteOpenHelper mySQLiteOpenHelper;private SQLiteDatabase myDatabase;private TextView mySchedule[] = new TextView[5];@Overrideprotected void onCreate(Bundle savedInstanceState) {super.onCreate(savedInstanceState);setContentView(R.layout.activity_main);initView();//这里不这样的话一进去就设置当天的日程会报错Calendar time = Calendar.getInstance();int year = time.get(Calendar.YEAR);int month = time.get(Calendar.MONTH)+1;//注意要+1,0表示1月份int day = time.get(Calendar.DAY_OF_MONTH);dateToday = year+"-"+month+"-"+day;//还要直接查询当天的日程,这个要放在initView的后面,不然会出问题queryByDate(dateToday);}private void initView() {mySQLiteOpenHelper = new MySQLiteOpenHelper(this);myDatabase = mySQLiteOpenHelper.getWritableDatabase();context = this;addSchedule = findViewById(R.id.addSchedule);addSchedule.setOnClickListener(this);checkAdd = findViewById(R.id.checkAdd);checkAdd.setOnClickListener(this);calendarView = findViewById(R.id.calendar);scheduleInput = findViewById(R.id.scheduleDetailInput);calendarView.setOnDateChangeListener(mySelectDate);mySchedule[0] = findViewById(R.id.schedule1);mySchedule[1] = findViewById(R.id.schedule2);mySchedule[2] = findViewById(R.id.schedule3);mySchedule[3] = findViewById(R.id.schedule4);mySchedule[4] = findViewById(R.id.schedule5);for(TextView v:mySchedule){v.setOnClickListener(this);}}private CalendarView.OnDateChangeListener mySelectDate = new CalendarView.OnDateChangeListener() {@Overridepublic void onSelectedDayChange(CalendarView view, int year, int month, int dayOfMonth) {dateToday = year+"-"+(month+1)+"-"+dayOfMonth;Toast.makeText(context, "你选择了:"+dateToday, Toast.LENGTH_SHORT).show();//得把用别的日期查出来的日程删除并将其隐藏for(TextView v:mySchedule){v.setText("");v.setVisibility(View.GONE);}queryByDate(dateToday);}};//根据日期查询日程private void queryByDate(String date) {//columns为null 查询所有列Cursor cursor = myDatabase.query("schedules",null,"time=?",new String[]{date},null,null,null);if(cursor.moveToFirst()){int scheduleCount = 0;do{String aScheduleDetail = cursor.getString(cursor.getColumnIndex("scheduleDetail"));mySchedule[scheduleCount].setText("日程"+(scheduleCount+1)+":"+aScheduleDetail);mySchedule[scheduleCount].setVisibility(View.VISIBLE);scheduleCount++;//一定要有这句 不然TextView不够多要数组溢出了if(scheduleCount >= 5)break;}while (cursor.moveToNext());}cursor.close();}@Overridepublic void onClick(View v) {switch (v.getId()){case R.id.addSchedule:addMySchedule();break;case R.id.checkAdd:checkAddSchedule();break;case R.id.schedule1:case R.id.schedule2:case R.id.schedule3:case R.id.schedule4:case R.id.schedule5:editSchedule(v);break;}}private void editSchedule(View v) {Intent intent = new Intent(MainActivity.this, EditScheduleActivity.class);String sch = ((TextView) v).getText().toString().split(":")[1];intent.putExtra("schedule",sch);startActivity(intent);}private void checkAddSchedule() {ContentValues values = new ContentValues();//第一个参数是表中的列名values.put("scheduleDetail",scheduleInput.getText().toString());values.put("time",dateToday);myDatabase.insert("schedules",null,values);scheduleInput.setVisibility(View.GONE);checkAdd.setVisibility(View.GONE);queryByDate(dateToday);//添加完以后把scheduleInput中的内容清除scheduleInput.setText("");}private void addMySchedule() {scheduleInput.setVisibility(View.VISIBLE);checkAdd.setVisibility(View.VISIBLE);}
}
4.用于删除和修改的Activity的布局activity_edit_schedule.xml
<?xml version="1.0" encoding="utf-8"?>
<android.support.constraint.ConstraintLayout xmlns:android="http://schemas.android.com/apk/res/android"xmlns:app="http://schemas.android.com/apk/res-auto"xmlns:tools="http://schemas.android.com/tools"android:layout_width="match_parent"android:layout_height="match_parent"tools:context=".EditScheduleActivity"><LinearLayoutandroid:layout_width="match_parent"android:layout_height="wrap_content"android:orientation="vertical"><Buttonandroid:id="@+id/deleteSchedule"android:layout_width="match_parent"android:layout_height="wrap_content"android:text="删除该日程"/><LinearLayoutandroid:layout_width="match_parent"android:layout_height="wrap_content"android:orientation="horizontal"android:layout_marginVertical="20dp"><EditTextandroid:id="@+id/scheduleInput"android:layout_width="290dp"android:layout_height="wrap_content" /><Buttonandroid:id="@+id/editBtn"android:layout_width="wrap_content"android:layout_height="wrap_content"android:text="确认修改"/></LinearLayout></LinearLayout>
</android.support.constraint.ConstraintLayout>
5.EditScheduleActivity
package com.example.yogi.mycalenderschedule;import android.content.ContentValues;
import android.content.Intent;
import android.database.sqlite.SQLiteDatabase;
import android.support.v7.app.AppCompatActivity;
import android.os.Bundle;
import android.view.View;
import android.widget.Button;
import android.widget.EditText;public class EditScheduleActivity extends AppCompatActivity  implements View.OnClickListener{private String schedule;private Button editBtn,deleteBtn;private EditText scheduleInput;private MySQLiteOpenHelper mySQLiteOpenHelper;private SQLiteDatabase myDatabase;@Overrideprotected void onCreate(Bundle savedInstanceState) {super.onCreate(savedInstanceState);setContentView(R.layout.activity_edit_schedule);// 首先获取到意图对象Intent intent = getIntent();// 获取到传递过来的姓名schedule = intent.getStringExtra("schedule");initView();}private void initView() {mySQLiteOpenHelper = new MySQLiteOpenHelper(this);myDatabase = mySQLiteOpenHelper.getWritableDatabase();editBtn = findViewById(R.id.editBtn);editBtn.setOnClickListener(this);deleteBtn = findViewById(R.id.deleteSchedule);deleteBtn.setOnClickListener(this);scheduleInput = findViewById(R.id.scheduleInput);scheduleInput.setText(schedule);}@Overridepublic void onClick(View v){switch (v.getId()){case R.id.deleteSchedule:deleteMySchedule();break;case R.id.editBtn:editSchedule();break;}}private void editSchedule() {ContentValues values = new ContentValues();values.put("scheduleDetail",scheduleInput.getText().toString());myDatabase.update("schedules",values,"scheduleDetail=?",new String[]{schedule});Intent intent = new Intent(EditScheduleActivity.this, MainActivity.class);startActivity(intent);}private void deleteMySchedule() {myDatabase.delete("schedules","scheduleDetail=?",new String[]{schedule});Intent intent = new Intent(EditScheduleActivity.this, MainActivity.class);startActivity(intent);}
}


