文章目录
- 模型配置文件
- 网络可视化
- 搭建网络
- 检测模块
模型配置文件
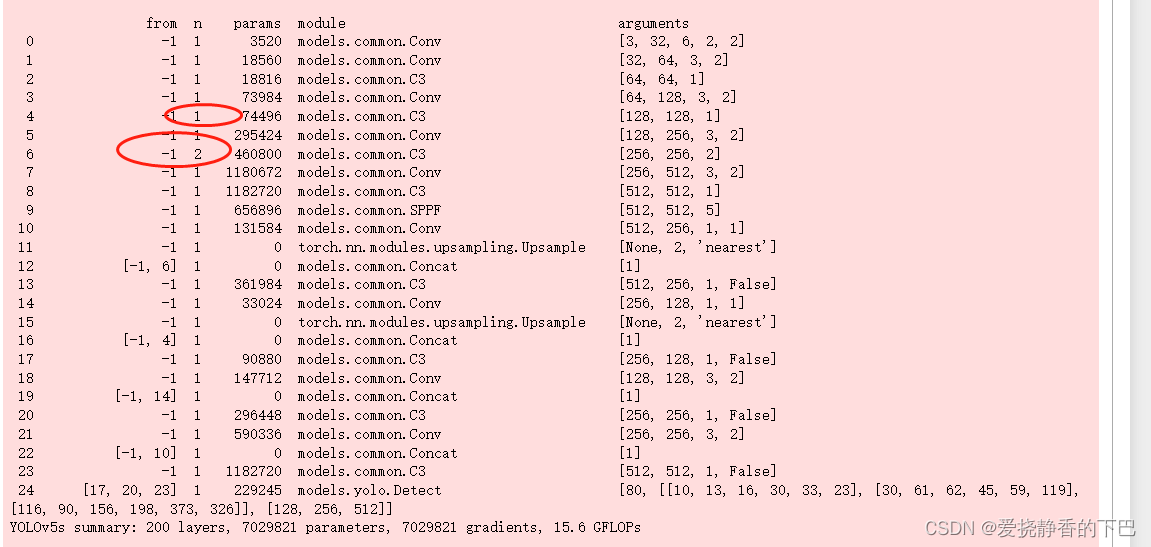
YOLO v5的模型配置文件都一样,区别在层深depth_multiple和宽度width_multiple控制不一样。YOLO v5s是最简洁的一个模型,深度为1就是说没有重复模块,因此方便用来分析其结构。模型的具体深度需要跑一下才能看到,或者将depth_multiple与各层 number相乘,按下式计算:
n = max(round(n * gd), 1) if n > 1 else n # depth gain
下面给出了具体的 YOLO v5s 参数配置信息:
                 from  n    params  module                                  arguments                       layer            cin    cout
---------------------------------------------------------------------------------------------------------------------------------------------0                -1  1      3520  models.common.Focus                     [3, 32, 3]                    	Focus          	   3	  321                -1  1     18560  models.common.Conv                      [32, 64, 3, 2]                	Conv           	  32	  642                -1  1     19904  models.common.BottleneckCSP             [64, 64, 1]                   	BottleneckCSP  	  64	  643                -1  1     73984  models.common.Conv                      [64, 128, 3, 2]               	Conv           	  64	 1284                -1  1    161152  models.common.BottleneckCSP             [128, 128, 3]                 	BottleneckCSP  	 128	 1285                -1  1    295424  models.common.Conv                      [128, 256, 3, 2]              	Conv           	 128	 2566                -1  1    641792  models.common.BottleneckCSP             [256, 256, 3]                 	BottleneckCSP  	 256	 2567                -1  1   1180672  models.common.Conv                      [256, 512, 3, 2]              	Conv           	 256	 5128                -1  1    656896  models.common.SPP                       [512, 512, [5, 9, 13]]        	SPP            	 512	 5129                -1  1   1248768  models.common.BottleneckCSP             [512, 512, 1, False]          	BottleneckCSP  	 512	 51210                -1  1    131584  models.common.Conv                      [512, 256, 1, 1]              	Conv           	 512	 25611                -1  1         0  torch.nn.modules.upsampling.Upsample    [None, 2, 'nearest']          	Upsample       	 512	 25612           [-1, 6]  1         0  models.common.Concat                    [1]                           	Concat         	 512	 51213                -1  1    378624  models.common.BottleneckCSP             [512, 256, 1, False]          	BottleneckCSP  	 512	 25614                -1  1     33024  models.common.Conv                      [256, 128, 1, 1]              	Conv           	 256	 12815                -1  1         0  torch.nn.modules.upsampling.Upsample    [None, 2, 'nearest']          	Upsample       	 256	 12816           [-1, 4]  1         0  models.common.Concat                    [1]                           	Concat         	 256	 25617                -1  1     95104  models.common.BottleneckCSP             [256, 128, 1, False]          	BottleneckCSP  	 256	 12818                -1  1      2322  torch.nn.modules.conv.Conv2d            [128, 18, 1, 1]               	Conv2d         	 128	 25519                -2  1    147712  models.common.Conv                      [128, 128, 3, 2]              	Conv           	 128	 12820          [-1, 14]  1         0  models.common.Concat                    [1]                           	Concat         	 128	 25621                -1  1    313088  models.common.BottleneckCSP             [256, 256, 1, False]          	BottleneckCSP  	 256	 25622                -1  1      4626  torch.nn.modules.conv.Conv2d            [256, 18, 1, 1]               	Conv2d         	 256	 25523                -2  1    590336  models.common.Conv                      [256, 256, 3, 2]              	Conv           	 256	 25624          [-1, 10]  1         0  models.common.Concat                    [1]                           	Concat         	 256	 51225                -1  1   1248768  models.common.BottleneckCSP             [512, 512, 1, False]          	BottleneckCSP  	 512	 51226                -1  1      9234  torch.nn.modules.conv.Conv2d            [512, 18, 1, 1]               	Conv2d         	 512	 25527      [-1, 22, 18]  1         0  Detect                                  [1, anchors						Detect         	 512	 255
网络可视化
根据配置文件定义,将网络进行图1划分:

归纳整理得到图2:

搭建网络
根据网络划分和梳理的连接就可以自行搭建网络了。
class YoloModel(nn.Module):anchors = [[116, 90, 156, 198, 373, 326],[30, 61, 62, 45, 59, 119],[10, 13, 16, 30, 33, 23]]def __init__(self, class_num=1, input_ch=3):super(YoloModel, self).__init__()self.build_model(class_num)# Build strides, anchorss = 128 # 2x min strideself.Detect.stride = torch.tensor([s / x.shape[-2] for x in self.forward(torch.zeros(1, input_ch, s, s))]) # forwardself.Detect.anchors /= self.Detect.stride.view(-1, 1, 1)check_anchor_order(self.Detect)self.stride = self.Detect.stride# print('Strides: %s' % self.Detect.stride.tolist()) # [8.0, 16.0, 32.0]print("Input size must be multiple of", self.stride.max().item())torch_utils.initialize_weights(self)self._initialize_biases() # only run once# model_info(self)def build_model(self, class_num):# output channelsself.class_num = class_numself.anchors_num = len(self.anchors[0]) // 2self.output_ch = self.anchors_num * (5 + class_num)# backboneself.Focus = Focus(c1=3, c2=32, k=3, s=1)self.CBL_1 = self.CBL(c1=32, c2=64, k=3, s=2)self.CSP_1 = BottleneckCSP(c1=64, c2=64, n=1)self.CBL_2 = self.CBL(c1=64, c2=128, k=3, s=2)self.CSP_2 = BottleneckCSP(c1=128, c2=128, n=3)self.CBL_3 = self.CBL(c1=128, c2=256, k=3, s=2)self.CSP_3 = BottleneckCSP(c1=256, c2=256, n=3)self.CBL_4 = self.CBL(c1=256, c2=512, k=3, s=2)self.SPP = SPP(c1=512, c2=512, k=(5, 9, 13))# headself.CSP_4 = BottleneckCSP(c1=512, c2=512, n=1, shortcut=False)self.CBL_5 = self.CBL(c1=512, c2=256, k=1, s=1)self.Upsample_5 = nn.Upsample(size=None, scale_factor=2, mode="nearest")self.Concat_5 = Concat(dimension=1)self.CSP_5 = BottleneckCSP(c1=512, c2=256, n=1, shortcut=False)self.CBL_6 = self.CBL(c1=256, c2=128, k=1, s=1)self.Upsample_6 = nn.Upsample(size=None, scale_factor=2, mode="nearest")self.Concat_6 = Concat(dimension=1)self.CSP_6 = BottleneckCSP(c1=256, c2=128, n=1, shortcut=False)self.Conv_6 = nn.Conv2d(in_channels=128, out_channels=self.output_ch, kernel_size=1, stride=1)self.CBL_7 = self.CBL(c1=128, c2=128, k=3, s=2)self.Concat_7 = Concat(dimension=1)self.CSP_7 = BottleneckCSP(c1=256, c2=256, n=1, shortcut=False)self.Conv_7 = nn.Conv2d(in_channels=256, out_channels=self.output_ch, kernel_size=1, stride=1)self.CBL_8 = self.CBL(c1=256, c2=256, k=3, s=2)self.Concat_8 = Concat(dimension=1)self.CSP_8 = BottleneckCSP(c1=512, c2=512, n=1, shortcut=False)self.Conv_8 = nn.Conv2d(in_channels=512, out_channels=self.output_ch, kernel_size=1, stride=1)# detectionself.Detect = Detect(nc=self.class_num, anchors=self.anchors)def forward(self, x):# backbonex = self.Focus(x) # 0x = self.CBL_1(x)x = self.CSP_1(x)x = self.CBL_2(x)y1 = self.CSP_2(x) # 4x = self.CBL_3(y1)y2 = self.CSP_3(x) # 6x = self.CBL_4(y2)x = self.SPP(x)# headx = self.CSP_4(x)y3 = self.CBL_5(x) # 10x = self.Upsample_5(y3)x = self.Concat_5([x, y2])x = self.CSP_5(x)y4 = self.CBL_6(x) # 14x = self.Upsample_6(y4)x = self.Concat_6([x, y1])y5 = self.CSP_6(x) # 17output_1 = self.Conv_6(y5) # 18 output_1x = self.CBL_7(y5)x = self.Concat_7([x, y4])y6 = self.CSP_7(x) # 21output_2 = self.Conv_7(y6) # 22 output_2x = self.CBL_8(y6)x = self.Concat_8([x, y3])x = self.CSP_8(x)output_3 = self.Conv_8(x) # 26 output_3output = self.Detect([output_1, output_2, output_3])return output@staticmethoddef CBL(c1, c2, k, s):return nn.Sequential(nn.Conv2d(c1, c2, k, s, autopad(k), bias=False),nn.BatchNorm2d(c2),nn.LeakyReLU(0.1, inplace=True),)def _initialize_biases(self, cf=None): # initialize biases into Detect(), cf is class frequency# cf = torch.bincount(torch.tensor(np.concatenate(dataset.labels, 0)[:, 0]).long(), minlength=nc) + 1.conv_layers = [self.Conv_6, self.Conv_7, self.Conv_8]for conv_layer, s in zip(conv_layers, self.Detect.stride):bias = conv_layer.bias.view(self.anchors_num, -1)bias[:, 4] += math.log(8 / (640 / s) ** 2) # initialize confidencebias[:, 5:] += math.log(0.6 / (self.class_num - 0.99)) if cf is None else torch.log(cf / cf.sum()) # clsconv_layer.bias = torch.nn.Parameter(bias.view(-1), requires_grad=True)
检测模块
关于上图中的 Detect 模块需要指出的是,在ONNX中被转化成了 reshape + transpose,这是因为模型在导入ONNX时设置了参数self.Detect.export = True,根据检测端的源码可知,检测端在训练和模型导出时直接输出的是三个预测张量,其shape = (bs, na, H, W, no),其中na*no=255,即图2中输出张量的通道数。这一变换过程对应源码:
bs, _, ny, nx = x[i].shape  # x(bs,na×no,20,20) to x(bs,na,20,20,no)
x[i] = x[i].view(bs, self.na, self.no, ny, nx).permute(0, 1, 3, 4, 2).contiguous()
变换结果:
input.shape = torch.Size([1, 3, 640, 640]) # NCHW
torch.Size([1, 3, 80, 80, 85])
torch.Size([1, 3, 40, 40, 85])
torch.Size([1, 3, 20, 20, 85])
而在Python端进行推理预测时,输出则是tuple(torch.cat(z, 1), x),直接对第一项进行处理即可:共计25200个预测框,每个预测框包含了80个类的预测概率、4个边框坐标和1个置信度。就是说,在推理过程中,多进行了归纳合并这一步。
torch.Size([1, 25200, 85])
( 80 × 80 + 40 × 40 + 20 × 20 ) × 3 = 25200 (80 \times 80 + 40 \times 40 + 20 \times 20 ) \times3 = 25200 (80×80+40×40+20×20)×3=25200
下面是完整的Detect模块定义:
class Detect(nn.Module):def __init__(self, nc=80, anchors=()): # detection layersuper(Detect, self).__init__()self.stride = None # strides computed during buildself.nc = nc # number of classesself.no = nc + 5 # channels of output tensorself.nl = len(anchors) # number of detection layersself.na = len(anchors[0]) // 2 # number of anchorsself.grid = [torch.zeros(1)] * self.nl # init grida = torch.tensor(anchors).float().view(self.nl, -1, 2)self.register_buffer('anchors', a) # shape(nl,na,2)self.register_buffer('anchor_grid', a.clone().view(self.nl, 1, -1, 1, 1, 2)) # shape(nl,1,na,1,1,2)self.export = False # model exportdef forward(self, x):# x = x.copy() # for profilingz = [] # inference outputself.training |= self.exportfor i in range(self.nl):bs, _, ny, nx = x[i].shape # x(bs,na×no,20,20) to x(bs,na,20,20,no)x[i] = x[i].view(bs, self.na, self.no, ny, nx).permute(0, 1, 3, 4, 2).contiguous()if not self.training: # inferenceif self.grid[i].shape[2:4] != x[i].shape[2:4]:self.grid[i] = self._make_grid(nx, ny).to(x[i].device)y = x[i].sigmoid()y[..., 0:2] = (y[..., 0:2] * 2. - 0.5 + self.grid[i].to(x[i].device)) * self.stride[i] # xyy[..., 2:4] = (y[..., 2:4] * 2) ** 2 * self.anchor_grid[i] # whz.append(y.view(bs, -1, self.no))return x if self.training else (torch.cat(z, 1), x)


