文章目录
- 一、URL资源抓取
- 1.urllib
- 2.requests
- 3.requests-html
- 二、正则表达式
- 三、数据解析
- 1.Beautiful Soup
- 2.lxml
- 3.selectolax
- 四、自动化爬虫selenium
- 五、爬虫框架
- 1.Scrapy
- 2.pyspider框架
- 六、模拟登录与验证码识别
- 七、autoscraper(不需要编程基础)
一、URL资源抓取
1.urllib
(1)介绍:urllib 模块是 Python 标准库,用于抓取网络上的 URL 资源。
注:现在用的更多的是第三方库requests,requests 模块比 urllib 模块更简洁。
(2)模块:
urllib.request:请求模块,用于打开和读取 URL;
urllib.error:异常处理模块,捕获 urllib.error 抛出异常;
urllib.parse:URL 解析,爬虫程序中用于处理 URL 地址;
urllib.robotparser:解析 robots.txt 文件,判断目标站点哪些内容可爬,哪些不可以爬,但是用的很少。
(3)urllib.request使用示例
①urlopen
语法:
urllib.request.urlopen(url, data=None, timeout=socket._GLOBAL_DEFAULT_TIMEOUT,*, cafile=None, capath=None, cadefault=False, context=None)
url:请求地址,必选参数;
data:请求参数,必须为 bytes 类型数据,可以使用 urlencode() 进行编码;
headers:字典类型,请求头设置;
origin_req_host:请求的主机地址,IP 或域名;
method:请求方法。
示例:
from urllib.request import urlopenwith urlopen('https://www.example.net') as html:
page = html.read()
print(page) #读取整个网页数据
print(html.getcode()) # 返回 200
②urllib.parse(解析数据)
语法:urllib.parse.urlparse(urlstring, scheme='', allow_fragments=True)
urlstring:URL 地址;
scheme:协议类型,可用的包括 file、ftp、gopher、hdl、http、https、imap、mailto、 mms、news、nntp、prospero、rsync、rtsp、rtspu、sftp、 sip、sips、snews、svn、svn+ssh、telnet……;
allow_fragments:是否忽略 URL 中的 fragment 部分。
示例:
from urllib.parse import urlparseresult = urlparse('http://www.example.com/index.html;info?id=10086#comment')
print(type(result), result)
print(result.scheme, result[0])
print(result.netloc, result[1])
print(result.path, result[2])
print(result.params, result[3])
print(result.query, result[4])
print(result.fragment, result[5])
其中要注意的是url的格式:info:最后一个路径元素参数,不常用;id=10086:查询字符串;comment:片段标志。
2.requests
(1)介绍:第三方库就是 requests,该库开源地址为:https://github.com/psf/requests
帮助文档:https://requests.readthedocs.io/projects/cn/zh_CN/latest/ (翻译质量不高,大致看看)
(2)安装(记得重新打开cmd界面) pip install requests
(3)使用示例
①get
示例1–直接请求网页:
import requestsx = requests.get('https://www.baidu.com/')
print(x.text) # 返回网页内容
print(x.status_code) # 返回 http 的状态码
示例2–请求json文件:
import requestsx = requests.get('https://www.runoob.com/try/ajax/json_demo.json')
print(x.json())# 返回 json 数据
示例3–带参数和header:
import requestskw = {'s':'python 教程'} #form表单参数
headers = {"User-Agent": "Mozilla/5.0 (Windows NT 10.0; Win64; x64) AppleWebKit/537.36 (KHTML, like Gecko) Chrome/54.0.2840.99 Safari/537.36"}# params 接收一个字典或者字符串的查询参数,字典类型自动转换为url编码,不需要urlencode()
response = requests.get("https://www.baidu.com/", params = kw, headers = headers)
print(response.text)  # 查看响应内容,response.text 返回的是Unicode格式的数据
②post
示例:
import requestsmyobj = {'fname': 'RUNOOB','lname': 'Boy'}
x = requests.post('https://www.runoob.com/try/ajax/demo_post2.php', data = myobj)
print(x.text)
3.requests-html
(1)介绍:是对requests(同作者),lxml,pyppeteer等的封装,python3.6版本以上才能使用。特点是集资源爬取和数据解析为一体。
官方手册查询地址:requests-html.kennethreitz.org/
特性如下(后面的使用示例会一一体现):
①支持JavaScript
②支持CSS选择器(又名jQuery风格, 感谢PyQuery)
③支持Xpath选择器
④可自定义模拟User-Agent(模拟得更像真正的web浏览器)
⑤自动追踪重定向
⑥连接池与cookie持久化
⑦支持异步请求
(2)安装:pip install requests-html
(3)使用
示例:
from requests_html import HTMLSession #导入session = HTMLSession() #开启请求会话
r = session.get('https://blog.csdn.net/tttalk?type=blog') #发送get请求到csdn,获取响应文本信息
print(r) #返回<Response [200]>
print(r.html.links) # 得到该网页所有的链接,返回的是一个set集合
print(r.html.xpath('//*[@id="userSkin"]/div[2]/div/div[1]/div/div[1]/ul/li/div[2]/div/span[2]')) #支持xpath
r.html.render() #支持js脚本,但是需要在第一次执行render的时候下载chromeium(执行这段代码后自动下载)
#定义js脚本
geturl="""() =>{return{ url:document.location.href}}
"""
#运行js
print(r.html.render(script=geturl))
print(r.html.find('#userSkin')) #支持css选择器,用法是 .find('css选择器',first = True) # 可以在发送请求的时候更换user-agent,如这里切换为火狐浏览器
ua = 'Mozilla/5.0 (Windows NT 10.0; Win64; x64; rv:62.0) Gecko/20100101 Firefox/62.0'
post_url = 'https://blog.csdn.net/tttalk?type=blog'
res = session.get(post_url, headers={'user-agent': ua})
print(res.html.html)# 使用异步发送请求
async_session = AsyncHTMLSession()async def get_baidu():url = 'https://www.baidu.com/'res = await async_session.get(url)print(res.html.absolute_links)async def get_sougou():url = 'https://www.sogou.com/'res = await async_session.get(url)print(res.html.links)start_time = time.time()
async_session.run(get_baidu, get_sougou)
print('耗时:', time.time() - start_time)# 使用同步发送请求,最后结果可以看到异步更快
session2 = HTMLSession()
start_time = time.time()
res = session2.get('https://www.baidu.com/')
print(res.html.links)
res = session2.get('https://www.sogou.com/')
print(res.html.absolute_links)
print('耗时:', time.time() - start_time)
二、正则表达式
1.原生字符串
原生字符串,需要在字符串前面加上 r。这个用法在正则中会经常使用。
如:
my_str='C:\number'
print(my_str) #打印结果为 C:换行  umber
my_str_ori=r'C:\number'
print(my_str_ori) #打印结果正常
2.re库相关函数
re.search(pattern,string,flags=0):在字符串中搜索正则表达式匹配到的第一个位置的值,返回 match 对象。
re.match(pattern,string,flags=0):该函数用于在目标字符串开始位置去匹配正则表达式,返回 match 对象,未匹配成功返回 None
re.findall(pattern,string,flags=0):以列表格式返回全部匹配到的字符串
re.split(pattern, string, maxsplit=0, flags=0):该函数将一个字符串按照正则表达式匹配结果进行分割,返回一个列表
re.finditer(pattern,string,flags=0):搜索字符串,并返回一个匹配结果的迭代器,每个迭代元素都是 match 对象
re.sub(pattern,repl,string,count=0,flags=0):在一个字符串中替换被正则表达式匹配到的字符串,返回替换后的字符串
示例:
import re str = r'我的滑板鞋,时尚时尚最时尚,yoyoyo'
pattern1 = r'时尚'
pattern2 = r','print(re.search(pattern1, str))  #<re.Match object; span=(6, 8), match='时尚'>
print(re.match(r'我', str))   #<re.Match object; span=(0, 1), match='我'>
print(re.findall(pattern1, str)) #['时尚', '时尚', '时尚']
print(re.split(pattern2, str,maxsplit=1)) #['我的滑板鞋', '时尚时尚最时尚,yoyoyo']
print(re.finditer(pattern2, str))  #<callable_iterator object at 0x000002EF16C89810>
print(re.sub(pattern2,'nice', str)) #我的滑板鞋nice时尚时尚最时尚niceyoyoyo
三、数据解析
1.Beautiful Soup
(1)介绍:Beautiful Soup 是一款 Python 解析库,主要用于将 HTML 标签转换为 Python 对象树,然后让我们从对象树中提取数据。
它能够通过你喜欢的转换器实现惯用的文档导航,查找,修改文档的方式。
(2)安装:pip install beautifulsoup4
(3)使用介绍
示例:
import requests
from bs4 import BeautifulSouphtml = '''
<html><head><title>The Dormouse's story</title></head><body>
<p class="title">side title:<b>side title one</b><b>side title two</b></p><p class="story">Once upon a time there were three little sisters; and their names were
<a href="http://example.com/elsie" class="sister" id="link1">Elsie</a>,
<a href="http://example.com/lacie" class="sister" id="link2">Lacie</a> and
<a href="http://example.com/tillie" class="sister" id="link3">Tillie</a>;
and they lived at the bottom of a well.</p><p class="story">...</p>
'''
#使用BeautifulSoup对网页代码进行解析,这里使用Python标准库——html.parser
soup = BeautifulSoup(html, "html.parser")print(soup.title) # 获取html代码中的titile标签--<title>The Dormouse's story</title>
print(soup.title.text) # 获取html代码中的titile内容--The Dormouse's story
print(soup.p.contents) #tag的 .contents 属性可以将tag的子节点以列表的方式输出--['side title:', <b>side title one</b>, <b>side title two</b>]print(soup.title.parent) #通过 .parent 属性来获取某个元素的父节点,通过元素的 .parents 属性可以递归得到元素的所有父辈节点print(soup.b.next_sibling) #通过.next_sibling获取兄弟节点的下一个,注意这里的b为找到的第一个b标签--<b>side title two</b>
print(soup.b.previous_sibling) #通过.privious_sibling获取兄弟节点的上一个--side title:print(soup.find_all("a")) #找到所有a标签
print(soup.find("a")) #找到第一个a标签
print(soup.find_all(id="link3")) #找到所有id为link3的标签
print(soup.select("p b"))#select选择器找到所有p标签下的b标签
print(soup.select_one("p b"))#select选择器找到所有p标签下的第一个b标签for i in soup.p.children:  #这里输出所有<p>标签为title的子内容print(i)
2.lxml
(1)介绍:lxml 库是一款 Python 数据解析库,其主要功能是解析和提取XML和HTML中的数据。
官方文档地址(英文):https://lxml.de/。项目开源地址:https://github.com/lxml/lxml
(2)安装:pip install lxml
(3)基本使用
①lxml.etree:通过etree.HTML直接将字符串实例转化为element对象
例:
import requests
from lxml import etreeres = requests.get("http://www.jsons.cn/zt/")
html = res.text
root_element = etree.HTML(html)
print(root_element)
print(root_element.tag)
②解析html网页
例:
from lxml import etreetext = '''
<html><head><title>The Dormouse's story</title></head><body>
<p class="title">side title:<b>side title one</b><b>side title two</b></p><p class="story">Once upon a time there were three little sisters; and their names were
<a href="http://example.com/elsie" class="sister" id="link1">Elsie</a>,
<a href="http://example.com/lacie" class="sister" id="link2">Lacie</a> and
<a href="http://example.com/tillie" class="sister" id="link3">Tillie</a>;
and they lived at the bottom of a well.</p><p class="story">...</p>
'''
# 开始初始化
html = etree.HTML(text)  # 这里需要传入一个html形式的字符串
print(html)
print(type) #<class 'type'>#获取xpath的方法:以chrome为例,F12打开Elements界面选择某一元素右键Copy-Copy Xpath:结果大概长这样--//*[@id="1"]
#提取所有a标签内的文本信息
xpath_bds='//a/text()' # 书写xpath表达式,提取文本最终使用text()
list1=html.xpath(xpath_bds) # 提取文本数据,以列表形式输出
print(list1)
#获取所有href的属性值
xpath_bds='//a/@href'
list2=html.xpath(xpath_bds)
print(list2)
#获取所有class为sister的a标签
xpath_bds='//a[@class="sister"]/text()'  #如果不加/text()返回的是三个对象
list3=html.xpath(xpath_bds)
print(list3)# 将字符串序列化为html字符串
result = etree.tostring(html).decode('utf-8')
print(result)
print(type(result)) #<class 'str'>
注意:html可以通过文件进行读取,如html = etree.parse(‘1.html’),result = etree.tostring(html).decode(‘utf-8’)
3.selectolax
(1)特点:对比lxml和Beautiful Soup解析速度快,解析能力强。缺点是不支持xpath,需要了解一些前端知识。
(2)安装:pip install selectolax
(3)实战教程
例–从示例可以看出selectolax的解析效率为lxml的三倍左右:
import time
import requests
from lxml import etree
from selectolax.parser import HTMLParserurl = 'https://www.baidu.com'
headers = {'User-Agent': 'Mozilla/5.0 (Macintosh; Intel Mac OS X 10_15_7) AppleWebKit/537.36 (KHTML, like Gecko) Chrome/103.0.5060.134 Safari/537.36 Edg/103.0.1264.71'
}
html = requests.get(url, headers=headers).textdef use_lxml():start = time.time()for _ in range(1000):tree = etree.HTML(html)lis = tree.xpath('//ul[@id="hotsearch-content-wrapper"]/li')end = time.time()print(f'耗时{end - start:.2f}秒  使用lxml')def use_selectolax():start = time.time()for _ in range(1000):html_parser = HTMLParser(html)lis = html_parser.css('ul#hotsearch-content-wrapper > li')end = time.time()print(f'耗时{end - start:.2f}秒  使用selectolax')if __name__ == '__main__':use_lxml()use_selectolax()
四、自动化爬虫selenium
(1)介绍:Selenium是一个Web的自动化测试工具,最初是为网站自动化测试而开发的,Selenium 可以直接运行在浏览器上,它支持所有主流的浏览器。
因为Selenium可以控制浏览器发送请求,并获取网页数据,因此可以应用于爬虫领域。
官方文档:Selenium with Python — Selenium Python Bindings 2 documentation
(2)安装
安装selenium:pip install selenium
安装浏览器驱动包WebDriver:
chrome :http://npm.taobao.org/mirrors/chromedriver/
firefox :https://github.com/mozilla/geckodriver/releases
Edge:https://developer.microsoft.com/en-us/micrsosft-edage/tools/webdriver
Safari:https://webkit.org/blog/6900/webdriver-support-in-safari-10/
例:
以chrome为例,先查看chrome当前版本如114.0.5735.110(正式版本) (64 位),再找到5735对应的版本包,如114.0.5735.16/114.0.5735.90选其一下载即可(下载chromedriver_win32.zip)。
驱动包不需要安装,只需要解压到项目目录,后续会在代码中调用。记住该地址,需要在环境变量中进行配置。如:D:\tools\chromedriver_win32。
然后测试配置是否正确,若运行代码出现谷歌浏览器,则表示安装完成:
from selenium import webdriver
driver = webdriver.Chrome()
(3)使用
注:在后面验证码识别模块中,有一个实战的示例可以参考
Ⅰ.对浏览器基本操作
例:
from selenium import webdriverdriver = webdriver.Chrome()
driver.set_window_size(800,600) # 设置浏览器大小
driver.maximize_window() # 可以直接最大化
driver.get("http://www.baidu.com")# 打开百度
driver.get("https://www.csdn.net/")  # 打开 CSDN 首页
time.sleep(1)  # 暂停1秒钟
driver.back()  # 回退
time.sleep(1)  # 暂停1秒钟
driver.forward()  # 前进
time.sleep(1)  # 暂停1秒钟
driver.refresh()  # 页面刷新
time.sleep(1)  # 暂停1秒钟
driver.quit()  # 浏览器关闭
Ⅱ.网页元素定位
Selenium3版本的元素定位如:driver.find_element_by_id(“value”) # 利用ID定位
Selenium4已经不再支持上面的写法,我们需要导入By方法,改变我们的元素定位写法,如:
find_element(By.ID,“inputOriginal”)
find_element(By.CSS_SELECTOR,“#inputOriginal”)
find_element(By.TAG_NAME,“div”)
find_element(By.NAME,“username”)
find_element(By.LINK_TEXT,“下一页”)
find_element(by=By.XPTAH,value=‘XXX’),这个非常好用,xpath的值可以浏览器F12后直接右键copy-copy Xpath
例:
from selenium import webdriver
from selenium.webdriver.common.by import By #引入By方法driver = webdriver.Chrome()
driver.maximize_window() # 可以直接最大化
driver.get("https://blog.csdn.net/tttalk/article/details/130063341?spm=1001.2014.3001.5502")  # 打开 CSDN某个网页
driver.find_element(By.ID,"toolbar-search-input").send_keys("TTTALK")  # 通过ID检索搜索框,并输入文本
driver.find_element(By.ID,"toolbar-search-button").click()  # 通过ID检索搜索按钮,并点击
五、爬虫框架
1.Scrapy
(1)介绍:Scrapy 是适用于 Python 的一个快速、高层次的屏幕抓取和 web 抓取框架,用于抓取 web 站点并从页面中提取结构化的数据。Scrapy 用途广泛,可以用于数据挖掘、监测和自动化测试。
scrapy内容较多较复杂,这里只作入门级别的教学,更多内容参考官方相关文档如下:
scrapy 官网:https://scrapy.org;
scrapy 文档:https://doc.scrapy.org/en/latest/intro/tutorial.html;
scrapy 更新日志:https://docs.scrapy.org/en/latest/news.html。
(2)安装:pip install scrapy
控制台输入scrapy,若出现如下内容则安装成功:
Scrapy 2.9.0 - no active projectUsage:scrapy <command> [options] [args]Available commands:bench Run quick benchmark testfetch Fetch a URL using the Scrapy downloadergenspider Generate new spider using pre-defined templatesrunspider Run a self-contained spider (without creating a project)settings Get settings valuesshell Interactive scraping consolestartproject Create new projectversion Print Scrapy versionview Open URL in browser, as seen by Scrapy[ more ] More commands available when run from project directoryUse "scrapy <command> -h" to see more info about a command
注意:Available commands部分是 scrapy 的内置命令列表,标准的格式的 scrapy ,通过 scrapy -h 可以查看指定命令的帮助手册
(3)使用
①新建项目
scrapy startproject my_scrapy D:\tools\scrapy
cd /d D:\tools\scrapy
scrapy genspider -l #查看所有模板,默认是basic
scrapy genspider pm imspm.com #创建第一个 scrapy 爬虫文件,语法是scrapy genspider [-t template]
此时在D:\tools\scrapy\my_scrapy\spiders路径下,生成了pm.py文件
测试爬虫运行:scrapy crawl pm
成功运行后,日志结果如下:
[scrapy.utils.log] INFO: Scrapy 2.9.0 started (bot: my_scrapy)
②项目文件介绍
Ⅰ.项目中的文件的简单说明
scrapy.cfg:配置文件路径与部署配置;
items.py:目标数据的结构;
middlewares.py:中间件文件;
pipelines.py:管道文件;
settings.py:配置信息。
pm.py:爬虫程序文件。
③获取网页源码
将文件中的allowed_domain和start_urls中的imspm.com改为www.imspm.com,将pass改为print(response.text),此时pm.py内容如下
import scrapyclass PmSpider(scrapy.Spider):name = "pm"allowed_domains = ["www.imspm.com"]start_urls = ["https://www.imspm.com"]def parse(self, response):print(response.text)
其中的 parse 表示请求 start_urls 中的地址,获取响应之后的回调函数,直接通过参数 response 的 .text 属性进行网页源码的输出。
再次启动:scrapy crawl pm
此时可以看到控制台输出了完整的html页面。
③实战教程
之前网上参考的imspm网站现在网页结构已经修改,网上的那些教程我实践了下全失效了。这里找了另一个实例。
这里选用的爬虫网站为职友集阿里招聘网https://www.jobui.com/company/281097/jobs
可以看到该网站内容比较简单,分页处理也比较简单(直接在url后面拼接页码),如下所示
图片1图片2…
步骤1-新建项目(重新打开cmd):scrapy startproject ali_scrapy D:\tools\scrapyProjects\ali
步骤2-创建爬虫程序文件:
cd /d  D:\tools\scrapyProjects\ali
scrapy genspider ali https://www.jobui.com/company/281097/jobs #ali为py文件名称
步骤3-定义item文件,作用是对源码进行解析和存储
# Define here the models for your scraped items
#
# See documentation in:
# https://docs.scrapy.org/en/latest/topics/items.htmlimport scrapy#定义一个item类继承scrapy.Item
class AlibabaItem(scrapy.Item):# define the fields for your item here like:# name = scrapy.Field()job_title = scrapy.Field() #定义职位名称数据属性address = scrapy.Field() #定义就职地点数据属性detail = scrapy.Field( ) #定义招聘要求数据属性pass
步骤4-修改爬虫程序文件,对网站进行爬取和解析
修改ali.py,代码如下:
import scrapy
import bs4 #导入bs4用于解析数据from ..items import AlibabaItem #导入item类#定义一个爬虫类,用于继承scrapy.Spider类
class AlibabaSpider(scrapy.Spider):name = 'ali_scrapy'  #定义爬虫名字,这是唯一属性allowed_domains = ['www.jobui.com'] #定义爬虫网络域名,只允许在该域名内爬取start_urls = ['https://www.jobui.com/company/281097/jobs/p1'] #设置爬虫起始爬取的urlfor page in range(1,601): #使用for遍历网址url = 'https://www.jobui.com/company/281097/jobs/p{i}'.format(i=page)start_urls.append(url) #将网址添加进start_urls内#parse是默认处理reponse的方法def parse(self, response):bs = bs4.BeautifulSoup(response.text,'html.parser')  #使用BeautifulSoup解析对象all_knowledge = bs.find_all('div',class_="c-job-list") #用find_all提取<div class="c-job-list">标签信息,里面包含所有的招聘信息for data in all_knowledge:  #使用for循环遍历all_knowledgeitem = AlibabaItem() #实例化AlibabaItem这个类item['job_title'] = data.find_all('div',class_="job-segmetation")[0].a.h3.text #提取招聘岗位信息item['address'] = data.find_all('div',class_="job-segmetation")[1].find_all('span')[0].text #提取工作地点信息item['detail'] = data.find_all('div',class_="job-segmetation")[1].find_all('span')[1].text #提取招要求信息yield item #使用yield将item返还给引擎pass步骤5-修改settings.py配置信息:定义导出文件的路径、格式、编码等# Scrapy settings for ali_scrapy project
#
# For simplicity, this file contains only settings considered important or
# commonly used. You can find more settings consulting the documentation:
#
#     https://docs.scrapy.org/en/latest/topics/settings.html
#     https://docs.scrapy.org/en/latest/topics/downloader-middleware.html
#     https://docs.scrapy.org/en/latest/topics/spider-middleware.htmlBOT_NAME = "ali_scrapy"SPIDER_MODULES = ["ali_scrapy.spiders"]
NEWSPIDER_MODULE = "ali_scrapy.spiders"# Crawl responsibly by identifying yourself (and your website) on the user-agent
#USER_AGENT = "ali_scrapy (+http://www.yourdomain.com)"# Obey robots.txt rules
ROBOTSTXT_OBEY = True#导出文件的路径
FEED_URI='%(name)s.csv'
#导出的数据格式
FEED_FORMAT='csv'
#导出文件编码
FEED_EXPORT_ENCODING='utf-8'
# Crawl responsibly by identifying yourself (and your website) on the user-agent
#定义请求头
USER_AGENT = 'Mozilla/5.0 (Windows NT 6.1; Win64; x64) AppleWebKit/537.36 (KHTML, like Gecko) Chrome/78.0.3904.97 Safari/537.36'# Obey robots.txt rules
#设置为不符合robots协议
ROBOTSTXT_OBEY = False#修改廷迟为2秒
DOWNLOAD_DELAY = 2# Configure maximum concurrent requests performed by Scrapy (default: 16)
#CONCURRENT_REQUESTS = 32# Configure a delay for requests for the same website (default: 0)
# See https://docs.scrapy.org/en/latest/topics/settings.html#download-delay
# See also autothrottle settings and docs
#DOWNLOAD_DELAY = 3
# The download delay setting will honor only one of:
#CONCURRENT_REQUESTS_PER_DOMAIN = 16
#CONCURRENT_REQUESTS_PER_IP = 16# Disable cookies (enabled by default)
#COOKIES_ENABLED = False# Disable Telnet Console (enabled by default)
#TELNETCONSOLE_ENABLED = False# Override the default request headers:
#DEFAULT_REQUEST_HEADERS = {
#    "Accept": "text/html,application/xhtml+xml,application/xml;q=0.9,*/*;q=0.8",
#    "Accept-Language": "en",
#}# Enable or disable spider middlewares
# See https://docs.scrapy.org/en/latest/topics/spider-middleware.html
#SPIDER_MIDDLEWARES = {
#    "ali_scrapy.middlewares.AliScrapySpiderMiddleware": 543,
#}# Enable or disable downloader middlewares
# See https://docs.scrapy.org/en/latest/topics/downloader-middleware.html
#DOWNLOADER_MIDDLEWARES = {
#    "ali_scrapy.middlewares.AliScrapyDownloaderMiddleware": 543,
#}# Enable or disable extensions
# See https://docs.scrapy.org/en/latest/topics/extensions.html
#EXTENSIONS = {
#    "scrapy.extensions.telnet.TelnetConsole": None,
#}# Configure item pipelines
# See https://docs.scrapy.org/en/latest/topics/item-pipeline.html
#ITEM_PIPELINES = {
#    "ali_scrapy.pipelines.AliScrapyPipeline": 300,
#}# Enable and configure the AutoThrottle extension (disabled by default)
# See https://docs.scrapy.org/en/latest/topics/autothrottle.html
#AUTOTHROTTLE_ENABLED = True
# The initial download delay
#AUTOTHROTTLE_START_DELAY = 5
# The maximum download delay to be set in case of high latencies
#AUTOTHROTTLE_MAX_DELAY = 60
# The average number of requests Scrapy should be sending in parallel to
# each remote server
#AUTOTHROTTLE_TARGET_CONCURRENCY = 1.0
# Enable showing throttling stats for every response received:
#AUTOTHROTTLE_DEBUG = False# Enable and configure HTTP caching (disabled by default)
# See https://docs.scrapy.org/en/latest/topics/downloader-middleware.html#httpcache-middleware-settings
#HTTPCACHE_ENABLED = True
#HTTPCACHE_EXPIRATION_SECS = 0
#HTTPCACHE_DIR = "httpcache"
#HTTPCACHE_IGNORE_HTTP_CODES = []
#HTTPCACHE_STORAGE = "scrapy.extensions.httpcache.FilesystemCacheStorage"# Set settings whose default value is deprecated to a future-proof value
REQUEST_FINGERPRINTER_IMPLEMENTATION = "2.7"
TWISTED_REACTOR = "twisted.internet.asyncioreactor.AsyncioSelectorReactor"
FEED_EXPORT_ENCODING = "utf-8"
步骤6-pipelines.py管道文件:定义导出内容
# Define your item pipelines here
#
# Don't forget to add your pipeline to the ITEM_PIPELINES setting
# See: https://docs.scrapy.org/en/latest/topics/item-pipeline.html# useful for handling different item types with a single interface
from itemadapter import ItemAdapter
#导入openpyxl
import openpyxlclass AliScrapyPipeline(object):#初始化函数,当类实例化时这个方法会启动def __init__(self):#创建工作薄self.wb = openpyxl.Workbook()#定位活动表self.ws = self.wb.active#用append()向表中添加表头self.ws.append(['职位','工作地点','招聘要求'])#默认处理item的方法def process_item(self, item, spider):#把岗位、工作地点、招聘要求等信息赋值给lineline = [item['job_title'],item['address'],item['detail']]# 用append函数将公司名称、职位名称、工作地点和招聘信息都添加进表格self.ws.append(line)# 将item丢回给引擎,如果后面还有这个item需要经过的itempipeline,引擎会自己调度return item
步骤7:启动 scrapy crawl ali_scrapy
步骤8:接下来需要等待数个小时,看到Spider closed (finished)提示后,发现excel已生成如下
2.pyspider框架
(1)介绍:PySpider是binux做的一个爬虫架构的开源化实现。
功能需求:抓取、更新调度多站点的特定的页面;需要对页面进行结构化信息提取;灵活可扩展,稳定可监控
源码地址:https://github.com/binux/pyspider
官方文档:http://docs.pyspider.org/en/latest/
(2)安装
PS:这个pyspider安装坑有点多,建议python低版本使用,高版本兼容性较差。
①首先需要安装pycurl,进入https://www.lfd.uci.edu/~gohlke/pythonlibs/#pycurl
找到你需要安装的pycurl版本,如python版本3.11,则下载pycurl-7.45.1-cp311-cp311-win_amd64.whl,cp311代表python版本是3.11
然后将文件放到制定目录后,cmd进入该目录,安装pycurl。命令是:pip install pycurl-7.45.1-cp311-cp311-win_amd64.whl
②重新打开一个cmd界面,安装pyspider:pip install pyspider。
安装成功后会生成相应的程序文件夹,如下
③接着需要安装phantomjs,下载路径为https://phantomjs.org/download.html
下载完phantomjs-2.1.1-windows后,解压后找到phantomjs.exe文件,将其复制到与python.exe文件放在同一层文件夹下。如下所示:
④验证是否安装成功:pyspider all
若报错如下,说明你使用的是3.7以上版本:
File "D:\tools\python\install\Scripts\pyspider-script.py", line 33, in <module>sys.exit(load_entry_point('pyspider==0.3.10', 'console_scripts', 'pyspider')())^^^^^^^^^^^^^^^^^^^^^^^^^^^^^^^^^^^^^^^^^^^^^^^^^^^^^^^^^^^^^^^^^^^File "D:\tools\python\install\Scripts\pyspider-script.py", line 25, in importlib_load_entry_pointreturn next(matches).load()^^^^^^^^^^^^^^^^^^^^File "D:\tools\python\install\Lib\importlib\metadata\__init__.py", line 202, in loadmodule = import_module(match.group('module'))^^^^^^^^^^^^^^^^^^^^^^^^^^^^^^^^^^^^File "D:\tools\python\install\Lib\importlib\__init__.py", line 126, in import_modulereturn _bootstrap._gcd_import(name[level:], package, level)
原因是变量(async)在2.X的版本中不是关键字,或者说是没有作为关键字使用,然而3.7版本中(async)是作为关键词使用的
此时需要将\python\install\Lib\site-packages\pyspider\run.py、\pyspider\fetcher\tornado_fetcher.py和\pyspider\webui\app.py中的async全部替换为shark
若报错 module ‘collections’ has no attribute ‘MutableMapping’,说明你使用的是python3.10以上版本,MutableMapping,MutableSet等放的位置变了:
需要修改\Lib\site-packages\tornado\httputil.py,将collections.MutableMapping替换为collections.abc.MutableMapping
若报错cannot import name ‘Mapping’ from ‘collections’,还需将\Lib\collections_init_.py的from collections import Mapping修改为from collections.abc import Mapping
如果是import _collections_abc,调用处为_collections_abc.Mapping,则新增from collections.abc import Mapping,并把_collections_abc.Mapping修改为Mapping
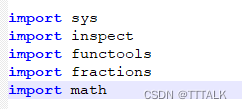
若报错AttributeError: module ‘fractions’ has no attribute ‘gcd’,说明你是python3.5以上版本,fractions.gcd(a, b)用于计算最大公约数。这个函数在Python3.5之后就废弃了,官方建议使用math.gcd()
用于计算最大公约数。此时需要修改\Lib\site-packages\pyspider\libs\base_handler.py, import math 后将下面fractions.gcd替换为math.gcd就可以了。如下所示
若出现webui running on 0.0.0.0:5000,则运行成功,此时可以访问127.0.0.1:5000
(3)项目创建和代码结构分析
TODO
六、模拟登录与验证码识别
1.无验证码
使用模拟form表单的方式模拟登录
示例:
import requests
import re
from bs4 import BeautifulSoups = requests.Session()
url_login = 'https://accounts.douban.com/login'formdata = {'redir': 'https://www.douban.com','form_email': '账号','form_password': '密码','login': u'登陆'
}
headers = {'User-Agent': 'Mozilla/5.0 (Windows NT 6.1; WOW64) AppleWebKit/537.36 (KHTML, like Gecko) ''Chrome/55.0.2883.87 Safari/537.36'}r = s.post(url_login, data=formdata, headers=headers)
content = r.text
2.有验证码
(1)自动化爬虫中,很多网站需要登录,会有验证码问题。推荐使用打码平台(如果不使用的话需要定位验证码url后手动输入),这里以selenium+超级鹰作为样例。
(2)超级鹰官网:https://www.chaojiying.com/api-14.html
(3)使用教程
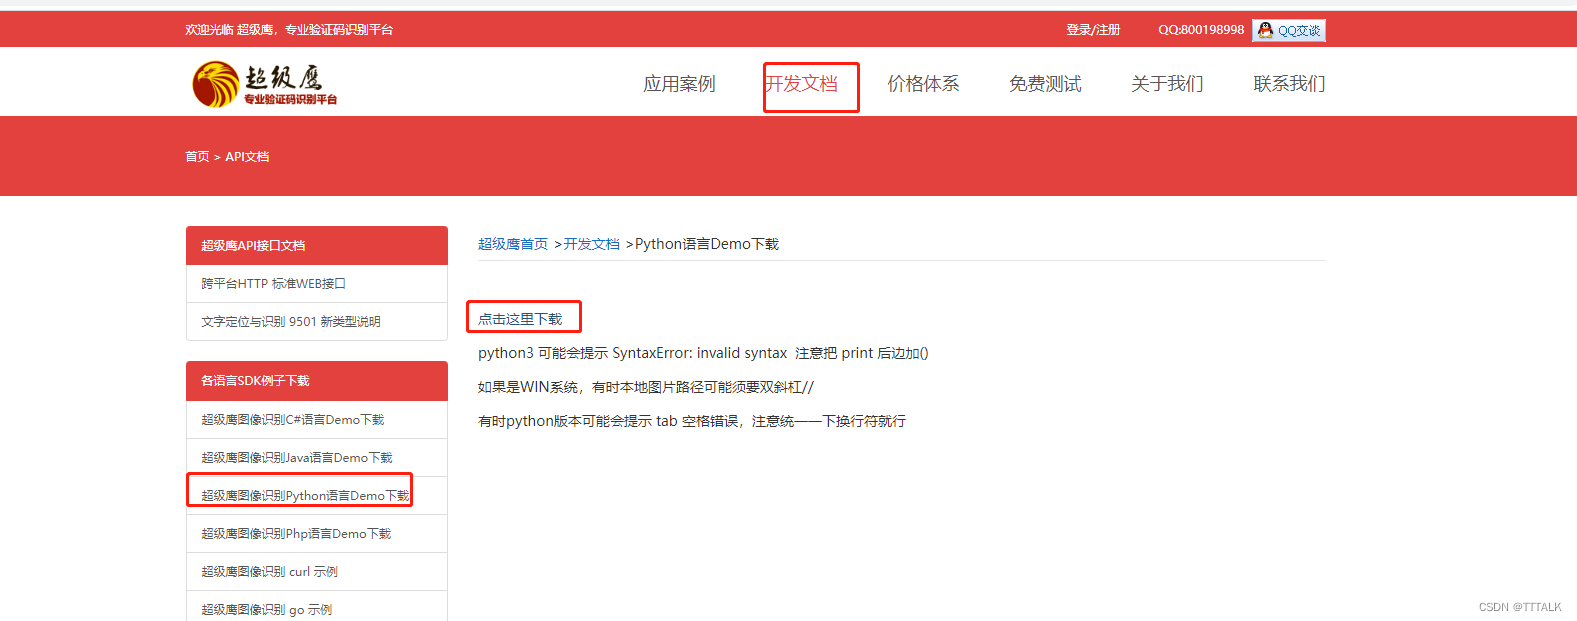
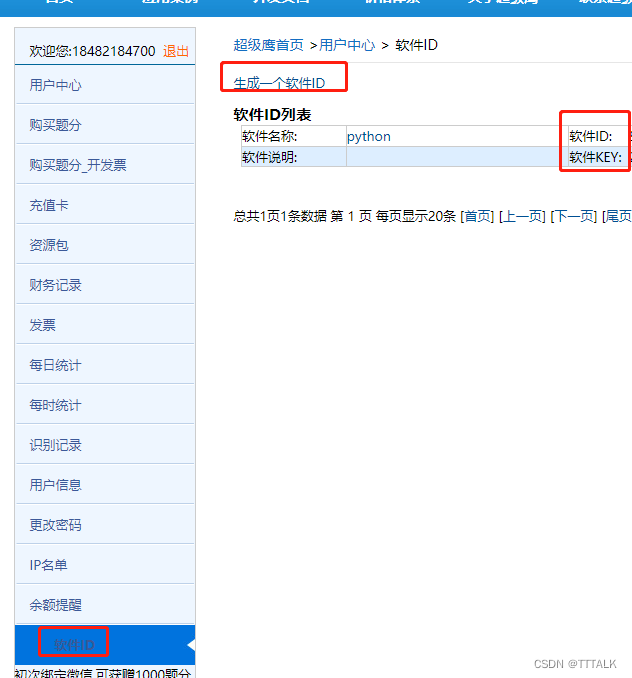
①如图所示,可以下载python的使用示例,文件名是chaojiying.py。然后注册一下,然后生成一下软件ID,会有一个软件ID和软件key,后面会用到。
这里需要绑定微信可以获得免费1000题分(100次),或者花1块钱可以购买使用100使用次数,不然获取那步会报
{‘err_no’: -1005, ‘err_str’: ‘无可用题分’, ‘pic_id’: ‘0’, ‘pic_str’: ‘’, ‘md5’: ‘’}

②修改chaojiying.py:如图所示修改最后几行。

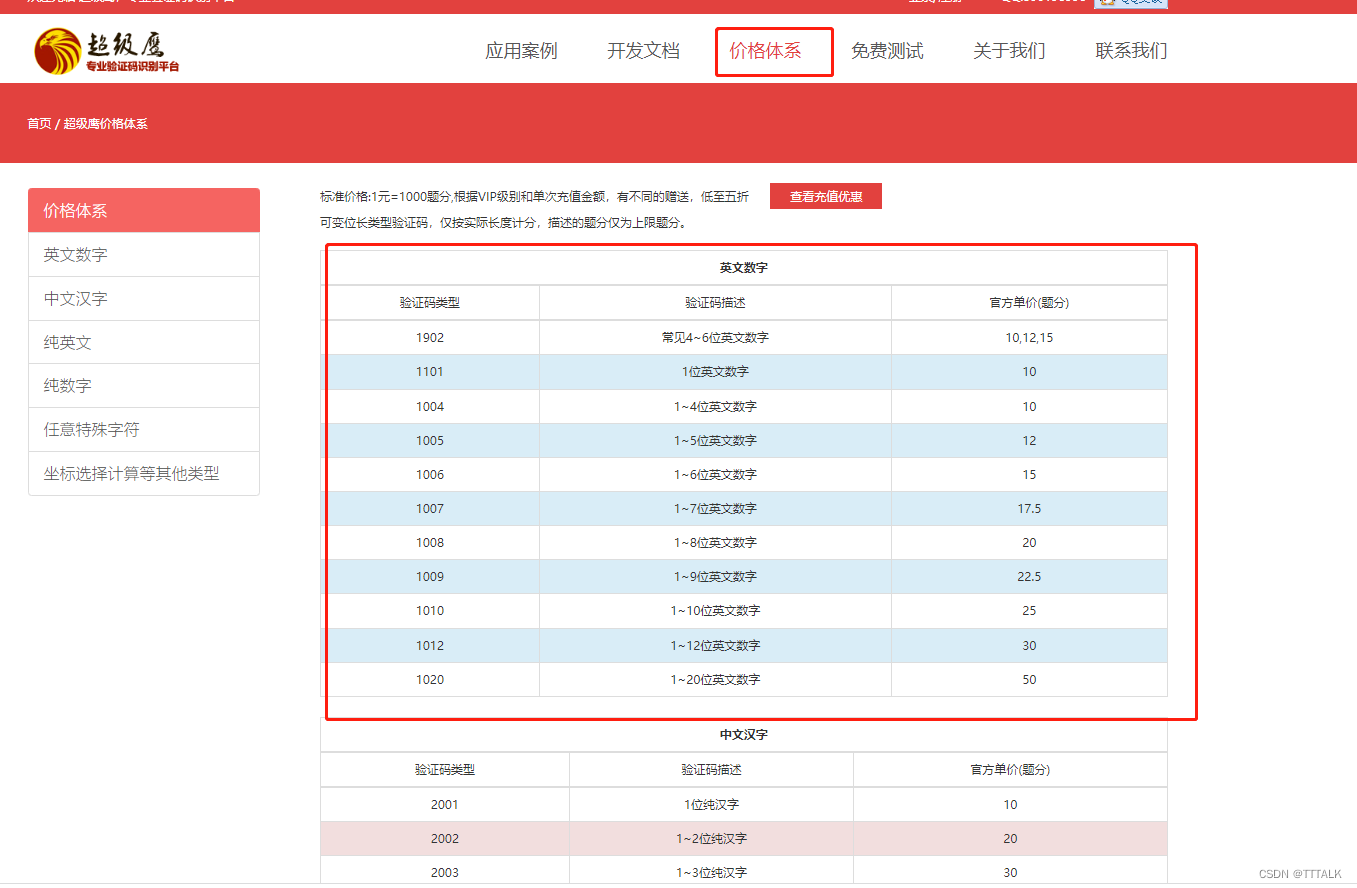
验证码类型1902对应字典查看方式如下:
这个文件哪里用到呢,可以放到你的python项目中,或者直接在该目录下运行python,否则会报找不到Chaojiying_Client这个包
③实战:我这里直接使用超级鹰官网的登录验证码,作为样例
如图找到登录按钮,账号、密码、验证码等,当然还有最重要的验证码图片。

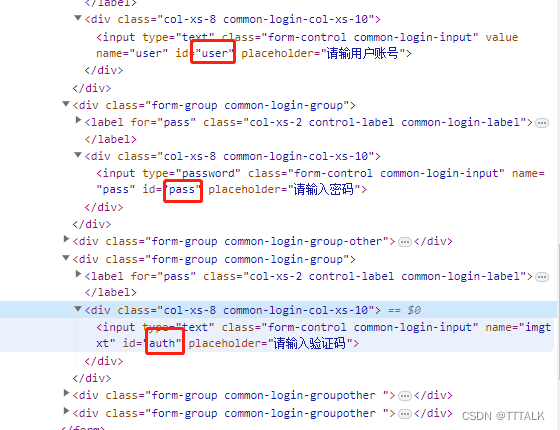

python运行代码如下:
from selenium import webdriver
from selenium.webdriver import ActionChains #这个包对应的是鼠标的操作
from selenium.webdriver.common.by import By #引入By方法
from chaojiying import Chaojiying_Client #导入超级鹰模块driver = webdriver.Chrome()
driver.set_window_size(800,600) # 设置浏览器大小
driver.maximize_window() # 可以直接最大化
driver.get("https://www.chaojiying.com/price.html")# 打开超级鹰action = ActionChains(driver) #获取ActionChains 对象 导包
el = driver.find_element(By.ID,"login-register")  # 通过ID属性检索找到登录框
action.move_to_element(el).perform()# 调用悬停方法
driver.find_element(By.ID,"user").send_keys("你的用户名")  # 通过ID检索搜索框,并输入账号
driver.find_element(By.ID,"pass").send_keys("你的密码")  # 通过ID检索搜索框,并输入密码
img = driver.find_element(by=By.XPATH,value='//*[@id="userone"]/section/form/div[3]/div/img').screenshot_as_png #通过xpath获取图片,creenshot_as_png是Selenium的截图方法
chaojiying = Chaojiying_Client('你的用户名', '你的密码', '你的软件id') #获取超级鹰模块,这里直接从chaojiying.py示例那里复制过来
data = chaojiying.PostPic(img, 1902) #获取验证码,这里也是参考chaojiying.py
print(data)
code = data["pic_str"]
print(code)
time.sleep(3)
driver.find_element(By.ID,"auth").send_keys(code)  # 通过ID检索搜索框,并输入验证码
driver.find_element(by=By.XPATH,value='//*[@id="userone"]/section/form/div[6]/button').click()  #通过xpath获取登录按钮并点击
—此时就登陆成功了!!
七、autoscraper(不需要编程基础)
(1)介绍:AutoScraper是一个智能、自动、快速和轻量级的Web爬虫,他的特点是很简单,不需要编程基础。
如果你需要页面中某个字段信息,只需要在把该信息放到wanted_list/wanted_dict中,它会自动帮你爬取该类型的同一数据,省去了定位标签的过程,后面示例中可以更直观的感受到。
github网址:https://github.com/alirezamika/autoscraper
(2)安装:pip install autoscraper
(3)使用教程
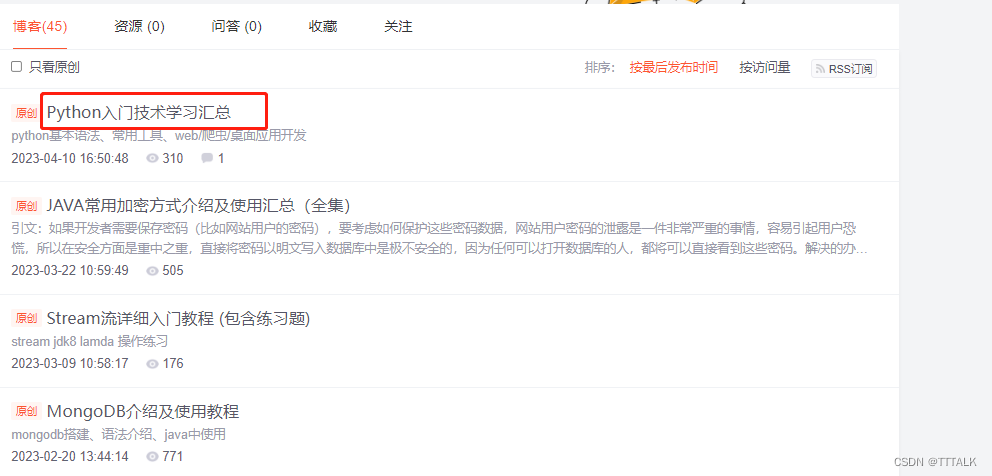
示例1–CSDN通过当前页面的一个标题找到当前页面所有标题:
from autoscraper import AutoScraper  #导入url = 'https://blog.csdn.net/tttalk?spm=1001.2101.3001.5343' # 爬取的网址
wanted_list = ["Python入门技术学习汇总"]  #随便找一个当前页面的标题
scraper = AutoScraper() #创建AutoScraper对象#建立爬虫,并进行信息爬取
result = scraper.build(url, wanted_list)
print('结果数量:',len(result))  #返回结果数量与当前页面标题数量一致
print('返回结果:',result)wanted_dict = {'title': ["Python入门技术学习汇总"], 'summary': ['python基本语法、常用工具、web/爬虫/桌面应用开发']}  #除了标题外,再找个能点击的摘要字段,然后命名一下
scraper.build(url=url, wanted_dict=wanted_dict)
result2 = scraper.get_result_similar(url=url, grouped=True) #抓取相似数据,参数grouped设置返回结果是字典形式,默认是False。
print('返回结果:')
print(result2)  #返回结果中rule_m3wz,rule_sgqv是规则名称,有可能同一种信息使用多种规则返回,选择其一即可。


