torch的安装
- torch的版本与python的版本是挂钩的,python低版本安装不了高版本的torch(亲测)。
python 3.6版本出问题

在下面的网站中找到
https://pytorch.org/

python版本将对应torch的版本
https://www.cnblogs.com/tingtin/p/13601104.html(对应关系表)
cuda官网
https://developer.nvidia.cn/cuda-toolkit-archive
torch对应cuda版本
先配置好cuda然后再装torch
https://download.pytorch.org/whl/torch_stable.html
print(torch.version.cuda)
#-f表示在给定链接中发现版本
pip install torch===1.4.0+cu100 -f https://download.pytorch.org/whl/torch_stable.html
torch_scatter对应的cuda版本
https://pytorch-geometric.com/whl/torch-1.4.0.html
检查torch是否可用
import torch
torch.cuda.is_available()
torch可用gpu的数量
import torch
print(torch.cuda.device_count()) # 可用gpu数量
数据加载
- torch.load()
*.pt文件保存了模型所有的参数 - load_state_dcit
而load_state_dict是net的一个方法
是将torch.load加载出来的数据加载到net中
源码详解
https://www.cnblogs.com/marsggbo/p/12075356.html
函数
one_hoe编码
https://blog.csdn.net/stay_zezo/article/details/121931429
F.one_hot(torch.Tensor([1,1,1]).long())
grad_fn
grad_fn: grad_fn用来记录变量是怎么来的,方便计算梯度
https://blog.csdn.net/zphuangtang/article/details/112788037#:~:text=grad_fn%EF%BC%9A%20grad_fn%E7%94%A8%E6%9D%A5%E8%AE%B0%E5%BD%95,%E6%9F%A5%E7%9C%8Bx%E7%9A%84%E6%A2%AF%E5%BA%A6%E5%80%BC%E3%80%82
reset_parameters
https://blog.csdn.net/weixin_43593330/article/details/107580084
repeat
https://www.cnblogs.com/luckforefforts/p/13663529.html
mm和mul
mm是矩阵相乘
mul是矩阵对应位相乘法
https://blog.csdn.net/qq_39938666/article/details/86004474
bmm
计算两个tensor的矩阵乘积
torch.contiguous()
toch.contiguous() 与torch.view配合使用
https://blog.csdn.net/qq_37828380/article/details/107855070
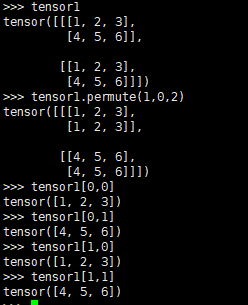
torch.permute()
改变对应位置,则对用位置进行转置,例如tensor[0,1]和tensor[1,0]进行了位置的转换。

torch.gather
在某一维度上按照索引值取对应的元素
https://zhuanlan.zhihu.com/p/344962512
向量拼接
import torch
A=torch.ones(2,3) #2x3的张量(矩阵)
B=2*torch.ones(4,3)#4x3的张量(矩阵)
C=torch.cat((A,B),0)#按维数0(行)拼接,要求两个矩阵另一个维度(列)相等, dim=-1表示使用最后一个维度进行拼接
print(C)#
# tensor([[1., 1., 1.],
#         [1., 1., 1.],
#         [2., 2., 2.],
#         [2., 2., 2.],
#         [2., 2., 2.],
#         [2., 2., 2.]])
print(C.size())#torch.Size([6, 3])
A=torch.ones(4,1) #2x3的张量(矩阵)
B=2*torch.ones(4,3)#4x3的张量(矩阵)
d=torch.cat((A,B),1)#按维数1(列)拼接,要求连个矩阵另一个维度相等,即这里要求两个矩阵行相等
print('d',d)
#tensor([[1., 2., 2., 2.],# [1., 2., 2., 2.],# [1., 2., 2., 2.],# [1., 2., 2., 2.]])
print(d.size())#([4, 4])
torch 损失函数
l2损失就是torch.nn.MSELoss
squeeze
对维度进行压缩或者填充
https://blog.csdn.net/xiexu911/article/details/80820028
稀疏转稠密
to_dense()
expand
这个函数的作用就是对指定的维度进行数值大小的改变。只能改变维大小为1的维,否则就会报错。不改变的维可以传入-1或者原来的数值。
torch.nn.Linear
权重采用Xvaier initialization 初始化方式初始参数。
torch.nn.ModuleList
可以主要应用于模型的参数初始化
class MyModel(nn.Module):def __init__(self):super(MyModel, self).__init__()self.linears = nn.ModuleList([nn.linear for i in range(10)])# ModuleList can act as an iterable, or be indexed using intsdef forward(self, x):for i, l in enumerate(self.linears):x = self.linears[i // 2](x) + l(x)return x
torch.clamp

expand_as
tensor_1.expand(size):把tensor_1扩展成size的形状
tensor_1.expand_as(tensor_2) :把tensor_1扩展成和tensor_2一样的形状
masked_fill
如果值等于括号左边的值,则填充为右边的值。
import torchattn = torch.randn(3, 3)
# tensor([[-0.5928,  0.9060,  1.6383],
#         [-0.1666,  0.6266,  0.6513],
#         [-0.5957, -1.1430, -1.2773]])mask = torch.tensor([[1, 0, 0], [0, 1, 0], [0, 0, 1]])
# tensor([[1, 0, 0],
#         [0, 1, 0],
#         [0, 0, 1]])# 将mask矩阵中为0的值填充为-1e9
attn = attn.masked_fill(mask == 0, -1e9)
# tensor([[-5.9281e-01, -1.0000e+09, -1.0000e+09],
#         [-1.0000e+09,  6.2657e-01, -1.0000e+09],
#         [-1.0000e+09, -1.0000e+09, -1.2773e+00]])
删除为0的元素
nonZeroRows = torch.abs(x).sum(dim=1) != 0
x = x[nonZeroRows]
找到任意元素的位置
torch.nonzero(a==0)
进行简单的模型搭建
https://blog.csdn.net/littlle_yan/article/details/116131963
import torch
import torch.nn.functional as F
import matplotlib.pyplot as plt
import osx = torch.unsqueeze(torch.linspace(-1, 1, 100), dim=1)  # x data (tensor), shape=(100, 1)
y = x.pow(2) + 0.2*torch.rand(x.size())                 # noisy y data (tensor), shape=(100, 1)class Net(torch.nn.Module):def __init__(self, n_feature, n_hidden, n_output):super(Net, self).__init__()self.hidden = torch.nn.Linear(n_feature, n_hidden)   # hidden layerself.predict = torch.nn.Linear(n_hidden, n_output)   # output layerdef forward(self, x):x = F.relu(self.hidden(x))      # activation function for hidden layerx = self.predict(x)             # linear outputreturn xnet = Net(n_feature=1, n_hidden=10, n_output=1)     # define the network
print(net)  # net architectureoptimizer = torch.optim.SGD(net.parameters(), lr=0.2)
loss_func = torch.nn.MSELoss()  # this is for regression mean squared lossplt.ion()   # something about plottingfor t in range(200):prediction = net(x)     # input x and predict based on xloss = loss_func(prediction, y)     # must be (1. nn output, 2. target)optimizer.zero_grad()   # clear gradients for next trainloss.backward()         # backpropagation, compute gradientsoptimizer.step()        # apply gradientsif t % 5 == 0:# plot and show learning processplt.cla()plt.scatter(x.data.numpy(), y.data.numpy())plt.plot(x.data.numpy(), prediction.data.numpy(), 'r-', lw=5)plt.text(0.5, 0, 'Loss=%.4f' % loss.data.numpy(), fontdict={'size': 20, 'color':  'red'})plt.pause(0.1)
plt.ioff()
plt.show()
F.nll_loss
常用于多分类任务,NLLLoss 函数输入 input 之前,需要对 input 进行 log_softmax 处理,即将 input 转换成概率分布的形式,并且取对数,底数为 e
https://www.cnblogs.com/leebxo/p/11913939.html
torch.softmax
torch.softmax实现
import torch
logits = torch.Tensor([[1.0, 2.0, 3.0], [1.0, 2.0, 3.0], [1.0, 2.0, 3.0]])
y = torch.softmax(logits,dim=1)
y_ = torch.Tensor([[0, 0, 1.0], [0, 0, 1.0], [0, 0, 1.0]])
tf_log = torch.log(y)
pixel_wise_mult = -y_*tf_logprint(torch.sum(pixel_wise_mult,axis=1))
梯度计算
requires_grad=True 要求计算梯度
requires_grad=False 不要求计算梯度
with torch.no_grad()或者@torch.no_grad()中的数据不需要计算梯度,也不会进行反向传播
梯度
当我们想对某个变量求导数时
x = torch.tensor(1., requires_grad=True) # 第二种
参数不更新
class Model(nn.Module):def __init__(self):super(Transfer_model, self).__init__()self.linear1 = nn.Linear(20, 50)self.linear2 = nn.Linear(50, 20)self.linear3 = nn.Linear(20, 2)
model = Model()
# 使用linear1层的参数不更新
for para in model.linear1.parameters():para.requires_grad = False
# 假如真的只有一层也可以这样操作:
# model.linear1.weight.requires_grad = False
#看到对应模型的名字
for name, param in model.named_parameters():print(name)
torch.addcmul_
https://guoyuantao.github.io/2019/06/23/pytorch-xue-xi-zhi-torch-shu-xue-cao-zuo-yi/
torch转为numpy
tensor.cpu().detach().numpy()
numpy转为torch
numpy.cuda()
给模型加参数
https://blog.csdn.net/u011501388/article/details/100016577
模型训练参数清零
pyTorch中在反向传播前为什么要手动将梯度清零?
pytorch不进行梯度清零操作,要想进行权重更新,则先需要进行梯度计算。
torch的cuda版本
torch.version.cuda
torch.softmax
可见默认按行计算,即dim=1
torch.nn.Softmax
https://blog.csdn.net/nefetaria/article/details/114411953
@和*
@表示矩阵相乘
*表示矩阵对应元素相乘
torch中的parameters
https://zhuanlan.zhihu.com/p/119305088
torch.nn.Embedding
一般用在自然语言处理中
torch 不同的学习率
torch依据不同层设置不同的学习率
https://blog.csdn.net/qq_17464457/article/details/101846874
torch.stack
通过竖排形式拼接向量
torch.split
1表示占一列,dim=1表示使用列维度进行划分
torch.split(features,1,dim=1)
torch损失函数
torch 自带的损失函数与交叉熵损失还有一定的区别。
https://www.jb51.net/article/177665.htm
torch权重分割
#############无用###############################################tweights = []for k in range(0,weights.shape[1]):# print("(weights[:,k]-weights[:,k-1]).tolist()",(weights[:,k]-weights[:,k-1]).tolist())# if k>2:# tweights.append((weights[:,k]-weights[:,k-1]).tolist())# else:# tweights.append((weights[:,k]).tolist())tweights.append((weights[:,k].tolist()))# print("torch.Tensor(tweights)",torch.Tensor(tweights))tweights = torch.Tensor(tweights).T.cuda()##############有用############################################### tweights = []# for tb in torch.split(weights,1,dim=1):# tweights.append(tb)# tweights = torch.cat(tweights,axis=-1)# print("weights",weights)# print("tweights",tweights)############################################################
返回Tensor中指定值对应的元素索引
a = torch.Tensor([1,2,3,4,5,2])
(a==2).nonzero() #非0元素对应的索引值
torch_sparse
a =  torch.Tensor([[0,0,1],[1,0,1],[1,0,0]])
#此处有代码问题,做以参考
torch_sparse.to_torch_sparse(a.to_sparse())
torch_sparse.to_torch_sparse(index=torch.Tensor([[0, 1, 1, 2],[2, 0, 2, 0]]), value=torch.Tensor([1., 1., 1., 1]),m=3,n=3)
#下面的做以参考
adj = adj.to_sparse()
rows = torch.cat([ey_row,adj.coalesce().indices()[0]]).long()
cols = torch.cat([ey_col,adj.coalesce().indices()[1]]).long()
values = torch.cat([torch.Tensor([1]*len(ey_index)),adj.coalesce().values()])
adj = SparseTensor(row=rows, col=cols, value=values,sparse_sizes=adj.coalesce().size())
获取稀疏向量中的值
tdata.coalesce().indices()
模型参数量统计
num_params = sum(param.numel() for param in model.parameters())
print("statistical model parameters", num_params)
torch 可视化网络
https://blog.csdn.net/CFH1021/article/details/105359587/
torch取Tensor中的值
Tensor.item()


