当使用 Spring Boot 进行数据访问时,我们可以选择使用 MyBatis 或 JPA(Java Persistence API)来实现增删改查操作。下面我将分别给出使用这两种方式整合数据访问的详细步骤和示例,同时结合 Thymeleaf 实现数据展现。
方式一: 使用 MyBatis 进行数据访问
步骤 1: 创建 Spring Boot 项目 首先,我们需要创建一个 Spring Boot 项目。您可以使用 Spring Initializr(https://start.spring.io/)创建一个新的项目,选择所需的依赖项和构建工具(如 Maven 或 Gradle)。
步骤 2: 添加依赖项 在项目的 pom.xml 文件中,添加 MyBatis 和相关的依赖项:
<dependencies>
    <!-- Spring Boot Web -->
    <dependency>
        <groupId>org.springframework.boot</groupId>
        <artifactId>spring-boot-starter-web</artifactId>
    </dependency>

    <!-- MyBatis -->
    <dependency>
        <groupId>org.mybatis.spring.boot</groupId>
        <artifactId>mybatis-spring-boot-starter</artifactId>
        <version>2.2.0</version>
    </dependency>

    <!-- H2 Database (可选,用于示例) -->
    <dependency>
        <groupId>com.h2database</groupId>
        <artifactId>h2</artifactId>
        <scope>runtime</scope>
    </dependency>
</dependencies>
步骤 3: 创建数据库和模拟数据 在此示例中,我们将使用 H2 数据库,并创建一个 users 表来存储用户数据。在 src/main/resources 目录下创建一个名为 schema.sql 的文件,并添加以下内容:
CREATE TABLE users (
    id bigint AUTO_INCREMENT PRIMARY KEY,
    name VARCHAR(100),
    email VARCHAR(100)
);

INSERT INTO users (id, name, email) VALUES (1, 'Alice', 'alice@example.com');
INSERT INTO users (id, name, email) VALUES (2, 'Bob', 'bob@example.com');
这将创建一个名为 users 的表,并插入两条模拟数据。
并在application.properties中添加数据源的配置信息:
spring.datasource.url=jdbc:h2:tcp://localhost/~/test
spring.datasource.username=sa
spring.datasource.password=
spring.datasource.driver-class-name=org.h2.Driver
步骤 4: 创建实体类和 MyBatis 映射接口 在 src/main/java 目录下的domain包下创建一个名为 User.java 的实体类,表示用户对象,代码如下:
public class User {
    private Long id;
    private String name;
    private String email;

    // Getters and setters
}
我们可以在dao包下面创建一个名为 UserMapper.java 的接口,定义 MyBatis 的映射方法,代码如下:
import org.apache.ibatis.annotations.*;

import java.util.List;

@Mapper
public interface UserMapper {
    @Select("SELECT * FROM users")
    List<User> findAll();

    @Select("SELECT * FROM users WHERE id = #{id}")
    User findById(@Param("id") Long id);

    @Insert("INSERT INTO users( name, email) VALUES ( #{name}, #{email})")
    @Options(useGeneratedKeys = true, keyProperty = "id")
    void save(User user);

    @Update("UPDATE users SET name = #{name}, email = #{email} WHERE id = #{id}")
    void update(User user);

    @Delete("DELETE FROM users WHERE id = #{id}")
    void deleteById(@Param("id") Long id);
}
这里使用了 MyBatis 的注解方式进行 SQL 映射。
步骤 5: 创建服务类和控制器类 在service包下创建一个名为 UserService.java 的服务类,用于处理用户数据的增删改查操作,代码如下:
@Service
public class UserService {

    @Autowired
    private final UserMapper userMapper;

    public List<User> findAll() {
        return userMapper.findAll();
    }

    public User findById(Long id) {
        return userMapper.findById(id);
    }

    public void save(User user) {
        userMapper.save(user);
    }

    public void update(User user) {
        userMapper.update(user);
    }

    public void deleteById(Long id) {
        userMapper.deleteById(id);
    }
}
接下来,创建一个名为 UserController.java 的控制器类,用于处理用户相关的 HTTP 请求,代码如下:
@Controller
public class UserController {
    @Autowired
    private UserService userService;

    @GetMapping("/")
    public String index(Model model) {
        List<User> users = userService.findAll();
        model.addAttribute("users", users);
        return "index";
    }

    @GetMapping("/user/{id}")
    public String getUser(@PathVariable Long id, Model model) {
        User user = userService.findById(id);
        model.addAttribute("user", user);
        return "user";
    }

    @GetMapping("/user/create")
    public String createUserForm(Model model) {
        model.addAttribute("user", new User());
        return "create_user";
    }

    @PostMapping("/user/create")
    public String createUser(@ModelAttribute User user) {
        userService.save(user);
        return "redirect:/";
    }

    @GetMapping("/user/edit/{id}")
    public String editUserForm(@PathVariable Long id, Model model) {
        User user = userService.findById(id);
        model.addAttribute("user", user);
        return "edit_user";
    }

    @PostMapping("/user/edit/{id}")
    public String editUser(@PathVariable Long id, @ModelAttribute User user) {
        user.setId(id);
        userService.update(user);
        return "redirect:/";
    }

    @GetMapping("/user/delete/{id}")
    public String deleteUser(@PathVariable Long id) {
        userService.deleteById(id);
        return "redirect:/";
    }
}
步骤 6: 创建 Thymeleaf 模板 在 src/main/resources/templates 目录下创建以下 Thymeleaf 模板文件:
-
index.html:
<!DOCTYPE html>
<html xmlns:th="http://www.thymeleaf.org">
<head>
    <meta charset="UTF-8">
    <title>用户列表</title>
</head>
<body>
    <h1>用户列表</h1>
    <table>
        <tr>
            <th>ID</th>
            <th>Name</th>
            <th>Email</th>
            <th>操作</th>
        </tr>
        <tr th:each="user : ${users}">
            <td th:text="${user.id}"></td>
            <td th:text="${user.name}"></td>
            <td th:text="${user.email}"></td>
            <td>
                <a th:href="@{/user/{id}(id=${user.id})}">查看</a>
                <a th:href="@{/user/edit/{id}(id=${user.id})

}">编辑</a>
                <a th:href="@{/user/delete/{id}(id=${user.id})}">删除</a>
            </td>
        </tr>
    </table>
    <a th:href="@{/user/create}">新增</a>
</body>
</html>
-
user.html:
<!DOCTYPE html>
<html xmlns:th="http://www.thymeleaf.org">
<head>
    <meta charset="UTF-8">
    <title>查看用户</title>
</head>
<body>
    <h1>用户信息</h1>
    <p>ID: <span th:text="${user.id}"></span></p>
    <p>Name: <span th:text="${user.name}"></span></p>
    <p>Email: <span th:text="${user.email}"></span></p>
    <a th:href="@{/}">返回</a>
</body>
</html>
-
create_user.html:
<!DOCTYPE html>
<html xmlns:th="http://www.thymeleaf.org">
<head>
    <meta charset="UTF-8">
    <title>创建用户</title>
</head>
<body>
    <h1>创建用户</h1>
    <form th:action="@{/user/create}" th:object="${user}" method="post">
        <label for="name">Name:</label>
        <input type="text" id="name" th:field="*{name}">
        <br>
        <label for="email">Email:</label>
        <input type="text" id="email" th:field="*{email}">
        <br>
        <input type="submit" value="Create">
    </form>
    <a th:href="@{/}">Back</a>
</body>
</html>
-
edit_user.html:
<!DOCTYPE html>
<html xmlns:th="http://www.thymeleaf.org">
<head>
    <meta charset="UTF-8">
    <title>编辑用户</title>
</head>
<body>
    <h1>编辑用户</h1>
    <form th:action="@{/user/edit/{id}(id=${user.id})}" th:object="${user}" method="post">
        <label for="name">Name:</label>
        <input type="text" id="name" th:field="*{name}">
        <br>
        <label for="email">Email:</label>
        <input type="text" id="email" th:field="*{email}">
        <br>
        <input type="submit" value="Update">
    </form>
    <a th:href="@{/}">返回</a>
</body>
</html>
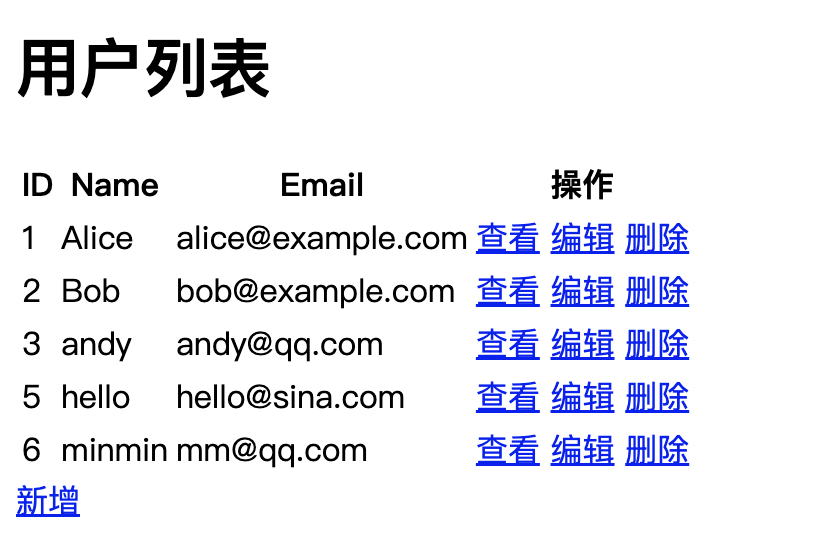
步骤 7: 运行和测试 现在,您可以运行该应用程序,并访问 http://localhost:8080 查看用户列表。您可以通过点击“查看”、“编辑”和“删除”链接来查看、编辑和删除用户。
-
列表页示例如下: 
方式二: 使用 JPA 进行数据访问
需要在pom.xml中添加相应的依赖如下:
-
pom.xml
  <dependency>
   <groupId>org.springframework.boot</groupId>
   <artifactId>spring-boot-starter-data-jpa</artifactId>
  </dependency>
-
在repository包,创建一个名为
UserRepository.java的接口,继承自JpaRepository,代码如下: -
UserRepository.java
import org.springframework.data.jpa.repository.JpaRepository;

public interface UserRepository extends JpaRepository<User, Long> {
}
-
在涉及到的实体对象中要添加相应的配置 @Entity , @Id, @GeneratedValue,代码如下:
-
User.java
@Entity(name = "users")
public class User {
    @Id
    @GeneratedValue(strategy = GenerationType.IDENTITY)
    private Long id;
-
然后在service的服务类中注入这个 UserRepository,调用这个bean来进行对数据的操作就可以,参考如下: -
UserService.java
    @Autowired
    private UserRepository userRepository;
-
其他的代码信息与上一个方式一样的。
同学们可以参考这些步骤和示例来理解并掌握 Spring Boot 数据访问的基本操作和 Thymeleaf 的语法,要掌握,重中之重在于多动手练习。
本文由 mdnice 多平台发布


