目录
🌴一、阻塞队列
1.概念
2.生产者消费者模型
3.阻塞队列的实现
🏹二、定时器
1.引出定时器
2.定时器的实现
🔥三、线程池
1.引出线程池
2.ThreadPoolExecutor 构造方法
3.标准数据库的4种拒绝策略【经典面试题】【重点掌握】
4.线程池的实现
🌴一、阻塞队列
1.概念
✨对于队列,首先我们想到 队列——先进先出——最朴素,最简单的队列 优先级队列—— PriorityQueue——堆
阻塞队列——带有阻塞特性——先进先出
1.如果队列空,尝试出队列,就会阻塞等待,等待到队列不为空为止
2.如果队列满,尝试入队列,也会阻塞等待,等待到队列不为满为止
在 Java 标准库中内置了阻塞队列
1️⃣BlockingQueue 是一个接口. 真正实现的类是 LinkedBlockingQueue.
2️⃣put 方法用于阻塞式的入队列
3️⃣take 用于阻塞式的出队列
public class ThreadDemo3 {public static void main(String[] args) throws InterruptedException {BlockingDeque<String> queue = new LinkedBlockingDeque<>();//阻塞队列和新方法,主要有两个//1.put 入队列queue.put("hello1");queue.put("hello2");queue.put("hello3");queue.put("hello4");queue.put("hello5");//2.take 出队列String result = null;result = queue.take();System.out.println(result);result = queue.take();System.out.println(result);result = queue.take();System.out.println(result);result = queue.take();System.out.println(result);result = queue.take();System.out.println(result);result = queue.take();System.out.println(result);}
}
结果:上述代码中,put 了5次,take 了6次,前5次 take 都很顺利,第六次 take 就阻塞了
2.生产者消费者模型
编写一个“生产者消费者模型”多线程使用阻塞队列
生产者消费者模型主要解决两个方面的问题:
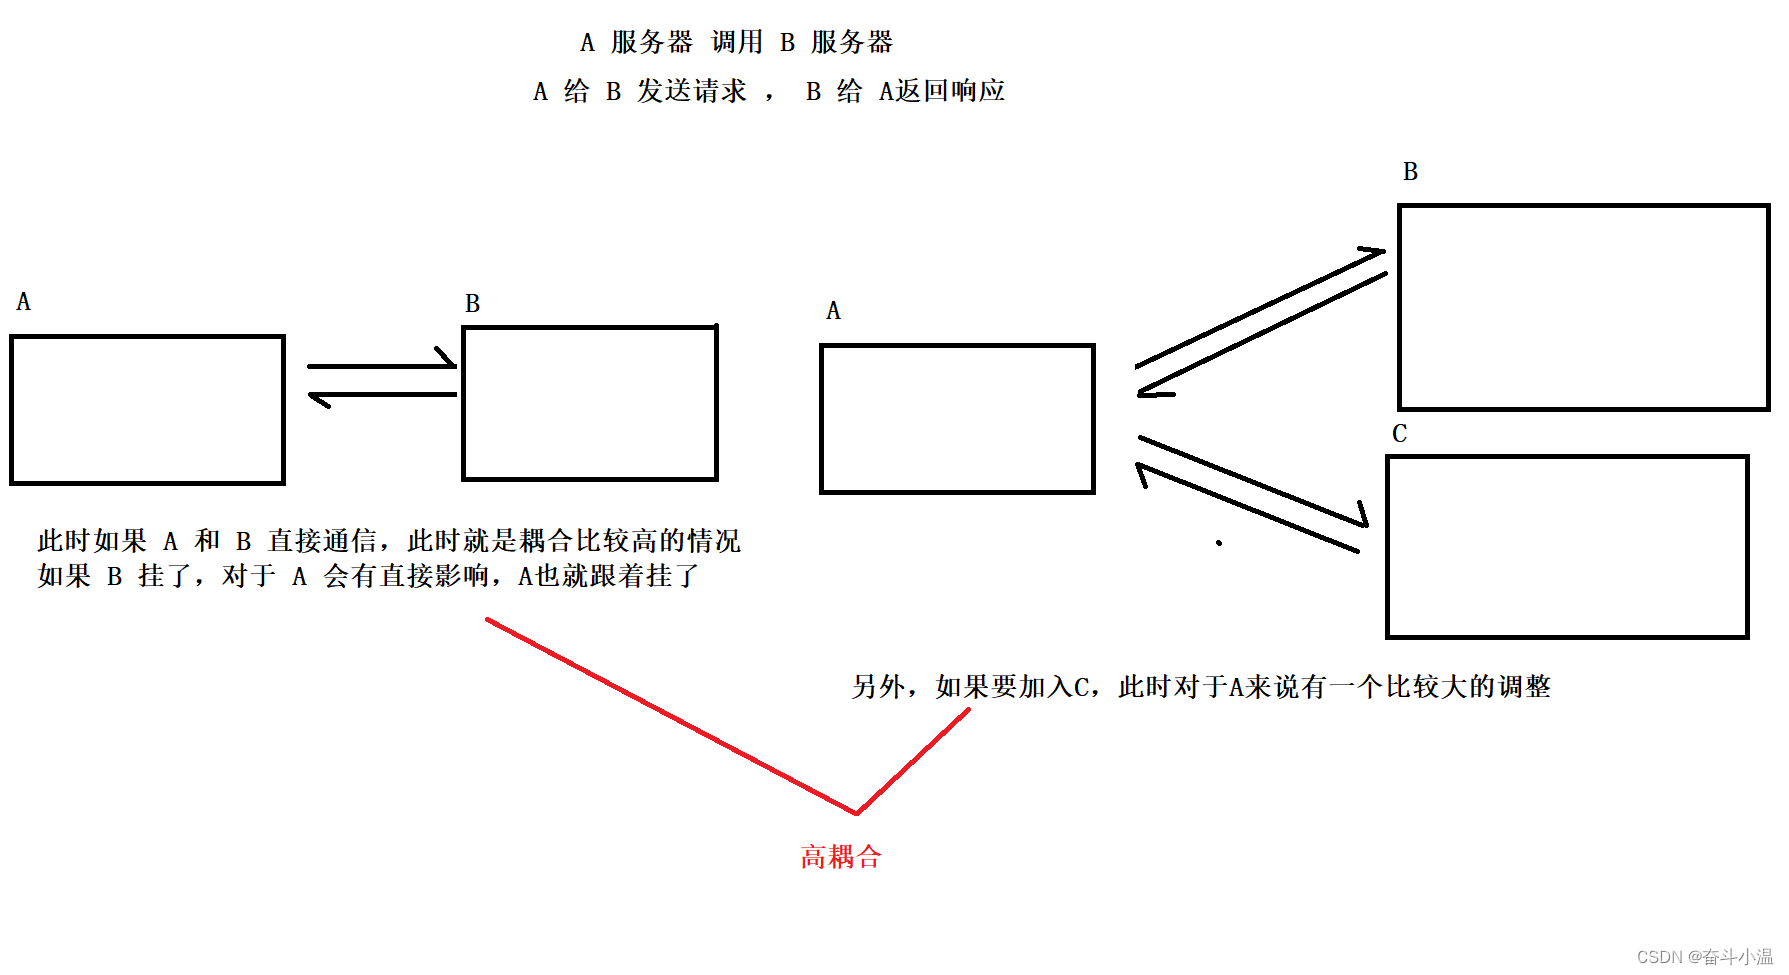
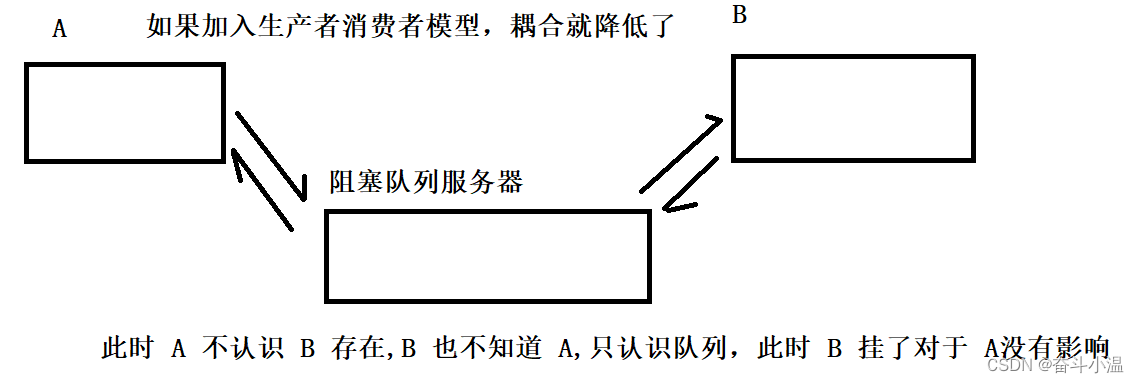
1️⃣可以让上下游块之间,进行更好的“解耦合”——(耦合——低内聚、高内聚——两个模块之间的关联关系是强还是弱,关联越强,耦合越高)
低内聚——相互关联的代码没有放到一起
高内聚——相关联的代码,分门别类的规制起来,想找很容易
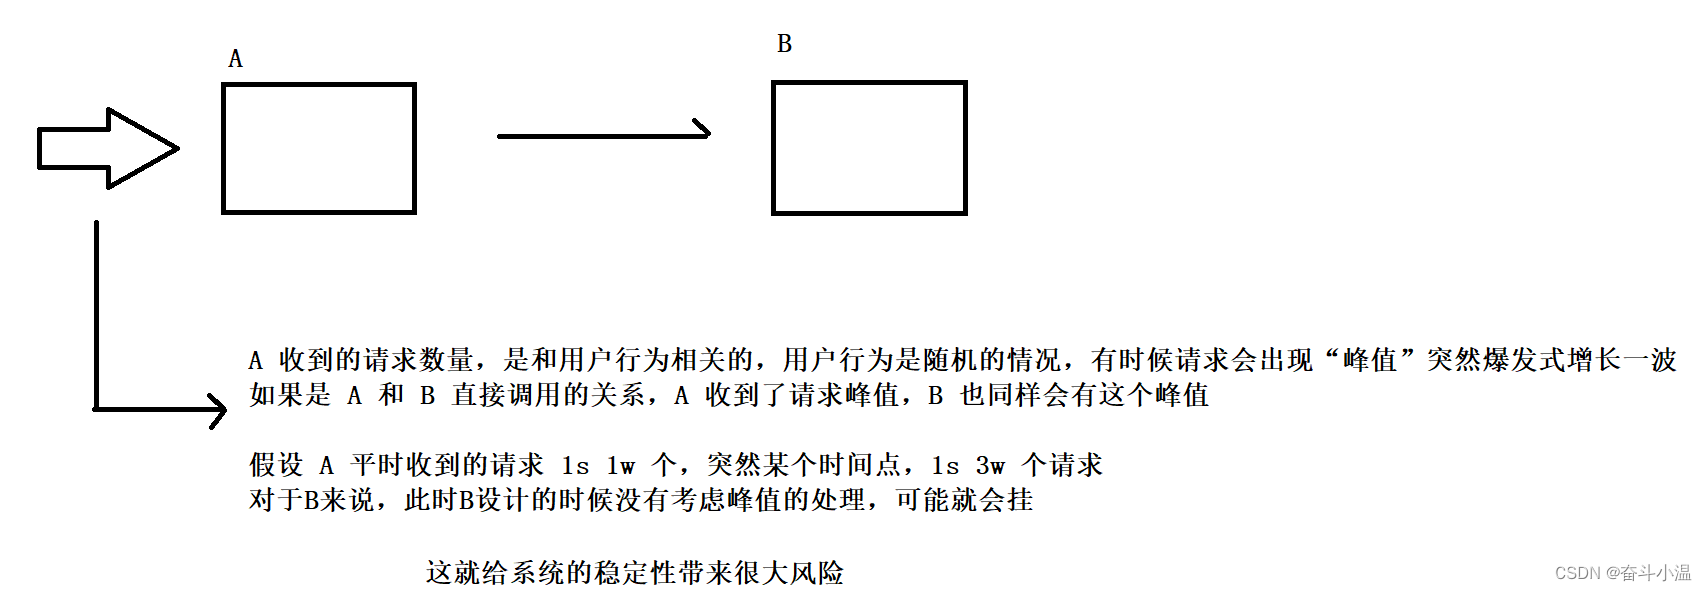
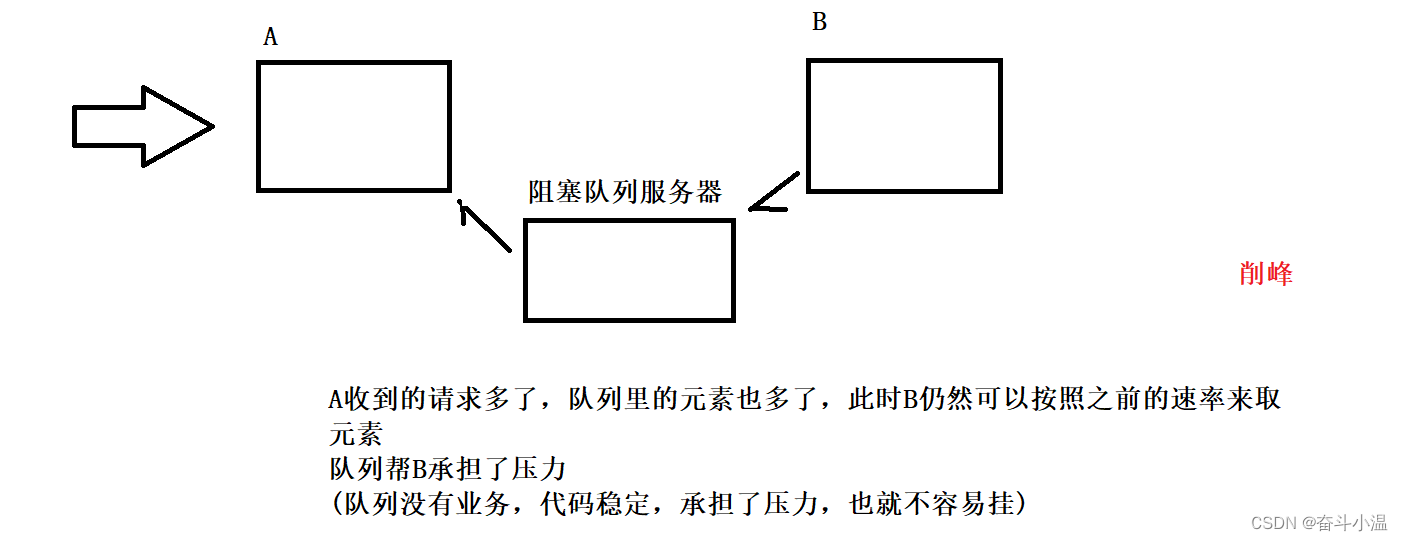
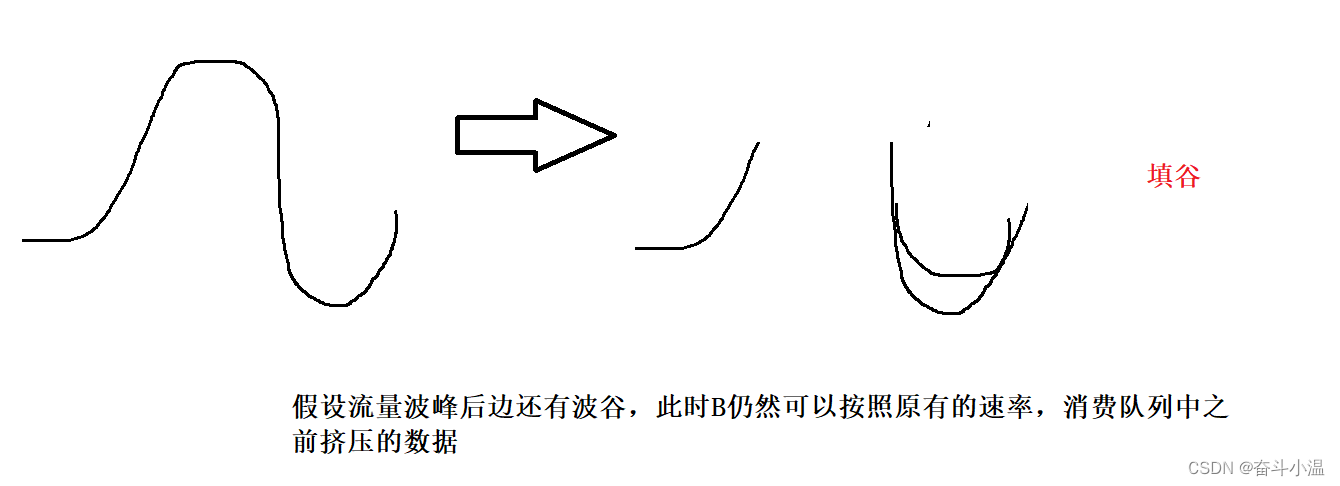
2️⃣ 削峰填谷
public class ThreadDemo4 {public static void main(String[] args) {BlockingDeque<Integer> blockingDeque = new LinkedBlockingDeque<>();//消费者Thread t1 = new Thread(() -> {while (true) {try {int value = blockingDeque.take();System.out.println("消费元素:" + value);} catch (InterruptedException e) {e.printStackTrace();}}});t1.start();//生产者Thread t2 = new Thread(() -> {int value = 0;while (true) {try {System.out.println("生产元素:" + value);blockingDeque.put(value);value++;Thread.sleep(1000);} catch (InterruptedException e) {e.printStackTrace();}}});t2.start();//上述代码,让生产者每隔 1s 生产一个元素//让消费者直接消费,不受限制}
}//生产元素:0
//消费元素:0
//生产元素:1
//消费元素:1
//生产元素:2
//消费元素:2
//生产元素:3
//消费元素:3
//...
3.阻塞队列的实现
❓针对 BlockingQueue 使用恼火的是比较简单的,重点如何实现一个阻塞队列
实现阻塞队列,分三步:
1.先实现一个普通队列
2.加上线程安全
3.加上阻塞功
❓如何区分队列满和队列空?
队列空式,head 和 tail 重合(初始情况);队列满,head 和 tail 也重合
1.浪费一个空间
2.记录元素个数(获取队列中元素的个数,本身就是队列的一个重要的方法)BlockingQueue, 没有实现取队首元素的阻塞版本,只有 put 和 take,虽然也提供 peek 方法,但是这个方法不会阻塞
//模拟实现一个阻塞队列//不写泛型,就直接写朴素的代码,假定存储的元素是 int
//基于数组来实现队列//记录元素个数//BlockingQueue,没有实现取队首元素的阻塞版本,只有 put 和 take,虽然也有 peek,但是这个方法不会阻塞
class MyBlockingQueue {private  int[] items = new int[1000];//约定 [head,tail) 队列的有效元素volatile private int head = 0;//指向队首元素下标volatile private int tail = 0;//指向队尾元素下标volatile private int size = 0;//入队列synchronized public void put(int elem) throws InterruptedException {if (size == items.length) {//队列满了,插入失败//return;this.wait();}//把新元素放到 tail 所在位置上items[tail] = elem;tail++;//万一 tail 达到末尾,就需要让 tail 从头再来if (tail == items.length) {tail = 0;}//tail = tail % items.length;//这个写法也可以达到效果,不推荐,这样写开发效率不好,执行效率也不好//求余操作不直观,求余对于计算机并不是高效率操作,没有 if 来的快this.notify();//唤醒出队列size++;}//出队列synchronized public Integer take() throws InterruptedException {if (size == 0) {//return null;this.wait();}int value = items[head];head++;if (head == items.length) {head = 0;}size--;this.notify();//唤醒入队列return value;}}
❗❗注意:上述两个代码的 wait 不可能同时阻塞!!!一个独立不可能即是空,又是满
✨java官方并不建议这么使用 wait,wait可能会导致其他方法给中断的(interrupt 方法),此时 wait 其实等待的条件还没有成熟,就被提前唤醒了,因此代码就可能不符合预期了
if (size == items.length) {//队列满了,插入失败//return;this.wait();}❗❗很有可能在别的代码里暗中 interrupt ,把 wait 给提前唤醒了,明明条件还没有满足(队列非空),但是 wait 唤醒之后就继续往下走了
当然,当前代码中,没有 interrupt ,但是一个更复杂的项目,就不能保证没有了,更稳妥的做法,是在 wait 唤醒之后,在判定一次条件wait 之前,发现条件不满足,开始 wait;然后等到 wait 被唤醒了之后,再确认一下条件是不是满足,如果不满足,还可以继续 wait
改为 while 循环:
while (size == items.length) {//队列满了,插入失败//return;this.wait();}最终阻塞队列代码的实现:
//模拟实现一个阻塞队列//不写泛型,就直接写朴素的代码,假定存储的元素是 int
//基于数组来实现队列//记录元素个数//BlockingQueue,没有实现取队首元素的阻塞版本,只有 put 和 take,虽然也有 peek,但是这个方法不会阻塞
class MyBlockingQueue {private  int[] items = new int[1000];//约定 [head,tail) 队列的有效元素volatile private int head = 0;//指向队首元素下标volatile private int tail = 0;//指向队尾元素下标volatile private int size = 0;//入队列synchronized public void put(int elem) throws InterruptedException {while (size == items.length) {//队列满了,插入失败//return;this.wait();}//把新元素放到 tail 所在位置上items[tail] = elem;tail++;//万一 tail 达到末尾,就需要让 tail 从头再来if (tail == items.length) {tail = 0;}//tail = tail % items.length;//这个写法也可以达到效果,不推荐,这样写开发效率不好,执行效率也不好//求余操作不直观,求余对于计算机并不是高效率操作,没有 if 来的快this.notify();//唤醒出队列size++;}//出队列synchronized public Integer take() throws InterruptedException {if (size == 0) {//return null;this.wait();}int value = items[head];head++;if (head == items.length) {head = 0;}size--;this.notify();//唤醒入队列return value;}}//上述两个代码的 wait 不可能同时阻塞!!!一个独立不可能即是空,又是满public class ThreadDemo1 {public static void main(String[] args) {MyBlockingQueue queue = new MyBlockingQueue();//消费者Thread t1 = new Thread(() -> {while (true) {try {int value = queue.take();System.out.println("消费:" + value);} catch (InterruptedException e) {e.printStackTrace();}}});//生产者Thread t2 = new Thread(() -> {int value = 0;while (true) {try {System.out.println("生产:" + value);queue.put(value);Thread.sleep(1000);value++;} catch (InterruptedException e) {e.printStackTrace();}}});t1.start();t2.start();}
}
🏹二、定时器
1.引出定时器
定时器:设定一个时间,当时间到,就可以执行一个指定的代码
Timer timer = new Timer();timer.schedule(new TimerTask() {@Overridepublic void run() {System.out.println("hello");}},2000);标准库中提供了一个 Timer 类. Timer 类的核心方法为 schedule .schedule 包含两个参数. 第一个参数指定即将要执行的任务代码, 第二个参数指定多长时间之后 执行 (单位为毫秒).
Timer timer = new Timer();timer.schedule(new TimerTask() {@Overridepublic void run() {System.out.println("hello4");}},4000);timer.schedule(new TimerTask() {@Overridepublic void run() {System.out.println("hello3");}},3000);timer.schedule(new TimerTask() {@Overridepublic void run() {System.out.println("hello2");}},2000);timer.schedule(new TimerTask() {@Overridepublic void run() {System.out.println("hello1");}},1000);System.out.println("hello0");}此时发现这个代码打印:
hello0
hello1
hello2
hello3
hello4并且这个代码没有结束,是因为 Timer 里边内置了线程(还是前台线程),会阻止进程结束
2.定时器的实现
1.定时器的构成: 一个带优先级的阻塞队列
为啥要带优先级呢?因为阻塞队列中的任务都有各自的执行时刻 (delay). 最先执行的任务一定是 delay 最小的. 使用带优先级的队列就可以高效的把这个 delay 最小的任务找出来.
1️⃣Timer 类提供的核心接口为 schedule, 用于注册一个任务, 并指定这个任务多长时间后执行.
public class Timer {public void schedule(Runnable runnable, long delay) {}
}2️⃣Task 类用于描述一个任务(作为 Timer 的内部类). 里面包含一个 Runnable 对象和一个 time (毫秒时间戳)
这个对象需要放到 优先队列 中. 因此需要实现 Comparable 接口.
//表示一个任务
class MyTask implements Comparable<MyTask>{public Runnable runnable;//为了方便后续判断,使用绝对的时间戳public long time;public MyTask(Runnable runnable,long delay) {this.runnable = runnable;//取当前时间的时间戳 + delay,作为读任务实际执行的时间戳this.time = System.currentTimeMillis() + delay;}@Overridepublic int compareTo(MyTask o) {//这样写意味着每次取出的是时间最小的元素return (int)(this.time - o.time);}
}
3️⃣Timer 实例中, 通过 PriorityBlockingQueue 来组织若干个 Task 对象. 通过 schedule 来往队列中插入一个个 Task 对象.
class MyTimer {//带有优先级的阻塞队列,核心数据结构private PriorityBlockingQueue<MyTask> queue = new PriorityBlockingQueue<>();//此处的 delay 是一个形如 3000 这样的数字(多长时间之后,执行读任务)public void schedule(Runnable runnable, long delay) {//根据参数,构造 MyTask,插入队列即可MyTask myTask = new MyTask(runnable, delay);queue.put(myTask);//入队列}
}4️⃣Timer 类中存在一个 myTask 线程, 一直不停的扫描队首元素, 看看是否能执行这个任务.
class MyTimer {//带有优先级的阻塞队列,核心数据结构private PriorityBlockingQueue<MyTask> queue = new PriorityBlockingQueue<>();//此处的 delay 是一个形如 3000 这样的数字(多长时间之后,执行读任务)public void schedule(Runnable runnable, long delay) {//根据参数,构造 MyTask,插入队列即可MyTask myTask = new MyTask(runnable, delay);queue.put(myTask);//入队列}//在这里构造线程,负责执行具体任务public MyTimer() {Thread t = new Thread(() -> {while (true) {try {//阻塞队列,只有阻塞入队列和阻塞出队列,没有阻塞的查看队首元素,因此出队列之后时间没到就需要重新入队列MyTask myTask = queue.take();//出队列//去队列中取元素 1.当前队列为空,take直接阻塞,2.队列有元素,直接获取到long curTime = System.currentTimeMillis();//获取系统时间if (myTask.time <= curTime) {//时间到了,可以执行任务myTask.runnable.run();} else {//时间还没到,就把刚才取出来的任务,重新塞回到队列中queue.put(myTask);//时间没到,入队列//时间没到需要加入一个等待,避免忙等   不适合用sleep,不方便唤醒,使用 wait,可以随时唤醒             }} catch (InterruptedException e) {e.printStackTrace();}}});t.start();}
}5️⃣引入一个 locker 对象, 借助该对象的 wait / notify 来解决 while (true) 的忙等问题.
class Timer {// 存在的意义是避免 worker 线程出现忙等的情况private Object locker = new Object();
}
引入 wait, 等待一定的时间.
//在这里构造线程,负责执行具体任务public MyTimer() {Thread t = new Thread(() -> {while (true) {try {//阻塞队列,只有阻塞入队列和阻塞出队列,没有阻塞的查看队首元素,因此出队列之后时间没到就需要重新入队列synchronized (locker) {MyTask myTask = queue.take();//出队列//去队列中取元素 1.当前队列为空,take直接阻塞,2.队列有元素,直接获取到long curTime = System.currentTimeMillis();//获取系统时间if (myTask.time <= curTime) {//时间到了,可以执行任务myTask.runnable.run();} else {//时间还没到,就把刚才取出来的任务,重新塞回到队列中queue.put(myTask);//时间没到,入队列//时间没到需要加入一个等待,避免忙等 不适合用sleep,不方便唤醒,使用 wait,可以随时唤醒locker.wait(myTask.time - curTime);//等待需要搭配锁//使用notify唤醒之后,重新获取队首元素}}} catch (InterruptedException e) {e.printStackTrace();}}});t.start();}修改 Timer 的 schedule 方法, 每次有新任务到来的时候唤醒一下线程. (因为新插入的任务可能 是需要马上执行的).
public void schedule(Runnable runnable, long delay) {//根据参数,构造 MyTask,插入队列即可MyTask myTask = new MyTask(runnable, delay);queue.put(myTask);//入队列synchronized (locker) {locker.notify();//唤醒正在 wait 的方法}}完整代码:
//表示一个任务
class MyTask implements Comparable<MyTask>{public Runnable runnable;//为了方便后续判断,使用绝对的时间戳public long time;public MyTask(Runnable runnable,long delay) {this.runnable = runnable;//取当前时间的时间戳 + delay,作为读任务实际执行的时间戳this.time = System.currentTimeMillis() + delay;}@Overridepublic int compareTo(MyTask o) {//这样写意味着每次取出的是时间最小的元素return (int)(this.time - o.time);}
}class MyTimer {//带有优先级的阻塞队列,核心数据结构private PriorityBlockingQueue<MyTask> queue = new PriorityBlockingQueue<>();//创建一个锁对象private Object locker = new Object();//此处的 delay 是一个形如 3000 这样的数字(多长时间之后,执行读任务)public void schedule(Runnable runnable, long delay) {//根据参数,构造 MyTask,插入队列即可MyTask myTask = new MyTask(runnable, delay);queue.put(myTask);//入队列synchronized (locker) {locker.notify();//唤醒正在 wait 的方法}}//在这里构造线程,负责执行具体任务public MyTimer() {Thread t = new Thread(() -> {while (true) {try {//阻塞队列,只有阻塞入队列和阻塞出队列,没有阻塞的查看队首元素,因此出队列之后时间没到就需要重新入队列synchronized (locker) {MyTask myTask = queue.take();//出队列//去队列中取元素 1.当前队列为空,take直接阻塞,2.队列有元素,直接获取到long curTime = System.currentTimeMillis();//获取系统时间if (myTask.time <= curTime) {//时间到了,可以执行任务myTask.runnable.run();} else {//时间还没到,就把刚才取出来的任务,重新塞回到队列中queue.put(myTask);//时间没到,入队列//时间没到需要加入一个等待,避免忙等   不适合用sleep,不方便唤醒,使用 wait,可以随时唤醒locker.wait(myTask.time - curTime);//等待需要搭配锁//使用notify唤醒之后,重新获取队首元素}}} catch (InterruptedException e) {e.printStackTrace();}}});t.start();}
}public class ThreadDemo2 {public static void main(String[] args) {//System.out.println(System.currentTimeMillis());MyTimer myTimer = new MyTimer();Timer timer = new Timer();timer.schedule(new TimerTask() {@Overridepublic void run() {System.out.println("hello4");}},4000);timer.schedule(new TimerTask() {@Overridepublic void run() {System.out.println("hello3");}},3000);timer.schedule(new TimerTask() {@Overridepublic void run() {System.out.println("hello2");}},2000);timer.schedule(new TimerTask() {@Overridepublic void run() {System.out.println("hello1");}},1000);System.out.println("hello0");}
}
🔥三、线程池
1.引出线程池
线程池:提前把线程准备好,创建线程不是直接从系统申请,而是从池子里获取,线程不使用之后,还给线程池 (池的目的是为了提高效率)
线程的创建,虽然比进程轻量,但是频繁创建的情况下,开销也是不可忽略的,需要提高效率
1️⃣协程(轻量级线程) java 标准库不支持2️⃣线程池
从线程池里那线程,纯粹的用户操作
从系统创建线程,涉及到用户态和内核态之间的切换,正真的创建时要在内核态完成
拓展:用户态、内核态、操作系统一个操作系统 = 内核 + 配套的应用程序
内核:操作系统最核心的功能模块集合 硬件管理,各种驱动,进程管理,内存管理,文件系统...
内核需要给上层应用程序提供支持应用程序,同一时刻有很多,但是内核只有一个人,内核要给这么多程序提供服务,有的时候服务不一定那么及时
结论:纯用户态操作,时间是可控的,涉及到内核操作,时间就不太可控了
❓简述线程池有什么优点?
1️⃣降低资源消耗:减少线程的创建和销毁带来的性能开销。
2️⃣提高响应速度:当任务来时可以直接使用,不用等待线程创建
3️⃣可管理性: 进行统一的分配,监控,避免大量的线程间因互相抢占系统资源导致的阻塞现象。
✨标准库中的线程池
使用 Executors.newFixedThreadPool(10) 能创建出固定包含 10 个线程的线程池.返回值类型为 ExecutorService通过 ExecutorService.submit 可以注册一个任务到线程池中.
//线程池ExecutorService pool = Executors.newFixedThreadPool(10);//添加任务到线程中pool.submit(new Runnable() {@Overridepublic void run() {System.out.println("hello");}});//线程池ExecutorService pool = Executors.newFixedThreadPool(10);此处并非是直接 new ExecutorService 对象,而是通过 Executors 类 里边的静态方法完成对象的构造———“工厂模式”
“工厂模式”:创建对象,不再是直接 new ,而是使用一些其他方法(通常是静态方法)协助把对象创建出来
工厂模式 是用来填构造方法的坑的 (如果要想要提供多种不同的构造方法,就得基于 “重载”)
📖Executors 创建线程池的几种方式:
newFixedThreadPool: 创建固定线程数的线程池newCachedThreadPool: 创建线程数目动态增长的线程池.newSingleThreadExecutor: 创建只包含单个线程的线程池.newScheduledThreadPool: 设定 延迟时间后执行命令,或者定期执行命令. 是进阶版的 Timer.
✅Executors 本质上是 ThreadPoolExecutor 类的封装.
2.ThreadPoolExecutor 构造方法

ThreadPoolExecutor(int corePoolSize, int maximumPoolSize, long keepAliveTime, TimeUnit unit, BlockingQueue<Runnable> workQueue, ThreadFactory threadFactory, RejectedExecutionHandler handler)
创建一个新 ThreadPoolExecutor给定的初始参数。corePoolSize:核心线程数(正式员工———签了劳动合同,不能随意辞退)
maximumPoolSize:最大线程数(正式+实习生——不签劳动合同,这是实习合同,随时可以辞退)
如果当前任务比较多,线程池就会多创建一些“临时线程”
如果当前任务少,比较空闲,线程池就会把多出来的临时工线程销毁掉(正式员工还是会保留)
long keepAliveTime(数值)/TimeUnit unit(单位) :keep保持,alive存活 当任务少的时候,整体空闲的时候,实习生不是立即被辞退,描述了实习生线程允许的最大摸鱼时间
BlockingQueue<Runnable> workQueue:线程池里要管理的任务很多,这些任务也是通过阻塞队列来组织,程序员可以手动指定线程池一个队列,此时程序员就很方便的可以控制/获取队列中的信息,submit 方法就是把任务放到该队列中
ThreadFactory threadFactory:创建线程的一个辅助类
RejectedExecutionHandler handler:线程池的拒绝策略,如果线程池,池子满了,继续往里添加任务,如何进行拒绝
3.标准数据库的4种拒绝策略【经典面试题】【重点掌握】

Modifier and Type Class and Description
static class ThreadPoolExecutor.AbortPolicy ———— 如果满了,继续添加任务,添加操作直接抛出异常
被拒绝的任务的处理程序,抛出一个 RejectedExecutionException 。static class ThreadPoolExecutor.CallerRunsPolicy ————添加的线程自己负责执行这个任务
一个被拒绝的任务的处理程序,直接在 execute方法的调用线程中运行被拒绝的任务,除非执行程序已经被关闭,否则这个 任务被丢弃。static class ThreadPoolExecutor.DiscardOldestPolicy ————把最老的任务丢弃
被拒绝的任务的处理程序,丢弃最旧的未处理请求,然后重试 execute ,除非执行程序关闭,在这种情况下,任务被丢弃。static class ThreadPoolExecutor.DiscardPolicy ————丢弃最新的任务
被拒绝的任务的处理程序静默地丢弃被拒绝的任务。
4.线程池的实现
//线程池关键的数据结构就是阻塞队列
class MyThreadPool {//阻塞队列用来存放任务private BlockingDeque<Runnable> queue = new LinkedBlockingDeque<>();//把一个任务添加到阻塞队列中public void submit(Runnable runnable) throws InterruptedException {queue.put(runnable);}//工作线程执行任务//此处实现一个固定线程数的线程池public MyThreadPool(int n) {for (int i = 0; i < n; i++) {Thread t = new Thread(() -> {try {//此处需要让线程内部有个 while 循环,不停的取任务while (true) {Runnable runnable = queue.take();runnable.run();}} catch (InterruptedException e) {e.printStackTrace();}});//启动线程t.start();}}}public class ThreadDemo1 {public static void main(String[] args) throws InterruptedException {MyThreadPool pool = new MyThreadPool(10);//十个线程的线程池for (int i = 0; i < 1000; i++) {int number = i;//每次循环都是创建新 number,没有人修改 numberpool.submit(new Runnable() {@Overridepublic void run() {System.out.println("hell0" + number);}});}}
}结果
hell00
hell08
hell011
hell012
hell09
hell05
hell07
hell06
hell017
....此处可以看到,线程池中任务执行的顺序和添加顺序不一定相同的———线程是无序调度的
