Android 之 打开系统摄像头拍照 打开系统相册,并展示
1,清单文件 AndroidManifest.xml
```
<uses-permission android:name="android.permission.INTERNET" />
<!--文件读取权限-->
<uses-permission android:name="android.permission.READ_EXTERNAL_STORAGE" />
<uses-permission android:name="android.permission.WRITE_EXTERNAL_STORAGE" />
<!--相机权限-->
<uses-permission android:name="android.permission.CAMERA" />
<uses-feature android:name="android.hardware.camera" />
<uses-feature android:name="android.hardware.camera.autofocus" />
<application ...>
...
<provider
android:name="androidx.core.content.FileProvider"
android:authorities="com.example.camera.fileprovider"
android:grantUriPermissions="true">
<meta-data
android:name="android.support.FILE_PROVIDER_PATHS"
android:resource="@xml/my_image" />
</provider>
</application>
```
2,配置文件 my_image.xml
```
<?xml version="1.0" encoding="utf-8"?>
<paths xmlns:android="" target="_blank">http://schemas.android.com/apk/res/android">
<external-path
name="my_image"
path="/" />
</paths>
```
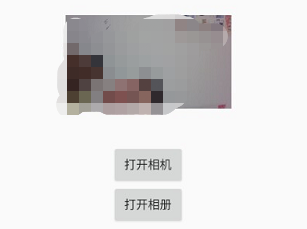
3,布局
<?xml version="1.0" encoding="utf-8"?>
<LinearLayout xmlns:android="http://schemas.android.com/apk/res/android"
xmlns:app="http://schemas.android.com/apk/res-auto"
xmlns:tools="http://schemas.android.com/tools"
android:layout_width="match_parent"
android:layout_height="match_parent"
android:orientation="vertical"
tools:context="com.sjl.nfc.MainActivity">
<ImageView
android:id="@+id/main_img01"
android:layout_width="200dp"
android:layout_height="200dp"
android:layout_gravity="center_horizontal"
android:src="@drawable/img_mine06" />
<Button
android:id="@+id/main_btn01"
android:layout_width="wrap_content"
android:layout_height="wrap_content"
android:layout_gravity="center_horizontal"
android:text="打开相机" />
<Button
android:id="@+id/main_btn02"
android:layout_width="wrap_content"
android:layout_height="wrap_content"
android:layout_gravity="center_horizontal"
android:text="打开相册" />
</LinearLayout>
4,主要代码 java
package com.sjl.nfc;
import android.annotation.TargetApi;
import android.app.Activity;
import android.content.ContentUris;
import android.content.Intent;
import android.database.Cursor;
import android.graphics.Bitmap;
import android.graphics.BitmapFactory;
import android.graphics.drawable.BitmapDrawable;
import android.net.Uri;
import android.os.Bundle;
import android.provider.DocumentsContract;
import android.provider.MediaStore;
import android.util.Base64;
import android.util.Log;
import android.widget.Button;
import android.widget.ImageView;
import android.widget.Toast;
import androidx.annotation.Nullable;
import androidx.appcompat.app.AppCompatActivity;
import androidx.core.content.FileProvider;
import java.io.ByteArrayOutputStream;
import java.io.File;
import java.io.FileNotFoundException;
import java.io.IOException;
/**
* 项目模板
*/
public class MainActivity extends AppCompatActivity {
private static final String TAG = "MainActivity";
private ImageView main_img01;
private Uri imageUri;
@Override
protected void onCreate(@Nullable Bundle savedInstanceState) {
super.onCreate(savedInstanceState);
setContentView(R.layout.main_activity);
main_img01 = findViewById(R.id.main_img01);
Button main_btn01 = findViewById(R.id.main_btn01); // 打开相机
Button main_btn02 = findViewById(R.id.main_btn02); // 打开相册
main_btn01.setOnClickListener(v -> {
// 打开相机
File outputImage = new File(getExternalCacheDir(), "shenhuiran_" + System.currentTimeMillis() + ".jpg"); // 名称(“shenhuiran_”+系统当前时间Millis()
if (outputImage.exists()) outputImage.delete();
try {
outputImage.createNewFile();
} catch (IOException e) {
e.printStackTrace();
}
imageUri = FileProvider.getUriForFile(this, "com.example.camera.fileprovider", outputImage);
Intent intent = new Intent("android.media.action.IMAGE_CAPTURE");
intent.putExtra(MediaStore.EXTRA_OUTPUT, imageUri);
startActivityForResult(intent, TAKE_PHOTO);
});
main_btn02.setOnClickListener(v -> {
// 打开相册
// 在Activity Action里面有一个“ACTION_GET_CONTENT”字符串常量,
// 该常量让用户选择特定类型的数据,并返回该数据的URI.我们利用该常量,
// 然后设置类型为“image/*”,就可获得Android手机内的所有image。*/
Intent intent = new Intent("android.intent.action.GET_CONTENT");
intent.setType("image/*"); // 开启Pictures画面Type设定为image
// 打开相册
startActivityForResult(intent, CHOOSE_PHOTO);
});
}
/**
* 获取活动或片段的位图和图像路径onActivityResult
*
* @param requestCode
* @param resultCode
* @param data
*/
public static final int TAKE_PHOTO = 1;
public static final int CROP_PHOTO = 2;
public static final int CHOOSE_PHOTO = 3;
@Override
protected void onActivityResult(int requestCode, int resultCode, Intent data) {
super.onActivityResult(requestCode, resultCode, data);
switch (requestCode) {
case TAKE_PHOTO:
if (resultCode == Activity.RESULT_OK) {
try {
Bitmap bitmap = BitmapFactory.decodeStream(getContentResolver().openInputStream(imageUri));
main_img01.setImageBitmap(bitmap); // 展示刚拍过的照片
getImgBase64(main_img01); // 直接把 imageview 取出图片转换为base64格式
} catch (FileNotFoundException e) {
e.printStackTrace();
}
}
break;
case CROP_PHOTO:
if (resultCode == RESULT_OK) {
try {
Bitmap bitmap = BitmapFactory.decodeStream(getContentResolver().openInputStream(imageUri));
// 显示裁剪后的图片
main_img01.setImageBitmap(bitmap);
} catch (FileNotFoundException ex) {
ex.printStackTrace();
}
}
break;
case CHOOSE_PHOTO:
if (resultCode == RESULT_OK) {
handleImage(data);
}
break;
default:
break;
}
}
// 只在Android4.4及以上版本使用
@TargetApi(19)
private void handleImage(Intent data) {
String imagePath = null;
Uri uri = data.getData();
if (DocumentsContract.isDocumentUri(this, uri)) {
// 通过document id来处理
String docId = DocumentsContract.getDocumentId(uri);
if ("com.android.providers.media.documents".equals(uri.getAuthority())) {
// 解析出数字id
String id = docId.split(":")[1];
String selection = MediaStore.Images.Media._ID + "=" + id;
imagePath = getImagePath(MediaStore.Images.Media.EXTERNAL_CONTENT_URI, selection);
} else if ("com.android.providers.downloads.documents".equals(uri.getAuthority())) {
Uri contentUri = ContentUris.withAppendedId(Uri.parse("content://downloads/public_downloads"), Long.valueOf(docId));
imagePath = getImagePath(contentUri, null);
}
} else if ("content".equals(uri.getScheme())) {
// 如果不是document类型的Uri,则使用普通方式处理
imagePath = getImagePath(uri, null);
}
// 根据图片路径显示图片
displayImage(imagePath);
}
private String getImagePath(Uri uri, String selection) {
String path = null;
// 通过Uri和selection来获取真实图片路径
Cursor cursor = getContentResolver().query(uri, null, selection, null, null);
if (cursor != null) {
if (cursor.moveToFirst()) {
path = cursor.getString(cursor.getColumnIndex(MediaStore.Images.Media.DATA));
}
cursor.close();
}
return path;
}
private void displayImage(String imagePath) {
if (imagePath != null) {
Bitmap bitmap = BitmapFactory.decodeFile(imagePath);
main_img01.setImageBitmap(bitmap);
} else {
Toast.makeText(this, "failed to get image", Toast.LENGTH_SHORT).show();
}
}
/**
* imageview取出图片转换为base64格式
*
* @param imageView
* @return
*/
private String takeimage;
public String getImgBase64(ImageView imageView) {
BitmapDrawable drawable = (BitmapDrawable) imageView.getDrawable();
Bitmap bitmap = drawable.getBitmap();
ByteArrayOutputStream bos = new ByteArrayOutputStream();
bitmap.compress(Bitmap.CompressFormat.PNG, 100, bos);
byte[] bb = bos.toByteArray();
takeimage = Base64.encodeToString(bb, Base64.NO_WRAP);
Log.d("111111 TakeActivity >>", "打印base64>>:" + takeimage);
// takeTv.setText("打印base64>>:" + image);
// jsJson.put("photographAdditionBase64", "data:image/png;base64," + takeimageview); // 图片上传,上传
return takeimage;
}
}