这款应用是大四实习时候公司不忙空闲时候做的,逼格不高,也不够炫,凑合着还能用吧。关键是通过这次app的编写,学会了一些服务器端知识,以及Android客户端与服务器端的交互知识,对Android界面的布局有了更深的理解与体会了,给我的体会就是:作为程序猿不能眼高手低,不要觉得简单就不去写,真正写起来时候还是会有很多问题,多去写代码,边写边学,理解会更加深刻。
客户端采用的ADT编写(为什么不用Android Studio?Eclipse用的比较习惯,Android Studio还不习惯,下次开发可能就会用Android Studio了)。
服务器端则采用IntelliJ IDEA,框架使用基于注解的SSH框架,服务器也是写这个应用时候现学的,只能算是会用,很多内部详细的也不是很懂。
数据库方面采用了MySQL数据库。服务器不用说,Tomcat。
最后把服务器架设在了阿里云的服务器上面,应用可以联网用,不过指不定哪一天阿里云就到期了,所以暂且先用着吧。(应用现在已经无法联网使用了,阿里云服务器没了,所以现在只能在本地服务器上跑着了)
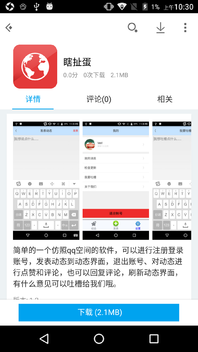
另外,应用也成功入驻应用宝、豌豆荚、安智市场、360手机助手了,以上应用市场中搜索“瞎扯蛋”就可以搜到了。
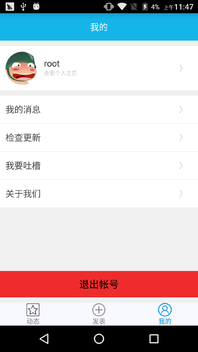
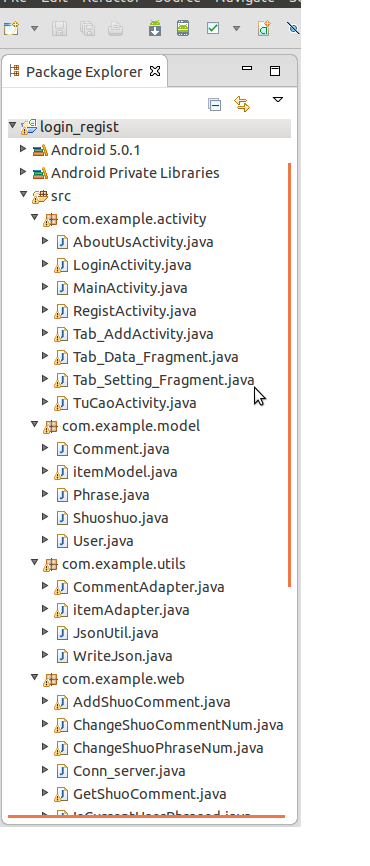
下面附上应用的一些截图和代码目录:
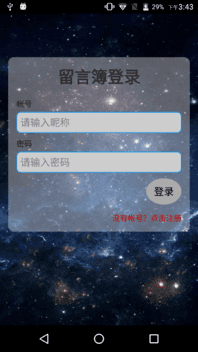
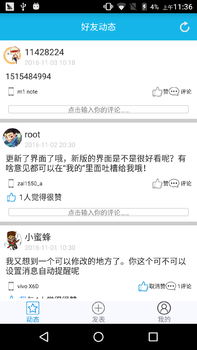
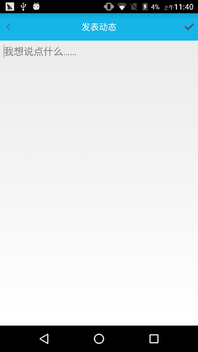
代码目录结构:
一、界面编写
我写的界面比较简单,没有啥自定义的view,但要写好一个美观高大上的界面还是要花很多功夫的。就初步来讲,先学好一些控件和五大布局以及一些重要的属性对写好界面来说很重要的。这次通过编写界面,对RelativeLayout理解也更加深刻了,相对布局真的是个神器,多用用能写出很好的布局。
1、登录界面的编写
登录界面代码保存在login.xml中,写的一般,至于椭圆形button和圆角布局之类的可以自己去网上搜下,很多教程,就是比自带的button好看点。
<?xml version="1.0" encoding="utf-8"?>
<LinearLayout xmlns:android="http://schemas.android.com/apk/res/android"android:layout_width="fill_parent"android:layout_height="fill_parent"android:background="@drawable/login_background"android:orientation="vertical" ><RelativeLayout
        android:layout_width="fill_parent"android:layout_height="wrap_content"android:layout_marginRight="15dp"android:layout_marginLeft="15dp"android:layout_marginTop="80dp"android:background="@drawable/background_login_div_bg"android:padding="15dp" ><TextView
            android:id="@+id/tv_login_title"android:layout_width="fill_parent"android:layout_height="wrap_content"android:gravity="center"android:text="留言簿登录"android:textSize="30sp"android:textStyle="bold" /><TextView
            android:id="@+id/tv_login_name"android:layout_width="wrap_content"android:layout_height="wrap_content"android:layout_below="@+id/tv_login_title"android:layout_marginTop="20dp"android:text="帐号"android:textStyle="bold" /><EditText
            android:id="@+id/et_login_name"android:layout_width="fill_parent"android:layout_height="wrap_content"android:layout_alignParentLeft="true"android:layout_below="@+id/tv_login_name"android:layout_marginTop="5dp"android:background="@drawable/edit_style"android:hint="请输入昵称"android:inputType="text"android:singleLine="true" /><TextView
            android:id="@+id/tv_login_password"android:layout_width="wrap_content"android:layout_height="wrap_content"android:layout_below="@+id/et_login_name"android:layout_marginTop="10dp"android:text="密码"android:textStyle="bold" /><EditText
            android:id="@+id/et_login_password"android:layout_width="fill_parent"android:layout_height="wrap_content"android:layout_alignParentLeft="true"android:layout_below="@+id/tv_login_password"android:layout_marginTop="5dp"android:background="@drawable/edit_style"android:hint="请输入密码"android:inputType="textPassword"android:singleLine="true" /><Button
            android:id="@+id/btn_login"android:layout_width="wrap_content"android:layout_height="wrap_content"android:layout_alignParentRight="true"android:layout_below="@+id/et_login_password"android:layout_marginTop="10dp"android:background="@drawable/btn_style"android:text="登录" /><TextView android:id="@+id/tv_login_regist"android:layout_width="fill_parent"android:layout_height="wrap_content"android:layout_below="@+id/btn_login"android:clickable="true"android:gravity="right"android:layout_marginTop="15dp"android:textColor="@android:color/holo_red_dark"android:text="没有帐号?点击注册"/></RelativeLayout></LinearLayout>
2、主界面的编写
主界面我是采用Activity+Fragment结合的方式,Activity中编写底部三个Tab的布局,另外编写三个布局作为点击不同Tab键显示的布局。至于其中点击和实现的逻辑在MainActivity.java中,这里注意:动态界面和设置界面是继承自Fragment,而发表动态界面仍然是一个Activity,便于发表之后退出直接返回到MainActivity中去。稍后粘出来。Fragment最终会显示在下面的一个id为content的FrameLayout中。
主界面activity_main.xml的布局如下:
<?xml version="1.0" encoding="utf-8"?>
<LinearLayout xmlns:android="http://schemas.android.com/apk/res/android"android:layout_width="match_parent"android:layout_height="match_parent"android:orientation="vertical" ><FrameLayout
        android:id="@+id/content"android:layout_width="match_parent"android:layout_height="0dp"android:layout_weight="1" ></FrameLayout><View
        android:layout_width="match_parent"android:layout_height="1dp"android:background="#000000" /><LinearLayout
        android:layout_width="match_parent"android:layout_height="60dp"android:background="#F8F8FF" ><RelativeLayout
            android:id="@+id/news_layout"android:layout_width="0dp"android:layout_height="match_parent"android:layout_weight="1" ><LinearLayout
                android:layout_width="match_parent"android:layout_height="wrap_content"android:layout_centerVertical="true"android:orientation="vertical" ><ImageView
                    android:id="@+id/news_image"android:layout_width="wrap_content"android:layout_height="wrap_content"android:layout_gravity="center_horizontal"android:src="@drawable/news_unselected" /><TextView
                    android:id="@+id/news_text"android:layout_width="wrap_content"android:layout_height="wrap_content"android:layout_gravity="center_horizontal"android:text="动态"android:textColor="#82858b" /></LinearLayout></RelativeLayout><RelativeLayout
            android:id="@+id/add_layout"android:layout_width="0dp"android:layout_height="match_parent"android:layout_weight="1" ><LinearLayout
                android:layout_width="match_parent"android:layout_height="wrap_content"android:layout_centerVertical="true"android:orientation="vertical" ><ImageView
                    android:id="@+id/add_image"android:layout_width="wrap_content"android:layout_height="wrap_content"android:layout_gravity="center_horizontal"android:src="@drawable/add" /><TextView
                    android:id="@+id/add_text"android:layout_width="wrap_content"android:layout_height="wrap_content"android:layout_gravity="center_horizontal"android:text="发表"android:textColor="#82858b" /></LinearLayout></RelativeLayout><RelativeLayout
            android:id="@+id/setting_layout"android:layout_width="0dp"android:layout_height="match_parent"android:layout_weight="1" ><LinearLayout
                android:layout_width="match_parent"android:layout_height="wrap_content"android:layout_centerVertical="true"android:orientation="vertical" ><ImageView
                    android:id="@+id/setting_image"android:layout_width="wrap_content"android:layout_height="wrap_content"android:layout_gravity="center_horizontal"android:src="@drawable/setting_unselected" /><TextView
                    android:id="@+id/setting_text"android:layout_width="wrap_content"android:layout_height="wrap_content"android:layout_gravity="center_horizontal"android:text="设置"android:textColor="#82858b" /></LinearLayout></RelativeLayout></LinearLayout>
</LinearLayout>
MainActivity与三个Fragment交互的实现,使用FragmentTransaction配合FragmentManager展示Fragment,注意点击时候要修改底部的图标颜色和字体颜色,然后将已有的Fragment隐藏,显示点击的Fragment,大概逻辑就是这样,网上也有很多Fragment实现底部导航栏的文章,可以搜索了解下。
package com.example.activity;import com.example.login_regist.R;import android.app.Activity;
import android.app.FragmentManager;
import android.app.FragmentTransaction;
import android.content.Intent;
import android.graphics.Color;
import android.os.Bundle;
import android.util.Log;
import android.view.View;
import android.view.View.OnClickListener;
import android.view.Window;
import android.widget.ImageView;
import android.widget.TextView;public class MainActivity extends Activity implements OnClickListener {private Tab_Data_Fragment dataFragment;private Tab_Setting_Fragment settingFragment;private View add_view;private View data_view;private View setting_view;private ImageView img_data;private ImageView img_setting;private TextView tv_data;private TextView tv_setting;private FragmentManager fragmentManager;private Bundle loginBundle;private String userName;private Bundle DataBundle;private Bundle SettingBundle;@Overrideprotected void onCreate(Bundle savedInstanceState) {// TODO Auto-generated method stubrequestWindowFeature(Window.FEATURE_NO_TITLE);super.onCreate(savedInstanceState);setContentView(R.layout.activity_main);initViews();fragmentManager = getFragmentManager();// 第一次启动时选中第0个tabtry {Thread.sleep(1000);} catch (InterruptedException e) {// TODO Auto-generated catch blocke.printStackTrace();}setTabSelection(0);}private void initViews() {add_view = findViewById(R.id.add_layout);data_view = findViewById(R.id.news_layout);setting_view = findViewById(R.id.setting_layout);img_data = (ImageView) findViewById(R.id.news_image);img_setting = (ImageView) findViewById(R.id.setting_image);tv_data = (TextView) findViewById(R.id.news_text);tv_setting = (TextView) findViewById(R.id.setting_text);add_view.setOnClickListener(this);data_view.setOnClickListener(this);setting_view.setOnClickListener(this);// 获取从LoginActivity传过来的用户名,显示在设置里面loginBundle = getIntent().getExtras();DataBundle = new Bundle();SettingBundle = new Bundle();if (loginBundle != null) {userName = loginBundle.getString("userName");if (userName == null) {userName = loginBundle.getString("name");}Log.i("TAG", "穿过来的值为" + userName);} else {Log.i("TAG", "extras为空");}DataBundle.putString("userName", userName);SettingBundle.putString("userName", userName);}@Overridepublic void onClick(View v) {switch (v.getId()) {case R.id.news_layout:Log.i("TAG", "模拟点击了");setTabSelection(0);break;case R.id.add_layout:Intent intent = new Intent();intent.setClass(MainActivity.this, Tab_AddActivity.class);intent.putExtra("name", userName);startActivityForResult(intent, 1);// MainActivity.this.findViewById(R.id.tv_refresh).performClick();break;case R.id.setting_layout:setTabSelection(1);break;default:break;}}@Overrideprotected void onActivityResult(int requestCode, int resultCode, Intent data) {if (resultCode == -1) {MainActivity.this.findViewById(R.id.tv_refresh).performClick();}}public void setTabSelection(int i) {// 每次选中之前先清除掉上次的选中状态clearSelection();// 开启一个Fragment事务FragmentTransaction transaction = fragmentManager.beginTransaction();// 先隐藏掉所有的Fragment,以防止有多个Fragment显示在界面上的情况hideFragments(transaction);switch (i) {case 0:Log.i("TAG", "单击走的显示流程");// 当点击了消息tab时,改变控件的图片和文字颜色img_data.setImageResource(R.drawable.news_selected);tv_data.setTextColor(Color.BLUE);if (dataFragment == null) {// 如果dataFragment为空,则创建一个并添加到界面上dataFragment = new Tab_Data_Fragment();dataFragment.setArguments(DataBundle);transaction.add(R.id.content, dataFragment);Log.i("TAG", "dataFragment为空");} else {// 如果dataFragment不为空,则直接将它显示出来Log.i("TAG", "dataFragment不为空。。。。。。");// dataFragment.setArguments(DataBundle);transaction.show(dataFragment);}break;case 1:// 当点击了设置tab时,改变控件的图片和文字颜色img_setting.setImageResource(R.drawable.setting_selected);tv_setting.setTextColor(Color.BLUE);if (settingFragment == null) {// 如果settingFragment为空,则创建一个并添加到界面上settingFragment = new Tab_Setting_Fragment();// 从activity传递给Fragment里面去settingFragment.setArguments(SettingBundle);transaction.add(R.id.content, settingFragment);Log.i("TAG", "settingFragment为空。。。。。。");} else {// 如果settingFragment不为空,则直接将它显示出来// settingFragment.setArguments(bundle);transaction.show(settingFragment);Log.i("TAG", "settingFragment不为空。。。。。。");}break;// case 2:// Log.i("TAG", "双击走的刷新流程");// // 当点击了消息tab时,改变控件的图片和文字颜色// img_data.setImageResource(R.drawable.news_selected);// tv_data.setTextColor(Color.BLUE);// dataFragment = null;// // 如果dataFragment为空,则创建一个并添加到界面上// dataFragment = new Tab_Data_Fragment();// dataFragment.setArguments(DataBundle);// transaction.add(R.id.content, dataFragment);//// break;default:break;}transaction.commit();}/*** 清除掉所有的选中状态。*/private void clearSelection() {img_data.setImageResource(R.drawable.news_unselected);tv_data.setTextColor(Color.parseColor("#82858b"));img_setting.setImageResource(R.drawable.setting_unselected);tv_setting.setTextColor(Color.parseColor("#82858b"));}/*** 将所有的Fragment都置为隐藏状态。* * @param transaction*            用于对Fragment执行操作的事务*/private void hideFragments(FragmentTransaction transaction) {if (dataFragment != null) {transaction.hide(dataFragment);}if (settingFragment != null) {transaction.hide(settingFragment);}}
}
先说下布局吧,下面的博客再说说服务器端怎么写的,再介绍下客户端和服务器端怎么交互数据的。app客户端和服务端源码链接:链接
