初始化部分
void OLED_Init(void)
{GPIO_InitTypeDef  GPIO_InitStructure;RCC_APB2PeriphClockCmd(RCC_APB2Periph_GPIOA, ENABLE);	 //使能A端口时钟GPIO_InitStructure.GPIO_Pin = GPIO_Pin_0|GPIO_Pin_1;	 GPIO_InitStructure.GPIO_Mode = GPIO_Mode_Out_OD; 		 //推挽输出GPIO_InitStructure.GPIO_Speed = GPIO_Speed_50MHz;//速度50MHzGPIO_Init(GPIOA, &GPIO_InitStructure);	  //初始化PA0,1GPIO_SetBits(GPIOA,GPIO_Pin_0|GPIO_Pin_1);GPIO_InitStructure.GPIO_Pin = GPIO_Pin_2;	 GPIO_InitStructure.GPIO_Mode = GPIO_Mode_Out_PP; 		 //推挽输出GPIO_InitStructure.GPIO_Speed = GPIO_Speed_50MHz;//速度50MHzGPIO_Init(GPIOA, &GPIO_InitStructure);	  //初始化PA2GPIO_SetBits(GPIOA,GPIO_Pin_2);OLED_RES_Clr();delay_ms(200);OLED_RES_Set();OLED_WR_Byte(0xAE,OLED_CMD); /*display off*/OLED_WR_Byte(0xD5,OLED_CMD); /*set osc division*/OLED_WR_Byte(0xF0,OLED_CMD);OLED_WR_Byte(0xA8,OLED_CMD); /*multiplex ratio*/OLED_WR_Byte(0x27,OLED_CMD); /*duty = 1/40*/OLED_WR_Byte(0xD3,OLED_CMD); /*set display offset*/OLED_WR_Byte(0x00,OLED_CMD);OLED_WR_Byte(0x40,OLED_CMD); /*Set Display Start Line */OLED_WR_Byte(0x8d,OLED_CMD); /*set charge pump enable*/OLED_WR_Byte(0x14,OLED_CMD);OLED_WR_Byte(0x20,OLED_CMD); /*Set page address mode*/OLED_WR_Byte(0x02,OLED_CMD);OLED_WR_Byte(0xA1,OLED_CMD); /*set segment remap*/OLED_WR_Byte(0xC8,OLED_CMD); /*Com scan direction*/OLED_WR_Byte(0xDA,OLED_CMD); /*set COM pins*/OLED_WR_Byte(0x12,OLED_CMD);OLED_WR_Byte(0xAD,OLED_CMD); /*Internal IREF Setting*/OLED_WR_Byte(0x30,OLED_CMD);OLED_WR_Byte(0x81,OLED_CMD); /*contract control*/OLED_WR_Byte(0xfF,OLED_CMD); /*128*/OLED_WR_Byte(0xD9,OLED_CMD); /*set pre-charge period*/OLED_WR_Byte(0x22,OLED_CMD);OLED_WR_Byte(0xdb,OLED_CMD); /*set vcomh*/OLED_WR_Byte(0x20,OLED_CMD);OLED_WR_Byte(0xA4,OLED_CMD); /*Set Entire Display On/Off*/OLED_WR_Byte(0xA6,OLED_CMD); /*normal / reverse*/OLED_WR_Byte(0x0C,OLED_CMD); /*set lower column address*/OLED_WR_Byte(0x11,OLED_CMD); /*set higher column address*/	OLED_Clear();OLED_WR_Byte(0xAF,OLED_CMD); /*display ON*/
}
显存与清屏部分
//更新显存到OLED
void OLED_Refresh(void)
{u8 i,n;for(i=0;i<5;i++){OLED_WR_Byte(0xb0+i,OLED_CMD); //设置行起始地址OLED_WR_Byte(0x0c,OLED_CMD);   //设置低列起始地址OLED_WR_Byte(0x11,OLED_CMD);   //设置高列起始地址I2C_Start();Send_Byte(0x78);I2C_WaitAck();Send_Byte(0x40);I2C_WaitAck();for(n=0;n<72;n++){Send_Byte(OLED_GRAM[n][i]);I2C_WaitAck();}I2C_Stop();}
}
//清屏函数
void OLED_Clear(void)
{u8 i,n;for(i=0;i<5;i++){for(n=0;n<72;n++){OLED_GRAM[n][i]=0;//清除所有数据}}OLED_Refresh();//更新显示
}
OLED的demo其他都差不多的。
需要注意的两点配置
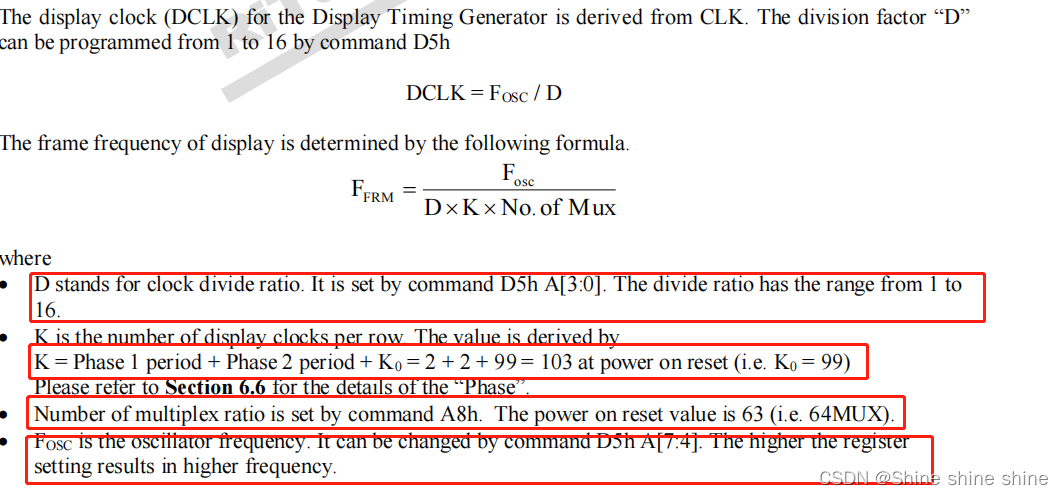
1.关于时钟频率的配置,不同的驱动也会有不同的要求值,比如我这里的是1315的驱动,具体如下图


FOSC表示内部振荡器的频率值,当命令D5h A[7:4]为默认值时,该值688的典型值。
2.关于页寻址的列地址,主要还是通过以下三个指令寻址写数据
设置页面的起始地址命令B0h~B7h目标显示位置。
通过命令00h~0Fh设置指针的低起始列地址。
通过命令10h~1Fh设置指针的高起始列地址。
所谓的低高,就是低满了高就进一。就比如,我的屏幕是72*40的,所以屏幕列的长度为72,通过计算,我应该偏移到28列开始写数据,那怎么得到这个值呢?按照上面说的,当为0x1c的时候就表示28,低位是C,高位为1.
参考链接
https://blog.csdn.net/u013581207/article/details/102467912
https://zhuanlan.zhihu.com/p/485419438
例程代码链接: https://pan.baidu.com/s/1BUKbeoyXgZSn7TOcj6gTGA?pwd=dikf 提取码: dikf


