基础布局与简单样式
首先,创建WPF项目,在自动打开的MainWindow.xaml里面,找到Grid标签,并将它替换为:
<Grid><Grid.RowDefinitions><RowDefinition></RowDefinition><RowDefinition></RowDefinition></Grid.RowDefinitions><Grid.ColumnDefinitions><ColumnDefinition></ColumnDefinition><ColumnDefinition></ColumnDefinition></Grid.ColumnDefinitions><TextBlock Name="t1" Grid.Row="0" Grid.Column="0" Text="t1"></TextBlock><TextBlock Name="t2" Grid.Row="0" Grid.Column="1" Text="t2"></TextBlock><Button Name="btn1" Grid.Row="1" Grid.Column="0" Content="btn1"></Button><Button Name="btn2" Grid.Row="1" Grid.Column="1" Content="btn2"></Button>
</Grid>
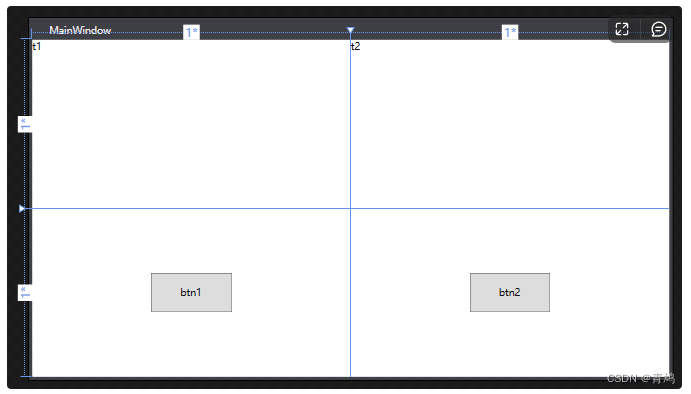
修改好之后,界面会变成这样:
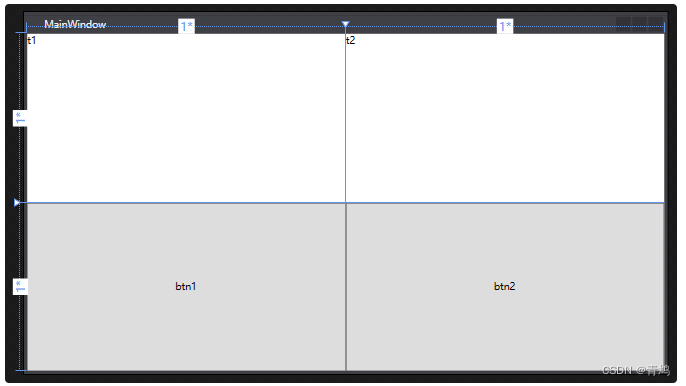
可以看到 MainWindow被分成一个“田”字,上面两个格子的左上角分别显示t1和t2,下面两个格子颜色有变化,并且中间显示btn1和btn2。
对比代码可以看出,WPF中Grid是用来布局的,我们使用RowDefinition和ColumnDefinition来定义Grid有几行几列,之后再在Grid标签中定义了两个TextBlock和两个Button,它们的位置是通过Grid.Row和Grid.Column确定的。同时,这四个控件的默认大小是填充了整个格子,且TextBlock中文本的显示位于左上角,Button中文本的显示位于居中位置。
下面我们写样式代码来使btn2变成我们常见的按钮样式,并且居中显示。
将btn2的代码替换为如下代码:
<Button Name="btn2" Grid.Row="1" Grid.Column="1"
Content="btn2" Width="100" Height="40"></Button>
为了让btn1和btn2的样式一样,且不用写重复的代码,我们可以将Width=“100”,Height="40"单独拎出来,写成样式,并且给btn1和btn2引用该样式即可。
<Window x:Class="WpfTest.MainWindow"xmlns="http://schemas.microsoft.com/winfx/2006/xaml/presentation"xmlns:x="http://schemas.microsoft.com/winfx/2006/xaml"xmlns:d="http://schemas.microsoft.com/expression/blend/2008"xmlns:mc="http://schemas.openxmlformats.org/markup-compatibility/2006"xmlns:local="clr-namespace:WpfTest"mc:Ignorable="d"Title="MainWindow" Height="450" Width="800"><Window.Resources><Style TargetType="Button" x:Key="btn"><Setter Property="Width" Value="100"></Setter><Setter Property="Height" Value="48"></Setter></Style></Window.Resources><Grid><Grid.RowDefinitions><RowDefinition></RowDefinition><RowDefinition></RowDefinition></Grid.RowDefinitions><Grid.ColumnDefinitions><ColumnDefinition></ColumnDefinition><ColumnDefinition></ColumnDefinition></Grid.ColumnDefinitions><TextBlock Name="t1" Grid.Row="0" Grid.Column="0" Text="t1"></TextBlock><TextBlock Name="t2" Grid.Row="0" Grid.Column="1" Text="t2"></TextBlock><Button Name="btn1" Grid.Row="1" Grid.Column="0" Content="btn1" Style="{StaticResource btn}"></Button><Button Name="btn2" Grid.Row="1" Grid.Column="1" Content="btn2" Style="{StaticResource btn}"></Button></Grid></Window>
可以看出,样式可以在Window.Resources中定义,通过TargetType属性来限制适用类型,通过x:Key属性来被引用。
修改后效果是这样的:
类似Web前端的css文件,我们常常将Style写在单独的文件中,并在页面中引用。在资源管理器中右键点击项目名,添加一个资源字典文件,命名为styles。

将styles.xaml代码替换为以下代码:
<ResourceDictionary xmlns="http://schemas.microsoft.com/winfx/2006/xaml/presentation"xmlns:x="http://schemas.microsoft.com/winfx/2006/xaml"xmlns:local="clr-namespace:WpfTest"><Style TargetType="Button" x:Key="btn"><Setter Property="Width" Value="100"></Setter><Setter Property="Height" Value="48"></Setter></Style>
</ResourceDictionary>
可以看出,我们将MainWindow.xaml中定义的btn样式复制到了styles.xaml中。为了在MainWindow中使用该样式,我们需要下面两点,二选一:
ⅰ. 在App.xaml中引用styles.xaml(全局样式,所有界面都适用)
ⅱ. 在MainWindow.xaml中引用styles.xaml(仅适用给MainWindow)
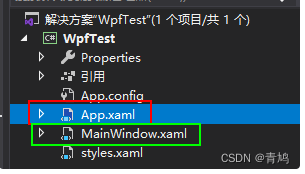
分别对应上面的 i 和 ii。
下面我们来分别实现上面两个步骤:
①首先,打开App.xaml,将代码替换为如下代码:
<Application x:Class="WpfTest.App"xmlns="http://schemas.microsoft.com/winfx/2006/xaml/presentation"xmlns:x="http://schemas.microsoft.com/winfx/2006/xaml"xmlns:local="clr-namespace:WpfTest"StartupUri="MainWindow.xaml"><Application.Resources><ResourceDictionary Source="styles.xaml"></ResourceDictionary></Application.Resources>
</Application>
②或者,在MainWindow.xaml文件中,将Window.Resources段代码改为如下代码:
<Window.Resources><ResourceDictionary Source="styles.xaml"></ResourceDictionary>
</Window.Resources>
如果MainWindow中需要引用两个及以上的样式文件,则需要将Window.Resources段改为下面格式:
<Window.Resources><ResourceDictionary><ResourceDictionary.MergedDictionaries><ResourceDictionary Source="styles.xaml"></ResourceDictionary><!-- 在这里添加更多的样式文件引用 --></ResourceDictionary.MergedDictionaries></ResourceDictionary>
</Window.Resources>
常用的布局标签还有StackPanel(与Grid对应),它支持横向或纵向布局,我们可以将btn2的代码替换为如下代码:
<StackPanel Orientation="Horizontal" Grid.Row="1" Grid.Column="1"><Button Name="btn2" Content="btn2" Style="{StaticResource btn}" Margin="5"></Button><Button Name="btn3" Content="btn3" Style="{StaticResource btn}"></Button>
</StackPanel>
将刚才上面修改的代码添加到MainWindow中,效果是这样的:
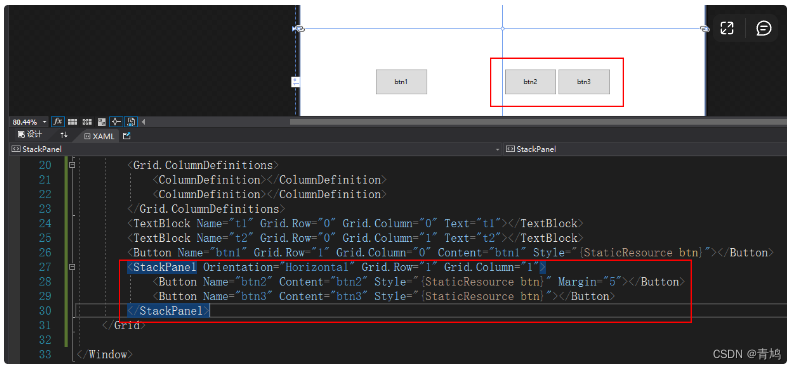
巧妙地使用Grid和StackPanel,以及简单的样式设置,即可设计出漂亮的WPF界面了。关于布局还有更多的标签可以使用,样式设置也可以设置更多的属性,不过用起来都类似,所以关于布局与样式,还需要更深入的学习。

关于布局容器Grid、StackPanel、GroupBox、DockPanel、WrapPanel:https://www.cnblogs.com/xixixing/p/10959455.html


