wordpress+Sakura主题建站优化
写在前面
本人博客:http://landasika.top/
Sakura的使用手册:https://yremp.live/wordpress-sakura-teach/
Sakura主题美化系列归档:https://blog.ukenn.top/technology/sakura-tbs/
- 为什么不安装Sakurairo呢?
- 主要是因为Sakura的可修改性高
- Sakura修改教程网上有很多
用wordpress搭建一个博客
部署WordPress
方法一、利用宝塔一键部署
这里直接用宝塔
首先建议升级一下数据库

然后到软件商店直接一键部署
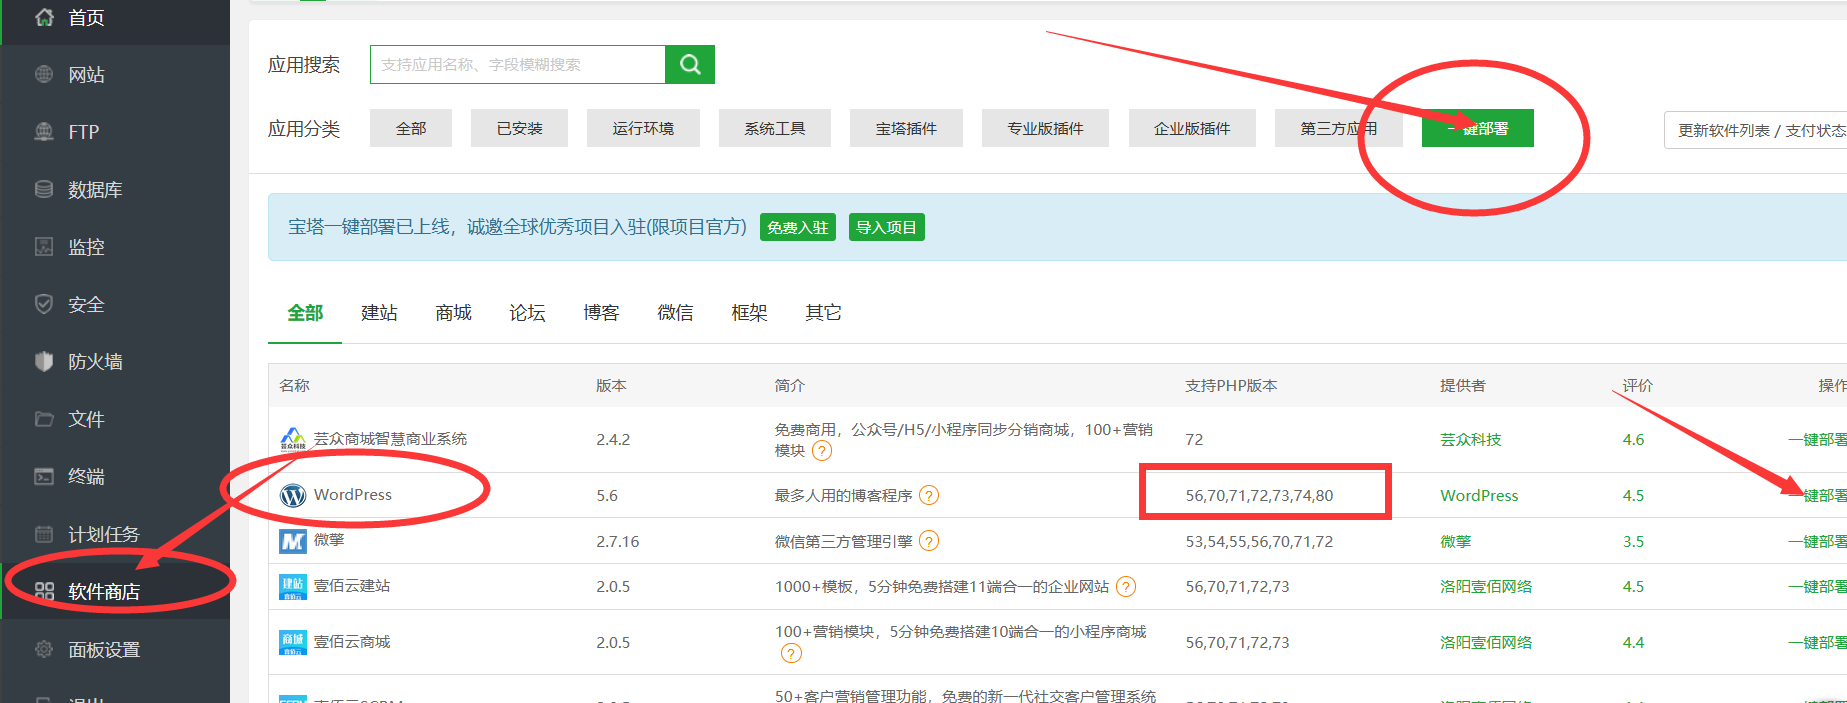
这里注意PHP的版本
然后根据要求一步一步部署即可。
方法二、官方下载源码放在网页目录部署
官网链接:https://cn.wordpress.org/
直接点击右上角的 获取WordPress,然后拉到最下面点击下载即可
然后在网页根目录解压即可
配置WordPress
访问站点目录,根据要求一步一步配置即可

配置好之后,点击右上角
注意!这个地方需要手动配置数据库

安装Sakura主题
gitee仓库链接:https://gitee.com/mashirozx/Sakura
下载之后解压放在wp-content\themes这个目录下面,注意的是,别犯迷糊,解压的时候注意目录结构,保证wp-content\themes\Sakura-3.x就是项目的源码而不是Sakura-3.x文件夹!
之后访问站点,登陆管理员密码,点击有右上角的头像进入仪表盘
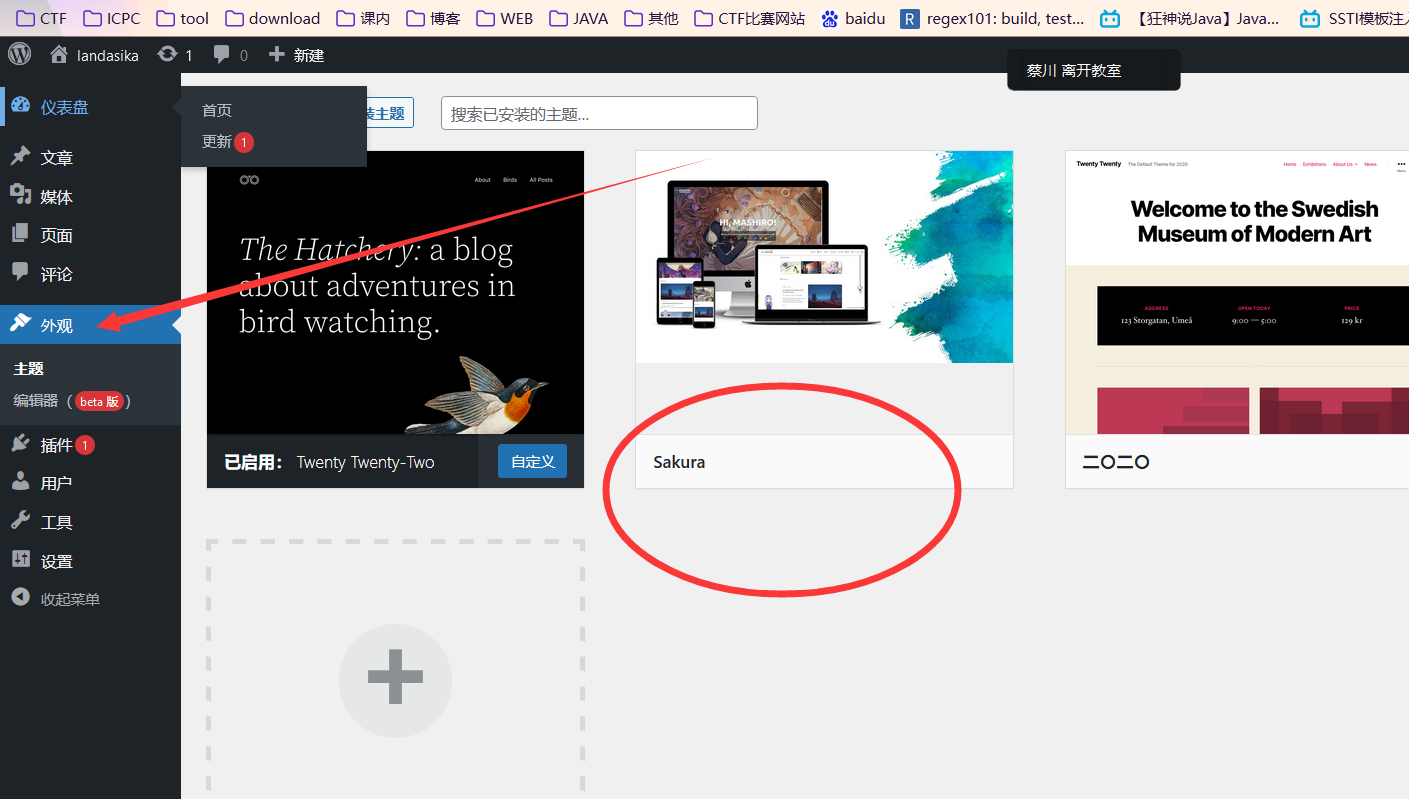
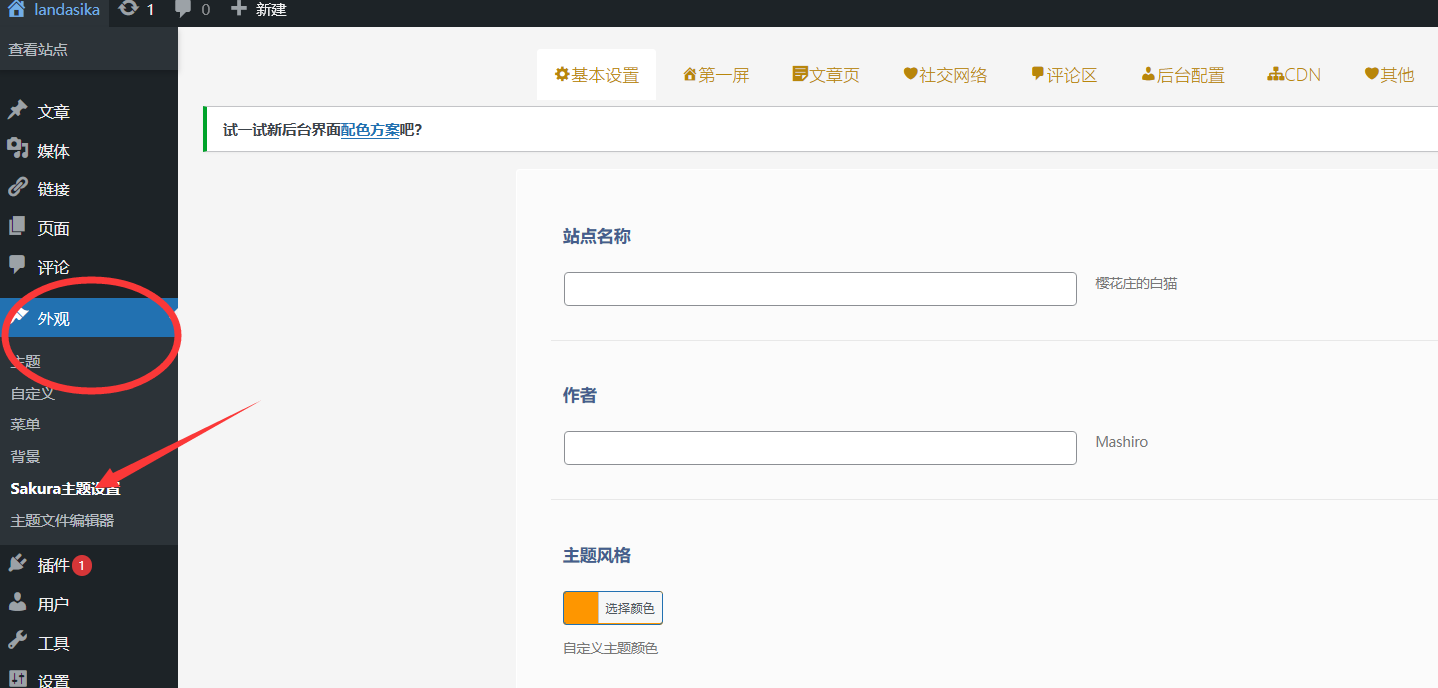
在外观里面可以看到Sakura主题,点击启用即可!
Sakura主题优化
基础设置
使用Sakura主题设置,慢慢捣鼓就可以慢慢的设置啦!
具体基础设置参考作者的文章:https://yremp.live/wordpress-sakura-teach/
这里不再赘述
DIY设置
首先!打开外链CSS和js的开关
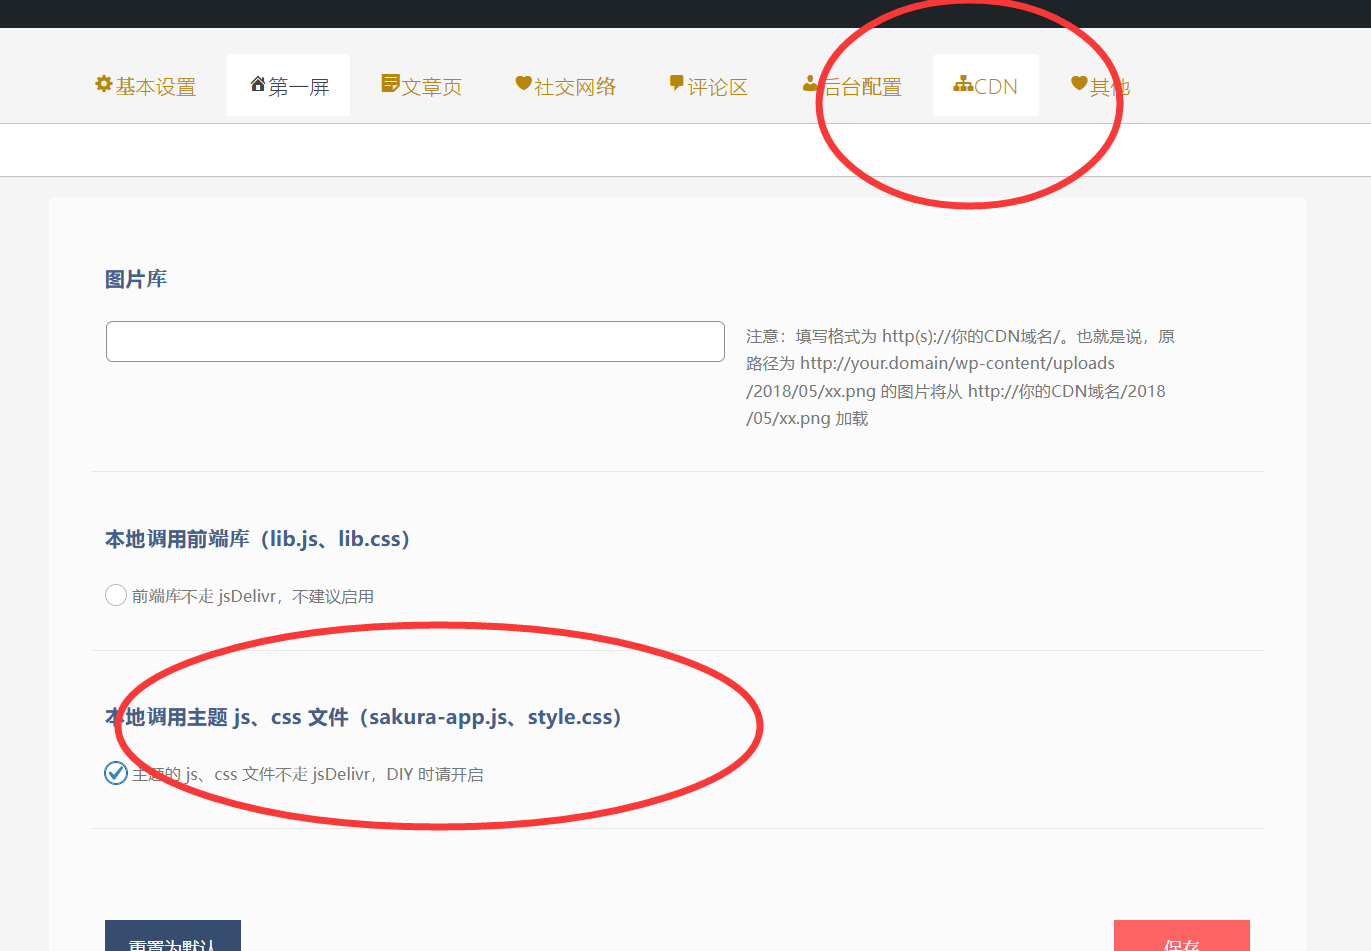
这个地方勾选
添加樱花飘落等效果
在/wp-content/themes/Sakura/foot.php最下面添加
<!-- 🌸飘落 -->
<script src="https://cdn.jsdelivr.net/gh/wallleap/cdn@latest/js/sakura.js"></script>
| sakura-small.js | 少量樱花 |
|---|---|
| sakura-half.js | 樱花相对原效果数量减半 |
| sakura-reduce.js | 樱花相对原效果减少1/4 |
| sakura-original.js | 樱花数量不变(原效果) |
其他样式:
<!-- 点击出现社会主义彩色文字 --><script src="https://cdn.jsdelivr.net/gh/wallleap/cdn/js/shehuizhuyi.js"></script>
<!-- 点击出现爱心 --><script src="https://cdn.jsdelivr.net/gh/wallleap/cdn/js/love.js"></script><!-- // 星星跟随坠落 -->
<script src="https://cdn.jsdelivr.net/gh/cungudafa/cdn@2.1.2/js/cursor.js"></script>
<!-- // 连线
<script src="https://cdn.jsdelivr.net/gh/wallleap/cdn/js/canvas-nest.min.js"></script>
<script type="text/javascript" src="https://cdn.bootcss.com/canvas-nest.js/1.0.1/canvas-nest.min.js"></script>-->
<!-- 样式二(飘动的彩带)
<script src="https://cdn.jsdelivr.net/gh/wallleap/cdn@latest/js/piao.js" type="text/javascript"></script>-->
添加Live2D看板娘
在/wp-content/themes/Sakura/foot.php添加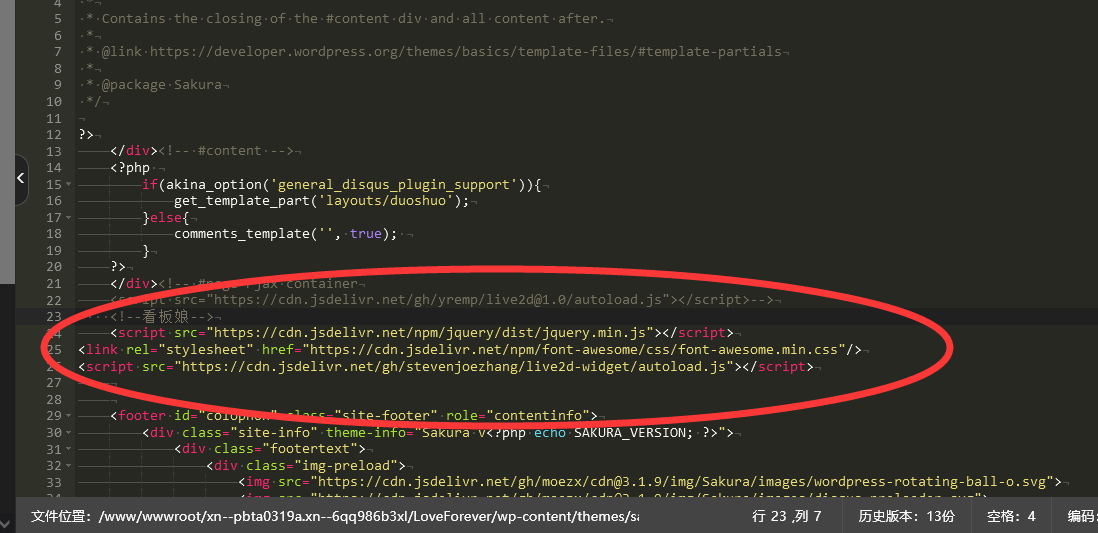
    <!--看板娘--><script src="https://cdn.jsdelivr.net/npm/jquery/dist/jquery.min.js"></script>
<link rel="stylesheet" href="https://cdn.jsdelivr.net/npm/font-awesome/css/font-awesome.min.css"/>
<script src="https://cdn.jsdelivr.net/gh/stevenjoezhang/live2d-widget/autoload.js"></script>
首页波浪动画效果
使用 CSS3 Animation 复现
1、在style.css中添加
#banner_wave_1 {width: auto;height: 65px;background: url(https://oss.amogu.cn/blog/sakura/images/wave_1.png) repeat-x;_filter: alpha(opacity=80);position: absolute;bottom: 0;width: 400%;left: -236px;z-index: 5;opacity: 1;transiton-property: opacity, bottom;transition-duration: .4s, .4s;animation-name: move2;animation-duration: 240s;animation-fill-mode: backwards;animation-timing-function: linear;animation-iteration-count: infinite;
}#banner_wave_2 {width: auto;height: 80px;background: url(https://oss.amogu.cn/blog/sakura/images/wave_2.png) repeat-x;_filter: alpha(opacity=80);position: absolute;bottom: 0;width: 400%;left: 0;z-index: 4;opacity: 1;transiton-property: opacity, bottom;transition-duration: .4s, .4s;animation-name: move2;animation-duration: 160s;animation-fill-mode: backwards;animation-timing-function: linear;animation-iteration-count: infinite;
}/* move1和move2只是方向不同,根据喜好自选即可。 */
/* 没做浏览器适配,具体哪些浏览器会生效未知,反正Chrome没什么问题。*/@keyframes move1 {100% {background-position: 100% 0;}
}@keyframes move2 {100% {background-position: -100% 0;}
}
2、两个DIV的穿插位置
在路径 /wp-content/themes/Sakura/layouts 下,打开 imgbox.php。在下面所述位置插入。
……
<style>.header-info::before{display: none !important;opacity: 0 !important;}</style>
<div id="banner_wave_1"></div><div id="banner_wave_2"></div><!--两个DIV插在这。-->
<figure id="centerbg" class="centerbg">
<?php if ( !akina_option('focus_infos') ){ ?><div class="focusinfo"><?php if (akina_option('focus_logo')):?>
……
{1}
给首页添加下拉箭头
1、修改 imgbox.php 文件
首先找到Sakura主题文件包下的 layouts 中的 imgbox.php 文件,在最底下添加如下代码
echo bgvideo(); //BGVideo
?>
<!-- 首页下拉箭头 -->
<div class="headertop-down faa-float animated" onclick="headertop_down()"><span><i class="fa fa-chevron-down" aria-hidden="true"></i></span></div>
其中:fa-chevron-down是下拉图标的部分,可以在http://www.fontawesome.com.cn/faicons/中找到替换
2、添加CSS
接着修改主题文件中的 style.css 文件(记得在WP后台主题设置-CDN-开启本地调用主题js、css文件) 或者 直接在 主题设置-自定义CSS样式 中添加如下代码
/* 首页下拉箭头 */
.headertop-bar::after {content: '';width: 150%;height: 4.375rem;background: #fff;left: -25%;bottom: -2.875rem;border-radius: 100%;position: absolute;z-index: 4;
}.headertop-down {position: absolute;bottom: 50px;left: 50%;cursor: pointer;z-index: 5;
}
@media (max-width: 860px) {.headertop-down {display: none}
}.headertop-down i {font-size: 28px;color: #fff;-ms-transform: scale(1.5,1); /* IE 9 */-webkit-transform: scale(1.5,1); /* Safari */transform: scale(1.5,1); /* Standard syntax */
}
3、修改sakura-app.js 文件
最后打开主题文件 js/sakura-app.js 文件,在底下添加函数
/* 首页下拉箭头 */function headertop_down() {var coverOffset = $('#content').offset().top;$('html,body').animate({scrollTop: coverOffset},600);
}
微语/说说页面设置
1、注册一个新的帖子类型
首先,我们需要使用 WordPress 的 register_post_type() 函数注册一个新的帖子类型,以方便日后编辑说说。将以下代码直接添加到到主题的 functions.php 文件中去即可。
//说说页面
function shuoshuo_custom_init()
{$labels = array('name' => '说说','singular_name' => '说说','add_new' => '发表说说','add_new_item' => '发表说说','edit_item' => '编辑说说','new_item' => '新说说','view_item' => '查看说说','search_items' => '搜索说说','not_found' => '暂无说说','not_found_in_trash' => '没有已遗弃的说说','parent_item_colon' => '','menu_name' => '说说');$args = array('labels' => labels,'public' => true,'publicly_queryable' => true,'show_ui' => true,'show_in_menu' => true,'query_var' => true,'rewrite' => true,'capability_type' => 'post','has_archive' => true,'hierarchical' => false,'menu_position' => null,'supports' => array('title','editor','author','comments'));register_post_type('shuoshuo',args);
}
add_action('init', 'shuoshuo_custom_init');
2、添加说说/心情WP页面模板文件
添加说说/心情WP页面模板文件,添加完上述函数后,我们就可以在后台发现一个“说说”的菜单,通过菜单即可编辑说说,但是我们发现编辑完成后的说说并不能在前端显示出来,这时我们需要新建一个说说的页面模板控制其前端显示,将以下代码复制并另存为 page-shuo.php 文件,并扔到主题根目录下。
<?php/*** Template Name: 说说/微语*/get_header(); ?><style>
body.theme-dark .cbp_tmtimeline::before{background:RGBA(255,255,255,0.06)}ul.cbp_tmtimeline{padding:0}div class.cdp_tmlabel > li .cbp_tmlabel{margin-bottom:0}.cbp_tmtimeline{margin:30px 0 0 0;padding:0;list-style:none;position:relative}.cbp_tmtimeline > li .cbp_tmtime{display:block;max-width:70px;position:absolute}.cbp_tmtimeline > li .cbp_tmtime span{display:block;text-align:right}.cbp_tmtimeline > li .cbp_tmtime span:first-child{font-size:0.9em;color:#bdd0db}.cbp_tmtimeline > li .cbp_tmtime span:last-child{font-size:1.2em;color:#9BCD9B}.cbp_tmtimeline > li:nth-child(odd) .cbp_tmtime span:last-child{color:RGBA(255,125,73,0.75)}div.cbp_tmlabel > p{margin-bottom:0}.cbp_tmtimeline > li .cbp_tmlabel{margin:0 0 45px 65px;background:#24a0f0;color:#fff;padding:.8em 1.2em .4em 1.2em;font-weight:300;line-height:1.4;position:relative;border-radius:5px;transition:all 0.3s ease 0s;box-shadow:0 1px 2px rgba(0,0,0,0.15);cursor:pointer;display:block}.cbp_tmlabel:hover{transform:translateY(-3px);z-index:1;-webkit-box-shadow:0 15px 32px rgba(0,0,0,0.15) !important}.cbp_tmtimeline > li:nth-child(odd) .cbp_tmlabel{background:#7878f0}.cbp_tmtimeline > li:nth-child(odd) .cbp_tmlabel:after{border-right-color:#7878f0}.cbp_tmtimeline > li .cbp_tmlabel:after{right:100%;border:solid transparent;content:" ";height:0;width:0;position:absolute;pointer-events:none;border-right-color:#24a0f0;border-width:10px;top:4px}p.shuoshuo_time{margin-top:10px;border-top:1px dashed #fff;padding-top:5px;font-family:Ubuntu}@media screen and (max-width:65.375em){.cbp_tmtimeline > li .cbp_tmtime span:last-child{font-size:1.2em}}.shuoshuo_author_img img{border:1px solid #ddd;padding:2px;float:left;border-radius:64px;transition:all 1.0s;height:50px}.avatar{-webkit-border-radius:100% !important;-moz-border-radius:100% !important;box-shadow:inset 0 -1px 0 #3333sf;-webkit-box-shadow:inset 0 -1px 0 #3333sf;-webkit-transition:0.4s;-webkit-transition:-webkit-transform 0.4s ease-out;transition:transform 0.4s ease-out;-moz-transition:-moz-transform 0.4s ease-out}.zhuan{transform:rotateZ(720deg);-webkit-transform:rotateZ(720deg);-moz-transform:rotateZ(720deg)}
</style><div id="primary" class="content-area"><main id="main" class="site-main" role="main"><div class="cbp_shuoshuo"><?phpquery_posts("post_type=shuoshuo & post_status=publish & posts_per_page=-1");if (have_posts()) : ?><ul class="cbp_tmtimeline"><?phpwhile (have_posts()) : the_post(); ?><li><span class="shuoshuo_author_img"><img src="<?php echo get_avatar_url(get_the_author_meta('ID')); ?>" class="avatar avatar-48" width="48" height="48"></span><a class="cbp_tmlabel" href="javascript:void(0)"><p></p><p><?php the_content(); ?></p><p></p><p class="shuoshuo_time"><i class="fa fa-clock-o"></i> <?php the_time('Y年n月j日G:i'); ?></p></a></li><?php endwhile;wp_reset_query();//重置查询?></ul><?phpelse : ?><h3 style="text-align: center;">你还没有发表说说噢!</h3><p style="text-align: center;">赶快去发表你的第一条说说心情吧!</p><?phpendif; ?></div></main><!-- #main -->
</div><!-- #primary -->
<script type="text/javascript">(function() {var oldClass = "";var Obj = "";(".cbp_tmtimeline li").hover(function() {Obj = $(this).children(".shuoshuo_author_img");Obj = Obj.children("img");oldClass = Obj.attr("class");var newClass = oldClass + " zhuan";Obj.attr("class", newClass);}, function() {Obj.attr("class", oldClass);})})
</script>
<?php
get_footer();
3、新建页面
上面代码部署完成后前往WP后台新建一个页面,页面模板选择“说说/心情”即可。
全站字体替换
1、选择字体
先选择一个你喜欢的字体下载他的TTF字体包(超过3M的我不建议你用它),用https://transfonter.org/转下格式(eot、woff、ttf、svg)
2、引用你的字体包
然后按如下引用你的字体包,放到主题根目录的 style.css 文件里
@font-face {font-family: "zhanku";src: url("zhanku.eot"); /* IE9 */src: url("zhanku.eot?#iefix") format("embedded-opentype"), /* IE6-IE8 */url("zhanku.woff") format("woff"), /* chrome、firefox */url("zhanku.ttf") format("truetype"), /* chrome、firefox、opera、Safari, Android, iOS 4.2+ */url("zhanku.svg#zhanku") format("svg"); /* iOS 4.1- */font-style: normal;font-weight: normal;font-display: swap;
}
注意名称的统一
最后主题根目录的 style.css 文件,大概在第7881行、8262行、8285行、8290行,找不到的 Ctrl + F,在前面加入你的字体,如下
.top-feature-row {width: 100%;height: auto;font-family: 'Noto Serif SC';/*这边用原来字体主要是怕聚焦图错位*/margin-top: 55px
}
/*移动端字体*/
.chinese-font {font-family: zhanku, 'Merriweather Sans', Helvetica, Tahoma, Arial, 'PingFang SC', 'Hiragino Sans GB', 'Microsoft Yahei', 'WenQuanYi Micro Hei', sans-serif
}
/*PC端字体*/
.serif {font-family: zhanku, 'Noto Serif SC', 'Source Han Serif SC', 'Source Han Serif', source-han-serif-sc, 'PT Serif', 'SongTi SC', 'MicroSoft Yahei', Georgia, serif
}
/*移动端字体*/
@media (max-width:860px) {.serif {font-family: zhanku, 'Merriweather Sans', Helvetica, Tahoma, Arial, 'PingFang SC', 'Hiragino Sans GB', 'Microsoft Yahei', 'WenQuanYi Micro Hei', sans-serif}
}
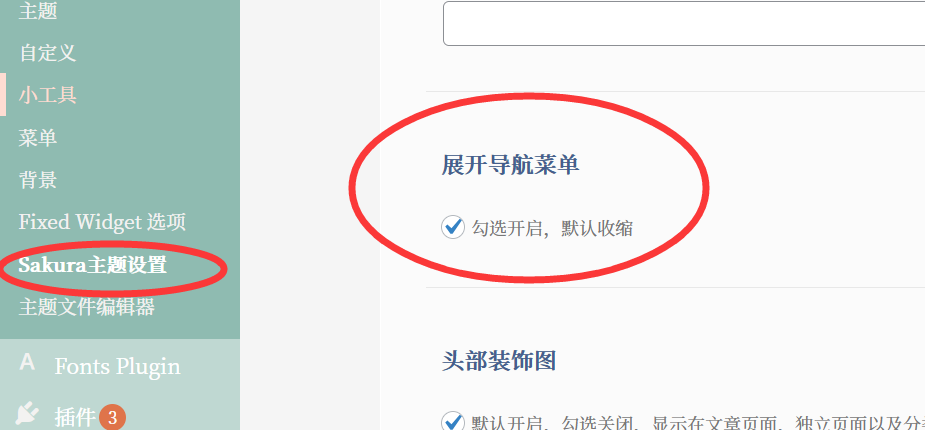
菜单栏居中显示
1、关闭菜单栏收起
2、修改header.php
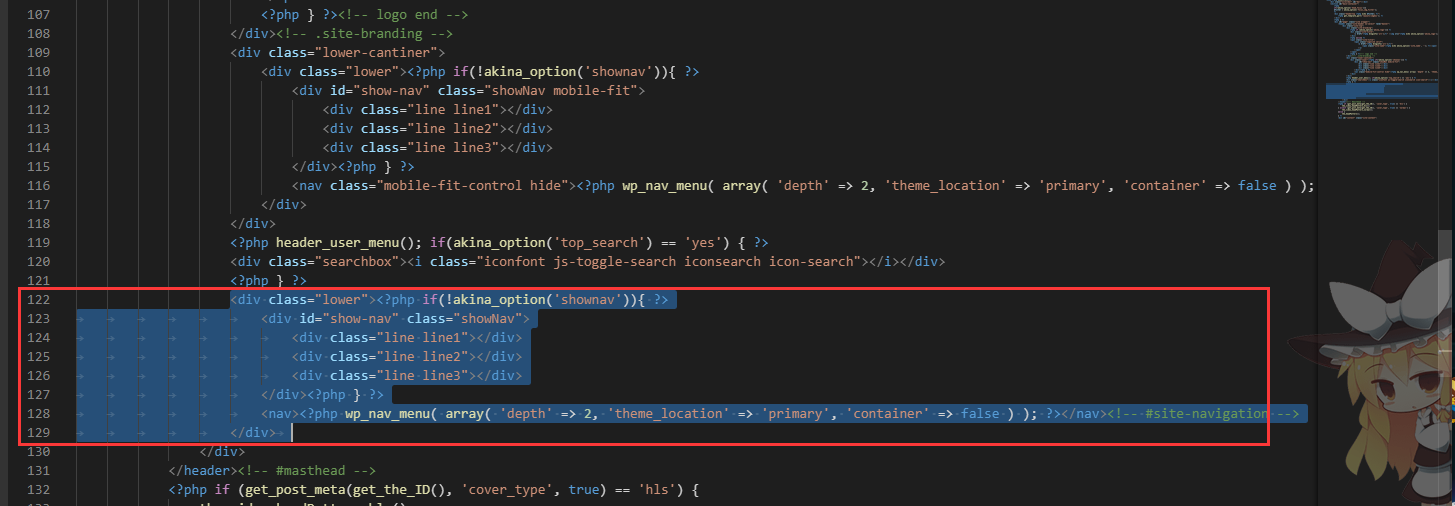
首先要修改 Sakura 主题目录的 header.php 文件,总共需要修改两处我在下图已标明

找不到的直接搜索
找到 </div><!-- .site-branding --> 在其下面加入
<div class="lower-cantiner"><div class="lower"><?php if(!akina_option('shownav')){ ?><div id="show-nav" class="showNav mobile-fit"><div class="line line1"></div><div class="line line2"></div><div class="line line3"></div></div><?php } ?><nav class="mobile-fit-control hide"><?php wp_nav_menu( array( 'depth' => 2, 'theme_location' => 'primary', 'container' => false ) ); ?></nav><!-- #site-navigation --></div></div>
然后我们再将重复部分删除/注释掉
3、修改Sakura主题目录的 style.css
修改前记得在 WP后台-外观-主题设置-CDN-开启本地调用主题 js、css 文件 选项哦~
增加如下CSS(标记为修改的需要自己Ctrl+F找到该属性修改下)
/* 菜单栏居中 */
.site-header.is-homepage .lower-cantiner {display: none;
}
.site-header.is-homepage.yya .lower-cantiner {display: block;
}
.site-header:hover.is-homepage .lower-cantiner {display: block;
}
.site-top .lower-cantiner {position: absolute;left: 50%;min-width: 758.4px;pointer-events: none;
}
#show-nav.mobile-fit {position: fixed !important;right: 120px;opacity: 0;pointer-events: none;
}
之后需要修改 style.css 中的部分属性,请依照下方修改,找不到的 Ctrl+F
/*此属性需要修改*/
.site-top .lower {position: relative;display: inline-block;margin: 15px 0 0 10px;font-size: 16px;left: -50%;pointer-events: auto !important;
}
/*此属性需要修改*/
@media(max-width:1200px) {.site-top .lower nav{/*right: calc(-150px - 100%);这行注释适配IPadPro*/position: absolute;float: right;animation: searchbox .2s;min-width: 860px;z-index: -1;}.site-top .lower nav.navbar {right: calc(-50px - 100%);}.site-top .lower nav.navbar ul {background: #fff;}
}
参考博客
[https://blog.ukenn.top](https://blog.ukenn.top)
[https://www.fuwafuwa.club](https://www.fuwafuwa.club)
[https://fairysen.com](https://fairysen.com)