文章目录
- MyBatis查询数据库
- 1. MyBatis 是什么?
- 2. 为什么要学习MyBatis?
- 3. 怎么学MyBatis?
- 4. 第一个MyBatis查询
- 4.1 创建数据库和表
- 4.2 添加MyBatis框架支持
- 4.3 配置连接字符串和MyBatis
- 4.3.1 配置连接数据库
- 配置MyBatis中的XML路径
- 4.4 添加业务代码
- 4.4.1 添加实体类
- 4.4.2 添加Mapper接口
- 4.4.3 添加UserMapper.xml
- 4.4.4 添加Service
- 4.4.5 添加Controller
- 5. 增、删、改操作
- 5.1 增加用户的操作
- 5.2 删除用户的操作
- 5.3 修改用户操作
- 6. 查询操作
- 6.1 单表查询
- 6.1.1 参数占位符 #{} 和 ${}
- 6.1.2 $优点
- 6.1.3 SQL 注入问题
- 6.1.4 like查询
- 6.2 多表查询
- 6.2.1 返回类型
- 6.2.2 返回字典映射:resultMap
- 6.2.3 多表查询
- 6.2.3.1 一对一的映射
- 6.2.3.2 一对多的映射
- 7. 复杂情况
- 7.1 `<if>`标签
- 7.2 `<trim>`标签
- 7.3 `<where>`标签
- 7.4 `<set>`标签
- 7.5 `<foreach>`标签
MyBatis查询数据库
经过前面的学习Spring系列的操作已经差不多了,接下来我们继续学习更加重要的知识,将前端传递的参数存储起来,或者查询数据库里面的数据
1. MyBatis 是什么?
MyBatis是款优秀的持久层框架,它支持自定义SQL、存储过程以及高级映射。MyBatis几乎祛除了所有的JDBC代码以及设置参数和获取结果集的操作。MyBatis可以通过简单的XML或者注解来配置和映射原始类型、接口和Java POJO为数据库中的记录
简单来说MyBatis是简单完成程序和数据库交互的工具,也就是更简单的操作和读取数据库的工具
2. 为什么要学习MyBatis?
对于后端程序员来说,程序是由以下两个程序组成的:
- 后端程序
- 数据库
而这两个重要的组成部分要通讯,就要依靠数据库连接工具,那么数据库连接工具有哪些?比如JDBC还有今天我们要介绍的MyBatis。既然已经有了JDBC,为什么还要学习MyBatis?这是因为JDBC操作太繁琐了,我们来回顾一下JDBC的操作流程:
- 创建数据库连接池
DataSource - 通过
DataSource获取数据库连接Connection - 编写要带?的占位符的SQL语句
- 通过
Connection及SQL创建操作命令对象Statement - 替换占位符:指定要替换的数据库字段类型,占位符索引及要替换的值
- 使用
Statement执行SQL语句 - 查询操作:返回结果集
ResultSet,更新操作:返回更新的数量 - 处理结果集
- 释放资源
3. 怎么学MyBatis?
MyBatis的学习只分为两部分:
- 配置MyBatis开发环境
- 使用MyBatis模式和语法操作数据库
4. 第一个MyBatis查询
开始搭建MyBatis之前,我们需要先来看看它在整个框架之中的地位
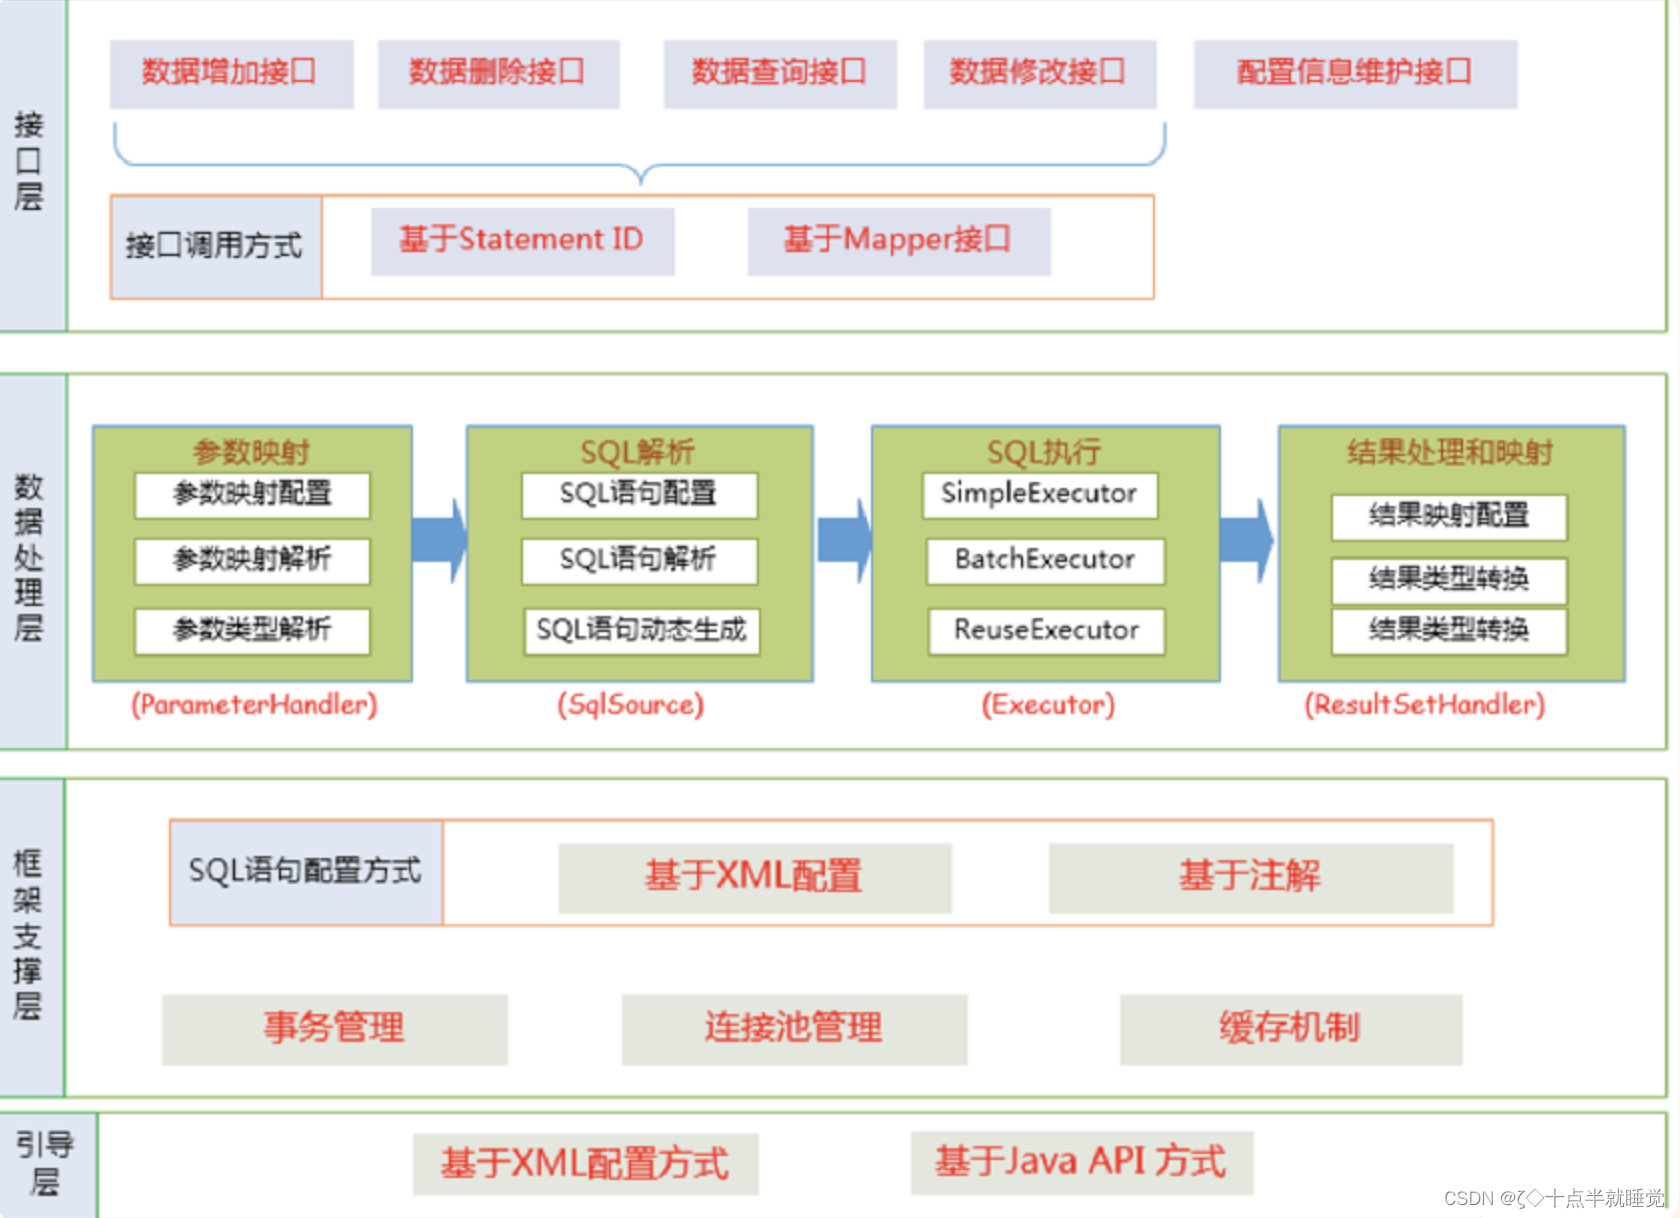
MyBatis也是一个ORM框架,ORM即对象关系映射。在面向对象编程语言当中,讲关系型数据库中的数据与对象建立起映射关系,进行自动完成数据与对象的相互转换
- 将输入数据(即传入对象)+ SQL映射原生SQL
- 将结果集映射为返回对象,即输出对象
ORM把数据库映射为对象:
- 数据表—》 类
- 记录—》对象
- 字段—》对象的属性
一般的ORM框架,会将数据库模型的每一张表都映射为一个Java类
也就是说使用MyBatis可以像操作对象一样操作数据库中的表,可以实现对象和数据表之间的转换,我们接下来看看MyBatis的使用
4.1 创建数据库和表
使用MyBatis的方式来读取用户表当中的所有用户,我们使用个人博客的数据包。
-- 创建数据库
drop database if exists mycnblog;
create database mycnblog DEFAULT CHARACTER SET utf8mb4;
-- 使⽤数据数据
use mycnblog;
-- 创建表[⽤户表]
drop table if exists userinfo;
create table userinfo(id int primary key auto_increment,username varchar(100) not null,password varchar(32) not null,photo varchar(500) default '',createtime datetime default now(),updatetime datetime default now(),`state` int default 1
) default charset 'utf8mb4';
-- 创建⽂章表
drop table if exists articleinfo;
create table articleinfo(id int primary key auto_increment,title varchar(100) not null,content text not null,createtime datetime default now(),updatetime datetime default now(),uid int not null,rcount int not null default 1,`state` int default 1
)default charset 'utf8mb4';
-- 创建视频表
drop table if exists videoinfo;
create table videoinfo(vid int primary key,`title` varchar(250),`url` varchar(1000),createtime datetime default now(),updatetime datetime default now(),uid int
)default charset 'utf8mb4';
-- 添加⼀个⽤户信息
INSERT INTO `mycnblog`.`userinfo` (`id`, `username`, `password`, `photo`,
`createtime`, `updatetime`, `state`) VALUES
(1, 'admin', 'admin', '', '2021-12-06 17:10:48', '2021-12-06 17:10:48', 1)
;
-- ⽂章添加测试数据
insert into articleinfo(title,content,uid)
values('Java','Java正⽂',1);-- 添加视频
insert into videoinfo(vid,title,url,uid) values(1,'java title','http://ww
w.baidu.com',1);
4.2 添加MyBatis框架支持
添加MyBatis框架支持分为两种情况:一种情况是对之前的Spring项目进行升级,另一种情况是创建一个全新的MyBatis和Spring Boot项目
扩展:在老项目当中快速的添加框架,更简单的操作是使用EditStarters插件
4.3 配置连接字符串和MyBatis
此步骤需要进行两项设置,数据库连接字符串设置和MyBatis的XML文件配置
4.3.1 配置连接数据库
spring:datasource:url: jdbc:mysql://127.0.0.1:3306/mycnblog?characterEncoding=utf8&&useSSL=falseusername: rootpassword: 123456driver-class-name: com.mysql.cj.jdbc.Driver
注意事项:
如果使用mysql-connector-java是5.x之前使用的
con.mysql.jdbc.Driver如果大于5.x使用的是com.mysql.cj.jdbc.Driver
配置MyBatis中的XML路径
MyBatis的XML中保存的是查询数据库的具体操作的SQL,配置如下:
mybatis:mapper-locations: classpath:mybatis/**Mapper.xml
4.4 添加业务代码
下面按照后端开发的工程思路,也就是下面的流程来实现MyBatis查询所有用户的功能:
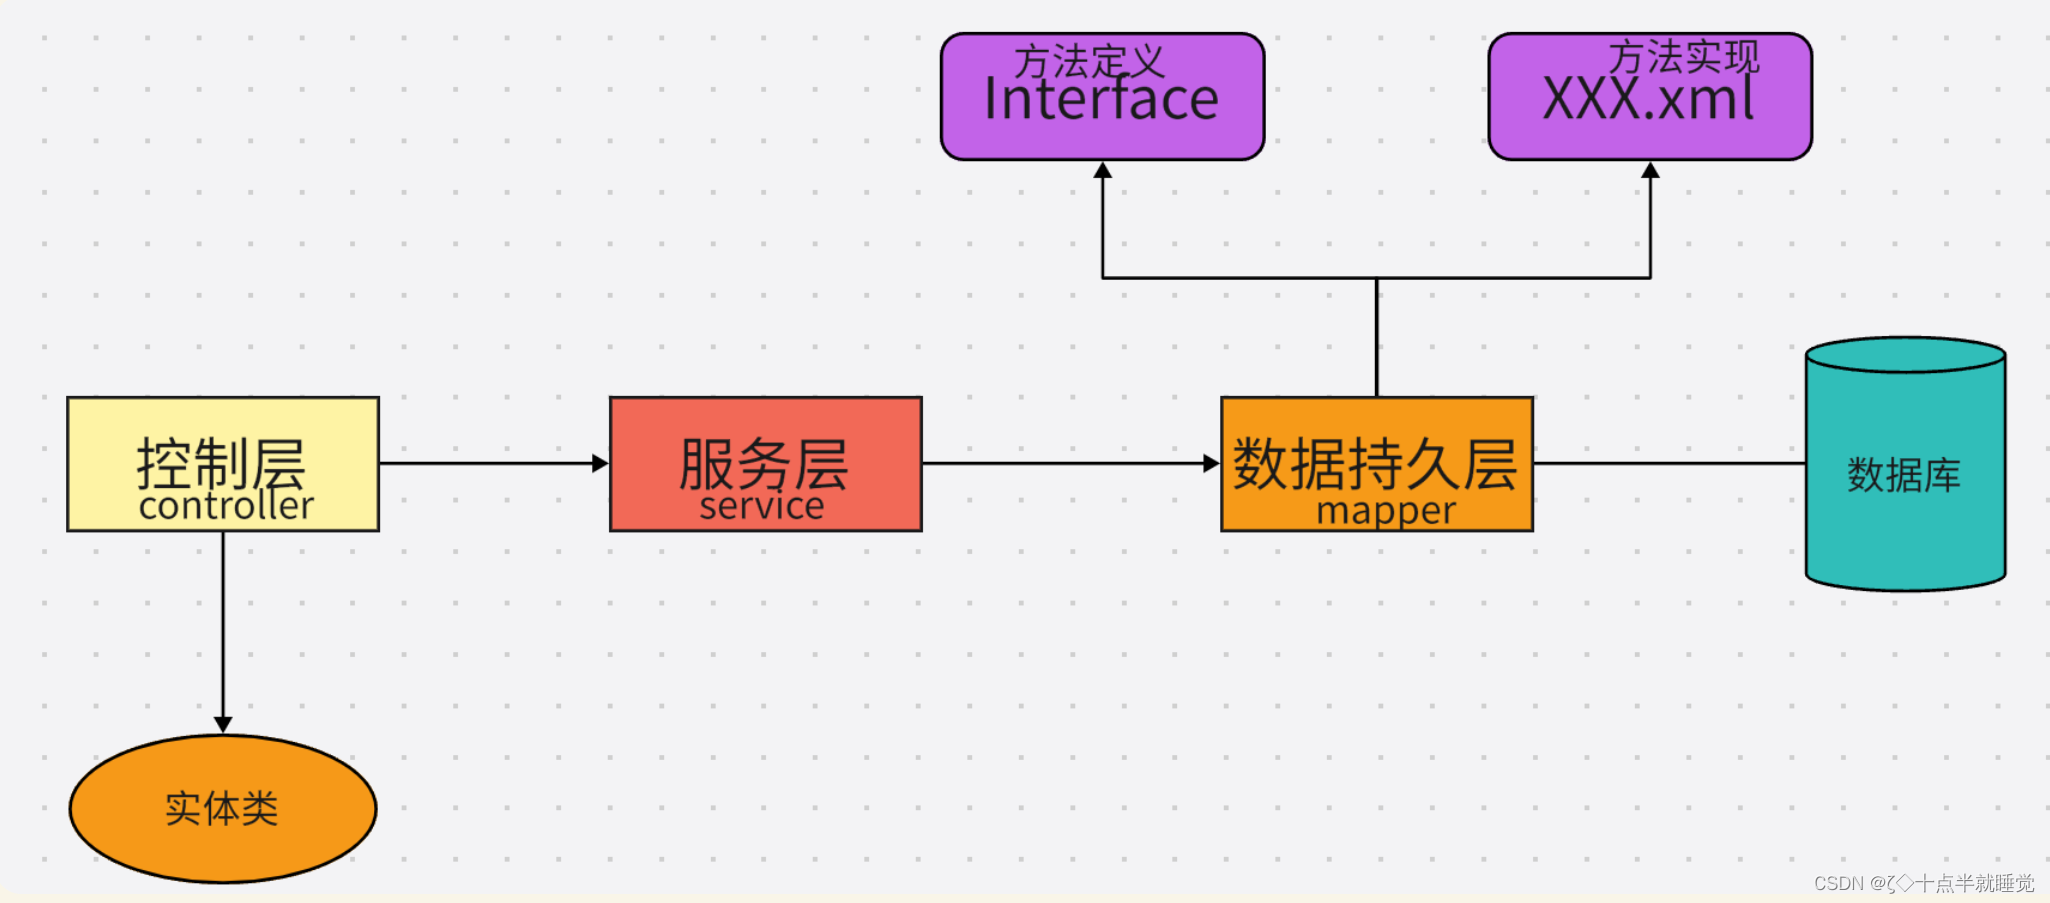
4.4.1 添加实体类
先添加用户的实体类:
import lombok.Data;
import java.util.Date;
@Data
public class User {private Integer id;private String username;private String password;private String photo;private Date createTime;private Date updateTime;
}
4.4.2 添加Mapper接口
数据持久层的接口定义:
@Mapper
public interface UserMapper {public UserInfo getUserById(@Param("id") Integer id);public void add(@RequestBody UserInfo userInfo);
}
4.4.3 添加UserMapper.xml
数据持久层的实现,MyBatis的固定格式:
<?xml version="1.0" encoding="UTF-8"?>
<!DOCTYPE mapper PUBLIC "-//mybatis.org//DTD Mapper 3.0//EN" "http://mybatis.org/dtd/mybatis-3-mapper.dtd">
<mapper namespace="com.example.demo.mapper.UserMapper"><select id="getUserById" resultType="com.example.demo.model.UserInfo">select * from userinfo where id = #{id}</select>
</mapper>
- 标签:需要指定namespace属性,表示命名空间,值为mapper接口的全限定名,包括包名.类名
<select>标签:是用来执行数据库的查询操作的- id:是和interface中定义的方法名称是一样的,表示对接口的具体实现方法
- resultType:是返回的数据类型,也就是开头定义的实体类
4.4.4 添加Service
服务层代码如下:
@Service
public class UserService {@Resourceprivate UserMapper userMapper;public UserInfo getUserById(Integer id) {return userMapper.getUserById(id);}
}
4.4.5 添加Controller
控制层的代码实现如下:
@Controller
@ResponseBody
public class UserController {@Resourceprivate UserService userService;@RequestMapping("/getuserbyid")public UserInfo getUserById(Integer id) {return userService.getUserById(id);}
}
5. 增、删、改操作
5.1 增加用户的操作
<insert id="add">insert into userinfo(username, password, photo) values (#{username}, #{password}, #{photo})
</insert>
<insert id="getId" useGeneratedKeys="true" keyProperty="id" keyColumn="id">insert into userinfo(username, password, photo) values (#{username}, #{password}, #{photo})
</insert>
- useGeneratedKeys: 这会令MyBatis使用JDBC的getGeneratedKeys 方法取出由数据库内部生成的主键。(像MySQL和SQL service这样的关系型数据库关系系统自增主键)默认值是:false
- keyColumn: 设置生成建在表中的列名,在某些数据库当中,当主键的列不是第一列的时候,是必须设置的。如果生成列不止一个,可以用逗号分割各个属性名称
- keyProperty:指定能够唯一
5.2 删除用户的操作
<delete id="del">delete from userinfo where id = #{id}
</delete>
5.3 修改用户操作
<update id="update">update userinfo set username = #{name} where id = #{id}
</update>
6. 查询操作
6.1 单表查询
controller代码如下:
@RequestMapping("/getuserbyid")
public UserInfo getUserById(Integer id) {return userService.getUserById(id);
}
Mapper.xml实现代码如下:
<select id="getUserById" resultType="com.example.demo.model.UserInfo">select * from userinfo where id = #{id}
</select>
6.1.1 参数占位符 #{} 和 ${}
- #{} :预编译处理
- ${}:字符直接替换
预编译处理是指:MyBatis在处理#{}时,会将SQL中的#{}替换为?,使用statement的set方法来赋值。直接替换:是MyBatis在处理时,就是把{}时,就是把时,就是把{}替换成变量的值
6.1.2 $优点
使用${}可以实现排序查询,而是用#{}就不能实现排序查询,因为当使用#{}查询时,如果传递的值为String则会加引号,就会导致SQL错误。
6.1.3 SQL 注入问题
<select id="isLogin" resultType="com.example.demo.model.User">select * from userinfo where username='${name}' and password='${pwd}'
</select>
结论:用于查询的字段,尽量使用#{}预查询的方式
6.1.4 like查询
like使用#{}报错,这个时候不能使用${},可以考虑使用MySQL内置的函数concat()来处理,实现代码如下:
<select id="findUserByName3" resultType="com.example.demo.model.User">select * from userinfo where username like concat('%',#{username},'%');
</select>
concat可以连接字符。
6.2 多表查询
如果增、删、改返回影响的行数,那么在mapper.xml中可以不设置返回的类型的。但是即使是最简单的查询,也要设置返回类型否则就会出现错误。
也就是说**对于<select>查询标签,至少存在两个属性:
- id 属性:用于标识实现接口的那个方法
- 结果映射属性:结果映射有两种实现标签:
<resultType和<resultMap
6.2.1 返回类型
绝大多数查询场景可以使用resultType进行返回,如下代码所示:
<select id="getNameById" resultType="java.lang.String">select username from userinfo where id=#{id}
</select>
它的优点就是使用方便、直接定义到某个实体类就可以
6.2.2 返回字典映射:resultMap
resultMap使用场景:
- 字段名称和程序中的属性名称不相同的情况,可以使用resultMap配置映射
- 一对一和多对一关系可以使用resultMap映射并查询数据
字段名和属性名不同的情况
<resultMap id="BaseMap" type="com.example.demo.model.User"><id column="id" property="id"></id><result column="username" property="username"></result><result column="password" property="pwd"></result>
</resultMap>
<select id="getUserById" resultMap="com.example.demo.mapper.UserMapper.BaseMap">select * from userinfo where id=#{id}
</select>
6.2.3 多表查询
在多表查询的时候,如果使用resultMap标签,在一个类中包含了另一个对象是查询不出来包含的对象的。如下图所示:

此时我们就需要使用特殊手段来实现联表查询了。
6.2.3.1 一对一的映射
一对一映射要使用<association>标签,具体实现如下所示:一篇文章只能对应一个作者
<resultMap id="BaseMap" type="com.example.demo.model.ArticleInfo"><id column="id" property="id"></id><result column="title" property="title"></result><result column="content" property="content"></result><result column="createtime" property="createtime"></result><result column="updatetime" property="updatetime"></result><result column="uid" property="uid"></result><result column="rcount" property="rcount"></result><result column="state" property="state"></result><association property="userInfo" resultMap="com.example.demo.mapper.UserMapper.BaseMap" columnPrefix="u_">				</association>
</resultMap><select id="getArticleById" resultMap="BaseMap">select a.*, u.id u_id, u.username u_username, u.password u_password from articleinfo a left join userinfo u on a.uid = u.id where a.id = #{id}
</select>
以上使用<assciation>标签,表示一对一的结果映射:
- property属性:指定Article中对应的属性,即用户
- resultMap属性:指定关联的结果集映射,将基于该映射配置来组织用户数据
- columnPrefix属性:绑定一对一对象时,是通过columnPrefix+assoction.result.colmn来映射结果集字段
注意:columnPrefix属性不能省略,如果省略当联表中有相同的字段,那么会导致查询出错
6.2.3.2 一对多的映射
一对多需要使用<collection>标签,用法和<association>相同,如下所示:
<resultMap id="BaseMap" type="com.example.demo.model.ArticleInfo"><id column="id" property="id"></id><result column="title" property="title"></result><result column="content" property="content"></result><result column="createtime" property="createtime"></result><result column="updatetime" property="updatetime"></result><result column="uid" property="uid"></result><result column="rcount" property="rcount"></result><result column="state" property="state"></result><association property="userInfo" resultMap="com.example.demo.mapper.UserMapper.BaseMap" columnPrefix="u_">		    </association>
</resultMap><select id="getArticleById" resultMap="BaseMap">select a.*, u.id u_id, u.username u_username, u.password u_password from articleinfo a left join userinfo u on a.uid = u.id where a.id = #{id}
</select>
7. 复杂情况
动态SQL是MyBatis的强大特性之一,能够完成不同条件下不同的sql拼接
7.1 <if>标签
在注册的时候,我们可能遇到这样一个问题。注册分为两个字段:必填字段和非必传字段,那如果在添加用户的时候又不确定的字段传入,程序应该如何实现?
这个时候我们就需要使用动态标签了。
<insert id="add2">insert into userinfo(username, password<if test="photo != null">,photo</if>) values (#{username}, #{password}<if test="photo != null">,#{photo}</if>);
</insert>
注意test中的,是传入对象的属性,不是数据库字段
7.2 <trim>标签
之前的插入功能,只是有一个字段为可选项,如果所有字段都是非必选项,就需要考虑用标签结合标签,对多个字段都采用动态生成的方式。
标签当中有如下属性:
- prefix: 表示整个语句块,以prefix值为前缀
- suffix:表示整个语句块,以suffix的值为后缀
- prefixOverrides:表示整个语句块要去除的前缀
- suffixOverrides:表示整个语句块要去除的后缀
使用方法如下:
<insert id="add3">insert into userinfo<trim prefix="(" suffix=")" suffixOverrides=","><if test="username != null">username,</if><if test="password != null">password,</if><if test="photo != null">photo</if>values<trim prefix="(" suffix=")" suffixOverrides=","><if test="username != null">#{username},</if><if test="password != null">#{password},</if><if test="photo != null">#{photo}</if></trim></trim>
</insert>
以上SQL动态解析时,会将第一个trim部分如下处理:
- 基于
prefix配置,开始加上( - 基于
suffix配置,结束部分加上) - 多个if组织的语句都以, 结尾,在最后拼接好的字符串还会以,结尾会基于
suffixOverrides配置去掉最后一个, - if 中的test是传入对象的属性
7.3 <where>标签
传入对象时,根据属性做where条件查询,用户对象中属性不为null,都为查询条件。
<select id="getUserById" resultMap="BaseMap">select * from userinfo<where><if test="id != null">id = #{id}</if></where>
</select>
7.4 <set>标签
根据传入的用户对象属性来更新用户数据,可以使用标签来指定动态内容
<update id="updateById" parameterType="org.example.model.User">update user<set><if test="username != null">username=#{username},</if><if test="password != null">password=#{password},</if><if test="nickname != null">nickname=#{nickname},</if><if test="sex != null">sex=#{sex},</if><if test="birthday != null">birthday=#{birthday},</if><if test="head != null">head=#{head},</if><if test="createTime != null">create_time=#{createTime},</if></set>where id=#{id}
</update>
7.5 <foreach>标签
对集合进行遍历时, 可以使用该标签。<foreach>标签有以下属性。
- collection:绑定方法参数中的集合,如List、Set、Map或数组对象
- item:遍历时的每一个对象
- open:语句块开头的字符串
- close:语句块结束时的字符串


![Java Web 项目入门指南(http、Servlet、Request、Response、ServletContext、会话技术[cookie、session]、Filter、Listener)](https://img-blog.csdnimg.cn/9d27cbe217114a8897de53bbacb21993.png#pic_center)