indicator-sysmonitor
ubuntu 16.04电脑运行时,经常出现卡机现象,速度慢的情况。可以安装indicator-sysmonitor用来显示cpu、内存、网速系统资源消耗
效果图如下:
![]()
安装
sudo add-apt-repository ppa:fossfreedom/indicator-sysmonitor
sudo apt-get update
sudo apt-get install indicator-sysmonitor
启动
indicator-sysmonitor &相关设置
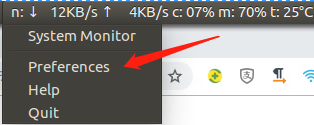
开机启动

显示设置
n: {net} c: {cpu} m: {mem} t: {cputemp}

提示Error:Unable to locate package indicator-sysmonitor
sudo apt-get install indicator-sysmonitor
Reading package lists... Done
Building dependency tree
Reading state information... Done
E: Unable to locate package indicator-sysmonitor
通过原始官方网站下载deb文件安装即可
https://launchpad.net/indicator-sysmonitor
Conky
conky是可以在Linux中实现桌面级系统资源监控的软件。同时由于具有较高的可配置性而成为桌面定制不可或缺的插件式软件之一。
Conky安装(apt)
sudo apt install conkyConky配置
sudo mkdir ~/.config/conky
sudo gedit ~/.config/conky/.conkyrc
-- vim: ts=4 sw=4 noet ai cindent syntax=luaconky.config = {alignment = 'top_right',background = false,border_width = 0.1,cpu_avg_samples = 4,default_color = 'white',default_outline_color = 'gray',default_shade_color = 'black',draw_borders = true,draw_graph_borders = false,draw_outline = false,draw_shades = false,use_xft = true,font = 'DejaVu Sans Mono:size=11',gap_x = 10,gap_y = 45,minimum_height = 5,minimum_width = 5,net_avg_samples = 2,double_buffer = true,out_to_console = false,out_to_stderr = false,extra_newline = false,own_window = true,own_window_colour = '000000',own_window_class = 'Conky',own_window_argb_visual = true,own_window_type = 'dock',own_window_transparent = true,own_window_hints = 'undecorated,below,sticky,skip_taskbar,skip_pager',stippled_borders = 0,update_interval = 1,uppercase = false,use_spacer = 'none',show_graph_scale = false,show_graph_range = false
}conky.text = [[
#${image ~/.face -p 180,5 -s 70x70 -f 86400}${image ~/.pacman -p 20,9 -s 60x60 -f 86400}
${font Entopia:bold:size=8}${alignc}   Conky PID: ${color red}${execi 15 pgrep -l conky | cut -d ' ' -f 1}
################SYSTEM################
${font Entopia:bold:size=12}${color 0277BD}SYSTEM ${hr 2}${font}
${offset 15}${font Entopia:size=11}${time %F %A}(w:${time %w}) ${alignr}${time %T}
${offset 15}Hostname: $alignr$nodename
${offset 15}System: ${alignr}${exec hostnamectl | grep System | cut -c18-40}
${offset 15}Kernel: $alignr$kernel
${offset 15}Machine:$alignr$machine
${offset 15}Uptime: $alignr$uptime
${offset 15}Temp: ${alignr}${acpitemp} °C
${offset 15}Battery:$alignr${battery}
################PERFORMANCE################
${font Entopia:bold:size=12}${color 33E9FF}PERFORMANCE ${hr 2}${font}
${offset 15}${color FFFDE2}Frequency: ${alignr}${freq dyn} MHz
${offset 15}${color FFFDE2}RAM Usage:$color $mem${color0}/${color4}$memmax - $memperc%
${offset 15}${color yellow}${membar 5}
${offset 15}${color FFFDE2}CPU:$color ${cpu}% ${color yellow}${cpubar 5}${color FFFDE2}${offset 15}Core 1   ${color ff9300}${cpubar cpu1 6}${color FFFDE2}
${offset 15}Core 2   ${color ff7300}${cpubar cpu2 6}${color FFFDE2}
${offset 15}Core 3   ${color ff4300}${cpubar cpu3 6}${color FFFDE2}
${offset 15}Core 4   ${color ff1300}${cpubar cpu4 6}${color FFFDE2}
${offset 15}${font}${color FFFDE2}Procs:$color $processes  ${color FFFDE2}Run:$color $running_processes Temp: ${acpitemp}°C
################NETWORK################
${font Entopia:bold:size=12}${color green}NETWORK ${hr 2}${font}
${offset 15}${color FFFDE2}Ext IP Addr ${color 33E9FF}${alignr}${exec cat /home/$USER/.conky/myip.txt}
${offset 15}${color FFFDE2}GateWay:${color 33E9FF}${alignr}${gw_ip}
${offset 5}${font Entopia:bold:size=12}${color orange}LAN  ${stippled_hr 1}
${offset 15}${font}${color FFFDE2}IPv4 Addr ${color 33E9FF}${alignr}${addr enp0s31f6}
${offset 15}${color green}${font}▼ $color${downspeed enp0s31f6} ${alignr}${color green}▲ $color${upspeed enp0s31f6}
${offset 15}${font}${color}DOWN ${downspeedgraph enp0s31f6 32,0 324D23 77B753}
${offset 15}${font}${color}UP   ${upspeedgraph enp0s31f6 32,0 104E8B ffff00}
${offset 5}${font Entopia:bold:size=12}${color orange}${wireless_essid wlp9s0} ${stippled_hr 1}
${offset 15}${color FFFDE2}${font}WiFi ${alignr}${wireless_link_qual_perc
wlp9s0}%(${wireless_link_qual wlp9s0}/${wireless_link_qual_max wlp9s0}) ${color 33E9FF}${addr wlp9s0}
${offset 15}${font}${color green}▼ $color${downspeed wlp9s0} ${alignr}${color green}▲ $color${upspeed wlp9s0}
${offset 15}${font}${color}DOWN ${downspeedgraph wlp9s0 32,0 324D23 77B753}
${offset 15}${font}${color}UP   ${upspeedgraph wlp9s0 32,0 104E8B ffff00}
################PROCESSES################
${font Entopia:bold:size=12}${color 33E9FF}PROCESSES ${hr 2}
${offset 15}${font Noto sans:size=9}${color EDE0FF}Name	${alignr}PID     CPU%  MEM%
${offset 15}${color FF7878}${top name 1} ${alignr}${top pid 1}  ${top cpu 1}   ${top mem 1}
${offset 15}${color FF7878}${top name 2} ${alignr}${top pid 2}  ${top cpu 2}   ${top mem 2}
${offset 15}${color FF7878}${top name 3} ${alignr}${top pid 3}  ${top cpu 3}   ${top mem 3}
${offset 15}${color FF7878}${top name 4} ${alignr}${top pid 4}  ${top cpu 4}   ${top mem 4}
${offset 15}${color FF7878}${top name 5} ${alignr}${top pid 5}  ${top cpu 5}   ${top mem 5}
${offset 15}${color FF7878}${top name 6} ${alignr}${top pid 6}  ${top cpu 6}   ${top mem 6}
${offset 15}${color FF7878}${top name 7} ${alignr}${top pid 7}  ${top cpu 7}   ${top mem 7}
${offset 15}${color FF7878}${top name 8} ${alignr}${top pid 8}  ${top cpu 8}   ${top mem 8}
${offset 15}${color FF7878}${top name 9} ${alignr}${top pid 9}  ${top cpu 9}   ${top mem 9}
################DISKINFO################
${font Entopia:bold:size=12}${color 7cfc00} DISKINFO ${hr 2}
${offset 15}${font Entopia:size=12}disk : ${diskio}
${offset 15}$Disk I/O:
${offset 15}${diskiograph 32,0 ff7300 ff7300}
${offset 15}/:${alignr}${fs_used /}/${fs_size /}(${fs_used_perc /}%)
${offset 15}${fs_bar 4 /}
#${font Entopia:bold:size=12}${color 33E9FF}END ${hr 2}${font}
]]
该文件完成编写后,可以通过终端输入:
conky -c ~/.config/conky/.conkyrc
从而得到执行。
配置文件中enp0s31f6和wlp9s0分别为Ubuntu22.04可识别的WiFi网卡及有线网卡,请参照个人情况进行修改。
可通过ifconfig或ip addr查看(考虑到部分系统已经放弃ifconfig命令)
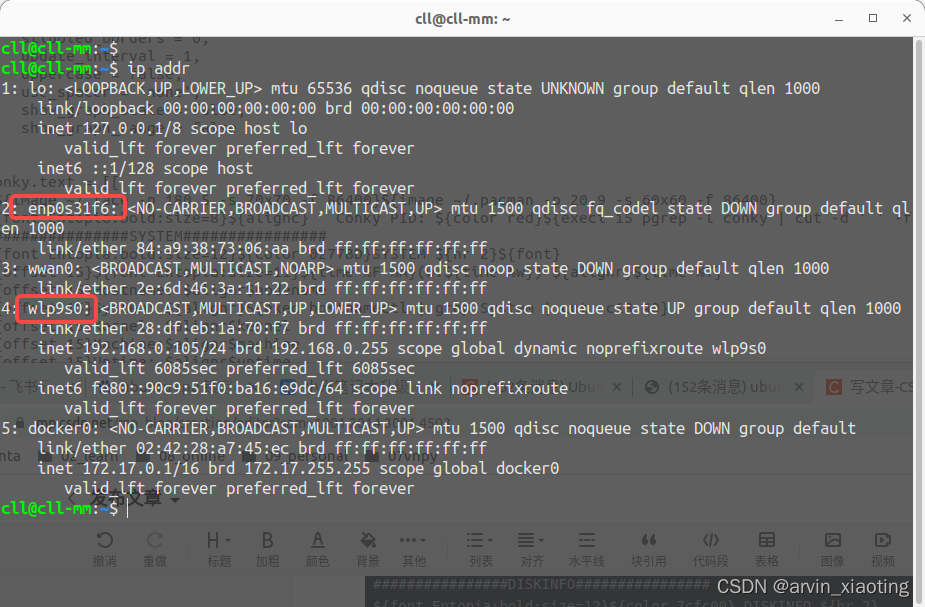
配置文件里有一个细节,就是
${alignc} Conky PID: ${color red}${execi 15 pgrep -l conky | cut -d ' ' -f 1}
这段配置在Conky界面上显示了Conky的PID,由于设置的Conky使用形式是后台服务程序,在一开始的使用里我曾陷入了不知道怎么关闭后台Conky的情况,后来也是通过不断地ps查看Conky活跃的PID,再进行强行关闭的操作。所以在新的配置中加入了当前Conky程序的PID,在迫不得已的时候可以直接在终端通过kill命令关闭当前Conky。
另一个细节是:
${offset 15}${color FFFDE2}Ext IP Addr ${color 33E9FF}${alignr}${exec cat /home/$USER/.conky/myip.txt}
这个配置是每15秒将/home/$USER/.conky/myip.txt中的IP地址返回到Conky中,显示为Ext IP Addr。而这个myip.txt文件是我通过shell命令生成的,
Conky的配置就到此结束了。下面是后续配置开机启动的设置。
系统环境:Ubuntu 22.04 LTS
为了让Conky可以从应用列表中启动(其实很多时候没有必要),我们先为Conky的启动命令简单地做一个shell脚本:
sudo gedit ~/.config/conky/startconky.shsleep 15
curl http://members.3322.org/dyndns/getip > ~/.conky/myip.txt
conky -c ~/.config/conky/.conkyrc
为了避免开机启动的时候会造成资源拥塞,因此设置了15秒的延时。并且将当前IP写到~/.conky/myip.txt文件中。
使用gnome-session-properties命令,打开开机启动配置项目,配置需要启动的脚本或者应用
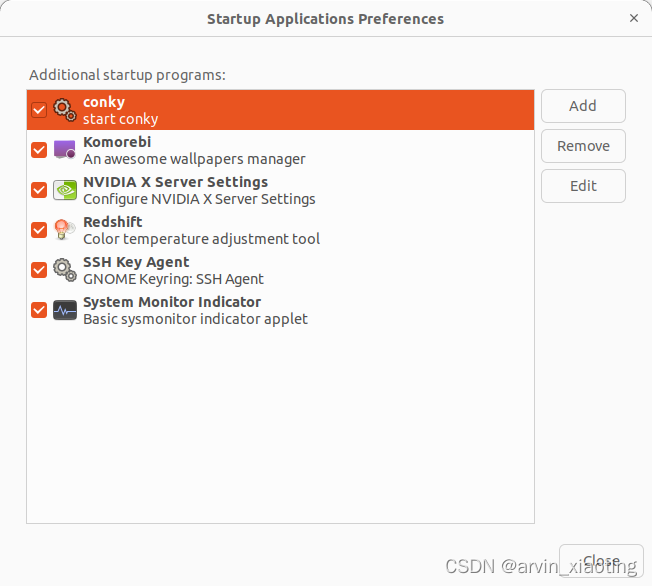

Komorebi
Komorebi壁纸软件,支持图片、视频、网页三种格式的壁纸。Komorebi中文意思为叶间洒落的阳光,单单是名字就已经很美了。这个单词在日本音乐作品中出现的频率很高,日本指弹吉他演奏家押尾桑有一首指弹作品就叫做《Komorebi》;此外,日本音乐家m-taku有一首钢琴曲也叫《Komorebi》。
首先需要下载komorebi的软件包,下载地址:
https://github.com/cheesecakeufo/komorebi/releases/download/v2.1/komorebi-2.1-64-bit.deb
然后在终端中执行如下命令来安装:
sudo apt install komorebi-2.1-64-bit.deb安装完成后,在应用程序窗口会出现两个程序启动器:Komorebi和Wallpaper Creator。
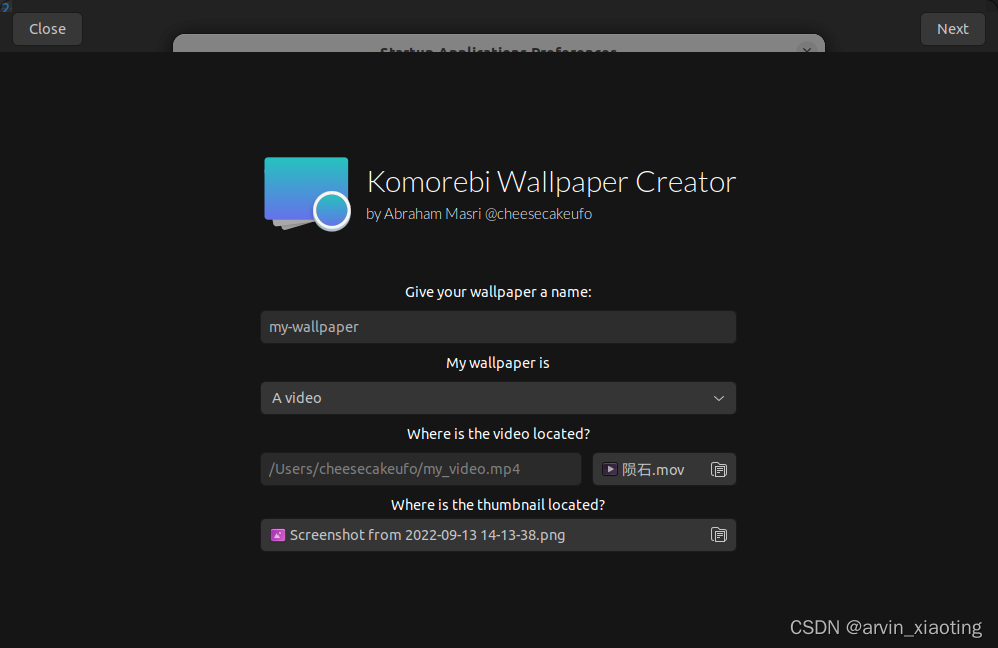
在Komorebi中可以更换壁纸。Wallpaper Creator可以创建自定义的壁纸。这里选择的是视频壁纸,输入名称,选择视频路径以及缩略图路径(注意这里缩略图不可缺少,缺少的话创建完成后无法看到新创建的壁纸)。之后可更改时间显示位置等配置,根据习惯配置即可。
最后,需要将刚创建好的壁纸配置文件夹移动至Komorebi文件夹内,按照Wallpaper Creator的提示在终端中输入命令行即可,如上图。
完成之后,便可以在Komorebi里看到自己创建的新壁纸了。应用即是动态壁纸
redshift护眼
redshift&redshift-gtk(带个小图标)![]() ,我二个都安装了。
,我二个都安装了。
sudo apt-get install redshift
sudo apt-get install redshift-gtk
设置一下参数即可启动:30.40:120.52 表示上海的经纬度,用于昼夜调节 ;5500:5000 表示白天色温5500 夜晚色温5000
redshift-gtk -l 34.27:108.93 -t 5500:5000加入开机启动
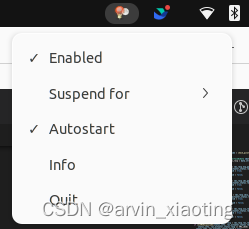
再重定义一下redshift的配置文件用于自启使用配置文件:
sudo gedit ~/.config/redshift.conf用gedit打开(新建)一个redshift的配置文件
; Global settings for redshift
[redshift]
; Set the day and night screen temperatures
temp-day=5000
temp-night=3500; Enable/Disable a smooth transition between day and night
; 0 will cause a direct change from day to night screen temperature.
; 1 will gradually increase or decrease the screen temperature.
transition=1; Set the screen brightness. Default is 1.0.
;brightness=0.9
; It is also possible to use different settings for day and night
; since version 1.8.
;brightness-day=0.7
;brightness-night=0.4
; Set the screen gamma (for all colors, or each color channel
; individually)
gamma=0.8
;gamma=0.8:0.7:0.8
; This can also be set individually for day and night since
; version 1.10.
;gamma-day=0.8:0.7:0.8
;gamma-night=0.6; Set the location-provider: geoclue, geoclue2, manual
; type redshift -l list to see possible values.
; The location provider settings are in a different section.
location-provider=manual; Set the adjustment-method: randr, vidmode
; type redshift -m list to see all possible values.
; randr is the preferred method, vidmode is an older API.
; but works in some cases when randr does not.
; The adjustment method settings are in a different section.
adjustment-method=randr; Configuration of the location-provider:
; type redshift -l PROVIDER:help to see the settings.
; ex: redshift -l manual:help
; Keep in mind that longitudes west of Greenwich (e.g. the Americas)
; are negative numbers.
[manual]
lat=22.5
lon=88.3; Configuration of the adjustment-method
; type redshift -m METHOD:help to see the settings.
; ex: redshift -m randr:help
; In this example, randr is configured to adjust screen 1.
; Note that the numbering starts from 0, so this is actually the
; second screen. If this option is not specified, Redshift will try
; to adjust _all_ screens.
[randr]
screen=0
运行以下命令重新系统即可
redshift -c .config/redshift.conf正常情下会自动加入开机启动,若未加入开机启动手动添加下
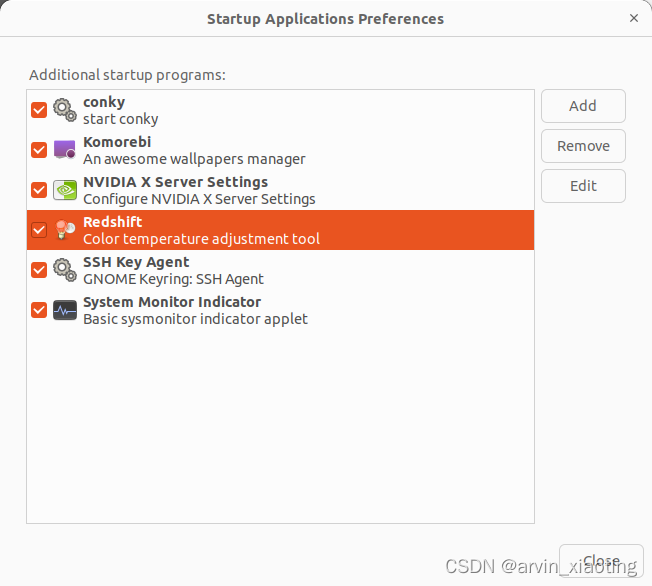
若提示以下错误
在GNOME的隐私设置中启用位置服务,或使用手动位置提供程序。


