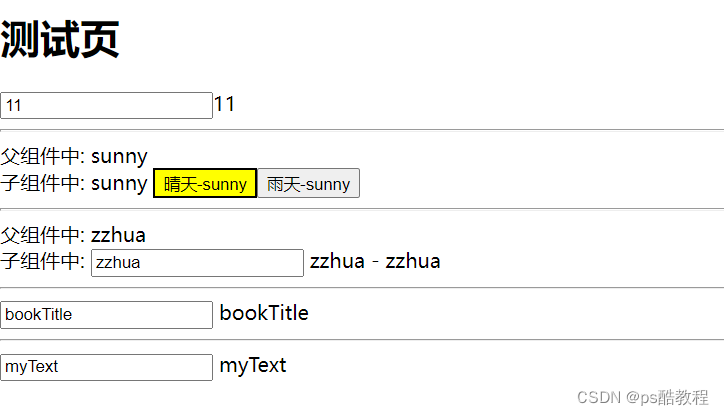
< template> < inputtype = " text" v-model = " title" /> < span> </ span> </ template> < scriptlang = " ts" setup > import { ref, reactive } from 'vue' const title = ref ( "11" ) </ script> < stylelang = " scss" > </ style> < template> < br/> < CustomInputv-model = " weather" /> </ template> < scriptlang = " ts" setup > import { ref, reactive } from 'vue' import CustomInput from '@/views/test/CustomInput.vue' const weather = ref ( 'rainy' )
</ script> < stylelang = " scss" > </ style> < template> < button:class = " {sunny:modelValue === 'sunny'}" @click = " $emit('update:modelValue','sunny')" > </ button> < button:class = " {sunny:modelValue === 'rainy'}" @click = " $emit('update:modelValue','rainy')" > </ button> </ template> < scriptlang = " ts" setup > const props = defineProps ( [ 'modelValue' ] ) const emits = defineEmits ( [ 'update:modelValue' ] ) </ script> < stylelang = " scss" > .sunny { background : yellow; } .rainy { background : darkgray; }
</ style> < template> < br/> < custom-input2v-model = " value1" /> </ template> < scriptlang = " ts" setup > import { ref, reactive } from 'vue' import CustomInput2 from '@/views/test/CustomInput2.vue' const value1 = ref ( "zzhua" ) </ script> < stylelang = " scss" > </ style> < template> < input:value = " value" @input = " value = $event.target.value" /> </ template> < scriptlang = " ts" setup >
import { computed } from 'vue' const props = defineProps ( [ 'modelValue' ] )
const emit = defineEmits ( [ 'update:modelValue' ] ) const value = computed ( { get ( ) { return props. modelValue} , set ( value) { emit ( 'update:modelValue' , value) }
} )
</ script> < template> < CustomInput3v-model: title= " bookTitle" /> </ template> < scriptlang = " ts" setup > import { ref, reactive } from 'vue' import CustomInput3 from '@/views/test/CustomInput3.vue' ; const bookTitle = ref ( "bookTitle" ) </ script> < stylelang = " scss" > </ style> < template> < inputtype = " text" :value = " title" @input = " $emit('update:title', $event.target.value)" /> </ template> < scriptsetup > defineProps ( [ 'title' ] ) defineEmits ( [ 'update:title' ] )
</ script> < template> < MyComponentv-model.capitalize = " myText" /> </ template> < scriptlang = " ts" setup > import { ref, reactive } from 'vue' import MyComponent from '@/views/test/MyComponent.vue' ; const myText = ref ( "myText" ) </ script> < stylelang = " scss" > </ style> < template> < inputtype = " text" :value = " modelValue" @input = " handleInput" /> </ template> < scriptlang = " ts" setup > const props = defineProps ( { modelValue : String, modelModifiers : { default : ( ) => ( { } ) } } ) console. log ( props. modelModifiers) const emit = defineEmits ( [ 'update:modelValue' ] ) function handleInput ( e ) { let value = e. target. valueif ( props. modelModifiers. capitalize) { value = value. charAt ( 0 ) . toUpperCase ( ) + value. slice ( 1 ) } emit ( 'update:modelValue' , value) } </ script> < stylelang = " scss" > </ style> 


