什么是SpringIOC?
答:IOC即控制反转,就是我们不在手动的去new一个对象,而是将创建对象的权力交给Spring去管理,我们想要一个User类型的对象,就只需要定义一个User类型的变量user1,然后让Spring去给我们创建对象,然后将创建的对象注入到user1中。
什么是依赖注入?
答:DI机制(DependencyInjection),依赖注入,上面提到的Spring将它创建的对象交给我们创建的变量的过程。依赖注入的方式有三种(set方法注入、构造器注入、注解注入)。下面我们简答的实现注解注入,了解IOC原理。
第一步,创建注解
创建的注解其实没有太大的作用,就是用来标记哪个类需要Spring帮我们去管理,哪个成员变量需要Spring去给我们注入。
import java.lang.annotation.ElementType;
import java.lang.annotation.Retention;
import java.lang.annotation.RetentionPolicy;
import java.lang.annotation.Target;
/**
*创建注解文件Component.java
*标记需要IOC的类
**/
@Target(ElementType.TYPE)
@Retention(RetentionPolicy.RUNTIME)
public @interface Component {
}
import java.lang.annotation.ElementType;
import java.lang.annotation.Retention;
import java.lang.annotation.RetentionPolicy;
import java.lang.annotation.Target;
/**
*创建注解文件Autowired.java
*标记需要Spring帮忙DI的成员变量
**/
@Target(ElementType.FIELD)
@Retention(RetentionPolicy.RUNTIME)
public @interface Autowired {
}
第二部,创建两个需要注解的类
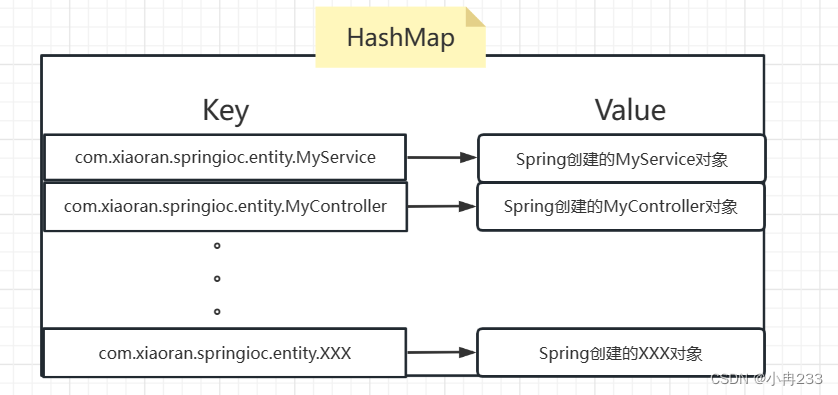
我们想要将MyService和MyController都交给Spring管理(项目启动后将这两个类实例化,然后放入一个HashMap中,等待调用)

import com.xiaoran.springioc.annotation.Component;
@Component
public class MyService {private int id;private String name;private int age;public void speck(String name,int age) {System.out.println("大家好,我叫"+name+"今年"+age+"岁了,请多多关照!");}
}
import com.xiaoran.springioc.annotation.Autowired;
import com.xiaoran.springioc.annotation.Component;
@Component
public class MyController {@Autowiredprivate MyService myService;public void test(){myService.speck("moss",67);}
}
第三步,IOC过程
创建MyIOC类,用于IOC过程
- 在项目启动时,实例化MyIOC,加载MyIOC的无参构造器时,对项目下所有的文件进行扫描,调用实例化方法完成被注释类的实例化和依赖注入。
private String basePath="D:\\Project\\XiaoRanIOC\\src\\main\\java\\com\\xiaoran\\springioc\\"; //项目路径private String basePackage="com.xiaoran.springioc"; //包路径private List<String> filePaths;//所有文件的路径private List<String> beanNames;//所有.java文件的全限定名private Map<String, Object> beans = new HashMap<>();/*** 实例化MyIOC时,让IOC进程伴随无参构造器加载启动*/public MyIOC() throws FileNotFoundException, IllegalAccessException {//扫描路径下所有文件scan();beanNames = new ArrayList<>();initBeanNames();initBeans();}
- 扫描项目下所有文件,将所有文件的路径存入filePaths中
/*** 扫描项目下所有文件,将所有文件的路径存入filePaths中*/public void scan() throws FileNotFoundException {File file = new File(basePath);filePaths=new ArrayList<>();if (file.exists()) {//将file放入列,出队后判断,如果是路径那就继续入队,如果是文件,就将文件路径放入filePaths中Queue<File> queue = new LinkedList<>();queue.add(file);while (!queue.isEmpty()) {File poll = queue.poll();if(poll==null){continue;}if (poll.isDirectory()){File[] files = poll.listFiles();for (File f :files) {queue.add(f);}}else{filePaths.add(poll.getPath());}}}else {throw new FileNotFoundException(basePath + "不存在");}}
- 将所有的.java文件的全限定名放入beanNames中
/***将所有的.java文件的全限定名放入beanNames中*/public void initBeanNames(){for (String string :filePaths) {String replace = string.replace(basePath, "");if (replace.endsWith(".java")) {replace = replace.substring(0, replace.length() - 5);}char[] chars = replace.toCharArray();for (int i = 0; i < chars.length; i++) {if(chars[i]=='\\'){chars[i] = '.';}}beanNames.add(basePackage+"."+new String(chars));}}
- 核心代码:将被@Component注解的类实例化放入beans(HashMap)中,等待调用
/***核心代码:将被@Component注解的类实例化放入beans(HashMap)中,等待调用*/public void initBeans() throws IllegalAccessException {//遍历包路径下所有类,是否被@Component注解,如果被注解就将其实例化放入beansfor (String beanName :beanNames) {try {Class<?> aClass = Class.forName(beanName);//获取类的所有注解Annotation[] declaredAnnotation = aClass.getDeclaredAnnotations();//遍历所有注解,是否是@Component注解for (Annotation annotation :declaredAnnotation) {if (annotation instanceof Component){Object o = aClass.newInstance();beans.put(beanName, o);}}} catch (ClassNotFoundException e) {e.printStackTrace();} catch (IllegalAccessException e) {e.printStackTrace();} catch (InstantiationException e) {e.printStackTrace();}}//遍历所有的beans的成员变量,如果有成员变量被@Autowired修饰,就根据成员变量的类型从beans中查找到对应的对象,用此对象给成员变量注入//因为是从beans中查找对象,所以被注入的成员变量对应的类一定是已经被实例化放入beans中的for (Map.Entry<String, Object> entry : beans.entrySet()) {Object value = entry.getValue();Field[] fields = value.getClass().getDeclaredFields();for (Field f :fields) {Annotation[] declaredAnnotations = f.getDeclaredAnnotations();for (Annotation annotation :declaredAnnotations) {if (annotation instanceof Autowired){//获取被@Autowired注解成员变量的类型(全限定名)String typeName = f.getType().getName();Object o = beans.get(typeName);//暴力反射f.setAccessible(true);//将从beans中获得的对象o,注入到该属性上f.set(value,o);}}}}}/*** 对外提供一个方法:根据全限定名返回对象*/public Object getInstance(String beanName){return beans.get(beanName);}
第四步,测试
创建测试类IOCTest
import com.xiaoran.springioc.entity.MyController;
import com.xiaoran.springioc.ioc.MyIOC;
import org.junit.Test;
import java.io.FileNotFoundException;
public class IOCTest {@Testpublic void test() throws FileNotFoundException, IllegalAccessException {MyIOC myIOC = new MyIOC();MyController myController = (MyController)myIOC.getInstance(MyController.class.getName());myController.test();}
}
GitHub
手撕SpringIOC

![[Pytorch]DataSet和DataLoader逐句详解](https://img-blog.csdnimg.cn/5fac6729a7374822b2c651f23afc56d9.png)


![[ vulnhub靶机通关篇 ] Empire Breakout 通关详解](https://img-blog.csdnimg.cn/67ebd906a15f47f6b83b181a03c77207.png)
