微信小程序开发笔记
- html
- 条件渲染
- 列表渲染
- 按钮组件 button
- css
- 单位 rpx、px、vw、vh、rem
- 定位方法
- 设置图片为页面的背景
- 自定义按钮的图标
- js
- 全局变量
- 底部导航栏 tabBar
- 其他
- 配置config.js
- 带参数跳转页面
- 云数据库的使用
- 初始化
- 查找
- 地图组件 map
- 从云数据库中调用经纬度,并且使用 marker 渲染标记点
- 实时监控用户位置变化
- 调用腾讯位置服务微信小程序 JavaScript SDK 实现实时路线规划
html
条件渲染
详情参考: https://developers.weixin.qq.com/miniprogram/dev/reference/wxml/conditional.html
<!-- .html 文件 -->
<!-- length 来自 .js 文件中的 data 变量 --><view wx:if="{{length > 5}}"> 1 </view>
<view wx:elif="{{length > 2}}"> 2 </view>
<view wx:else> 3 </view>
列表渲染
详情参考: https://developers.weixin.qq.com/miniprogram/dev/reference/wxml/list.html
<!-- .html 文件 -->
<!-- array 是来自 .js 中的 data 数值型变量,里面的元素类型为 Object类型 Object对象类型形式为:{key:value} 键:值 -->
<!-- 使用 wx:for-item 可以指定数组当前元素的变量名,使用 wx:for-index 可以指定数组当前下标的变量名: --><viewwx:for="{{array}}"wx:for-index="idx"wx:for-item="itemName"
>{{idx}}: {{itemName.message}}
</view>
// .js 文件data: {array: [{message: 'foo',}, {message: 'bar'}]
}按钮组件 button
详情参考: https://developers.weixin.qq.com/miniprogram/dev/component/button.html
按钮css样式参考: https://www.runoob.com/css3/css3-buttons.html
<!-- .html 文件 -->
<!-- 设置登录按钮,type=的样式类型,bindtap=绑定按键点击事件的响应函数 -->
<!-- button组件的,详情参考:https://developers.weixin.qq.com/miniprogram/dev/component/button.html --><button type='primary' bindtap="signIn">登录</button>
// .js 文件
// 点击事件的响应函数写法signIn(e) {console.log('用户点击登录按钮')console.log('打印事件e的详情\t---e:\t', e)},css
详情参考: https://www.runoob.com/css/css-intro.html
单位 rpx、px、vw、vh、rem
/* 微信小程序中的单位
px:
像素,图片采样的基本单位。
Vw:
视窗宽度,1vw等 于窗口宽度的1%
vh:
视窗高度、1wh等于窗口高度的1%
rem:
规定屏幕宽度为20rem,实际.上是把页面按比例分割达到自适应的效果(把页面宽度分成20份)
rpx:
规定屏幕宽度为750rpx,以此来根据屏幕宽度进行自适应。如在iphone6 上,屏幕宽度为375px,共有750个物理像素,则
750rpx=375px=750物理像素,相当于1rpx=0.5px=1物理像素。 */
定位方法
/* 页面定位
选择器{ position: relative; }
相对定位的特点: (务必记住)
1.它是相对于自己原来的位置来移动的(移动位置的时候参照点是自己原来的位置)。
2.原来在标准流的位置继续占有,后面的盒子仍然以标准流的方式对待它。(不脱标,继续保留原来位置)选择器{ position: absolute; }
绝对定位的特点: (务必记住)
1.如果没有祖先元素或者祖先元素没有定位,则以浏览器为准定位( Document文档)。
2.如果祖先元素有定位(相对、绝对、固定定位) , 则以最近一级的有定位祖先元素为参考点移动位置。
3.绝对定位不再占有原先的位置。(脱标) */
设置图片为页面的背景
<!-- .html 文件 --><view class='background'><!-- 添加背景图片 --><image src='../../images/icon/background.jpg' mode='aspectFill'></image><!-- 添加背景图片的蒙层 --><view></view>
</view>
/* .css 文件 *//* 背景图片 */
.background>image {position: absolute;left: 0;bottom: 0;width: 100%;height: 100%;z-index: -999;
}/* 背景图片上层的蒙层 */
.background>view {background-color: rgba(255, 255, 255, 0.15);position: absolute;left: 0;bottom: 0;width: 100%;height: 100%;z-index: -900;
}自定义按钮的图标
<!-- .html 文件 --><buttonclass="building-btn"size="mini"bindtap="showBuildingComplex"
><imagesrc='...'class="building-btn-img"mode='aspectFit'></image>
</button>
/* .css 文件 *//* 建筑物图标按钮 */
.building-btn {padding: 0;/*按钮透明*/background-color: transparent;/*设置按钮边框*/border: none;width: 10vw;height: 10vh;
}/* 建筑物图标 */
.building-btn-img {width: 10vw;height: 10vh;
}js
全局变量
// app.js
// 全局变量,在每一个文件中都可以用
// 使用时,需要结合先定义var app = getApp(),然后再app.globalData.student引用this.globalData = {student: {_id: '',password: ''}};
// 在其他 .js 文件获取全局变量var app = getApp()
this.setData({student: app.globalData.student,})底部导航栏 tabBar
详情参考: https://developers.weixin.qq.com/miniprogram/dev/reference/configuration/app.html#tabBar
// 在 app.json 中"tabBar": {"list": [{"pagePath": "","text": "","iconPath": "","selectedIconPath": ""},{"pagePath": "","text": "","iconPath": "","selectedIconPath": ""}]},其他
配置config.js
// config.js 文件module.exports = {"appName": "应用","default_scale": 16,"buildingComplexNameAndIconPath": [],
}
// 在其他 .js 文件中使用 config.js 的数据// 加载 config.js 文件
const config = require('../../config.js');// 使用配置文件中的参数
config.default_scale带参数跳转页面
详情参考: https://developers.weixin.qq.com/miniprogram/dev/api/route/wx.navigateTo.html
// .js 文件// wx.navigateTo,详情参考:https://developers.weixin.qq.com/miniprogram/dev/api/route/wx.navigateTo.html// url传参,详情参考:https://blog.csdn.net/weixin_43970434/article/details/98876750// 跳转至当前建筑物详情的界面,传递变量名为 building 的参数,传参时变量必须用字符串// 所以可以在当前界面使用 JSON.stringify() 转化为 JSON 字符串,在目的地界面使用 JSON.parse() 转化为 JavaScript 对象// JSON.stringify() 方法用于将 JavaScript 值转换为 JSON 字符串// JSON.parse() 方法将数据转换为 JavaScript 对象wx.navigateTo({url: '../detailsBuilding/detailsBuilding?building=' + JSON.stringify(building),})},云数据库的使用
初始化
详情参考: https://developers.weixin.qq.com/miniprogram/dev/wxcloud/guide/database/init.html
// .js 文件
// 调用云数据库 const db=wx.cloud.database()const db = wx.cloud.database()
查找
详情参考:https://developers.weixin.qq.com/miniprogram/dev/wxcloud/guide/database/read.html
通过调用集合上的 where 方法可以指定查询条件,再调用 get 方法即可只返回满足指定查询条件的记录,
// .js 文件db.collection('Site').where({ buildingComplexName: this.data.buildingComplexName }).get().then(res => {console.log('从云数据库Site数据集中,获得了' + res.data.length + '条数据')
})
地图组件 map
从云数据库中调用经纬度,并且使用 marker 渲染标记点
详情参考:https://developers.weixin.qq.com/miniprogram/dev/component/map.html#marker
<!-- .html 文件 --><mapclass="map"scale="{{defaultScale}}"longitude='{{longitude}}'latitude='{{latitude}}'show-location="{{true}}"markers="{{markers}}"polyline="{{polyline_Object}}"bindmarkertap="detailsBuilding"bindlabeltap="detailsBuilding"
>
// .js 文件// 调取云数据库中的Site数据集,// 查询属性buildingComplexName的值为this.data.building的数据db.collection('Site').where({ buildingComplexName: this.data.buildingComplexName }).get().then(res => {console.log('从云数据库Site数据集中,获得了' + res.data.length + '条数据')// 将云数据库中的相关数据值转换为可用合法的markers值// 标记点用于在地图上显示标记的位置,详情参考:https://developers.weixin.qq.com/miniprogram/dev/component/map.html#markerfor (let i = 0; i < res.data.length; i++) {let markObj = {id: i, // 当前标记点的编号latitude: res.data[i].latitude, // 当前标记点的维度longitude: res.data[i].longitude, // 当前标记点的经度iconPath: markersIconPath, // 当前标记点的图标路径width: config.iconHeight, // 当前标记点的图标的宽height: config.iconWidth, // 当前标记点的图标的宽zIndex: i + 1, // 当前标记点的图标图层// 当前标记点的标签显示label: {content: res.data[i].buildingName, // 当前标记点的标签文字color: config.iconLabelColor,fontSize: config.iconLabelFontSize,anchorX: config.iconLabelAnchorX,anchorY: config.iconLabelAnchorY,borderWidth: config.iconLabelBorderWidth,borderColor: config.iconLabelBorderColor,borderRadius: config.iconLabelBorderRadius,bgColor: config.themeColors,padding: config.iconLabelPadding,}}// 将当前的标记点带加入标记点集合中this.data.markers.push(markObj)}// 更新当前的标记点集合,相当于刷新显示// 并且将获取到的建筑物群信息赋值给this.data.buildingComplexthis.setData({markers: this.data.markers,buildingComplex: res.data})console.log("当前获取的标记点详情为:\t---this.data.markers:\t\t\t", this.data.markers, "\n")console.log("当前获取的建筑群详情为:\t---this.data.buildingComplex:\t", this.data.buildingComplex, "\n")})实时监控用户位置变化
详情参考: https://developers.weixin.qq.com/miniprogram/dev/api/location/wx.startLocationUpdate.html
// .js 文件// wx.startLocationUpdate,开启小程序进入前台时接收位置消息。详情参考:https://developers.weixin.qq.com/miniprogram/dev/api/location/wx.startLocationUpdate.html// 注意,需要在 app.json 中配置 "requiredPrivateInfos": ["startLocationUpdate"]wx.startLocationUpdate({success: (res) => {type: 'gcj02',// wx.onLocationChange,监听实时地理位置变化事件。详情参考:https://developers.weixin.qq.com/miniprogram/dev/api/location/wx.onLocationChange.html// 需要配合,移除实时地理位置变化事件的监听函数wx.offLocationChange使用——【 wx.offLocationChange(this.data.locationChangeFn)】。详情参考:https://developers.weixin.qq.com/miniprogram/dev/api/location/wx.offLocationChange.html// 注意,需要在 app.json 中配置 "requiredPrivateInfos": ["onLocationChange"]wx.onLocationChange(this.data.locationChangeFn)console.log('开启小程序进入前台时接收位置消息函数wx.startLocationUpdate的返回值\t---res:\t', res)},fail: (err) => {// 重新获取位置权限wx.openSetting({success(res) {res.authSetting = {"scope.userLocation": true}}})reject(err)}})调用腾讯位置服务微信小程序 JavaScript SDK 实现实时路线规划
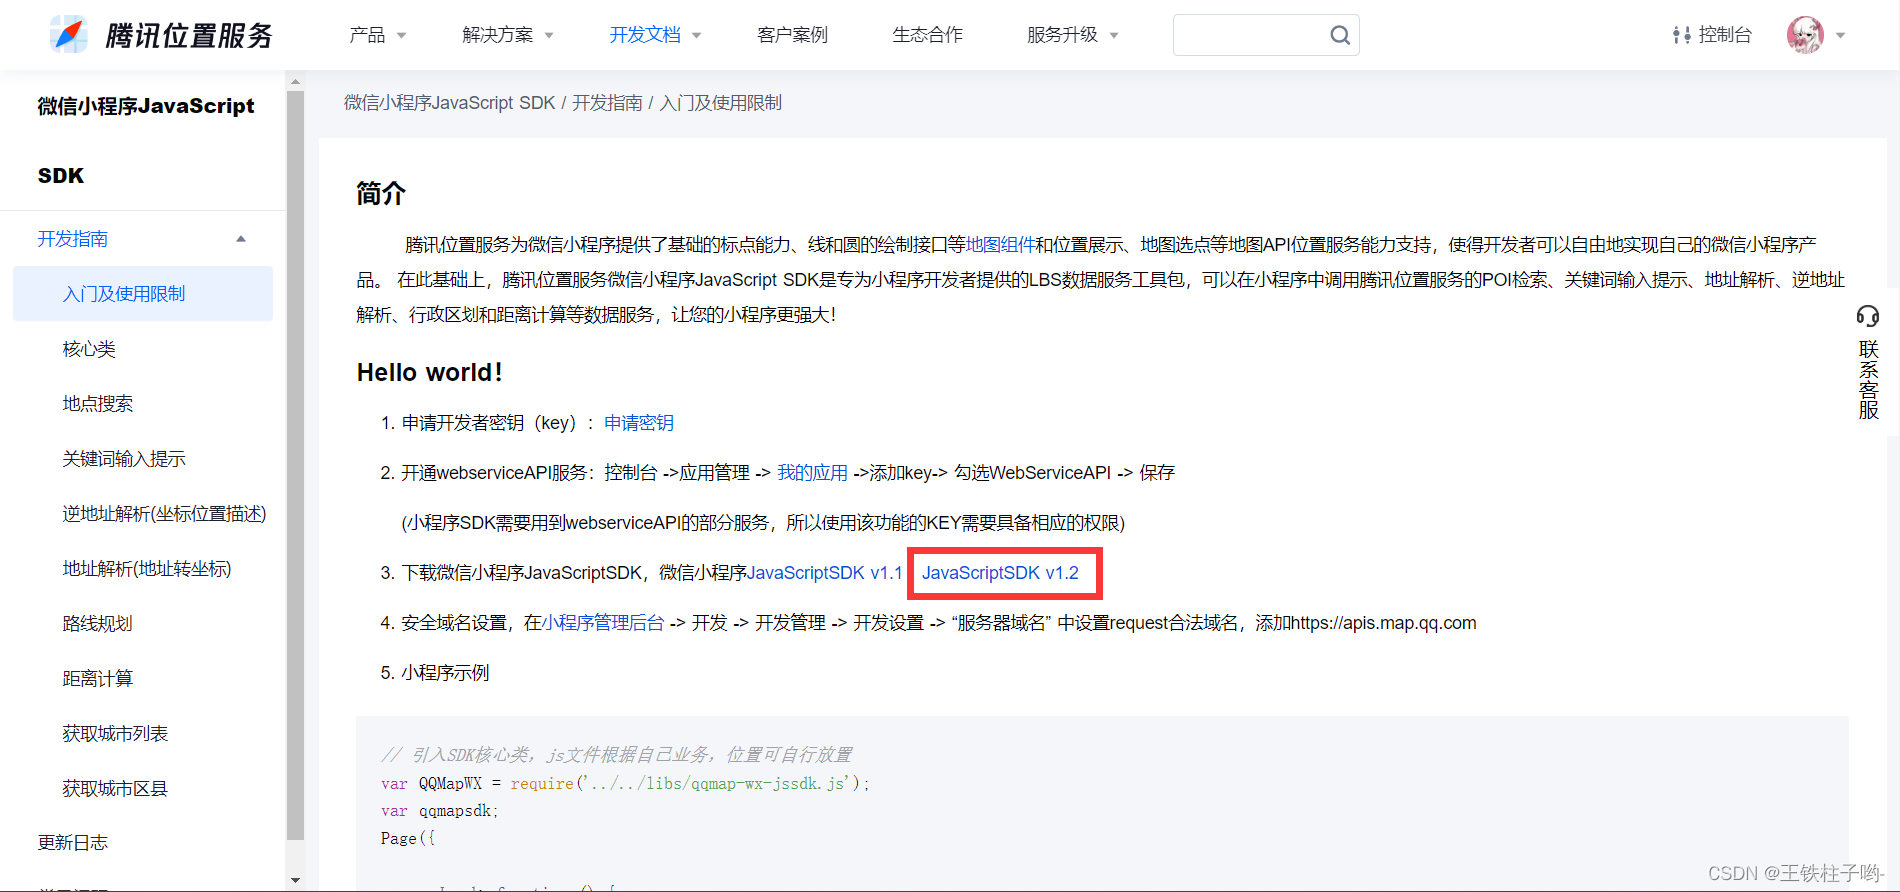
详情参考: https://lbs.qq.com/miniProgram/jsSdk/jsSdkGuide/methodDirection
- 申请开发者密钥(key):申请密钥
- 开通webserviceAPI服务:控制台 ->应用管理 -> 我的应用 ->添加key-> 勾选WebServiceAPI -> 保存
(小程序SDK需要用到webserviceAPI的部分服务,所以使用该功能的KEY需要具备相应的权限) - 下载微信小程序JavaScriptSDK,微信小程序JavaScriptSDK v1.1 JavaScriptSDK v1.2
- 安全域名设置,在小程序管理后台 -> 开发 -> 开发管理 -> 开发设置 -> “服务器域名” 中设置request合法域名,添加https://apis.map.qq.com
- 小程序示例
<!-- .html 文件 --><mapclass="map"scale="{{defaultScale}}"longitude='{{longitude}}'latitude='{{latitude}}'show-location="{{true}}"markers="{{markers}}"polyline="{{polyline_Object}}"
>
// .js 文件// 位置改变时,执行当前函数,wx.onLocationChange(function listener)的示例代码,详情参考:https://developers.weixin.qq.com/miniprogram/dev/api/location/wx.onLocationChange.html#%E7%A4%BA%E4%BE%8B%E4%BB%A3%E7%A0%81this.data.locationChangeFn = function (res) {console.log('位置开始改变,获取\t---res:\t', res)// 实时更新用户当前的位置,也是路线的开始位置,即start_address// 同时将用户当前的位置设置为地图的中心位置that.setData({latitude: res.latitude,longitude: res.longitude,default: 20,start_address: {longitude: res.longitude,latitude: res.latitude}})console.log('获取起始位置为\t---that.data.start_address:\t', that.data.start_address)console.log('获取终点位置为\t---that.data.end_address:\t', that.data.end_address)// 使用腾讯位置服务,调用距离计算接口// 详情参考:https://lbs.qq.com/service/webService/webServiceGuide/webServiceRoute#3 // 以及以下网页,特别是其中的‘Javascript 关键代码片段(驾车、步行、骑行路线规划):’:https://lbs.qq.com/miniProgram/jsSdk/jsSdkGuide/methodDirectionqqmapsdk.direction({// 路线规划选择mode: 'walking',// 起始位置坐标,采用Object格式from: {latitude: that.data.start_address.latitude,longitude: that.data.start_address.longitude},// 终点位置坐标,采用Object格式to: {latitude: that.data.start_address.latitude,longitude: that.data.end_address.longitude},// // 用于测试的几组数据,不用看// from: {// latitude: 29.9781013308885,// longitude: 103.000237941741// },// to: {// latitude: 29.9774832826657,// longitude: 102.993076443672// },success: function (res) {console.log('\n开始规划路线');console.log('调用距离计算接口qqmapsdk.direction的返回值\t---res:\t', res);// res.status状态码,正常为0if (res.status == 0) {// 解压路线坐标点串let coors = res.result.routes[0].polyline;for (let i = 2; i < coors.length; i++) {coors[i] = coors[i - 2] + coors[i] / 1000000}console.log('路线坐标点串解压完毕!路线坐标点串解压结果如下:\c---oors:', coors)// 将解压后的坐标点串进行拼接成polyline想要的样子var coors_new = []for (var j = 0; j < coors.length; j++) {coors_new.push({latitude: parseFloat(coors[j]),longitude: parseFloat(coors[j + 1])})j++;}// 更新路线that.setData({polyline_Object: [{points: coors_new,color: "#3FB837",width: 5,dottedLine: false}]})}console.log('当前的路线为:\t---that.polyline_Object:\t', that.data.polyline_Object);},fail: function (res) {console.log('调用路线规划函数失败\t---res:\t', res);},complete: function (res) {console.log('调用路线规划函数结束\t---res:\t', res);}});}

![[附源码]Python计算机毕业设计Django-大学生健康档案管理](https://img-blog.csdnimg.cn/186ad9862faf4449b0048e5730296fac.png)