文章目录
- 1.qemu
- 2.buildroot
- 配置
- 编译
- 3.linux kernel
- 下载交叉编译工具链
- linux kernel 5.16
- 配置内核
- config_kernel.sh
- build_kernel.sh
- 4.启动虚拟机
- start_qemu.sh
- 参数解释
- 运行
环境: wls2、qemu8.2、buildroot、linuxkernel
1.qemu
https://buildroot.org/download.html
参考资料: https://wiki.qemu.org/Hosts/Linux
wget https://download.qemu.org/qemu-8.0.2.tar.xz
tar xvJf qemu-8.0.2.tar.xz
cd qemu-8.0.2
mkdir compile_result && cd compile_result #编译后的目录
../configure --prefix=$(pwd)
make
make install
2.buildroot
https://buildroot.org/download.html
git clone git://git.busybox.net/buildrootmake menuconfig
配置
在弹出的配置界面中,
设置
Target option ---> Target Architecture为
AArch64 (little endian);
设置
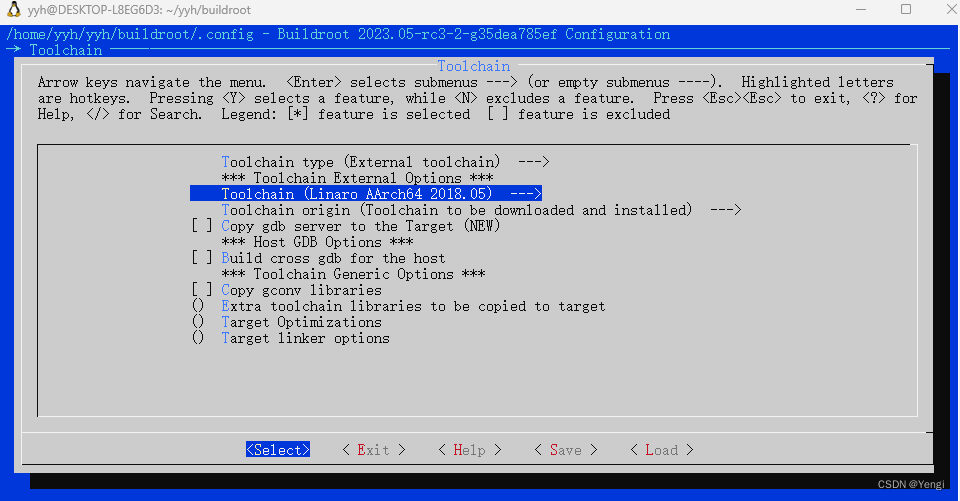
Toolchain ---> Toolchain type为
External toolchain,这时我们可以看到
Toolchain ---> Toolchain的值为
linaro AArch64 xxxx.xx;
设置
System configuration ---> Enable root login with password开启,并设置
System configuration ---> Root password为
xxxx(任意的你喜欢的密码);
设置
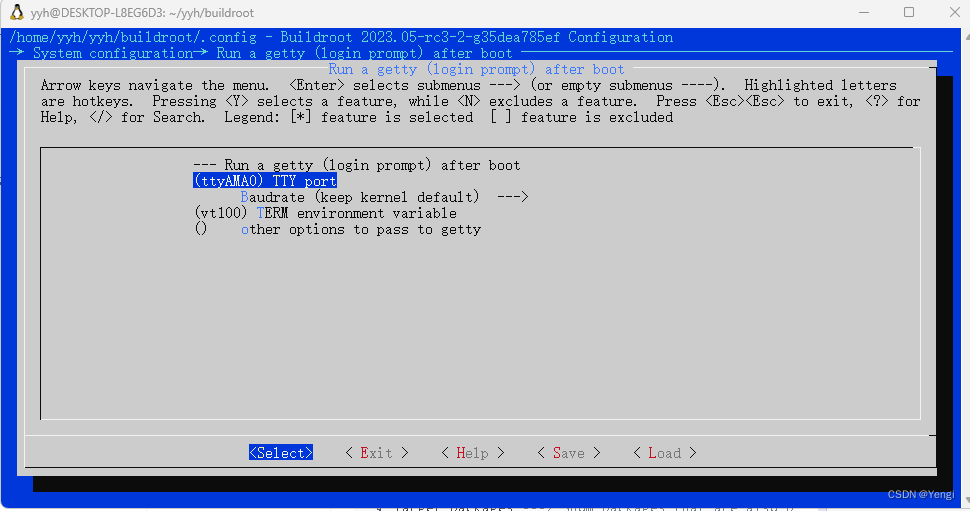
System configuration ---> Run a getty (login prompt) after boot ---> TTY port的值为
ttyAMA0(这一条非常重要,不然虚拟机可能启动不了);
设置
Target packages ---> Show packages that are also provided by busybox开启;设置
Target packages ---> Debugging, profiling and benchmark ---> strace开启;设置
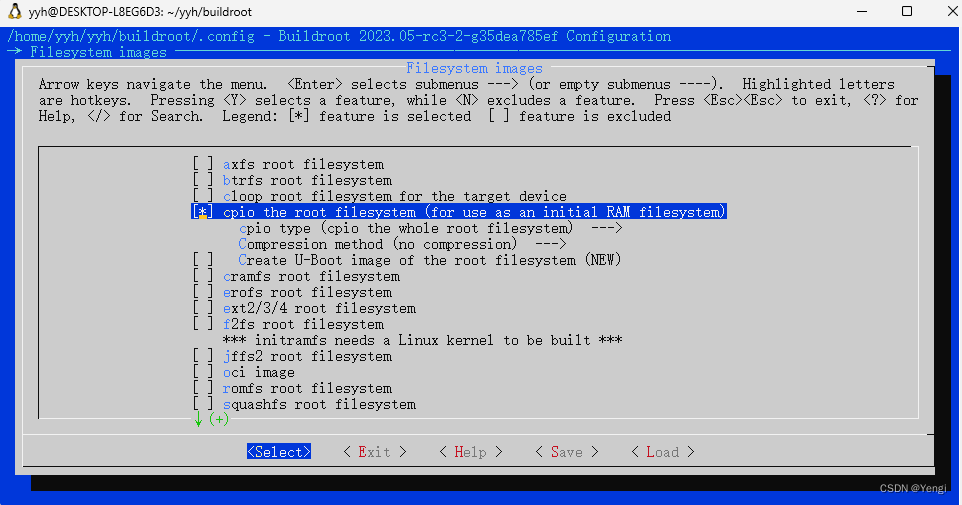
Filesystem images ---> cpio the root filesystem开启
编译
make#编译好的结果会在output目录

3.linux kernel
下载交叉编译工具链
https://releases.linaro.org/components/toolchain/binaries/

wget -c https://releases.linaro.org/components/toolchain/binaries/7.2-2017.11/aarch64-linux-gnu/gcc-linaro-7.2.1-2017.11-x86_64_aarch64-linux-gnu.tar.xz
linux kernel 5.16
https://www.kernel.org/
#下载内核源码:
wget -c https://cdn.kernel.org/pub/linux/kernel/v5.x/linux-5.16.tar.xz
#配置内核:
make ARCH=arm64 CROSS_COMPILE=/home/toolchain/gcc-linaro-7.4.1-2019.02-x86_64_aarch64-linux-gnu/bin/aarch64-linux-gnu-defconfig#编译内核:
make ARCH=arm64 CROSS_COMPILE=/home/toolchain/gcc-linaro-7.4.1-2019.02-x86_64_aarch64-linux-gnu/bin/aarch64-linux-gnu--j8
配置内核
设置
Boot options ---> (console=ttyAMA0) Default kernel command string
设置其值为console=ttyAMA0;
设置
General setup  ---> [*] Initial RAM filesystem and RAM disk (initramfs/initrd) support                       (/home/yyh/yyh/buildroot/output/images/rootfs.cpio) Initramfs source file(s)
设置其值为
$BUILD_ROOT_PATH/output/images/rootfs.cpio(注意,这里要自己展开变量BUILD_ROOT_PATH);
config_kernel.sh
#!/bin/shBUILD_DIR=/home/yyh/yyh/linux-6.3.6   #这里用的linux-6.3.6的内核if [ ! -z $1 ]
thenBUILD_DIR=$1
fiexport ARCH=arm64
export CROSS_COMPILE=/home/tools/gcc-linaro-7.2.1-2017.11-x86_64_aarch64-linux-gnu/bin/aarch64-linux-gnu-
cd $BUILD_DIR
#make defconfig#make menuconfig
build_kernel.sh
#! /bin/bashBUILD_DIR=/home/yyh/yyh/linux-6.3.6if [ ! -z $1 ]
thenBUILD_DIR=$1
fiexport ARCH=arm64
export CROSS_COMPILE=/home/tools/gcc-linaro-7.2.1-2017.11-x86_64_aarch64-linux-gnu/bin/aarch64-linux-gnu-
cd $BUILD_DIR
make -j8
4.启动虚拟机
start_qemu.sh
#! /bin/bash/home/yyh/yyh/qemu-8.0.2/compile_result/qemu-system-aarch64 \-machine virt \-cpu cortex-a57 \-machine type=virt \-nographic -smp 1 \-m 2048 \-kernel /home/yyh/yyh/linux-6.3.6/arch/arm64/boot/Image \--append "console=ttyAMA0" \$1 $2
参数解释
/home/yyh/yyh/qemu-8.0.2/compile_result/qemu-system-aarch64: 这是QEMU模拟器的可执行文件路径。
-machine virt: 这个选项指定使用
virt类型的虚拟机。
-cpu cortex-a57: 这个选项指定使用Cortex-A57 CPU。
-nographic: 这个选项指定不使用图形化界面,而是使用控制台进行交互。
-smp 1: 这个选项指定使用1个CPU核。
-m 2048: 这个选项指定虚拟机的内存大小为2048MB。
-kernel /home/yyh/yyh/linux-6.3.6/arch/arm64/boot/Image: 这个选项指定ARM64内核镜像的路径。
--append "console=ttyAMA0": 这个选项指定内核启动参数,其中
console=ttyAMA0表示将控制台输出重定向到串口。
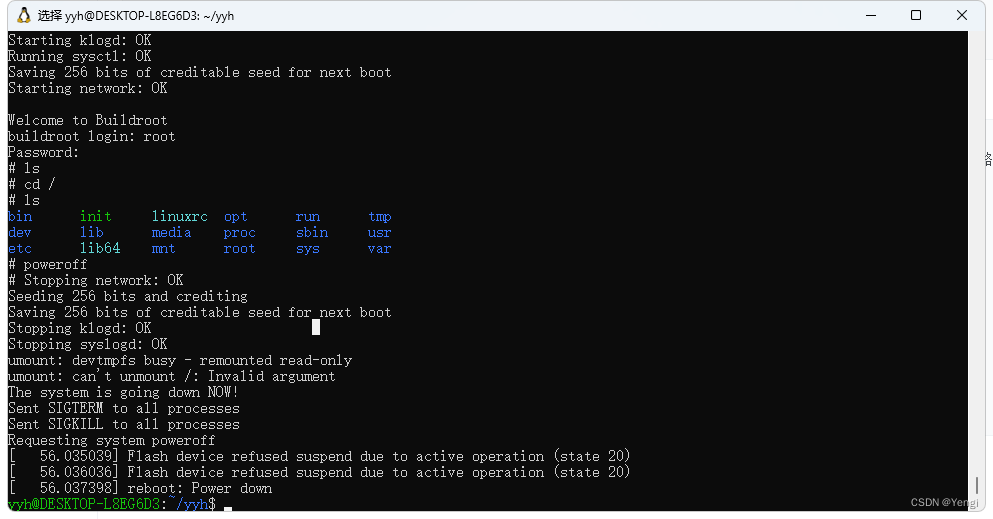
运行
./start_qemu.sh
参考:
https://blog.csdn.net/pro_human/article/details/123446938
https://blog.csdn.net/leacock1991/article/details/113730672


