介绍:路由配置主要是用来确定网站访问路径对应哪个文件代码显示的,这里主要描述路由的配置、子路由、动态路由(运行中添加删除路由)
1、npm添加
npm install vue-router
// 执行完后会自动在package.json中添加
"vue-router": "^4.0.15"
// 如果区分dev或发布版本中使用,把上面添加的拷贝过去即可
2、在main.js中添加使用(主要是下面第3/13行)
import { createApp } from 'vue'
import ElementPlus from 'element-plus'
import router from '../router'
import 'element-plus/dist/index.css'
import './index.css'                    // 这个居中对齐了,不知道有哪些功能
import App from './App.vue'const app = createApp(App)
// app.use(ElementPlus)
// app.mount('#app')
app.use(ElementPlus).use(router).mount('#app')
3、上面import的router需要在根目录下创建router文件夹,里面添加index.js文件
import {createRouter, createWebHashHistory} from "vue-router";
// import Home from "../views/test.vue";const routes = [{path: '*',          // 默认在Home页面,没有匹配到路由时使用redirect: '/Home'}, {path: '/',redirect: '/test'}, {path: '/test',name: 'test',// 上面importvue文件名后在''中添加名字即可,或按需引入component: () => import('../views/test.vue')}
]const router = createRouter({// createWebHashHistory路径有#号,createWebHistory路径不包含#。使用web方式部署到服务器刷新会报404错误history: createWebHashHistory(),routes
});// router.beforeEach((to, from, next) => {
//     document.title = `${to.meta.title} | vue-manage-system`;
//     const role = localStorage.getItem('ms_username');
//     if (!role && to.path !== '/login') {
//         next('/login');
//     } else if (to.meta.permission) {
//         // 如果是管理员权限则可进入,这里只是简单的模拟管理员权限而已
//         role === 'admin'
//             ? next()
//             : next('/403');
//     } else {
//         next();
//     }
// });
export default router
4、在App.vue中添加显示
// router-view显示内容
<template><div id="app" ><router-view/></div>
</template>
5、router-link路由链接,跳转到指定位置
<!-- 字符串 -->
<router-link to="/home">Home</router-link>
<!-- 渲染结果 -->
<a href="/home">Home</a><!-- 使用 v-bind 的 JS 表达式 -->
<router-link :to="'/home'">Home</router-link><!-- 同上 -->
<router-link :to="{ path: '/home' }">Home</router-link><!-- 命名的路由 -->
<router-link :to="{ name: 'user', params: { userId: '123' }}">User</router-link><!-- 带查询参数,下面的结果为 `/register?plan=private` -->
<router-link :to="{ path: '/register', query: { plan: 'private' }}">Register
</router-link>
6、如何根据router切换子窗体?嵌套路由,示例代码:

路由下加变量访问
const User = {template: '<div>User {{ $route.params.id }}</div>',
}// 这些都会传递给 `createRouter`
const routes = [{ path: '/user/:id', component: User }]
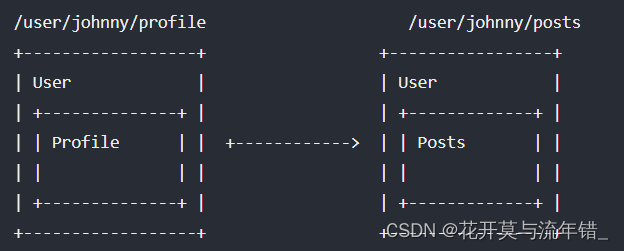
子路由(router-view显示的内容中还有router-view),如下需要配置默认打开的子路由及显示对应子路由
const routes = [{path: '/user/:id',component: User,children: [// 当 /user/:id 匹配成功// UserHome 将被渲染到 User 的 <router-view> 内部{ path: '', component: UserHome },// ...其他子路由{// 当 /user/:id/profile 匹配成功// UserProfile 将被渲染到 User 的 <router-view> 内部path: 'profile',component: UserProfile,},{// 当 /user/:id/posts 匹配成功// UserPosts 将被渲染到 User 的 <router-view> 内部path: 'posts',component: UserPosts,},],},
]
7、同级目录下有多个显示
<ul><li><router-link to="/">First page</router-link></li><li><router-link to="/other">Second page</router-link></li></ul><router-view class="view one"></router-view><router-view class="view two" name="a"></router-view><router-view class="view three" name="b"></router-view>路由配置如下
import { createRouter, createWebHistory } from 'vue-router'
import First from './views/First.vue'
import Second from './views/Second.vue'
import Third from './views/Third.vue'export const router = createRouter({history: createWebHistory(),routes: [{path: '/',// a single route can define multiple named components// which will be rendered into <router-view>s with corresponding names.components: {default: First,a: Second,b: Third,},},{path: '/other',components: {default: Third,a: Second,b: First,},},],
})
不用路由,vue加载显示
<template><div><Header/></div>
</template><script>
import { useRouter } from "vue-router";
import Header from "../src/components/Header.vue";
import vTags from "../src/components/Tags.vue";
export default {components: {Header,vTags,},
}
</script>
嵌套路由时
<template><div id="app"><router-view></router-view></div>
</template><script>
import { useRouter } from "vue-router";
export default {methods:{clickMenu(item) {console.log(item);// console.log(item.name);this.$router.push({item// name: 'About'})}},
</script>
别人的教程代码,主要是看注释
import { createRouter } from'@naturefw/ui-elp'import home from'../views/home.vue'const router = {/**   * 基础路径   */baseUrl: baseUrl,/**   * 首页   */home: home,menus: [{menuId: '1', // 相当于路由的 nametitle: '全局状态', // 浏览器的标题naviId: '0', // 导航IDpath: 'global', // 相当于 路由 的pathicon: FolderOpened, // 菜单里的图标childrens: [ // 子菜单,不是子路由。{menuId: '1010', // 相当于路由的 nametitle: '纯state',path: 'state',icon: Document,// 加载的组件component: () =>import('../views/state-global/10-state.vue')// 还可以有子菜单。},{menuId: '1020',title: '一般的状态',path: 'standard',icon: Document,component: () =>import('../views/state-global/20-standard.vue')} ]},{menuId: '2000',title: '局部状态',naviId: '0',path: 'loacl',icon: FolderOpened,childrens: [{menuId: '2010',title: '父子组件',path: 'parent-son',icon: Document,component: () =>import('../views/state-loacl/10-parent.vue')}]} ]
}exportdefault createRouter(router )
8、push、replace函数
router.push(location)使用 router.push 方法。这个方法会向 history 栈添加一个新记录,当用户点击浏览器后退按钮时,可以返回到之前的URL,所以,等同于
router.replace()导航后不会留下 history 记录。点击返回按钮时,不会返回到这个页面。
9、动态路由
动态路由主要通过两个函数实现。router.addRoute() 和 router.removeRoute()。它们只注册一个新的路由,也就是说,如果新增加的路由与当前位置相匹配,就需要你用 router.push() 或 router.replace() 来手动导航,才能显示该新路由。
之前在router文件夹下定义了router
const router = createRouter({// createWebHashHistory路径有#号,createWebHistory路径不包含#并且无法刷新显示(需要nginx适配)history: createWebHashHistory(),routes
});
添加路由,并手动调用 router.replace() 来改变当前的位置(覆盖我们原来的位置)
router.addRoute({ path: '/about', component: About })
// 我们也可以使用 this.$route 或 route = useRoute() (在 setup 中)
router.replace(router.currentRoute.value.fullPath)
如果你决定在导航守卫内部添加或删除路由,你不应该调用router.replace(),而是通过返回新的位置来触发重定向:
router.beforeEach(to => {if (!hasNecessaryRoute(to)) {router.addRoute(generateRoute(to))// 触发重定向return to.fullPath}
})
通过添加一个名称冲突的路由。如果添加与现有途径名称相同的途径,会先删除路由,再添加路由(以下三种删除方式):
// 这将会删除之前已经添加的路由,因为他们具有相同的名字且名字必须是唯一的
const removeRoute = router.addRoute(routeRecord)
// 删除路由如果存在的话
removeRoute()
// 删除路由
router.removeRoute('about')
// 添加路由
router.addRoute({ path: '/other', name: 'about', component: Other })
添加嵌套路由
router.addRoute({ name: 'admin', path: '/admin', component: Admin })
router.addRoute('admin', { path: 'settings', component: AdminSettings })// 上面等效于如下实现方式
router.addRoute({name: 'admin',path: '/admin',component: Admin,children: [{ path: 'settings', component: AdminSettings }],
})
查看现有路由
Vue Router 提供了两个功能来查看现有的路由:
- router.hasRoute():检查路由是否存在。
- router.getRoutes():获取一个包含所有路由记录的数组。
10、动态路由用于登录
// 在login界面的事件中校验完成后,把用户名和密码存到本地,使用localStorage.getItem读取
localStorage.setItem("ms_username", param.username);
// 登录成功后触发访问其他页面
router.push("/");
在router中添加如下处理。beforeEach:添加一个导航守卫,在任何导航前执行。返回一个删除已注册守卫的函数
router.beforeEach((to, from, next) => {document.title = `${to.meta.title} | vue-manage-system`;const role = localStorage.getItem('ms_username');if (!role && to.path !== '/login') {next('/login');} else if (to.meta.permission) {// 如果是管理员权限则可进入,这里只是简单的模拟管理员权限而已role === 'admin'? next(): next('/403');} else {next();}
});


