今天是国庆节,祝伟大的祖国生日快乐!!
假期适当的休息一下,还是要敲敲代码的!冲冲冲
今天我们写的是小米购物车!So easy!
老规矩,先看实现效果
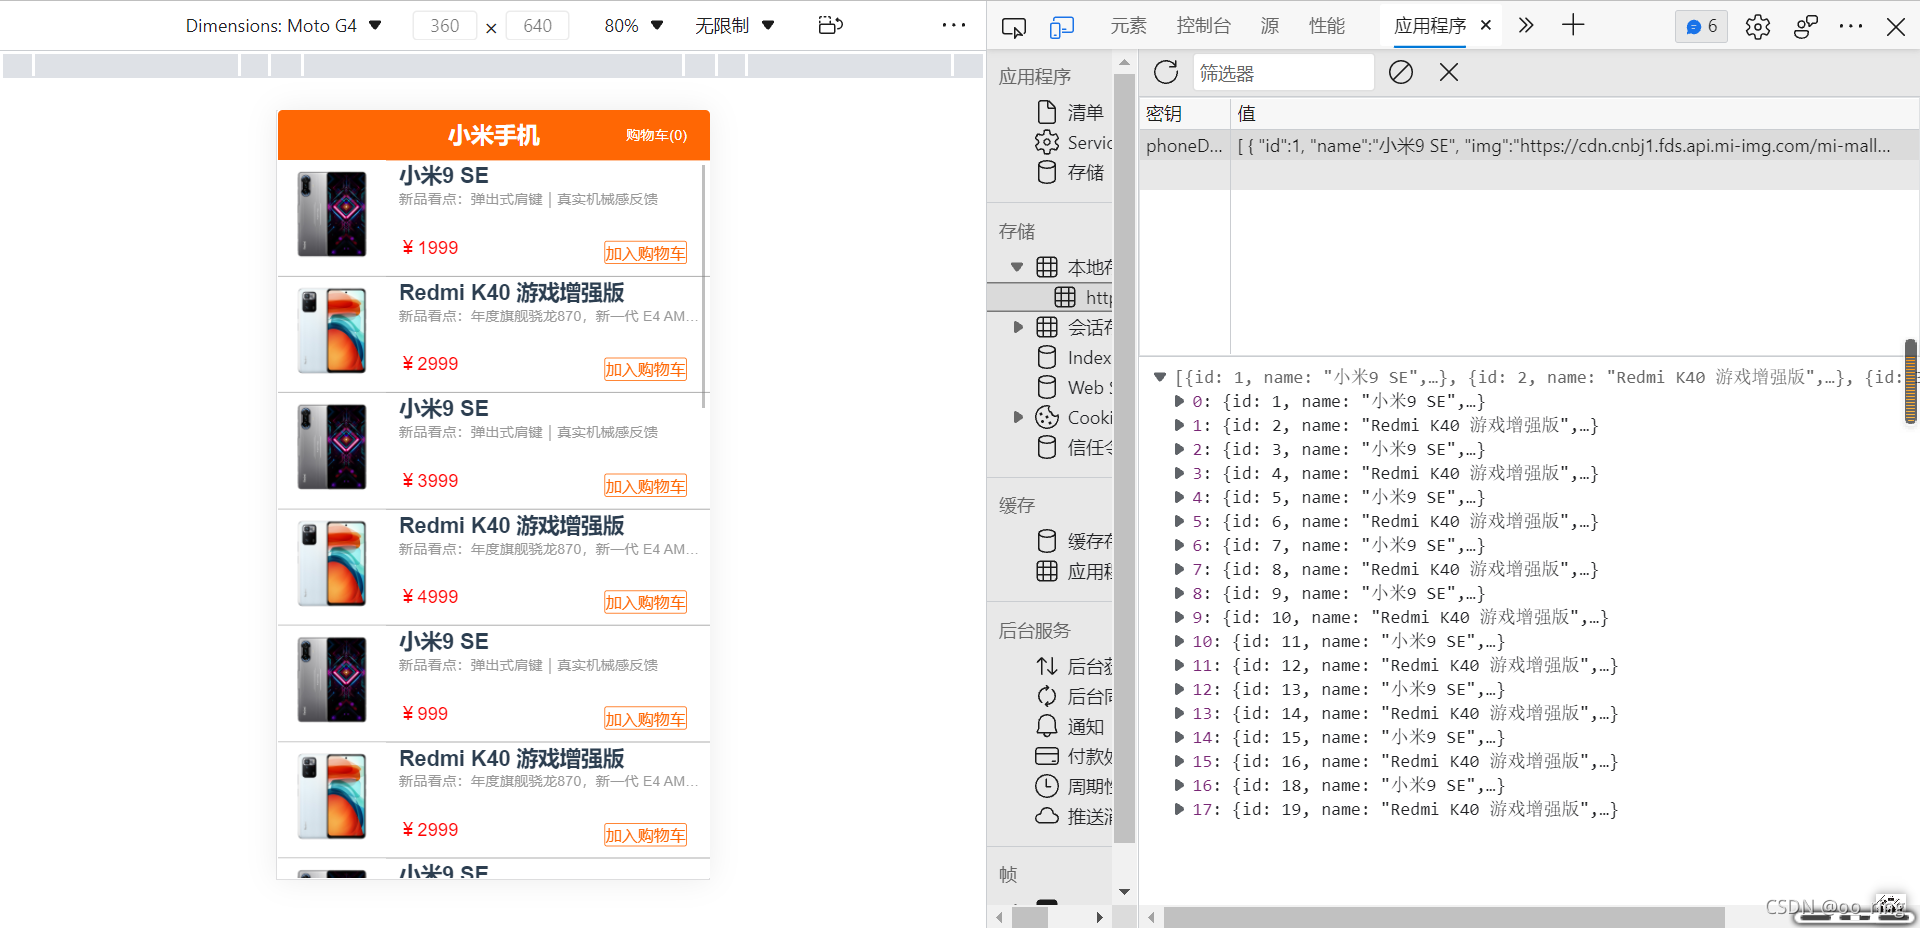
数据直接存储到本地的,在后面我会把数据写上 : )
左上角的数据是实时响应的,当点击加入购物车时,数量会依次增加。
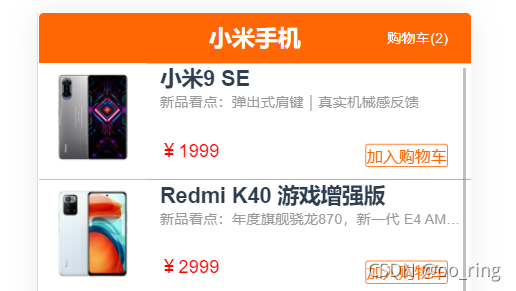
点击购物车会跳转到购物车页面,里面有两个我们刚刚加入的商品 ,价格也是直接算好。还有加减数量
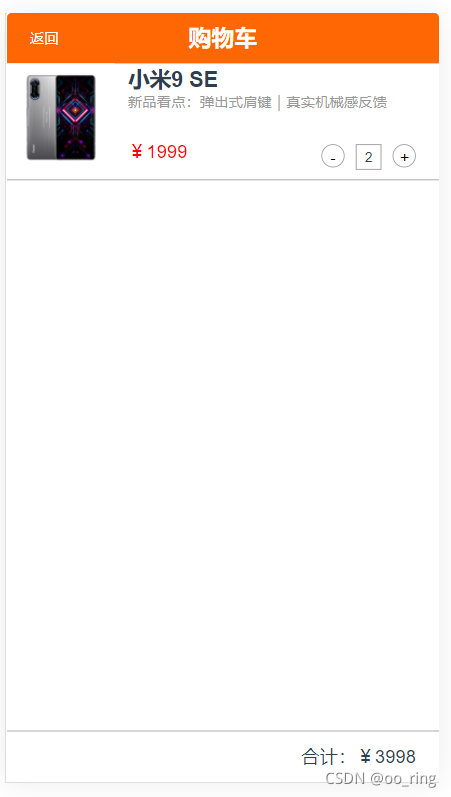
当数量减到1个的时候就不能再减了,此时会弹出提示框

1.在vuex中创建数据,将本地存储的数据存进去。
本地数据
[{"id":1,"name":"小米9 SE","img":"https://cdn.cnbj1.fds.api.mi-img.com/mi-mall/5652bd7a2f8bd6daaa1dd4b5c3c2e9b3.jpg","price":1999,"slogan":"新品看点:弹出式肩键|真实机械感反馈","totalMount":1,"totolPrice":0},{"id":2,"name":"Redmi K40 游戏增强版","img":"https://cdn.cnbj1.fds.api.mi-img.com/mi-mall/61454401f855cf5ed64747a6ac04bae5.jpg","price":2999,"slogan":"新品看点:年度旗舰骁龙870,新一代 E4 AMOLED旗舰直屏","totalMount":1,"totolPrice":0},{"id":3,"name":"小米9 SE","img":"https://cdn.cnbj1.fds.api.mi-img.com/mi-mall/5652bd7a2f8bd6daaa1dd4b5c3c2e9b3.jpg","price":3999,"slogan":"新品看点:弹出式肩键|真实机械感反馈","totalMount":1,"totolPrice":0},{"id":4,"name":"Redmi K40 游戏增强版","img":"https://cdn.cnbj1.fds.api.mi-img.com/mi-mall/61454401f855cf5ed64747a6ac04bae5.jpg","price":4999,"slogan":"新品看点:年度旗舰骁龙870,新一代 E4 AMOLED旗舰直屏","totalMount":1,"totolPrice":0},{"id":5,"name":"小米9 SE","img":"https://cdn.cnbj1.fds.api.mi-img.com/mi-mall/5652bd7a2f8bd6daaa1dd4b5c3c2e9b3.jpg","price":999,"slogan":"新品看点:弹出式肩键|真实机械感反馈","totalMount":1,"totolPrice":0},{"id":6,"name":"Redmi K40 游戏增强版","img":"https://cdn.cnbj1.fds.api.mi-img.com/mi-mall/61454401f855cf5ed64747a6ac04bae5.jpg","price":2999,"slogan":"新品看点:年度旗舰骁龙870,新一代 E4 AMOLED旗舰直屏","totalMount":1,"totolPrice":0},{"id":7,"name":"小米9 SE","img":"https://cdn.cnbj1.fds.api.mi-img.com/mi-mall/5652bd7a2f8bd6daaa1dd4b5c3c2e9b3.jpg","price":1999,"slogan":"新品看点:弹出式肩键|真实机械感反馈","totalMount":1,"totolPrice":0},{"id":8,"name":"Redmi K40 游戏增强版","img":"https://cdn.cnbj1.fds.api.mi-img.com/mi-mall/61454401f855cf5ed64747a6ac04bae5.jpg","price":699,"slogan":"新品看点:年度旗舰骁龙870,新一代 E4 AMOLED旗舰直屏","totalMount":1,"totolPrice":0},{"id":9,"name":"小米9 SE","img":"https://cdn.cnbj1.fds.api.mi-img.com/mi-mall/5652bd7a2f8bd6daaa1dd4b5c3c2e9b3.jpg","price":799,"slogan":"新品看点:弹出式肩键|真实机械感反馈","totalMount":1,"totolPrice":0},{"id":10,"name":"Redmi K40 游戏增强版","img":"https://cdn.cnbj1.fds.api.mi-img.com/mi-mall/61454401f855cf5ed64747a6ac04bae5.jpg","price":1099,"slogan":"新品看点:年度旗舰骁龙870,新一代 E4 AMOLED旗舰直屏","totalMount":1,"totolPrice":0},{"id":11,"name":"小米9 SE","img":"https://cdn.cnbj1.fds.api.mi-img.com/mi-mall/5652bd7a2f8bd6daaa1dd4b5c3c2e9b3.jpg","price":1199,"slogan":"新品看点:弹出式肩键|真实机械感反馈","totalMount":1,"totolPrice":0},{"id":12,"name":"Redmi K40 游戏增强版","img":"https://cdn.cnbj1.fds.api.mi-img.com/mi-mall/61454401f855cf5ed64747a6ac04bae5.jpg","price":1299,"slogan":"新品看点:年度旗舰骁龙870,新一代 E4 AMOLED旗舰直屏","totalMount":1,"totolPrice":0},{"id":13,"name":"小米9 SE","img":"https://cdn.cnbj1.fds.api.mi-img.com/mi-mall/5652bd7a2f8bd6daaa1dd4b5c3c2e9b3.jpg","price":1399,"slogan":"新品看点:弹出式肩键|真实机械感反馈","totalMount":1,"totolPrice":0},{"id":14,"name":"Redmi K40 游戏增强版","img":"https://cdn.cnbj1.fds.api.mi-img.com/mi-mall/61454401f855cf5ed64747a6ac04bae5.jpg","price":1499,"slogan":"新品看点:年度旗舰骁龙870,新一代 E4 AMOLED旗舰直屏","totalMount":1,"totolPrice":0},{"id":15,"name":"小米9 SE","img":"https://cdn.cnbj1.fds.api.mi-img.com/mi-mall/5652bd7a2f8bd6daaa1dd4b5c3c2e9b3.jpg","price":15999,"slogan":"新品看点:弹出式肩键|真实机械感反馈","totalMount":1,"totolPrice":0},{"id":16,"name":"Redmi K40 游戏增强版","img":"https://cdn.cnbj1.fds.api.mi-img.com/mi-mall/61454401f855cf5ed64747a6ac04bae5.jpg","price":17999,"slogan":"新品看点:年度旗舰骁龙870,新一代 E4 AMOLED旗舰直屏","totalMount":1,"totolPrice":0},{"id":18,"name":"小米9 SE","img":"https://cdn.cnbj1.fds.api.mi-img.com/mi-mall/5652bd7a2f8bd6daaa1dd4b5c3c2e9b3.jpg","price":18999,"slogan":"新品看点:弹出式肩键|真实机械感反馈","totalMount":1,"totolPrice":0},{"id":19,"name":"Redmi K40 游戏增强版","img":"https://cdn.cnbj1.fds.api.mi-img.com/mi-mall/61454401f855cf5ed64747a6ac04bae5.jpg","price":19999,"slogan":"新品看点:年度旗舰骁龙870,新一代 E4 AMOLED旗舰直屏","totalMount":1,"totolPrice":0}
]
获取数据,在此之前要把数据手动存储到Application中
state: {getData:[]//在vuex中创建数据
},
mutations: {SET_DATA(state,data){const {getData}=datastate.getData=getData}
},
actions: {setData({commit}){//将本地存储的数据存到创建的数据中const getData=JSON.parse(localStorage.getItem('phoneData'))||[];commit('SET_DATA',{getData})}
}
此时我就拿到数据了,然后再页面循环数据
2.渲染数据
<template><div class="home"><header><span class="mititle">小米手机</span><router-link to="/about" class="gocar">购物车(0)</router-link></header><div class="fristpage"><ul><li v-for="item in getData" :key="item.id"><div class="shopimg"><img :src="item.img" alt=""></div><div class="shopcont"><h3 class="shopname">{{item.name}}</h3><p class="shopmore">{{item.slogan}}</p><p class="shopprice">¥{{item.price}}</p><button>加入购物车</button></div></li></ul></div></div>
</template>
.home{position: relative;float: left;width: 100%;height:6.67rem;border-radius: .04rem;overflow: hidden;header{height: 0.44rem;line-height: 0.44rem;background: #ff6704;color: white;padding: 0 0.2rem;display: flex;justify-content: center;align-content: center;span{font-size: 0.2rem;font-weight: 700;}.gocar{float: right;font-size: 0.1rem;color: white;position: absolute;right: 0.2rem;}}.fristpage{height: 6.23rem;overflow-x: scroll;ul{list-style: none;li{min-height: 1rem;border-bottom: solid 1px #999;position: relative;.shopimg{width: 25%;float: left;img{width: 100%;}}.shopcont{width: 72%;text-align: left;float: right;padding-top: 0.1rem 0 0 0.1rem;.shopmore{font-size: 0.1rem;height: 0.4rem;overflow: hidden;white-space: nowrap;text-overflow: ellipsis;color: #999;}.shopprice{color: red;}button{background: white;border: 1px solid #ff6704;color: #ff6704;outline: none;position: absolute;right: 0.2rem;top: 0.7rem;}}}}
}
}在js中调用vuex里面的数据,并在初始化加载数据
import {mapState} from 'vuex'
export default {name: 'Home',computed:{...mapState(['getData'])},created(){this.$store.dispatch('setData')}
}
3.创建购物车数据,将加入购物车的数据存放到里面
import Vue from 'vue'
import Vuex from 'vuex'Vue.use(Vuex)export default new Vuex.Store({state: {getData:[],//在vuex中创建数据carData:[]},getters: {},mutations: {SET_DATA(state,data){const {getData}=datastate.getData=getData},SET_CAR_DATA(state,data){const {carData}=datastate.carData=carData},SET_CAR(state,data){// 加入购物车时,要把对应的数据一同加进去const {id,img,name,price,slogan,_type}=data;const index=state.carData.findIndex(item=>item.id==id)if(index==-1){state.carData.push({id,img,name,price,slogan,_type,mount:1,tPrice:price,select:true})}else{let item=state.carData[index]//将添加,减少的 方法写在这里if(_type=='ADD'){item.mount+=1;item.tPrice+=price;}else if(_type=='DEL'){if(item.mount>1){item.mount-=1;item.tPrice-=price;}else{alert("数量不能减少了")}}}localStorage.setItem('carData',JSON.stringify(state.carData))//存储到本地中}},actions: {setData({commit}){//将本地存储的数据存到创建的数据中const getData=JSON.parse(localStorage.getItem('phoneData'))||[];commit('SET_DATA',{getData})},setCarData({commit}){const carData=JSON.parse(localStorage.getItem('carData'))||[];commit('SET_CAR_DATA',{carData})},setCar({commit},data){commit('SET_CAR',data)}},modules: {}
})
给加入购物车添加点击按钮,且调用vuex里面的方法
<button @click="addCar(item,'ADD')">加入购物车</button>在js中调用方法,且传入对应的参数和数据
methods:{addCar(item,_type){this.$store.dispatch('setCar',{id:item.id,name:item.name,img:item.img,price:item.price,slogan:item.slogan,_type})}}4.在购物车页面中渲染购物车的数据
<template><div class="about"><header><router-link to="/" class="back">返回</router-link><span class="cartitle">购物车</span></header><div class="carpage"><ul><li v-for="item in carData" :key="item.id"><div class="shopimg"><img :src="item.img" alt=""></div><div class="shopcont"><h3 class="shopname">{{item.name}}</h3><p class="shopmore">{{item.slogan}}</p><p class="shopprice">¥{{item.price}}</p><p class="adddel"><button class="del" @click="append(item,'DEL')">-</button><span class="num">{{item.mount}}</span><button class="add" @click="append(item,'ADD')">+</button></p></div></li></ul></div><footer><span>合计:¥0</span></footer></div>
</template>
<style lang="less" scoped>.about{position: relative;float: left;width: 100%;height:6.67rem;border-radius: .04rem;overflow: hidden;header{height: 0.44rem;line-height: 0.44rem;background: #ff6704;color: white;padding: 0 0.2rem;display: flex;justify-content: center;align-content: center;span{font-size: 0.2rem;font-weight: 700;}.back{float: right;font-size: 0.1rem;color: white;position: absolute;left: 0.2rem;}}.carpage{height: 5.79rem;overflow-y: scroll;ul{list-style: none;li{min-height: 1rem;border-bottom: solid 1px #999;position: relative;.shopimg{width: 25%;float: left;img{width: 100%;}}.shopcont{width: 72%;text-align: left;float: right;padding-top: 0.1rem 0 0 0.1rem;.shopmore{font-size: 0.1rem;height: 0.4rem;overflow: hidden;white-space: nowrap;text-overflow: ellipsis;color: #999;}.shopprice{color: red;}.adddel{position: absolute;right: 0.1rem;top: 0.7rem;button{float: left;padding: 0.05rem;height: 0.2rem;width: 0.2rem;border: solid 1px #999;line-height: 0.1rem;text-align: center;border-radius: 50%;margin-right: 0.1rem;background: #fff;}.num{display: block;float: left;padding: 0.05rem;height: 0.1rem;width: 0.1rem;border: solid 1px #999;line-height: 0.1rem;text-align: center;margin-right: 0.1rem;font-size: 0.1rem;}}}}}}footer{height: 0.44rem;border-top: solid 1px #999;line-height: 0.44rem;text-align: right;padding: 0 0.2rem;}
}
</style><script>
import {mapActions} from 'vuex'
export default {name: 'Home',computed:{//调用数据carData(){return this.$store.state.carData}},methods:{...mapActions(['setCar','setCarData']),append(item,_type){if(item.select){if(_type=='ADD' && item.id==-1){this.setCar({tPrice:item.price,mount:1})}else if(_type=='DEL' && item.id==-1){if(item.mount>1){this.setCar({tPrice:-item.price,mount:-1})}}}this.setCar({id:item.id,price:item.price,_type})}},mounted(){this.setCarData()}
}
</script>此时购物车的总数量和总价格没有实现,其他都ok
5.在vuex的getters中写入总数量和总价格实现方法
getters: {Mount(state){let mount=0state.carData.forEach((item)=>{mount+=item.mount})return mount},Price(state){let price=0state.carData.forEach((item)=>{price+=item.mount*item.price})return price}}分别在computed引用相对应的方法
总数量
totalMount(){return this.$store.getters.Mount}总价格
totalPrice(){return this.$store.getters.Price}然后再HTML中直接渲染数据
<router-link to="/about" class="gocar">购物车({{totalMount}})</router-link><footer><span>合计:¥{{totalPrice}}</span>
</footer>欧克,今天就到这里,加油!!
假期愉快
