文章目录
- 前言
- 一. 实验环境
- 二. 安装MySQL5.7
- 2.1 配置yum源
- 2.2 安装MySQL之前的环境检查
- 2.3 开始使用yum安装
- 2.4 启动MySQL并测试
- 三. 安装MySQL_exporter
- 3.1 MySQL_exporter的介绍
- 3.2 mysql_exporter的安装
- 3.3 设置MySQL账户,用于数据收集
- 3.4 启动mysql_exporter
- 3.5 配置服务端拉取数据
- 3.6 到网页端查看监控情况
- 四. MySQL中常见的监控指标:
- 写在最后
前言
大家好,又见面了,我是沐风晓月,本文是专栏【云原生实战】专栏的第3篇文章,主要讲解prometheus监控远程主机实战。
专栏地址:【云原生实战】 , 此专栏是沐风晓月对云原生项目的汇总,希望能够加深自己的印象,以及帮助到其他的小伙伴😉😉。
如果文章有什么需要改进的地方还请大佬不吝赐教👏👏。
🏠个人主页:我是沐风晓月
🧑个人简介:大家好,我是沐风晓月,双一流院校计算机专业😉😉
💕 座右铭: 先努力成长自己,再帮助更多的人 ,一起加油进步🍺🍺🍺
💕欢迎大家:这里是CSDN,我总结知识的地方,喜欢的话请三连,有问题请私信😘
一. 实验环境
本次的实验环境见下表:
| 操作系统 | 服务器IP | hostname |
|---|---|---|
| centos7.6 | 192.168.1.41 | mufengrow41 |
| centos7.6 | 192.168.1.42 | mufenggrow42 |
如何查看相应的参数:
- 查看操作系统:
[root@mufenggrow ~]# cat /etc/redhat-release
CentOS Linux release 7.6.1810 (Core)
- 查看hostname
## 修改hostname
[root@mufenggrow ~]# hostnamectl set-hostname mufenggrow41
[root@mufenggrow ~]# bash
# 查看hostname
[root@mufenggrow41 ~]# hostname
mufenggrow41
- 查看ip
[root@mufenggrow41 ~]# ifconfig |grep inet |awk 'NR==1{print $2}'
192.168.1.41
本文中的master服务器,也就是prometheus已经安装好,如果你还未安装,可以参考上一篇文章:prometheus安装及使用入门
二. 安装MySQL5.7
2.1 配置yum源
- 配置网络yum源
想要安装MySQL5.7, 需要配置网络源和 MySQL官网提供的rpm包
## 把系统再带的base源备份一份
[root@mufeng ~]# mv /etc/yum.repos.d/CentOS-Base.repo /etc/yum.repos.d/CentOS-Base.repo.bak
# 从阿里云下载需要的网络源
[root@mufeng ~]# wget -O /etc/yum.repos.d/CentOS-Base.repo http://mirrors.aliyun.com/repo/Centos-7.repoyum clean all # 清除系统所有的yum缓存
yum makecache # 生成yum缓存
yum update
这里安装的过程中,若没有wget命令,需要提前安装:
root@mufenggrow42 ~]# yum install wget -y
- 下载官网提供的rpm包
[root@mufenggrow42 ~]# wget https://dev.mysql.com/get/mysql57-community-release-el7-9.noarch.rpm
2.2 安装MySQL之前的环境检查
centos7之后的操作系统中,不能直接安装MySQL,默认的是mariadb,所以安装前要先清空系统中是否有其他的MySQL包
[root@mufeng ~]# rpm -qa |grep mysql
[root@mufeng ~]# rpm -qa |grep mariadb
mariadb-libs-5.5.68-1.el7.x86_64[root@mufeng ~]# rpm -e mariadb-libs-5.5.68-1.el7.x86_64 --nodeps
[root@itlaoxin21 ~]# 查找老版本的mysql相关的安装目录
[root@mufeng ~]# find / -name mysql
/etc/selinux/targeted/active/modules/100/mysql
/usr/lib64/mysql
## 查出来后删除
[root@mufeng ~]# rm -rf /etc/selinux/targeted/active/modules/100/mysql
[root@mufeng ~]# rm -rf /usr/lib64/mysql/
2.3 开始使用yum安装
-
- 使用rpm 命令配置MySQL源
刚才我们下载了官网提供的mysql的rpm包,如果你没有下载,可以使用命令下载下:
wget https://dev.mysql.com/get/mysql57-community-release-el7-9.noarch.rpm
然后使用rpm包进行安装:
[root@mufenggrow42 ~]# rpm -ivh mysql57-community-release-el7-9.noarch.rpm
警告:mysql57-community-release-el7-9.noarch.rpm: 头V3 DSA/SHA1 Signature, 密钥 ID 5072e1f5: NOKEY
准备中...                          ################################# [100%]
正在升级/安装...1:mysql57-community-release-el7-9  ################################# [100%]
安装完成后,会在/etc/yum.repo.d目录下,生成MySQL-community.repo文件:

2. 使用yum安装MySQL
[root@mufenggrow42 yum.repos.d]# yum install mysql-community-server -y若安装过程中出现:

可以执行
rpm --import https://repo.mysql.com/RPM-GPG-KEY-mysql-2022
之后再继续安装一下上面的yum install mysql-community-server -y
安装成功如图:

2.4 启动MySQL并测试
直接启动MySQL,并查看是否启动
启动mysql
root@mufeng yum.repos.d]# systemctl  start mysqld
查看启动状态
[root@mufeng yum.repos.d]# systemctl  status mysqld
● mysqld.service - MySQL ServerLoaded: loaded (/usr/lib/systemd/system/mysqld.service; enabled; vendor preset: disabled)Active: active (running) since 三 2022-09-28 15:21:42 CST; 5s agoDocs: man:mysqld(8)http://dev.mysql.com/doc/refman/en/using-systemd.htmlProcess: 28280 ExecStart=/usr/sbin/mysqld --daemonize --pid-file=/var/run/mysqld/mysqld.pid $MYSQLD_OPTS (code=exited, status=0/SUCCESS)Process: 28223 ExecStartPre=/usr/bin/mysqld_pre_systemd (code=exited, status=0/SUCCESS)Main PID: 28283 (mysqld)Tasks: 27Memory: 304.8MCGroup: /system.slice/mysqld.service└─28283 /usr/sbin/mysqld --daemonize --pid-file=/var/run/mysqld/mysqld.pid
设置MySQL的新密码:
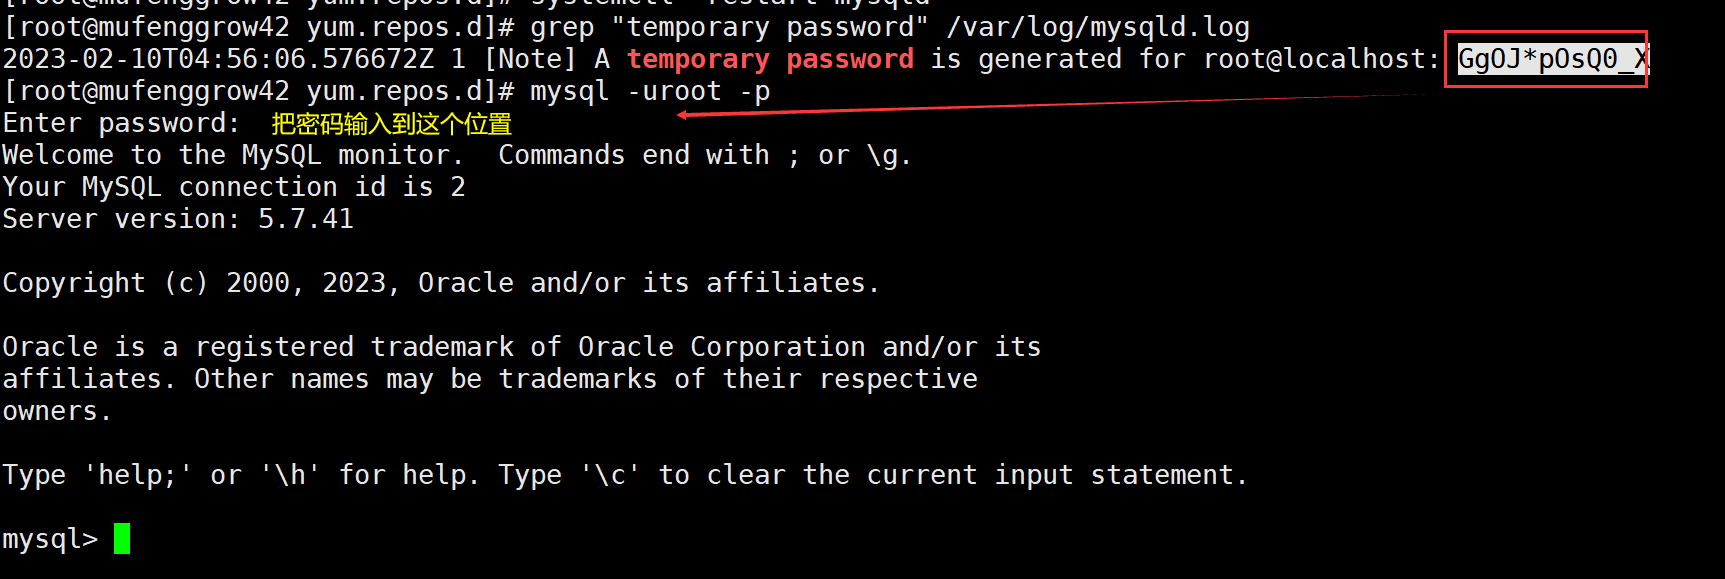
先找到原来的密码:
[root@mufenggrow42 yum.repos.d]# grep "temporary password" /var/log/mysqld.log
2023-02-10T04:56:06.576672Z 1 [Note] A temporary password is generated for root@localhost: GgOJ*pOsQ0_X
[root@mufenggrow42 yum.repos.d]#
使用找到密码登录MySQL:
然后进行密码修改:
mysql> alter user 'root'@'localhost' identified by "Mufeng123!";
Query OK, 0 rows affected (0.00 sec)
三. 安装MySQL_exporter
3.1 MySQL_exporter的介绍
广义上讲所有可以向Prometheus提供监控样本数据的程序都可以被称为一个exporter。而exporter的一个实例称为target
prometheus 通过轮询的方式定期从这些target中获取样本数据。
MySQL数据库的exporter 主要监控Mysql数据库的稳定性、吞吐量、连接情况、缓冲池使用情况、查询性能等各项指标,是我们压测时常常需要监控的一些指标。
3.2 mysql_exporter的安装
先上传我们需要的包:
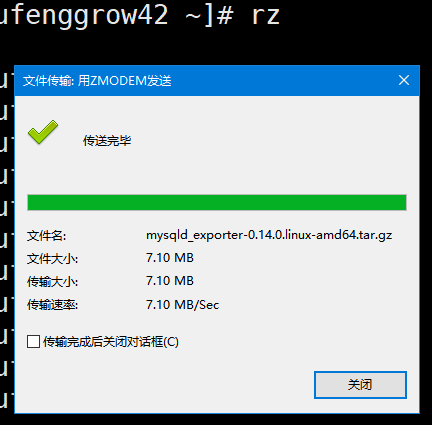
接下来进行解压:
[root@mufenggrow42 ~]# tar xf mysqld_exporter-0.14.0.linux-amd64.tar.gz
[root@mufenggrow42 ~]# mv mysqld_exporter-0.14.0.linux-amd64 mysqld_exporter[root@mufenggrow42 ~]# cd mysqld_exporter
可以看到mysqld_exporter解压后,有个可执行文件:
[root@mufenggrow42 mysqld_exporter]# ls
LICENSE  mysqld_exporter  NOTICE
3.3 设置MySQL账户,用于数据收集
在这里我们创建要给用户:mysql_monitor 从本地访问数据库,使用密码:MUFfeng123! 来访问数据库
[root@mufenggrow42 mysqld_exporter]# mysql -uroot -pMufeng123!
mysql: [Warning] Using a password on the command line interface can be insecure.
Welcome to the MySQL monitor.  Commands end with ; or \g.
Your MySQL connection id is 4
Server version: 5.7.41 MySQL Community Server (GPL)Copyright (c) 2000, 2023, Oracle and/or its affiliates.Oracle is a registered trademark of Oracle Corporation and/or its
affiliates. Other names may be trademarks of their respective
owners.Type 'help;' or '\h' for help. Type '\c' to clear the current input statement.mysql> grant select,replication client,process ON *.* to 'mysql_monitor'@'localhost' identified by 'MUfenggrow123!';
Query OK, 0 rows affected, 1 warning (0.00 sec)mysql> flush privileges;
Query OK, 0 rows affected (0.00 sec)mysql> exit
Bye
我们在目录mysql_exporter目录中创建配置文件,把刚刚设置好的用户名和密码写入进去:
这个配置文件默认是没有的,需要手工创建:
[root@mufenggrow42 mysqld_exporter]# vim .my.cnf
[root@mufenggrow42 mysqld_exporter]# cat .my.cnf
[client]
user=mysql_monitor
password=MUfeng123!
3.4 启动mysql_exporter
启动的时候要指定刚刚设置的配置文件:
[root@mufenggrow42 mysqld_exporter]# nohup ./mysqld_exporter --config.my-cnf=/root/mysqld_exporter/.my.cnf &
[8] 31412
查看是否启动成功:
[root@mufenggrow42 ~]# ss -antlp |grep 9104
LISTEN     0      128         :::9104                    :::*                   users:(("mysqld_exporter",pid=31412,fd=3))
[root@mufenggrow42 ~]#
看到端口,说明启动成功,接下来,需要到server端配置文件中指定IP和端口
3.5 配置服务端拉取数据
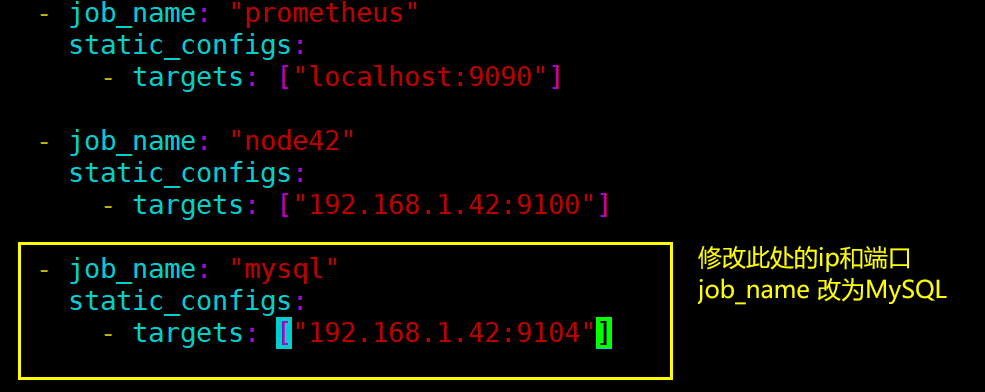
前面两个我们在之前的文章中配置过了,下面我们只需要修改最后三行即可
scrape_configs:# The job name is added as a label `job=<job_name>` to any timeseries scraped from this config.- job_name: "prometheus"static_configs:- targets: ["localhost:9090"]- job_name: "node42"static_configs:- targets: ["192.168.1.42:9100"]- job_name: "mysql"static_configs:- targets: ["192.168.1.42:9104"]
修改方式如图:
修改配置文件之后需要重启:
[root@mufenggrow41 prometheus]# pkill prometheus
[root@mufenggrow41 prometheus]# ./prometheus &
3.6 到网页端查看监控情况
从下图可以看到,已经能够监控到MySQL了。
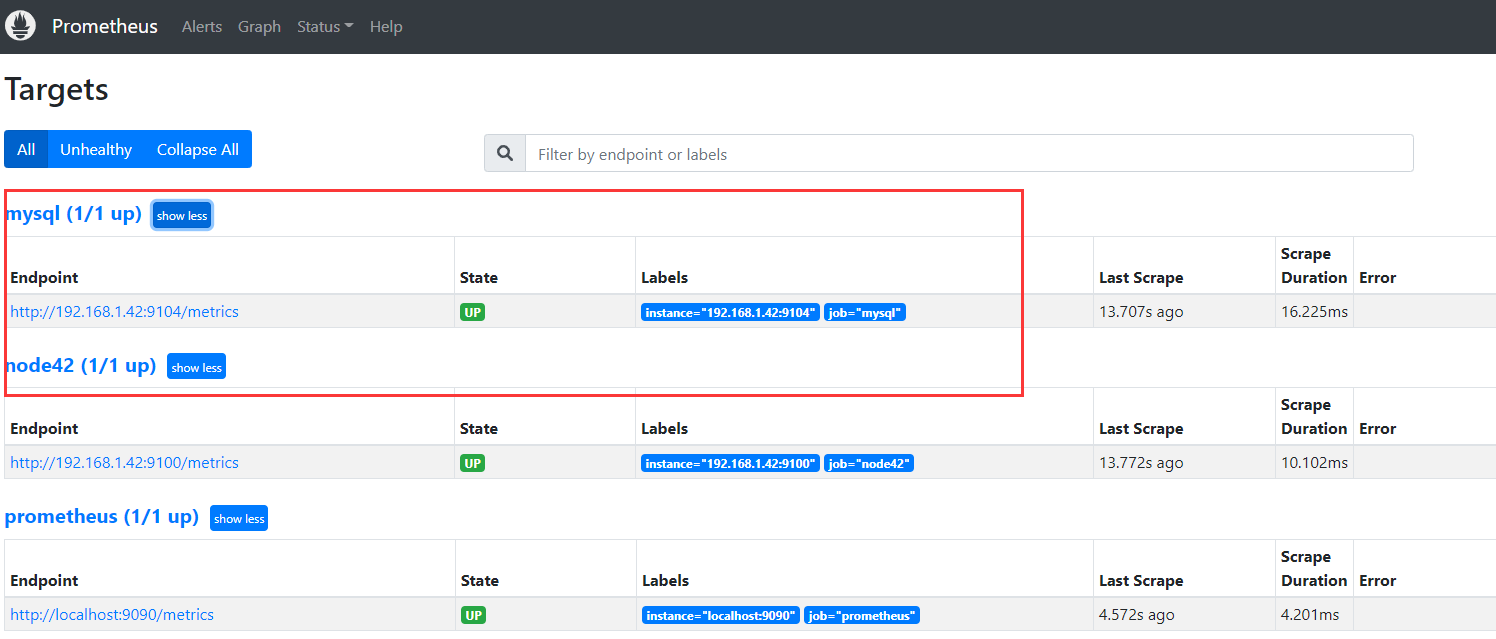
上图中的三个常见的单词:
Alerts:可以看到自定义的告警规则。
Graph:按查询条件进行数据查询,并生成指定图形。
Status:可以查看配置信息、规则、节点目标等,其中Targets表示本地和远端的监控,可以查看各节点运行情况
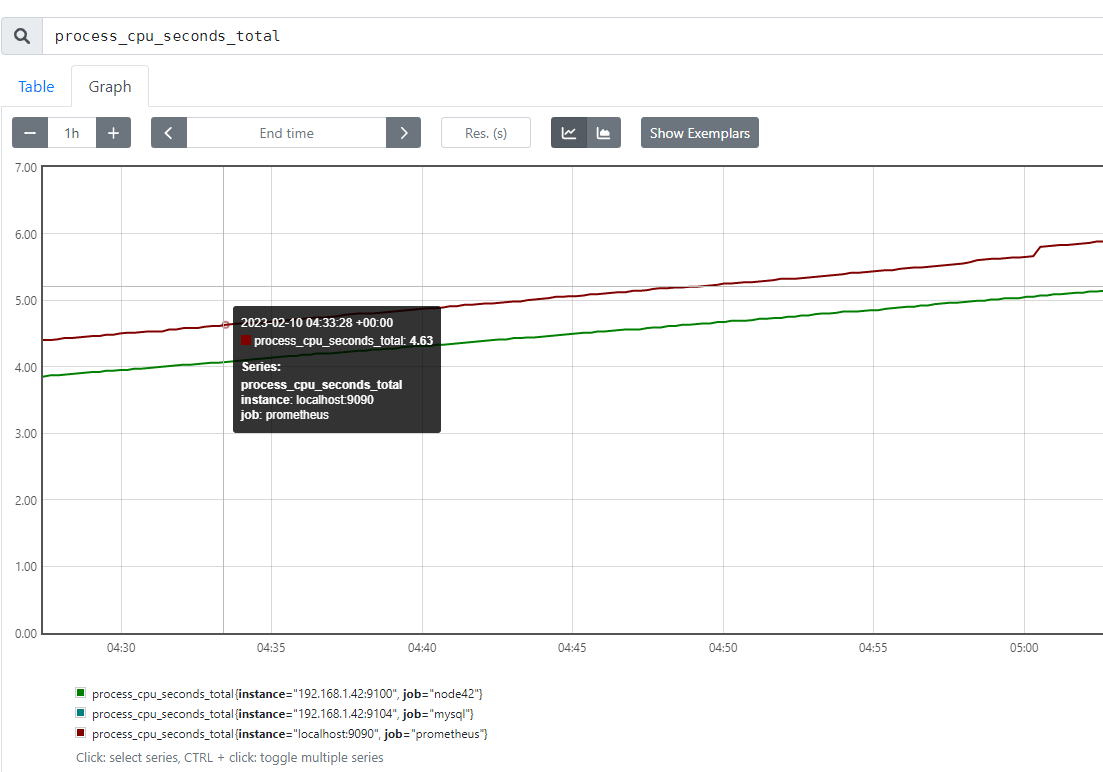
接下来我们通过控制面板查看:process_cpu_seconds_total,查看CPU指标
四. MySQL中常见的监控指标:
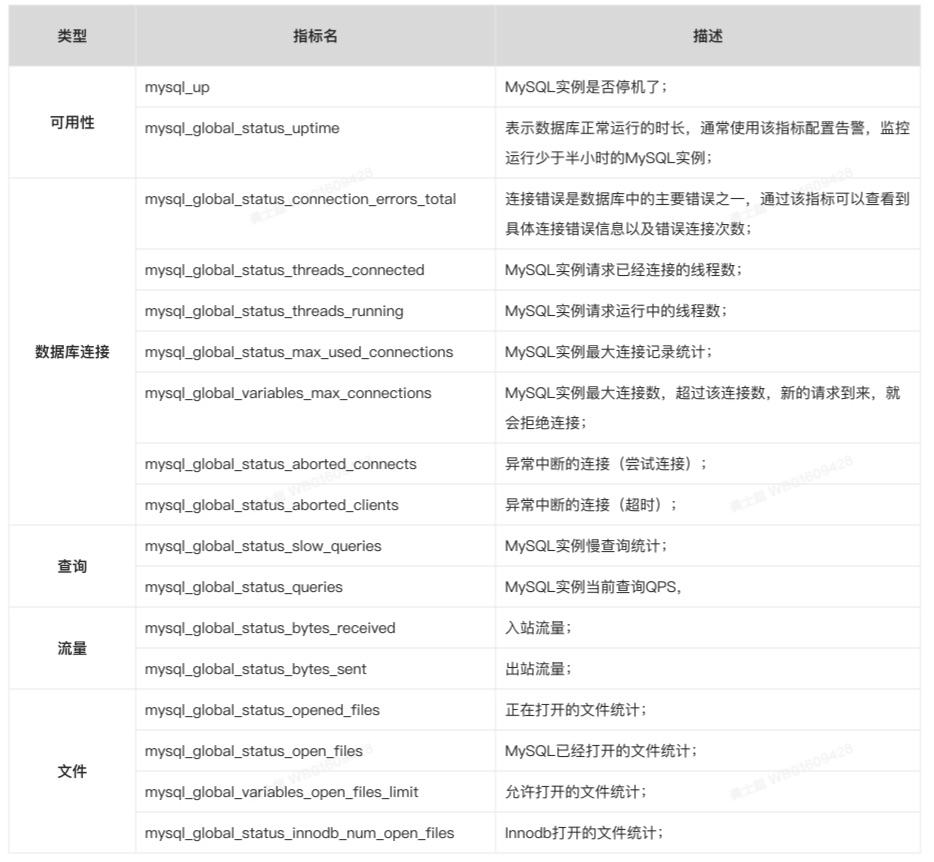
Google 提出系统监控的 Latency,Traffic,Saturation,Errors 作为黄金指标。而 MySQL 作为资源类服务系统出现,我们将之进行细化,从可用性、数据库连接、查询、流量、文件五大维度入手:
写在最后
以上就是使用prometheusmysql 服务器实战,欢迎点赞收藏哦。
✨原创不易,还希望各位大佬支持一下\textcolor{blue}{原创不易,还希望各位大佬支持一下}原创不易,还希望各位大佬支持一下
👍 点赞,你的认可是我创作的动力!\textcolor{green}{点赞,你的认可是我创作的动力!}点赞,你的认可是我创作的动力!
⭐️ 收藏,你的青睐是我努力的方向!\textcolor{green}{收藏,你的青睐是我努力的方向!}收藏,你的青睐是我努力的方向!
✏️ 评论,你的意见是我进步的财富!\textcolor{green}{评论,你的意见是我进步的财富!}评论,你的意见是我进步的财富!
