ask对于.NET的重要性毋庸置疑。通过最近的一些面试人员经历,发现很多人对与Task及其调度机制,以及线程和线程池之间的关系并没有清晰的认识。本文采用最简单的方式模拟了Task的实现,旨在说明Task是什么?它是如何被调度执行的?
一、Task(Job)
Task代表一项具有某种状态的操作,我们使用如下这个Job类型来模拟Task。Job封装的操作体现为一个Action委托,状态则通过JobStatus枚举来表示(对应TaskStatus枚举)。简单起见,我们仅仅定义了四种状态(创建、调度、执行和完成)。Invoke方法负责执行封装的Action委托,并对状态进行相应设置。
public class Job
{private readonly Action _work;public Job(Action work)=> _work = work;public JobStatus Status { get; internal set; }internal protected virtual void Invoke(){Status = JobStatus.Running;_work();Status = JobStatus.Completed;    }
}public enum JobStatus
{Created,Scheduled,Running,Completed
}
二、TaskScheduler(JobScheduler)
Task承载的操作通过调度得以执行,具体的调度策略取决于调度器的选择。Task调度器通过TaskScheduler表示,我们利用如下这个JobScheduler类型对它进行模拟。如下面的代码片段所示,我们只为抽象类JobScheduler定义了唯一的QueueJob方法来调度作为参数的Job对象。静态Current属性表示当前默认实现的调度器。
public abstract class JobScheduler
{public abstract void QueueJob(Job job);public static JobScheduler Current { get; set; } = new ThreadPoolJobScheduler ();
}
对于开发者来说,执行Task就是将它提交给调度器,这一操作体现在我们为Job类型定义的静态Start方法中。该方法通过参数指定具体的调度器,如果没有显式指定,默认采用JobScheduler的Current静态属性设置的默认调度器。为了方便后面的演示,我们还定义了一个静态的Run方法,该方法会将指定的Action对象封装成Job,并调用Start方法利用默认的调度器进行调度。
public class Job
{private readonly Action _work;public Job(Action work)=> _work = work;public JobStatus Status { get; internal set; }internal protected virtual void Invoke(){Status = JobStatus.Running;_work();Status = JobStatus.Completed;}public void Start(JobScheduler? scheduler = null) => (scheduler ?? JobScheduler.Current).QueueJob(this);public static Job Run(Action work){var job = new Job(work);job.Start();return job;}
}
三、基于线程池的调度
Task如何执行取决于选择怎样的调度器,.NET默认采用基于线程池的调度策略,这一策略体现在ThreadPoolTaskScheduler类型上,我们使用如下这个ThreadPoolJobScheduler 进行模拟。如下面的代码片段所示,重写的QueueJob方法通过调用ThreadPool.QueueUserWorkItem方法执行指定Job对象封装的Action委托。JobScheduler的Current属性设置的默认调度器就是这么一个ThreadPoolJobScheduler 对象。
public class ThreadPoolJobScheduler : JobScheduler
{public override void QueueJob(Job job){job.Status = JobStatus.Scheduled;var executionContext = ExecutionContext.Capture();ThreadPool.QueueUserWorkItem(_ => ExecutionContext.Run(executionContext!, _ => job.Invoke(), null));}
}
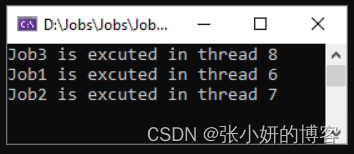
我们按照如下的方式调用Job的静态Run方法创建并执行了三个Job,每个Job封装的Action委托在执行的时候会将当前线程ID打印出来。
_ = Job.Run(() => Console.WriteLine($"Job1 is excuted in thread {Thread.CurrentThread.ManagedThreadId}"));
_ = Job.Run(() => Console.WriteLine($"Job2 is excuted in thread {Thread.CurrentThread.ManagedThreadId}"));
_ = Job.Run(() => Console.WriteLine($"Job3 is excuted in thread {Thread.CurrentThread.ManagedThreadId}"));Console.ReadLine();
由于采用默认的基于线程池的调度策略,所以三个Job会在三个不同的线程上执行。

四、使用指定线程进行调度
我们知道.NET进程只有一个全局的线程池,对于一些需要长时间运行且具有较高优先级的操作,采用基于线程池的调用未必是好的选择。比如在一个Web应用中,线程池的工作线程会被用来处理请求,对于一个需要持续运行的Job可能会因为可用工作线程的不足而被阻塞。.NET对于这种情况具有不同的处理方式(启动Task的时候选择TaskCreationOptions.LongRunning选项),这里我们使用自定义调度器的方式来解决这个问题。如下这个DedicatedThreadJobScheduler 利用创建的“专有线程”来保证被调用的Job能够“立即”执行。
internal class DedicatedThreadJobScheduler : JobScheduler
{private readonly BlockingCollection<Job> _queues = new();private readonly Thread[] _threads;public DedicatedThreadJobScheduler(int threadCount){_threads = Enumerable.Range(1, threadCount).Select(i_ => new Thread(Invoke)).ToArray();Array.ForEach(_threads, it => it.Start());void Invoke(object? state){while (true){_queues.Take().Invoke();}}}public override void QueueJob(Job job)=>_queues.Add(job);
}
还是上面演示的程序,这次我们将当前调度器设置为上面这个DedicatedThreadJobScheduler ,并将使用的线程数设置为2。
JobScheduler.Current = new DedicatedThreadJobScheduler (2);
_ = Job.Run(() => Console.WriteLine($"Job1 is excuted in thread {Thread.CurrentThread.ManagedThreadId}"));
_ = Job.Run(() => Console.WriteLine($"Job2 is excuted in thread {Thread.CurrentThread.ManagedThreadId}"));
_ = Job.Run(() => Console.WriteLine($"Job3 is excuted in thread {Thread.CurrentThread.ManagedThreadId}"));
_ = Job.Run(() => Console.WriteLine($"Job4 is excuted in thread {Thread.CurrentThread.ManagedThreadId}"));
_ = Job.Run(() => Console.WriteLine($"Job5 is excuted in thread {Thread.CurrentThread.ManagedThreadId}"));
_ = Job.Run(() => Console.WriteLine($"Job6 is excuted in thread {Thread.CurrentThread.ManagedThreadId}"));Console.ReadLine();
我们会发现所有的操作只会在两个固定的线程中被执行。

五、异步等待
如果需要在某个Task执行之后接着执行后续的操作,我们可以调用其ContinueWith方法指定待执行的操作,现在我们将这个方法定义Job类型上。Job与Task的ContinueWith有些差异,在这里我们认为ContinueWith指定的也是一个Job,那么多个Job则可以按照预先编排的顺序构成一个链表。当前Job执行后,只需要将后续这个Job交付给调度器就可以了。如下面的代码片段所示,我们利用_continue字段来表示异步等待执行的Job,并利用它维持一个Job链表。ContinueWith方法会将指定的Action委托封装成Job并添加到链表末端。
public class Job
{private readonly Action _work;private Job? _continue;public Job(Action work) => _work = work;public JobStatus Status { get; internal set; }public void Start(JobScheduler? scheduler = null) => (scheduler ?? JobScheduler.Current).QueueJob(this);internal protected virtual void Invoke(){Status = JobStatus.Running;_work();Status = JobStatus.Completed;_continue?.Start();}public static Job Run(Action work){var job = new Job(work);job.Start();return job;}public Job ContinueWith(Action<Job> continuation){if (_continue == null){var job = new Job(() => continuation(this));_continue = job;}else{_continue.ContinueWith(continuation);}return this;}
}
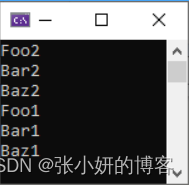
利用ContinueWith方法实现异步操作的按序执行体现在如下的程序中。
Job.Run(() =>{Thread.Sleep(1000);Console.WriteLine("Foo1");
}).ContinueWith(_ =>{Thread.Sleep(100);Console.WriteLine("Bar1");
}).ContinueWith(_ =>{Thread.Sleep(100);Console.WriteLine("Baz1");
});Job.Run(() =>{Thread.Sleep(100);Console.WriteLine("Foo2");
}).ContinueWith(_ =>{Thread.Sleep(10);Console.WriteLine("Bar2");
}).ContinueWith(_ =>{Thread.Sleep(10);Console.WriteLine("Baz2");
});Console.ReadLine();
输出结果

六、await关键字的运用
虽然ContinueWith方法能够解决“异步等待”的问题,但是我们更喜欢使用await关键字,接下来我们就为Job赋予这个能力。为此我们定义了如下这个实现了ICriticalNotifyCompletion接口的JobAwaiter结构体。顾名思义,该接口用来发送操作完成的通知。一个JobAwaiter对象由一个Job对象构建而成,当它自身执行完成之后,OnCompleted方法会被调用,我们利用它执行后续的操作。
public struct JobAwaiter: ICriticalNotifyCompletion
{private readonly Job _job;public bool IsCompleted => _job.Status ==  JobStatus.Completed;public JobAwaiter(Job job){_job = job;if (job.Status == JobStatus.Created){job.Start();}}public void OnCompleted(Action continuation){_job.ContinueWith(_ => continuation());}public void GetResult() { }public void UnsafeOnCompleted(Action continuation)=>OnCompleted(continuation);
}
我们在Job类型上添加这个GetAwaiter方法返回根据自身创建的JobAwaiter对象。
public class Job
{private readonly Action _work;private Job? _continue;public Job(Action work) => _work = work;public JobStatus Status { get; internal set; }public void Start(JobScheduler? scheduler = null) => (scheduler ?? JobScheduler.Current).QueueJob(this);internal protected virtual void Invoke(){Status = JobStatus.Running;_work();Status = JobStatus.Completed;_continue?.Start();}public static Job Run(Action work){var job = new Job(work);job.Start();return job;}public Job ContinueWith(Action<Job> continuation){if (_continue == null){var job = new Job(() => continuation(this));_continue = job;}else{_continue.ContinueWith(continuation);}return this;}public JobAwaiter GetAwaiter() => new(this);
}
任何一个类型一旦拥有了这样一个GetAwaiter方法,我们就能将await关键词应用在对应的对象上面。
await Foo();
await Bar();
await Baz();Console.ReadLine();static Job Foo() =>  new Job(() =>
{Thread.Sleep(1000);Console.WriteLine("Foo");
});static Job Bar() => new Job(() =>
{Thread.Sleep(100);Console.WriteLine("Bar");
});static Job Baz() => new Job(() =>
{Thread.Sleep(10);Console.WriteLine("Baz");
});
输出结果:

七、状态机
我想你应该知道await关键字仅仅是编译器提供的语法糖,编译后的代码会利用一个“状态机”实现“异步等待”的功能,上面这段代码最终编译成如下的形式。值得一提的是,Debug和Release模式编译出来的代码是不同的,下面给出的是Release模式下的编译结果,上述的状态机体现为生成的<<Main>$>d__0这个结构体。它的实现其实很简单:如果个方法出现了N个await关键字,它们相当于将整个方法的执行流程切割成N+1段,状态机的状态体现为当前应该执行那段,具体的执行体现在MoveNext方法上。GetAwaiter方法返回的ICriticalNotifyCompletion对象用来确定当前操作是否结束,如果结束则可以直接指定后续操作,否则需要调用AwaitUnsafeOnCompleted对后续操作进行处理。
// Program
using System;
using System.Diagnostics;
using System.Runtime.CompilerServices;
using System.Runtime.InteropServices;
using System.Threading.Tasks;
using Jobs;[CompilerGenerated]
internal class Program
{[StructLayout(LayoutKind.Auto)][CompilerGenerated]private struct <<Main>$>d__0 : IAsyncStateMachine{public int <>1__state;public AsyncTaskMethodBuilder <>t__builder;private JobAwaiter <>u__1;private void MoveNext(){int num = <>1__state;try{JobAwaiter awaiter;switch (num){default:awaiter = <<Main>$>g__Foo|0_0().GetAwaiter();if (!awaiter.IsCompleted){num = (<>1__state = 0);<>u__1 = awaiter;<>t__builder.AwaitUnsafeOnCompleted(ref awaiter, ref this);return;}goto IL_006c;case 0:awaiter = <>u__1;<>u__1 = default(JobAwaiter);num = (<>1__state = -1);goto IL_006c;case 1:awaiter = <>u__1;<>u__1 = default(JobAwaiter);num = (<>1__state = -1);goto IL_00c6;case 2:{awaiter = <>u__1;<>u__1 = default(JobAwaiter);num = (<>1__state = -1);break;}IL_00c6:awaiter.GetResult();awaiter = <<Main>$>g__Baz|0_2().GetAwaiter();if (!awaiter.IsCompleted){num = (<>1__state = 2);<>u__1 = awaiter;<>t__builder.AwaitUnsafeOnCompleted(ref awaiter, ref this);return;}break;IL_006c:awaiter.GetResult();awaiter = <<Main>$>g__Bar|0_1().GetAwaiter();if (!awaiter.IsCompleted){num = (<>1__state = 1);<>u__1 = awaiter;<>t__builder.AwaitUnsafeOnCompleted(ref awaiter, ref this);return;}goto IL_00c6;}awaiter.GetResult();Console.ReadLine();}catch (Exception exception){<>1__state = -2;<>t__builder.SetException(exception);return;}<>1__state = -2;<>t__builder.SetResult();}void IAsyncStateMachine.MoveNext(){//ILSpy generated this explicit interface implementation from .override directive in MoveNextthis.MoveNext();}[DebuggerHidden]private void SetStateMachine([System.Runtime.CompilerServices.Nullable(1)] IAsyncStateMachine stateMachine){<>t__builder.SetStateMachine(stateMachine);}void IAsyncStateMachine.SetStateMachine([System.Runtime.CompilerServices.Nullable(1)] IAsyncStateMachine stateMachine){//ILSpy generated this explicit interface implementation from .override directive in SetStateMachinethis.SetStateMachine(stateMachine);}}[AsyncStateMachine(typeof(<<Main>$>d__0))]private static Task <Main>$(string[] args){<<Main>$>d__0 stateMachine = default(<<Main>$>d__0);stateMachine.<>t__builder = AsyncTaskMethodBuilder.Create();stateMachine.<>1__state = -1;stateMachine.<>t__builder.Start(ref stateMachine);return stateMachine.<>t__builder.Task;}[SpecialName]private static void <Main>(string[] args){<Main>$(args).GetAwaiter().GetResult();}
}
上面提到过,编译器生成的状态机代码在Debug和Release模式是不一样的。在Release模式下状态机是一个结构体,虽然是以接口ICriticalNotifyCompletion的方式使用它,但是由于使用了ref关键字,所以不会涉及装箱,所以不会对GC造成任何影响。但是Debug模式下生成的状态机则是一个类(如下所示),将会涉及针对堆内存的分配和回收。对于遍布await关键字的应用程序,两者之间的性能差异肯定是不同的。实际上针对Task的很多优化策略,比如使用ValueTask,对某些Task<T>对象(比如状态为Completed的Task<bool>对象)的复用,以及使用IValueTaskSource等,都是为了解决内存分配的问题。
// Program
using System;
using System.Diagnostics;
using System.Runtime.CompilerServices;
using System.Threading.Tasks;
using Jobs;[CompilerGenerated]
internal class Program
{[CompilerGenerated]private sealed class <<Main>$>d__0 : IAsyncStateMachine{public int <>1__state;public AsyncTaskMethodBuilder <>t__builder;public string[] args;private JobAwaiter <>u__1;private void MoveNext(){int num = <>1__state;try{JobAwaiter awaiter3;JobAwaiter awaiter2;JobAwaiter awaiter;switch (num){default:awaiter3 = <<Main>$>g__Foo|0_0().GetAwaiter();if (!awaiter3.IsCompleted){num = (<>1__state = 0);<>u__1 = awaiter3;<<Main>$>d__0 stateMachine = this;<>t__builder.AwaitUnsafeOnCompleted(ref awaiter3, ref stateMachine);return;}goto IL_007e;case 0:awaiter3 = <>u__1;<>u__1 = default(JobAwaiter);num = (<>1__state = -1);goto IL_007e;case 1:awaiter2 = <>u__1;<>u__1 = default(JobAwaiter);num = (<>1__state = -1);goto IL_00dd;case 2:{awaiter = <>u__1;<>u__1 = default(JobAwaiter);num = (<>1__state = -1);break;}IL_00dd:awaiter2.GetResult();awaiter = <<Main>$>g__Baz|0_2().GetAwaiter();if (!awaiter.IsCompleted){num = (<>1__state = 2);<>u__1 = awaiter;<<Main>$>d__0 stateMachine = this;<>t__builder.AwaitUnsafeOnCompleted(ref awaiter, ref stateMachine);return;}break;IL_007e:awaiter3.GetResult();awaiter2 = <<Main>$>g__Bar|0_1().GetAwaiter();if (!awaiter2.IsCompleted){num = (<>1__state = 1);<>u__1 = awaiter2;<<Main>$>d__0 stateMachine = this;<>t__builder.AwaitUnsafeOnCompleted(ref awaiter2, ref stateMachine);return;}goto IL_00dd;}awaiter.GetResult();Console.ReadLine();}catch (Exception exception){<>1__state = -2;<>t__builder.SetException(exception);return;}<>1__state = -2;<>t__builder.SetResult();}void IAsyncStateMachine.MoveNext(){//ILSpy generated this explicit interface implementation from .override directive in MoveNextthis.MoveNext();}[DebuggerHidden]private void SetStateMachine([System.Runtime.CompilerServices.Nullable(1)] IAsyncStateMachine stateMachine){}void IAsyncStateMachine.SetStateMachine([System.Runtime.CompilerServices.Nullable(1)] IAsyncStateMachine stateMachine){//ILSpy generated this explicit interface implementation from .override directive in SetStateMachinethis.SetStateMachine(stateMachine);}}[AsyncStateMachine(typeof(<<Main>$>d__0))][DebuggerStepThrough]private static Task <Main>$(string[] args){<<Main>$>d__0 stateMachine = new <<Main>$>d__0();stateMachine.<>t__builder = AsyncTaskMethodBuilder.Create();stateMachine.args = args;stateMachine.<>1__state = -1;stateMachine.<>t__builder.Start(ref stateMachine);return stateMachine.<>t__builder.Task;}[SpecialName][DebuggerStepThrough]private static void <Main>(string[] args){<Main>$(args).GetAwaiter().GetResult();}
}

