文章目录
- 2.1 peerconnection conductor
- 2.2 PeerConnectionFactory和PeerConnection
- 2.2.1 CreatePeerConnectionFactory
- 2.2.2 PeerConnection
- 2.2.3 PeerConnection::Create
- 2.3 Conductor::AddTracks
- 2.3.1 LocalAudioSource
- 2.3.2 AudioTrack创建
- 2.3.4 AudioTrack绑定
- 2.4 开启发送
本章以WebRTC 的peerconnection native层例子分析P2P视频会议是如何实现的,第一章1.5小节编译出各个模块的二进制可执行测试程序的同时也会编译出WebRTC peerconnection例子的可执行程序,其中客户端应用程序在examples/peerconnection/client目录,服务器端应用程序在examples/peerconnection/server目录下。客户端具有简单的音视频功能,服务器端使得客户端程序能够通过信令开启会议。
2.1 peerconnection conductor
conductor的作用是桥接UI层和WebRTC会议逻辑层,和会议有关的核心启动流程放在了peerConnectionFactory的创建过程中,本小节先看一下UI层是如何触发核心启动流程创建的,整个会议过程需要服务器先启动服务,如./peerconnection_server --port=8888,成功启动服务端后Ubuntu终端上后会有如下输出:
Server listening on port 8888
WebRTC的P2P例子通信双方在连接阶段使用SDP协商(offer/answer)后续传输的多媒体信息、主机候选地址以及网络传输协议等,SDP协议内容不是本书的重点,关于该协议可见RFC4566。启动 peerconnection native例子的server端之后,再启动client端,则client端会弹出如图2-1所示的界面,鼠标点击右侧connect按钮之后,将连接到server端,并在界面中展示可以显示可以通信的对象,如图2-2所示,可以看到P2P两边显示的名称是一样的,(这是因为两个client是在同一个电脑不同终端启动的,所以两边看到的都是gsc@240),下文所述发生在选中图中gsc@240这一通信方并回车之后。
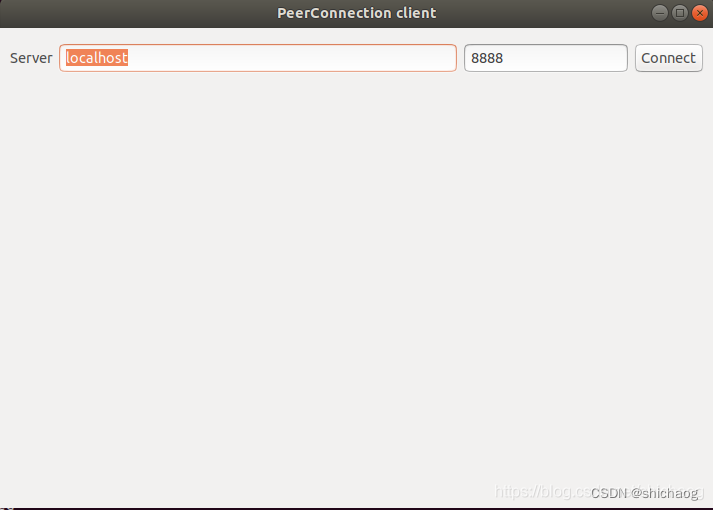
图2-1 启动peerconnection client界面
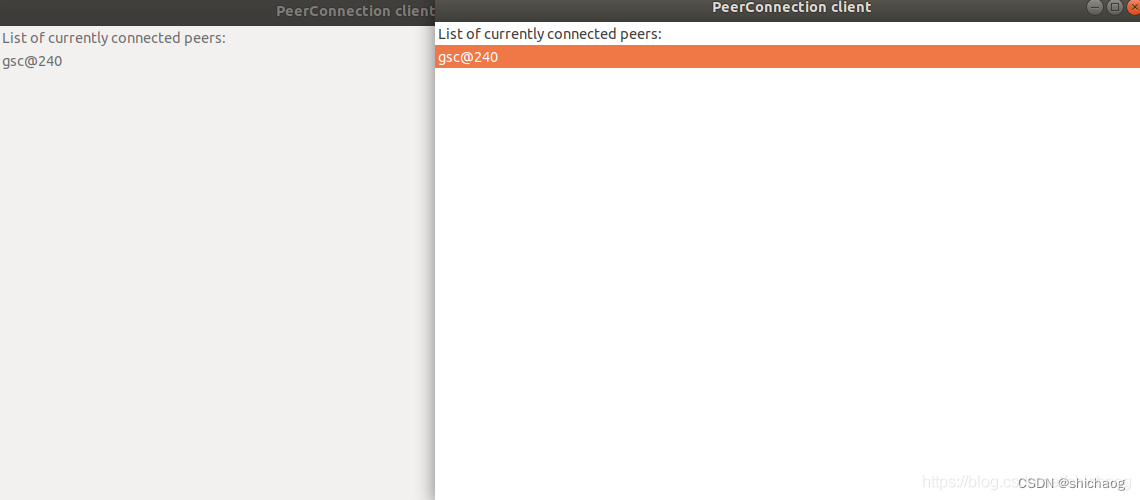
图2-2 选中gsc@240并回车
图2-2中的动作会触发conductor.cc文件中的void Conductor::ConnectToPeer(int peer_id)函数,其会通过SDP协议向对端发送要通信的元信息(网络以及多媒体信息),而对端则是通过void Conductor::**OnMessageFromPeer**(int peer_id, const std::string& message)处理接收到的信息,而既然是peer到peer的通信,所以不论是发送端(offer)还是接收端(answer)都应该创建peer_connection_这个对象,并由peer_connection_对象调用CreateOffer和CreateAnswer完成SDP协议协商。
//webrtc/examples/peerconnection/client/conductor.cc
void Conductor::ConnectToPeer(int peer_id) {RTC_DCHECK(peer_id_ == -1);RTC_DCHECK(peer_id != -1);
//并不支持mesh网络的多个P2P之间的互联,只支持单个P2P,而图形上connect按钮应该触发首次创建peer_connection_这个对象if (peer_connection_.get()) {main_wnd_->MessageBox("Error", "We only support connecting to one peer at a time", true);return;}
//初始化peer_connection_对象,并且保存peer_idif (InitializePeerConnection()) {peer_id_ = peer_id;//SDP协议offer侧peer_connection_->CreateOffer(this, webrtc::PeerConnectionInterface::RTCOfferAnswerOptions());} else {main_wnd_->MessageBox("Error", "Failed to initialize PeerConnection", true);}
}
InitializePeerConnection函数定义于同一个文件,该函数并不长,创建signaling_thread_、peer_connection_factory_以及调用AddTracks函数完成初始化工作,完成这些工作之后才使用SDP协议完成信令通讯,一个P2P会议中,由于传输的多媒体内容是音频和视频,因而在创建peer_connection_factory_对象时,需要对多媒体信息进行细化,音频部分主要包括APM、ADM以及ACM,视频部分主要VCM、VDM,为了层级上便于管理,这分别由于voice engine和video engine两大引擎类进行了管理,在此基础上又使用了channel、track以及stream的概念进行了抽象封装以便于使用。
//webrtc/examples/peerconnection/client/conductor.cc
#include "api/create_peerconnection_factory.h"
bool Conductor::InitializePeerConnection() {//在进入这个函数的时候,peer_connection_和peer_connection_factory_这个对象都是还未创建的RTC_DCHECK(!peer_connection_factory_);RTC_DCHECK(!peer_connection_);if (!signaling_thread_.get()) {signaling_thread_ = rtc::Thread::CreateWithSocketServer();signaling_thread_->Start();}//使用工厂类创建peer_connection_factory_对象,这是启动一个典型的WebRTC会议步骤见2.2小节,属于第一步,实现见2.2.1小节peer_connection_factory_ = webrtc::CreatePeerConnectionFactory(nullptr /* network_thread */, nullptr /* worker_thread */,signaling_thread_.get(), nullptr /* default_adm */,webrtc::CreateBuiltinAudioEncoderFactory(),webrtc::CreateBuiltinAudioDecoderFactory(),webrtc::CreateBuiltinVideoEncoderFactory(),webrtc::CreateBuiltinVideoDecoderFactory(), nullptr /* audio_mixer */,nullptr /* audio_processing */);if (!peer_connection_factory_) {main_wnd_->MessageBox("Error", "Failed to initialize PeerConnectionFactory",true);DeletePeerConnection();return false;}
//这是启动一个典型的WebRTC会议步骤见2.2小节,属于第二步if (!CreatePeerConnection()) {main_wnd_->MessageBox("Error", "CreatePeerConnection failed", true);DeletePeerConnection();}
//这是启动一个典型的WebRTC会议步骤见2.3小节,属于第三步AddTracks();return peer_connection_ != nullptr;
}
2.2 PeerConnectionFactory和PeerConnection
PeerConnectionFactory 工厂类提供创建PeerConnection、MediaStream以及MediaStreamTrack对象的工厂方法。
启动一个典型的WebRTC会议步骤如下:
1.创建一个PeerConnectionFactoryInterface,所需参数可以参考构造函数;
2.创建一个PeerConnection对象,提供用于ICE透传候选的STUN/TURN服务器配置结构和用于接收来自PeerConnection回调的实现PeerConnectionObserver接口的对象;
3.使用PeerConnectionFactory创建local MediaStreamTracks,并使用AddTrack方法将其添加到上一步创建的PeerConnection对象中;
4.创建SDP协议中的offer侧请求信息,调用SetLocalDescription方法并将其发送到对端;
5.当ICE透传信息收集到后,PeerConnection对象将调用ICE observer OnIceCandidate,ICE的透传信息需要传递给对端;
6.当接收到来自对端的SDP answer之后,本地端将调用SetRemoteDescription设置远端answer的SDP信息;
7.当接收到对端的透传候选信息之后,调用AddIceCandidate将其传递给PeerConnection对象;
8.当接收到会议请求之后,接收到可以选择接受或者拒绝,这一决定权取决于应用程序而非PeerConnection对象,当选择接受会议请求之后,接收方需要做如下事项:
a. 如果PeerConnectionFactoryInterface对象不存在则创建一个;
b. 创建一个新的PeerConnection对象;
c.通过调用SetRemoteDescription将远端通过SDP协议传来的offer信息设置到新的PeerConnection对象中;
d.调用CreateAnswer创建应答远端SDP offer信息的SDP answer,并将该answer发送给offer端;
e.通过调用SetLocalDescription将本地刚刚创建的answer内容设置到新的PeerConnection对象中;
f.通过调用AddIceCandidate设置远端ICE candidates
g.一旦candidate信息收集到之后,PeerConnection对象将会调用观察函数OnIceCandidate,并将这些candidates发送到远端;
关于SDP协议并不深入分析,其主要是通过offer/answer模型建立通信,透传这里也不涉及,大多数多人会议场景还是需要多媒体服务器,WebRTC这种只有信令服务器的场景在多人视频会议中使用到的还是非常少的。
2.2.1 CreatePeerConnectionFactory
在2.1小节,conductor调用webrtc::CreatePeerConnectionFactory的如下参数传递的是NULL值,这是由于该工厂方法中定义了默认的创建方式。
//见1.7小节rtc::scoped_refptr<AudioDeviceModule> default_adm,rtc::scoped_refptr<AudioMixer> audio_mixer,//默认创建采用AudioProcessingBuilder().Create();方法,见1.6小节rtc::scoped_refptr<AudioProcessing> audio_processing,
这个函数一个非常重要的作用是创建多媒体引擎cricket::CreateMediaEngine(std::move(media_dependencies));,传递给该创建引擎API中的media_dependencies参数中的audio_processing是创建好了的,而mixer和adm则是NULL值,这会丢给engine自己调用默认方法创建,peer_connection_factory_对象时,其工厂方法中音视频编解码对象参数类型和实参如下:
rtc::scoped_refptr<PeerConnectionFactoryInterface> CreatePeerConnectionFactory(rtc::Thread* network_thread,rtc::Thread* worker_thread,rtc::Thread* signaling_thread,rtc::scoped_refptr<AudioDeviceModule> default_adm,rtc::scoped_refptr<AudioEncoderFactory> audio_encoder_factory,rtc::scoped_refptr<AudioDecoderFactory> audio_decoder_factory,std::unique_ptr<VideoEncoderFactory> video_encoder_factory,std::unique_ptr<VideoDecoderFactory> video_decoder_factory,rtc::scoped_refptr<AudioMixer> audio_mixer,rtc::scoped_refptr<AudioProcessing> audio_processing,AudioFrameProcessor* audio_frame_processor,std::unique_ptr<FieldTrialsView> field_trials) {if (!field_trials) {field_trials = std::make_unique<webrtc::FieldTrialBasedConfig>();}PeerConnectionFactoryDependencies dependencies;dependencies.network_thread = network_thread;dependencies.worker_thread = worker_thread;dependencies.signaling_thread = signaling_thread;dependencies.task_queue_factory =CreateDefaultTaskQueueFactory(field_trials.get());dependencies.call_factory = CreateCallFactory();dependencies.event_log_factory = std::make_unique<RtcEventLogFactory>(dependencies.task_queue_factory.get());dependencies.trials = std::move(field_trials);if (network_thread) {// TODO(bugs.webrtc.org/13145): Add an rtc::SocketFactory* argument.dependencies.socket_factory = network_thread->socketserver();}cricket::MediaEngineDependencies media_dependencies;media_dependencies.task_queue_factory = dependencies.task_queue_factory.get();media_dependencies.adm = std::move(default_adm);media_dependencies.audio_encoder_factory = std::move(audio_encoder_factory);media_dependencies.audio_decoder_factory = std::move(audio_decoder_factory);media_dependencies.audio_frame_processor = audio_frame_processor;if (audio_processing) {media_dependencies.audio_processing = std::move(audio_processing);} else {media_dependencies.audio_processing = AudioProcessingBuilder().Create();}media_dependencies.audio_mixer = std::move(audio_mixer);media_dependencies.video_encoder_factory = std::move(video_encoder_factory);media_dependencies.video_decoder_factory = std::move(video_decoder_factory);media_dependencies.trials = dependencies.trials.get();//多媒体引擎创建,非常重要dependencies.media_engine =cricket::CreateMediaEngine(std::move(media_dependencies));return CreateModularPeerConnectionFactory(std::move(dependencies));
}
这里以CreateBuiltinAudioEncoderFactory为例一窥音频工厂类创建方法。
//api/audio_codecs/builtin_audio_encoder_factory.cc
rtc::scoped_refptr<AudioEncoderFactory> CreateBuiltinAudioEncoderFactory() {return CreateAudioEncoderFactory<#if WEBRTC_USE_BUILTIN_OPUSAudioEncoderOpus, NotAdvertised<AudioEncoderMultiChannelOpus>,
#endifAudioEncoderIsac, AudioEncoderG722,#if WEBRTC_USE_BUILTIN_ILBCAudioEncoderIlbc,
#endifAudioEncoderG711, NotAdvertised<AudioEncoderL16>>();
}
CreateAudioEncoderFactory是一个模板类,是对audio_encoder_factory_template_impl命名空间中的AudioEncoderFactoryT类的封装,最终创建的返回的是AudioEncoderFactory类型的对象,这一对象的MakeAudioEncoder方法很重要,是真正创建编解码的API,不过真正的创建放在了voice engine里。
每一个编码器都有MakeAudioEncoder方法,比如opus通过该方法创建opus编码类的方法如下。
std::unique_ptr<AudioEncoder> AudioEncoderOpus::MakeAudioEncoder(const AudioEncoderOpusConfig& config,int payload_type,absl::optional<AudioCodecPairId> /*codec_pair_id*/,const FieldTrialsView* field_trials) {if (!config.IsOk()) {RTC_DCHECK_NOTREACHED();return nullptr;}return AudioEncoderOpusImpl::MakeAudioEncoder(config, payload_type);
}
2.2.2 PeerConnection
PeerConnection是PeerConnectionInterface API定义的实现类,该类目前仅负责的内容如下:
* 管理会话状态机(信号状态);
* 创建和初始化底层如PortAllocator和BaseChannels等底层对象;
* 拥有和管理RtpSender/RtpReceiver以及音视频track对象的生命周期;
* 踪当前和挂起的本地/远程会话描述;
该类联合负责的内容如下:
* 解析SDP协议;
* 根据当前状态创建SDP offer/answer信息;
* ICE透传状态机;
* 生成统计信息;
SDP(Session Description Protocol)协议是会话描述协议,是用于描述用于通知和邀请的多媒体通信会话的一种格式,其主要用途是支持流媒体应用,如IP语音(VoIP)和视频会议。SDP本身不传递任何媒体流,而是在端点之间用于协商网络度量、媒体类型和其他相关属性,属性和参数集称为会话配置文件,在WebRTC的实现中,SDP协议分为PlanB与UnifiedPlan两种,PlanB:只有两个媒体描述,即音频媒体描述(m=audio…)和视频媒体描述(m=video…)。如果要传输多路视频,则他们在视频媒体描述中需要通过SSRC来区分。
UnifiedPlan中可以有多个媒体描述,因此对于多路视频,将其拆成多个视频媒体描述即可,如果引⼊ Stream 和 Track 的概念,那么⼀个 Stream 可能包含AudioTrack 和 VideoTrack,当有多路 Stream 时,就会有更多的 Track,如果每⼀个 Track 唯⼀对应⼀个⾃⼰的m描述,那么这就是 UnifiedPlan,如果每⼀个m=描述了多个Track(track id),那么这就是 Plan B。在p2p实现上,UnifiedPlan使用AddTrack API,而PlanB使用AddStream API。
WebRTC中也使用该协议,Jsep (JavaScript Session Establishment Protocol)协议描述了允许JavaScript应用程序通过W3C RTCPeerConnection API中指定的接口控制多媒体会话的信令平面的机制,并讨论了这与现有信令协议的关系,Native例子用c++实现了这一通信协议。
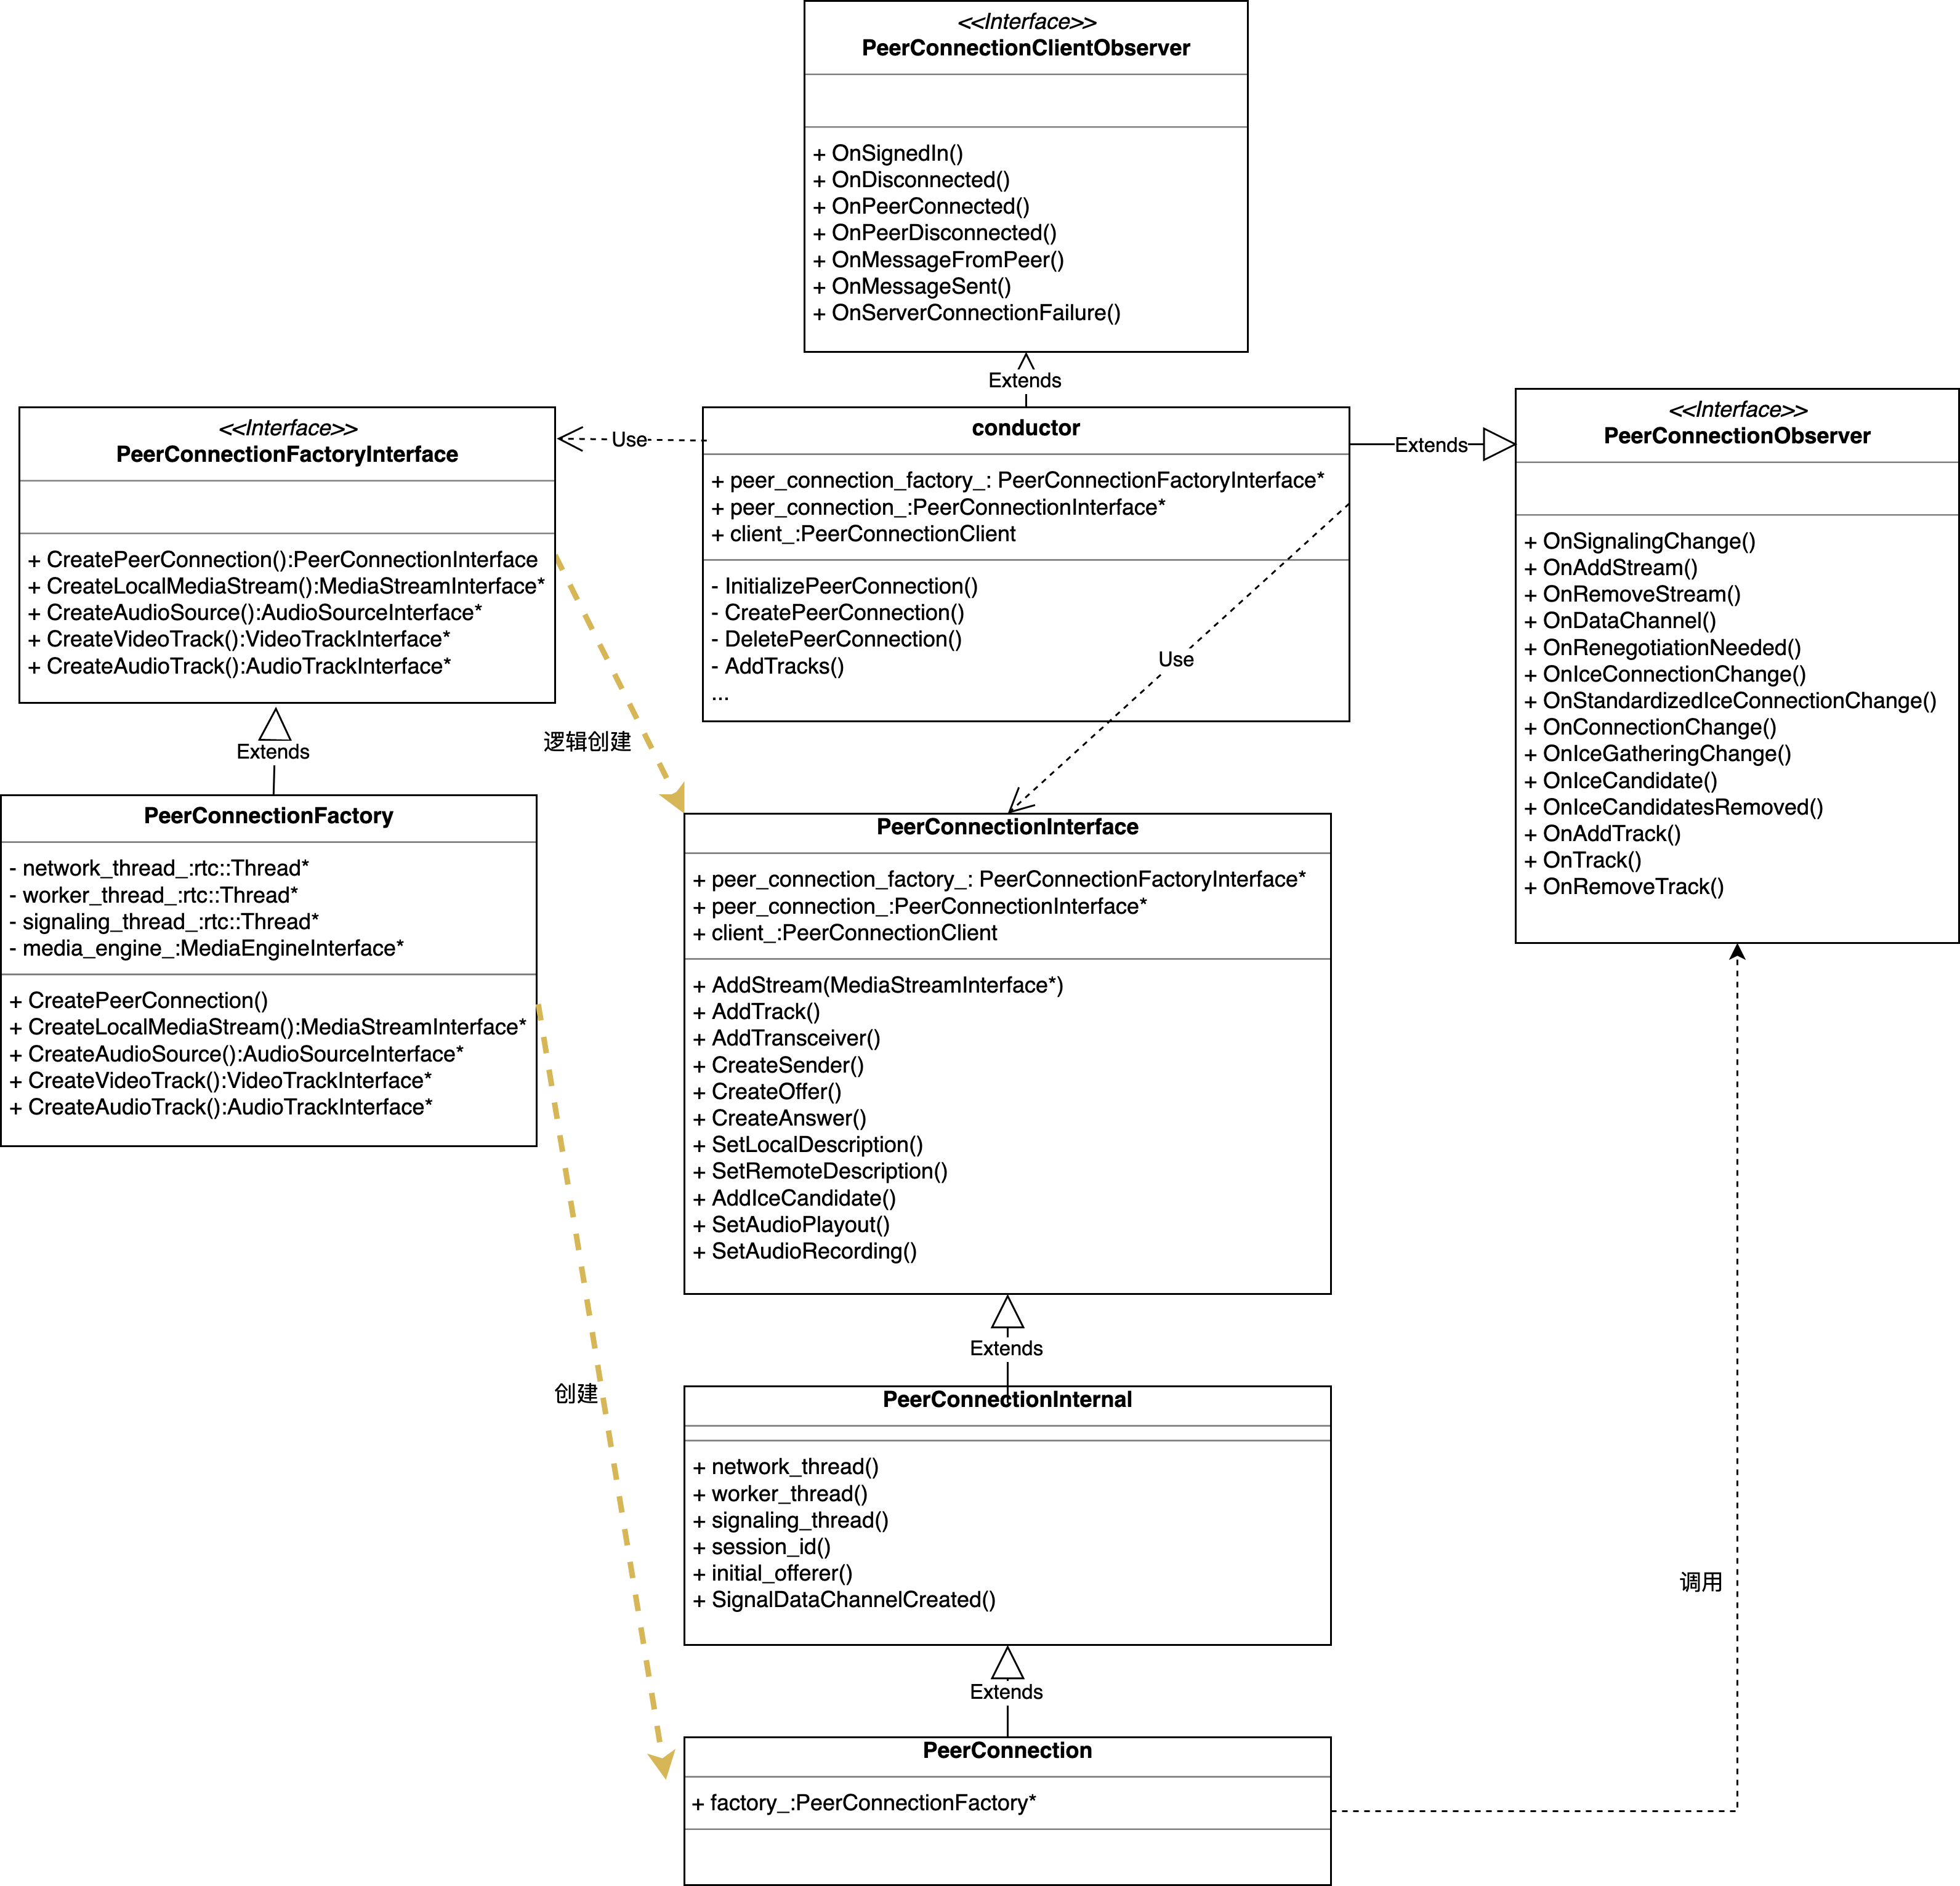
图2-3 PeerConnection 类UML关系图
在2.1小节,在成功创建peer_connection_factory_对象之后,就会创建peer_connection_对象,这个对象创建的源自conductor命名空间中的CreatePeerConnection方法,其定义如下:
//examples/peerconnection/client/conductor.cc
bool Conductor::CreatePeerConnection() {//至此,peer_connection_factory_已经成功创建,peer_connection_还未创建,这一函数将会创建这个对象RTC_DCHECK(peer_connection_factory_);RTC_DCHECK(!peer_connection_);webrtc::PeerConnectionInterface::RTCConfiguration config;config.sdp_semantics = webrtc::SdpSemantics::kUnifiedPlan;webrtc::PeerConnectionInterface::IceServer server;server.uri = GetPeerConnectionString();config.servers.push_back(server);webrtc::PeerConnectionDependencies pc_dependencies(this);auto error_or_peer_connection =peer_connection_factory_->CreatePeerConnectionOrError(config, std::move(pc_dependencies));if (error_or_peer_connection.ok()) {peer_connection_ = std::move(error_or_peer_connection.value());}return peer_connection_ != nullptr;
}
CreatePeerConnectionOrError主要调用了三个函数实现PeerConnection的创建任务:
//webrtc/pc/peer_connection_factory.cc
RTCErrorOr<rtc::scoped_refptr<PeerConnectionInterface>>
PeerConnectionFactory::CreatePeerConnectionOrError(std::unique_ptr<Call> call =worker_thread()->BlockingCall([this, &event_log, trials, &configuration] {return CreateCall_w(event_log.get(), *trials, configuration);});auto result = PeerConnection::Create(context_, options_, std::move(event_log),std::move(call), configuration,std::move(dependencies));rtc::scoped_refptr<PeerConnectionInterface> result_proxy =PeerConnectionProxy::Create(signaling_thread(), network_thread(),result.MoveValue());
}
一个Call对象是可以包含多个发送/接收流,这些流对应于同一个远端,并且这些流共享比特率估计,Call对象提供了如下功能:
- 发送码率设置(最小30kbps、初始300kbps,最大2000kbps,初始码率);
- 提供获取传输统计信息方法,接收端拥塞控制
- 创建PacketReceiver对象,接收到的说有RTP/RTCP数据包都会经过Call模块;
PeerConnectionProxy是为了多线程开发简单而衍生出来的PeerConnectionFactory代理对象,其Create方法就是可以将其封装成是线程安全的PeerConnectionFactory对象。
//传递的参数*c是 PeerConnection对象
static rtc::scoped_refptr<PeerConnectionFactoryProxyWithInternal> Create(                    rtc::Thread* signaling_thread, INTERNAL_CLASS* c) {                  return new rtc::RefCountedObject<PeerConnectionFactoryProxyWithInternal>(signaling_thread,  c);
2.2.3 PeerConnection::Create
这个函数完成了和网络相关的一些设置,比如SDP以及RTP等对象的创建。
//webrtc/pc/peer_connection.cc
RTCErrorOr<rtc::scoped_refptr<PeerConnection>> PeerConnection::Create(rtc::scoped_refptr<ConnectionContext> context,const PeerConnectionFactoryInterface::Options& options,std::unique_ptr<RtcEventLog> event_log,std::unique_ptr<Call> call,const PeerConnectionInterface::RTCConfiguration& configuration,PeerConnectionDependencies dependencies) {// PeerConnection构造函数依赖于部分dependencies,参数call是上一节创建的对象;auto pc = rtc::make_ref_counted<PeerConnection>(context, options, is_unified_plan, std::move(event_log), std::move(call),dependencies, dtls_enabled);//RTCError init_error = pc->Initialize(configuration, std::move(dependencies));}//这个函数忽略了STUN/TURN服务器初始化的内容
RTCError PeerConnection::Initialize(const PeerConnectionInterface::RTCConfiguration& configuration,PeerConnectionDependencies dependencies) {//SDP协议sdp_handler_ = SdpOfferAnswerHandler::Create(this, configuration,dependencies, context_.get());//RtpTransmissionManager负责RtpSender,RtpReceiver以及RtpTransceiver对象之间的关系和生命周期的管理。rtp_manager_ = std::make_unique<RtpTransmissionManager>(IsUnifiedPlan(), context_.get(), &usage_pattern_, observer_,legacy_stats_.get(), [this]() {RTC_DCHECK_RUN_ON(signaling_thread());sdp_handler_->UpdateNegotiationNeeded();});//如果是Plan B的SDP则在此时添加音视频的传输器;//PlanB和UnifiedPlan 是WebRTC在多路媒体(multi media source场景下的两种不同的SDP协商⽅式。if (!IsUnifiedPlan()) {rtp_manager()->transceivers()->Add(RtpTransceiverProxyWithInternal<RtpTransceiver>::Create(signaling_thread(), rtc::make_ref_counted<RtpTransceiver>(cricket::MEDIA_TYPE_AUDIO, context())));rtp_manager()->transceivers()->Add(RtpTransceiverProxyWithInternal<RtpTransceiver>::Create(signaling_thread(), rtc::make_ref_counted<RtpTransceiver>(cricket::MEDIA_TYPE_VIDEO, context())));}
}
2.3 Conductor::AddTracks
根据2.2小节启动一个典型的WebRTC会议步骤可知,在成功创建好PeerConnection对象之后需按2.2小节的步骤3调用PeerConnection对象的AddTrack方法向其中添加音视频Track了,因为Track的还依赖于Source提供数据,Native 例子的AddTrack的起始位置源于2.1小节conductor的Conductor::InitializePeerConnection() 函数。该函数在调用了2.2小节所述的CreatePeerConnection()函数之后,紧接着调用本小节的Conductor::AddTracks()函数,该函数的定义如下:
void Conductor::AddTracks() {//如果sender非空,则意味着track已经创建好了,这是因为在添加track时会为其添加Sender。if (!peer_connection_->GetSenders().empty()) {return;  // Already added tracks.}
//创建音频Track,其AudioSource见2.4小节rtc::scoped_refptr<webrtc::AudioTrackInterface> audio_track(peer_connection_factory_->CreateAudioTrack(kAudioLabel,peer_connection_factory_->CreateAudioSource(cricket::AudioOptions()).get()));//添加音频trackauto result_or_error = peer_connection_->AddTrack(audio_track, {kStreamId});if (!result_or_error.ok()) {RTC_LOG(LS_ERROR) << "Failed to add audio track to PeerConnection: "<< result_or_error.error().message();}//创建视频devicertc::scoped_refptr<CapturerTrackSource> video_device =CapturerTrackSource::Create();//创建video track。if (video_device) {rtc::scoped_refptr<webrtc::VideoTrackInterface> video_track_(peer_connection_factory_->CreateVideoTrack(kVideoLabel,video_device.get()));//视频是要回显的,设置本地渲染器main_wnd_->StartLocalRenderer(video_track_.get());//添加Video trackresult_or_error = peer_connection_->AddTrack(video_track_, {kStreamId});if (!result_or_error.ok()) {RTC_LOG(LS_ERROR) << "Failed to add video track to PeerConnection: "<< result_or_error.error().message();}} else {RTC_LOG(LS_ERROR) << "OpenVideoCaptureDevice failed";}
//切换到流式UI,即回显local采集的视频main_wnd_->SwitchToStreamingUI();
}
在创建音视频Track的时候,其中一个非常重要的参数是源,音频源和视频源的本意是一样的,即可以生成数据的设备,source和Track分开是因为一个source可以向多个不同的track提供数据,即AudioSourceInterface是AudioTracks以引用计数方式使用的一个源,在2.2.3小节中,视频Track创建的参数确实是设备,而音频的源参数则不是真正意义上的设备,其音频源的创建见2.3.1小节。
2.3.1 LocalAudioSource
PeerConnectionFactory::CreateAudioSource调用的是LocalAudioSource::Create(cricket::AudioOptions*)方法创建音频源,这个类定义如下:
//pc/local_audio_source.h
//LocalAudioSource继承于AudioSourceInterface,其包括的主要是APM模块各算法的开关设置。
class LocalAudioSource : public Notifier<AudioSourceInterface> {public://创建一个LocalAudioSource实例,实现就是保存了audio_options参数。static rtc::scoped_refptr<LocalAudioSource> Create(const cricket::AudioOptions* audio_options);SourceState state() const override { return kLive; }bool remote() const override { return false; }const cricket::AudioOptions options() const override { return options_; }
//这里重写之后,这两个接口什么事也没干,LocalAudioSource只剩APM开关的配置作用了void AddSink(AudioTrackSinkInterface* sink) override {}void RemoveSink(AudioTrackSinkInterface* sink) override {}protected:LocalAudioSource() {}~LocalAudioSource() override {}private:void Initialize(const cricket::AudioOptions* audio_options);cricket::AudioOptions options_;
};
创建LocalAudioSource类实例的Create方法实现如下,其实现非常简单就是保存了audio_options参数。
//third_party/webrtc/pc/local_audio_source.cc
rtc::scoped_refptr<LocalAudioSource> LocalAudioSource::Create(const cricket::AudioOptions* audio_options) {auto source = rtc::make_ref_counted<LocalAudioSource>();source->Initialize(audio_options);return source;
}void LocalAudioSource::Initialize(const cricket::AudioOptions* audio_options) {if (!audio_options)return;options_ = *audio_options;
}
传递的实参cricket::AudioOptions()是使用默认构造函数创建的对象,因为这个时候还不知道APM模块各算法开关情况是怎样的,AudioOptions将由VoiceMediaChannel 或 VoiceMediaEngine使用。
LocalAudioSource继承于AudioSourceInterface,而AudioSourceInterface继承于MediaSourceInterface接口类,
//api/media_stream_interface.h
// 媒体源的基类实现,一个MediaStreamTrack 有一个源提供媒体数据,源可以被多个track使用
class RTC_EXPORT MediaSourceInterface : public rtc::RefCountInterface,public NotifierInterface {public:enum SourceState { kInitializing, kLive, kEnded, kMuted };virtual SourceState state() const = 0;virtual bool remote() const = 0;protected:~MediaSourceInterface() override = default;
};//从AudioTrack接收数据的接口类
class AudioTrackSinkInterface {public:virtual void OnData(const void* audio_data,int bits_per_sample,int sample_rate,size_t number_of_channels,size_t number_of_frames) {RTC_DCHECK_NOTREACHED() << "This method must be overridden, or not used.";}//absolute_capture_timestamp_ms表示的是audio frame原始采集的时间戳,该时间戳必须和rtc::TimeMillis()基于一样的时钟virtual void OnData(const void* audio_data,int bits_per_sample,int sample_rate,size_t number_of_channels,size_t number_of_frames,absl::optional<int64_t> absolute_capture_timestamp_ms) {// TODO(bugs.webrtc.org/10739): Deprecate the old OnData and make this one// pure virtual.return OnData(audio_data, bits_per_sample, sample_rate, number_of_channels,number_of_frames);}//返回由sink编码的声道数,如果下混发生时,该值可能低于number_of_channels,-1表示不确定的声道数virtual int NumPreferredChannels() const { return -1; }protected:virtual ~AudioTrackSinkInterface() {}
};// 同样的音频源可以被多个AudioTracks使用,AudioSourceInterface是用于AudioTracks的引用计数源
class RTC_EXPORT AudioSourceInterface : public MediaSourceInterface {public:class AudioObserver {public:virtual void OnSetVolume(double volume) = 0;protected:virtual ~AudioObserver() {}};// Sets the volume of the source. `volume` is in  the range of [0, 10].// TODO(tommi): This method should be on the track and ideally volume should// be applied in the track in a way that does not affect clones of the track.virtual void SetVolume(double volume) {}// Registers/unregisters observers to the audio source.virtual void RegisterAudioObserver(AudioObserver* observer) {}virtual void UnregisterAudioObserver(AudioObserver* observer) {}// TODO(tommi): Make pure virtual.virtual void AddSink(AudioTrackSinkInterface* sink) {}virtual void RemoveSink(AudioTrackSinkInterface* sink) {}// Returns options for the AudioSource.// (for some of the settings this approach is broken, e.g. setting// audio network adaptation on the source is the wrong layer of abstraction).virtual const cricket::AudioOptions options() const;
};
从接口的设计上看LocalAudioSource是可以获取或生成音频的组件,AudioSource将交由AudioTrack管理,因而Conductor::AddTracks() 函数在创建了 AudioSource 之后,会立即创建 AudioTrack,见2.3.2小节。
2.3.2 AudioTrack创建
AudioTrack创建原始调用位置为在2.3小节的如下代码是:
peer_connection_factory_->CreateAudioTrack(kAudioLabel,peer_connection_factory_->CreateAudioSource(cricket::AudioOptions()).get()));
即调用webrtc::PeerConnectionFactory::CreateAudioTrack(),该函数调用webrtc::AudioTrack::Create()完成实际的Track创建,这个函数就是调用构造函数创建一个默认的AudioTrack对象。
//pc/peer_connection_factory.cc
rtc::scoped_refptr<AudioTrackInterface> PeerConnectionFactory::CreateAudioTrack(const std::string& id,AudioSourceInterface* source) {RTC_DCHECK(signaling_thread()->IsCurrent());rtc::scoped_refptr<AudioTrackInterface> track =AudioTrack::Create(id, rtc::scoped_refptr<AudioSourceInterface>(source));return AudioTrackProxy::Create(signaling_thread(), track);
}
AudioTrack的代码如下:
// pc/audio_track.cc
rtc::scoped_refptr<AudioTrack> AudioTrack::Create(absl::string_view id,const rtc::scoped_refptr<AudioSourceInterface>& source) {return rtc::make_ref_counted<AudioTrack>(id, source);
}//将参数source绑定其私有变量audio_source_
AudioTrack::AudioTrack(absl::string_view label,const rtc::scoped_refptr<AudioSourceInterface>& source): MediaStreamTrack<AudioTrackInterface>(label), audio_source_(source) {if (audio_source_) {audio_source_->RegisterObserver(this);OnChanged();}
}AudioTrack::~AudioTrack() {RTC_DCHECK_RUN_ON(&signaling_thread_checker_);set_state(MediaStreamTrackInterface::kEnded);if (audio_source_)audio_source_->UnregisterObserver(this);
}std::string AudioTrack::kind() const {return kAudioKind;
}AudioSourceInterface* AudioTrack::GetSource() const {// Callable from any thread.return audio_source_.get();
}void AudioTrack::AddSink(AudioTrackSinkInterface* sink) {RTC_DCHECK_RUN_ON(&signaling_thread_checker_);if (audio_source_)audio_source_->AddSink(sink);
}void AudioTrack::RemoveSink(AudioTrackSinkInterface* sink) {RTC_DCHECK_RUN_ON(&signaling_thread_checker_);if (audio_source_)audio_source_->RemoveSink(sink);
}void AudioTrack::OnChanged() {RTC_DCHECK_RUN_ON(&signaling_thread_checker_);if (audio_source_->state() == MediaSourceInterface::kEnded) {set_state(kEnded);} else {set_state(kLive);}
}
构造函数将AudioSource和Track绑定,并将Track注册为Source的RegisterObserver,同时将Track的状态改成kLive。至此已经成功创建了AudioTrack了,接下来就是将Track和PeerConnection对象绑定了,绑定见2.3.4小节。
2.3.4 AudioTrack绑定
创建好的track会通过rtp_manager(RtpTransmissionManager)中的AddTrack添加,而RtpTransmissionManager的AddTrack的第一个参数是rtc::scoped_refptr<[MediaStreamTrackInterface>track这一类型在MediaStream一节谈及过,video和audio都通过这个接口添加track,在这之后,会根据需要跟新SDP协商,和多媒体相关的是rtp_manager如何创建track的。
auto sender_or_error =rtp_manager()->AddTrack(track, stream_ids, init_send_encodings);if (sender_or_error.ok()) {sdp_handler_->UpdateNegotiationNeeded();}
将AudioTrack绑定到PeerConnection对象初始位置发生在PeerConnection::AddTrack函数,其实现如下:
 RTCErrorOr<rtc::scoped_refptr<RtpSenderInterface>> PeerConnection::AddTrack(rtc::scoped_refptr<MediaStreamTrackInterface> track,const std::vector<std::string>& stream_ids) {auto sender_or_error = rtp_manager()->AddTrack(track, stream_ids);if (sender_or_error.ok()) {//成功添加Track之后,跟新SDP协商sdp_handler_->UpdateNegotiationNeeded();legacy_stats_->AddTrack(track.get());}return sender_or_error;
}
在绑定AudioTrack的时候,函数调用顺序如下:
webrtc::PeerConnection::AddTrack
//因为RTP内部根据SDP协议为Plan B和UnifiedPlan分别提供了,
//AddTrackPlanB和AddTrackUnifiedPlan两种接口,所以这个函数就是封装了一下
webrtc::RtpTransmissionManager::AddTrack
//WebRTC native 例子使用的是AddTrackUnifiedPlan方式添加AudioTrack。
webrtc::RtpTransmissionManager::AddTrackUnifiedPlan
webrtc::RtpTransmissionManager::CreateSender
//pc/rtp_sender_proxy.h
webrtc::RtpSenderProxyWithInternal<webrtc::RtpSenderInternal>::SetTrack(webrtc::MediaStreamTrackInterface*)
webrtc::RtpSenderBase::SetTrack(webrtc::MediaStreamTrackInterface*)
webrtc::AudioRtpSender::AttachTrack()
从调用顺序可以看到,其使用了2.2.3小节PeerConnection::Initialize函数创建的rtp_manager_对象,这里将和AudioSource绑定的AudioTrack添加到RTPSender里,而RTPSender和RTPReceiver则是由RtpManager统一管理的。
//pc/rtp_transmission_manager.cc
RTCErrorOr<rtc::scoped_refptr<RtpSenderInterface>>
RtpTransmissionManager::AddTrackUnifiedPlan(rtc::scoped_refptr<MediaStreamTrackInterface> track,const std::vector<std::string>& stream_ids,const std::vector<RtpEncodingParameters>* init_send_encodings) {//因为是首次创建,所以这里并不会找到已经创建好的transceiver,而是会执行else分支auto transceiver =FindFirstTransceiverForAddedTrack(track, init_send_encodings);if (transceiver) {RTC_LOG(LS_INFO) << "Reusing an existing "<< cricket::MediaTypeToString(transceiver->media_type())<< " transceiver for AddTrack.";if (transceiver->stopping()) {LOG_AND_RETURN_ERROR(RTCErrorType::INVALID_PARAMETER,"The existing transceiver is stopping.");}if (transceiver->direction() == RtpTransceiverDirection::kRecvOnly) {transceiver->internal()->set_direction(RtpTransceiverDirection::kSendRecv);} else if (transceiver->direction() == RtpTransceiverDirection::kInactive) {transceiver->internal()->set_direction(RtpTransceiverDirection::kSendOnly);}transceiver->sender()->SetTrack(track.get());transceiver->internal()->sender_internal()->set_stream_ids(stream_ids);transceiver->internal()->set_reused_for_addtrack(true);} else {cricket::MediaType media_type =(track->kind() == MediaStreamTrackInterface::kAudioKind? cricket::MEDIA_TYPE_AUDIO: cricket::MEDIA_TYPE_VIDEO);RTC_LOG(LS_INFO) << "Adding " << cricket::MediaTypeToString(media_type)<< " transceiver in response to a call to AddTrack.";std::string sender_id = track->id();// Avoid creating a sender with an existing ID by generating a random ID.// This can happen if this is the second time AddTrack has created a sender// for this track.if (FindSenderById(sender_id)) {sender_id = rtc::CreateRandomUuid();}//RTPSender,改代码片段下一个即有CreateSender的实现auto sender = CreateSender(media_type, sender_id, track, stream_ids,init_send_encodings? *init_send_encodings: std::vector<RtpEncodingParameters>());auto receiver = CreateReceiver(media_type, rtc::CreateRandomUuid());//一个RtpTransceive可以有send和receive两个方向transceiver = CreateAndAddTransceiver(sender, receiver);transceiver->internal()->set_created_by_addtrack(true);transceiver->internal()->set_direction(RtpTransceiverDirection::kSendRecv);}return transceiver->sender();
}rtc::scoped_refptr<RtpSenderProxyWithInternal<RtpSenderInternal>>
RtpTransmissionManager::CreateSender(cricket::MediaType media_type,const std::string& id,rtc::scoped_refptr<MediaStreamTrackInterface> track,const std::vector<std::string>& stream_ids,const std::vector<RtpEncodingParameters>& send_encodings) {RTC_DCHECK_RUN_ON(signaling_thread());rtc::scoped_refptr<RtpSenderProxyWithInternal<RtpSenderInternal>> sender;if (media_type == cricket::MEDIA_TYPE_AUDIO) {RTC_DCHECK(!track ||(track->kind() == MediaStreamTrackInterface::kAudioKind));//这个代理类的作用和之前的类似,就是调用AudioRtpSender::AudioRtpSender(...)构造函数创建一个AudioRtpSender对象sender = RtpSenderProxyWithInternal<RtpSenderInternal>::Create(signaling_thread(),AudioRtpSender::Create(worker_thread(), id, legacy_stats_, this));NoteUsageEvent(UsageEvent::AUDIO_ADDED);} else {RTC_DCHECK_EQ(media_type, cricket::MEDIA_TYPE_VIDEO);RTC_DCHECK(!track ||(track->kind() == MediaStreamTrackInterface::kVideoKind));sender = RtpSenderProxyWithInternal<RtpSenderInternal>::Create(signaling_thread(), VideoRtpSender::Create(worker_thread(), id, this));NoteUsageEvent(UsageEvent::VIDEO_ADDED);}//SetTrack通过代理调用的实际函数是webrtc::RtpSenderBase::SetTrack。bool set_track_succeeded = sender->SetTrack(track.get());RTC_DCHECK(set_track_succeeded);sender->internal()->set_stream_ids(stream_ids);sender->internal()->set_init_send_encodings(send_encodings);return sender;
}rtc::scoped_refptr<RtpTransceiverProxyWithInternal<RtpTransceiver>>
RtpTransmissionManager::CreateAndAddTransceiver(rtc::scoped_refptr<RtpSenderProxyWithInternal<RtpSenderInternal>> sender,rtc::scoped_refptr<RtpReceiverProxyWithInternal<RtpReceiverInternal>>receiver) {RTC_DCHECK_RUN_ON(signaling_thread());// Ensure that the new sender does not have an ID that is already in use by// another sender.// Allow receiver IDs to conflict since those come from remote SDP (which// could be invalid, but should not cause a crash).RTC_DCHECK(!FindSenderById(sender->id()));auto transceiver = RtpTransceiverProxyWithInternal<RtpTransceiver>::Create(signaling_thread(),rtc::make_ref_counted<RtpTransceiver>(sender, receiver, context_,sender->media_type() == cricket::MEDIA_TYPE_AUDIO? media_engine()->voice().GetRtpHeaderExtensions(): media_engine()->video().GetRtpHeaderExtensions(),[this_weak_ptr = weak_ptr_factory_.GetWeakPtr()]() {if (this_weak_ptr) {this_weak_ptr->OnNegotiationNeeded();}}));transceivers()->Add(transceiver);return transceiver;
}
Track的绑定实际由 bool set_track_succeeded = sender->SetTrack(track.get());实现,即使用了RTPSender的SetTrack方法,AudioRtpSender类的UML关系图如下所示,SetTrack实际调用的是RtpSenderBase中的方法,这是因为在AduioRtpSender中并未重载该方法。

图2-4 AudioRTPSender UML图
在RtpSenderBase::SetTrack() 函数实现如下,在设置Track时,如果可以开始发送,会执行 SetSend(),否则不执行。
//pc/rtp_sender.cc
bool RtpSenderBase::SetTrack(MediaStreamTrackInterface* track) {RTC_DCHECK_RUN_ON(signaling_thread_);TRACE_EVENT0("webrtc", "RtpSenderBase::SetTrack");if (stopped_) {RTC_LOG(LS_ERROR) << "SetTrack can't be called on a stopped RtpSender.";return false;}if (track && track->kind() != track_kind()) {RTC_LOG(LS_ERROR) << "SetTrack with " << track->kind()<< " called on RtpSender with " << track_kind()<< " track.";return false;}// Detach from old track.if (track_) {DetachTrack();track_->UnregisterObserver(this);RemoveTrackFromStats();}// Attach to new track.bool prev_can_send_track = can_send_track();// Keep a reference to the old track to keep it alive until we call SetSend.rtc::scoped_refptr<MediaStreamTrackInterface> old_track = track_;track_ = track;if (track_) {//RtpSenderBase将自身注册为track的observertrack_->RegisterObserver(this);//这里调用的是子类AudioRtpSender的AttachTrack()方法,该方法是将LocalAudioSinkAdapter对象的实例添加到绑定到Track的Source上AttachTrack();}// 如果track_和ssrc_都是合法的值则意味着这是可以开始发送了,对于这里的例子,ssrc_还没被设置if (can_send_track()) {SetSend();AddTrackToStats();} else if (prev_can_send_track) {ClearSend();}attachment_id_ = (track_ ? GenerateUniqueId() : 0);return true;
}
SetSend() 接口由 RtpSenderBase 的具体子类实现,如对于音频来说,子类实现为 AudioRtpSender::SetSend(),这一关系见2-4UML图,类似的对于video则是void VideoRtpSender::SetSend(),AddTrackPlanB则会调用PeerConnection::AddStream方法添加AudioTrack,其会在SDP层添加AudioTrack,调用的函数如下:
    8 void SdpOfferAnswerHandler::OnAudioTrackAdded(AudioTrackInterface* track,9                                               MediaStreamInterface* stream) {10   if (pc_->IsClosed()) {11     return;12   }13   rtp_manager()->AddAudioTrack(track, stream);14   UpdateNegotiationNeeded();15 }void PeerConnection::OnNegotiationNeeded() {RTC_DCHECK_RUN_ON(signaling_thread());RTC_DCHECK(!IsClosed());sdp_handler_->UpdateNegotiationNeeded();
}
2.4 开启发送
不论是audio还是video发送都依赖于SetSend()的调用,在创建的时候没被调用时因为SDP还没真正协商完毕,在通过webrtc::WebRtcSessionDescriptionFactory::OnMessage(rtc::Message*)接收到到对端信息后,如果是SDP offer协商获得应答信息成功时,则其后就可以调用SetSend()启动rtp发送数据了,其函数调用顺序如下:
webrtc::WebRtcSessionDescriptionFactory::OnMessage(rtc::Message*)
//pc/sdp_offer_answer.cc
webrtc::CreateSessionDescriptionObserverOperationWrapper::OnSuccess(webrtc::SessionDescriptionInterface*)
//examples/peerconnection/client/conductor.cc
Conductor::OnSuccess(webrtc::SessionDescriptionInterface*)
//pc/peer_connection.cc
webrtc::PeerConnection::SetLocalDescription(webrtc::SetSessionDescriptionObserver*,webrtc::SessionDescriptionInterface*)
//pc/sdp_offer_answer.cc
webrtc::SdpOfferAnswerHandler::SetLocalDescription(webrtc::SetSessionDescriptionObserver*, webrtc::SessionDescriptionInterface*)
webrtc::SdpOfferAnswerHandler::DoSetLocalDescription(...)
webrtc::SdpOfferAnswerHandler::ApplyLocalDescription(...)
webrtc::RtpSenderBase::SetSsrc(unsigned int)
webrtc::AudioRtpSender::SetSend()
在将RTP协议需要的ssrc信息设置完之后,即可进行通信数据的发送了。
//pc/rtp_sender.cc
void AudioRtpSender::SetSend() {RTC_DCHECK_RUN_ON(signaling_thread_);RTC_DCHECK(!stopped_);RTC_DCHECK(can_send_track());if (!media_channel_) {RTC_LOG(LS_ERROR) << "SetAudioSend: No audio channel exists.";return;}cricket::AudioOptions options;
#if !defined(WEBRTC_CHROMIUM_BUILD) && !defined(WEBRTC_WEBKIT_BUILD)// TODO(tommi): Remove this hack when we move CreateAudioSource out of// PeerConnection.  This is a bit of a strange way to apply local audio// options since it is also applied to all streams/channels, local or remote.if (track_->enabled() && audio_track()->GetSource() &&!audio_track()->GetSource()->remote()) {options = audio_track()->GetSource()->options();}
#endif// `track_->enabled()` hops to the signaling thread, so call it before we hop// to the worker thread or else it will deadlock.bool track_enabled = track_->enabled();bool success = worker_thread_->BlockingCall([&] {return voice_media_channel()->SetAudioSend(ssrc_, track_enabled, &options,sink_adapter_.get());});if (!success) {RTC_LOG(LS_ERROR) << "SetAudioSend: ssrc is incorrect: " << ssrc_;}
}
AudioRtpSender::SetSend() 获得 AudioSource 的 audio options,audiooptions主要是音频增强算法各种启用配置flag选项,该函数然后检查一下 AudioTrack 是否被 enable,然后将该使能标志值、ssrc以及AudioSource 作为 VoiceMediaChannel的参数在工作线程中调用SetAudioSend,VoiceMediaChannel 实际为 WebRtcVoiceMediaChannel。WebRtcVoiceMediaChannel::SetAudioSend() 函数实现如下:
//media/engine/webrtc_voice_engine.cc
bool WebRtcVoiceMediaChannel::SetAudioSend(uint32_t ssrc,bool enable,const AudioOptions* options,AudioSource* source) {RTC_DCHECK_RUN_ON(worker_thread_);// TODO(solenberg): The state change should be fully rolled back if any one of//                  these calls fail.if (!SetLocalSource(ssrc, source)) {return false;}if (!MuteStream(ssrc, !enable)) {return false;}if (enable && options) {return SetOptions(*options);}return true;
}
核心任务在SetLocalSource()中完成,该函数按如下顺序调用函数完成音频发送。
webrtc::AudioRtpSender(...)
//media/engine/webrtc_voice_engine.cc
cricket::WebRtcVoiceMediaChannel::SetAudioSend(unsigned int, bool, cricket::AudioOptions const*, cricket::AudioSource*)
cricket::WebRtcVoiceMediaChannel::SetLocalSource(unsigned int, cricket::AudioSource*)
cricket::WebRtcVoiceMediaChannel::WebRtcAudioSendStream::SetSource(cricket::AudioSource*)
webrtc::LocalAudioSinkAdapter::SetSink(cricket::AudioSource::Sink*)
上述调用过程显示了如下的数据处理的层级结构关系:

图2-5 数据处理层级结构
AudioSource 和 LocalAudioSinkAdapter 绑定的代码如下
//pc/rtp_sender.cc
void AudioRtpSender::AttachTrack() {RTC_DCHECK(track_);cached_track_enabled_ = track_->enabled();//AddSink的参数是AudioRtpSender类的 std::unique_ptr<LocalAudioSinkAdapter> sink_adapter_;成员audio_track()->AddSink(sink_adapter_.get());
}
//pc/audio_track.cc
void AudioTrack::AddSink(AudioTrackSinkInterface* sink) {RTC_DCHECK_RUN_ON(&signaling_thread_checker_);if (audio_source_)audio_source_->AddSink(sink);
}
LocalAudioSinkAdapter 和 WebRtcAudioSendStream 以及WebRtcAudioSendStream 和 webrtc::AudioSendStream的绑定代码如下:
//media/engine/webrtc_voice_engine.cc
class WebRtcVoiceMediaChannel::WebRtcAudioSendStream: public AudioSource::Sink {public:// LocalAudioSinkAdapter 和 WebRtcAudioSendStream 的绑定//将自身以sink角色注册到AudioSource中,以便调用数据回调void SetSource(AudioSource* source) {RTC_DCHECK_RUN_ON(&worker_thread_checker_);RTC_DCHECK(source);if (source_) {RTC_DCHECK(source_ == source);return;}source->SetSink(this);source_ = source;UpdateSendState();}//WebRtcAudioSendStream 和 webrtc::AudioSendStream 的连接void OnData(const void* audio_data,int bits_per_sample,int sample_rate,size_t number_of_channels,size_t number_of_frames,absl::optional<int64_t> absolute_capture_timestamp_ms) override {RTC_DCHECK_EQ(16, bits_per_sample);RTC_CHECK_RUNS_SERIALIZED(&audio_capture_race_checker_);RTC_DCHECK(stream_);std::unique_ptr<webrtc::AudioFrame> audio_frame(new webrtc::AudioFrame());audio_frame->UpdateFrame(audio_frame->timestamp_, static_cast<const int16_t*>(audio_data),number_of_frames, sample_rate, audio_frame->speech_type_,audio_frame->vad_activity_, number_of_channels);// TODO(bugs.webrtc.org/10739): add dcheck that// `absolute_capture_timestamp_ms` always receives a value.if (absolute_capture_timestamp_ms) {audio_frame->set_absolute_capture_timestamp_ms(*absolute_capture_timestamp_ms);}//将数据通过webrtc::AudioSendStream* stream_;的SendAudioData API发送出去stream_->SendAudioData(std::move(audio_frame));}
总结一下Track添加的过程,PeerConnection::AddTrack() 将 AudioTrack 添加进 PeerConnection 之后,通过 AudioRtpSender 和 WebRtcVoiceMediaChannel 将 LocalAudioSource 、LocalAudioSink以及AudioSendStream串接起来,形成音频处理流水线。
在音频数据源是麦克风采集的数据时,这里的 LocalAudioSource 只提供音频算法的使能配置,webrtc::AudioSendStream之前还有 AudioDeviceModule 和 AudioTransportImpl 模块,这部分可以见第三章,当然也可以用mp3/mp4文件作为原始的音频数据源,这样实现对应的 AudioSource即可而不使用 AudioDeviceModule 获取数据。
回到本小节开始的 WebRtcVoiceMediaChannel::SetAudioSend() 函数的实现,其主要调用``WebRtcVoiceMediaChannel::SetLocalSource和WebRtcVoiceMediaChannel::SetOptions完成源的添加工作, WebRtcVoiceMediaChannel::SetLocalSource将ssrc对应的WebRtcAudioSendStream对象和Source绑定,这样就可以通过回调Source的OnData()方法向上层送数据,AudioOptions通过WebRtcVoiceMediaChannel::SetOptions传给 WebRtcVoiceEngine,来控制音频算法的使能/禁用设置,如 APM 里面的回声,降噪等。此外,还可以通过 AudioSource` 控制音频流发送的停止/重启等。
//webrtc/media/engine/webrtc_voice_engine.cc
//将ssrc对应的`WebRtcAudioSendStream`对象和Source绑定
bool WebRtcVoiceMediaChannel::SetLocalSource(uint32_t ssrc,AudioSource* source) {auto it = send_streams_.find(ssrc);if (it == send_streams_.end()) {if (source) {// Return an error if trying to set a valid source with an invalid ssrc.RTC_LOG(LS_ERROR) << "SetLocalSource failed with ssrc " << ssrc;return false;}// The channel likely has gone away, do nothing.return true;}if (source) {it->second->SetSource(source);} else {it->second->ClearSource();}return true;
}bool WebRtcVoiceMediaChannel::SetOptions(const AudioOptions& options) {RTC_DCHECK_RUN_ON(worker_thread_);RTC_LOG(LS_INFO) << "Setting voice channel options: " << options.ToString();// We retain all of the existing options, and apply the given ones// on top.  This means there is no way to "clear" options such that// they go back to the engine default.options_.SetAll(options);engine()->ApplyOptions(options_);absl::optional<std::string> audio_network_adaptor_config =GetAudioNetworkAdaptorConfig(options_);for (auto& it : send_streams_) {it.second->SetAudioNetworkAdaptorConfig(audio_network_adaptor_config);}RTC_LOG(LS_INFO) << "Set voice channel options. Current options: "<< options_.ToString();return true;
}
在2.3.4小节提到RtpSenderBase::SetTrack会将RtpSender对象注册为AudioTrack的observer,这就意味着当track的状态改变时会通知到的该observer,当track调用set_enabled API时也会通知到observer。set_enabled定义于其继承的父类MediaStreamTrack中,AudioTrack 的父类 MediaStreamTrack 实现 (webrtc/src/api/media_stream_track.h) 如下:
//api/media_stream_track.h
// MediaTrack implements the interface common to AudioTrackInterface and
// VideoTrackInterface.
template <typename T>
class MediaStreamTrack : public Notifier<T> {public:typedef typename T::TrackState TypedTrackState;std::string id() const override { return id_; }MediaStreamTrackInterface::TrackState state() const override {return state_;}bool enabled() const override { return enabled_; }bool set_enabled(bool enable) override {bool fire_on_change = (enable != enabled_);enabled_ = enable;if (fire_on_change) {Notifier<T>::FireOnChanged();}return fire_on_change;}void set_ended() { set_state(MediaStreamTrackInterface::TrackState::kEnded); }protected:explicit MediaStreamTrack(absl::string_view id): enabled_(true), id_(id), state_(MediaStreamTrackInterface::kLive) {}bool set_state(MediaStreamTrackInterface::TrackState new_state) {bool fire_on_change = (state_ != new_state);state_ = new_state;if (fire_on_change)Notifier<T>::FireOnChanged();return true;}private:bool enabled_;const std::string id_;MediaStreamTrackInterface::TrackState state_;
};
在 AudioTrack 的 state 状态的改变会通知到它的 observer,即RtpSenderBase/AudioRtpSender,AudioRtpSender 会通过本节一开始的函数AudioRtpSender::SetSend()更新AudioTrack 在音频数据流中的接入:
//pc/rtp_sender.cc
void AudioRtpSender::OnChanged() {RTC_DCHECK_RUN_ON(signaling_thread_);TRACE_EVENT0("webrtc", "AudioRtpSender::OnChanged");RTC_DCHECK(!stopped_);if (cached_track_enabled_ != track_->enabled()) {cached_track_enabled_ = track_->enabled();if (can_send_track()) {SetSend();}}
}
WebRtcVoiceMediaChannel::WebRtcAudioSendStream创建并管理 webrtc::AudioSendStream,从 WebRtcVoiceMediaChannel::WebRtcAudioSendStream 的实现看,webrtc::AudioSendStream 的数据源于 AudioSource。然而,在通过 webrtc::Call 创建 webrtc::AudioSendStream对象并启动它的时候,也会将其被传给 AudioTransportImpl对象,代码调用如下:
cricket::BaseChannel::ChannelWritable_n()
//pc/channel.cc
cricket::VoiceChannel::UpdateMediaSendRecvState_w()
//media/engine/webrtc_voice_engine.cc
cricket::WebRtcVoiceMediaChannel::SetSend(bool)
//media/engine/webrtc_voice_engine.cc
cricket::WebRtcVoiceMediaChannel::WebRtcAudioSendStream::SetSend(bool)
//media/engine/webrtc_voice_engine.cc
cricket::WebRtcVoiceMediaChannel::WebRtcAudioSendStream::UpdateSendState()
//audio/audio_send_stream.cc
webrtc::internal::AudioSendStream::Start()
//audio/audio_state.cc
webrtc::internal::AudioState::AddSendingStream(webrtc::AudioSendStream*, int, unsigned long)
//audio/audio_transport_impl.cc
webrtc::AudioTransportImpl::UpdateAudioSenders(std::vector<webrtc::AudioSender*, std::allocator<webrtc::AudioSender*> >, int, unsigned long)
通过 webrtc::AudioSendStream -> webrtc::Call -> AudioState -> AudioTransportImpl将webrtc::AudioSendStream 对象自身添加进了 AudioTransportImpl 对象的 AudioSender 列表里。最终形成如下音频数据处理pipe line:

从上图的两条线可以看出,和AudioDeviceModule是真正音频数据来源,而下面的 AudioSource/ LocalAudioSource则是音频算法的使能/禁止标志,这些标志最终会传递给VoiceEngine的APM模块,当然LocalAudioSource也可以也诸如MP4等可以提供音频数据的源而不用上面的那条线提供音频数据。
webrtc:: (API)
cricket:: (internal logic)
talk_base:: (utils)
webrtc:: (engines; this may change in the future to avoid confusion)