Python+request+Unittest接口测试入门
接口测试流程
1.需求分析(产品经理的需求文档)
2.接口文档解析(开发编写的接口API文档)
3.设计接口测试用例(编写Excel表格形式的用例)
4.准备接口测试脚本:python代码编写脚本
5.执行测试口例,跟踪缺陷
6.生成接口测试报告
7.接口自动化持续集成
一、基础:http请求、http响应和接口规范
HTTP协议
简介:超⽂本传输协议,基于请求与响应的 应⽤层协议。
特点:
1. 客户端、服务器模式
2. 简单快速
3. 灵活
4. ⽆连接
5. ⽆状态
URL格式
完整语法格式:协议 :// IP地址:端⼝号/资源路径?查询参数
- 协议http、https
作⽤:指定数据传输规则
- IP地址:
也就是 域名。 作⽤:在⽹络环境中,唯⼀定位 ⼀台主机
- 端⼝号:
作⽤:在 主机上,唯⼀定义个应⽤程序。
可以省略。如果省略,跟随协议。 http - 80 、 Https - 443
- 资源路径:
作⽤:应⽤对应的数据资源。
可以省略。如果省略,资源路径为 “/”
- 查询参数:
作⽤:给资源传递参数
可以省略。如果省略,没有 ?分割符。
可以有多组。每组 k=v 格式。各组之间 ⽤ “&” 隔分。
HTTP请求
⼀定产⽣于 客户端。当 客户端给服务器发送请求时,使⽤该协议。(请求报⽂、请求包)
整体格式
- 请求⾏:请求⽅法、URL、协议版本
- 请求头:k :v
- 空⾏:代表 请求头 结束。
- 请求体:发送给服务器请求时,携带的数据。
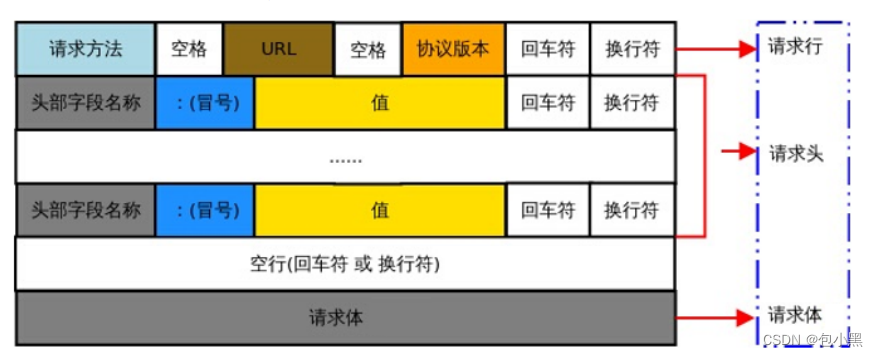
请求⾏
⼀定位于 http请求协议的,第⼀⾏。格式:请求⽅法(空格) URL(空格) 协议版本
-
请求⽅法:
- GET:查询 —— 没有请求体
- POST:添加 (注册、登录)
- DELETE:删除 —— 没有请求体
- PUT:修改
-
URL:见上
-
协议版本:常⻅ HTTP/1.1
请求头
- 位于 请求⾏之下,空⾏之上的部分。 数据组织格式一定是 k:v 对。
- Content-Type : 作用,指定 请求体的数据类型。
- application/json:请求体数据类型为json
- application/x-www-form-urlencoded:请求体的数据类型 为 表单类型。
请求体
位于 空行之下。
有的 请求协议 是没有请求体。如:get、delete
请求体的数据类型, 受 请求头中 Content-Type 的值影响。
http响应
一定产生于 服务端。 当服务器接收到 http请求协议 之后,才会产生 http响应协议(响应报文、响应包)
整体格式
- 响应行:协议版本、状态码、状态码描述
- 响应头:K:V格式数据。
- 空行:代表响应头结束。
- 响应体:服务回发给客户端的数据。几乎所有的响应包,都有响应体。
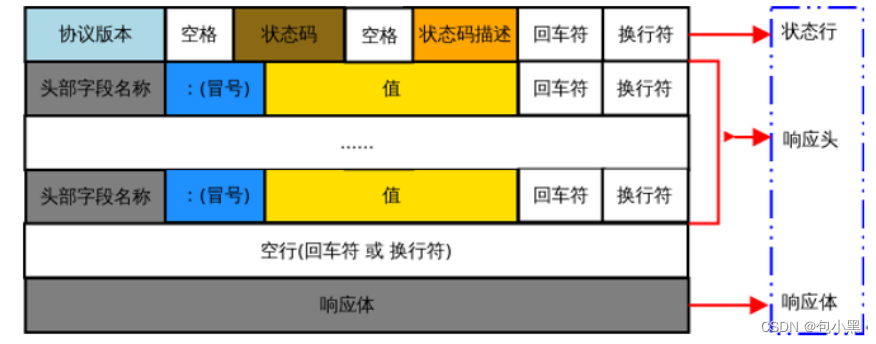
状态行
- 一定位于http响应协议的,第一行。格式:协议版本(空格)状态码(空格)状态码描述
- 状态码:5类:
- 1xx:指示信息
- 2xx:成功
- 3xx:重定向
- 4xx:客户端错误
- 5xx:服务端错误
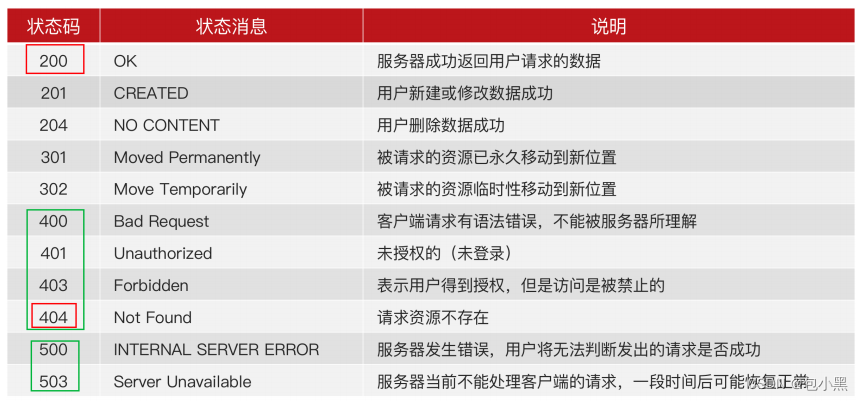
响应头
位于响应行之下,空行之上的部分。数据组织格式一定是k:v对。
响应体
位于空行之下。
几乎所有响应协议都有响应体。
响应体中包含的数据,是接口测试过程中,所要使用的实际结果!!
接口规范
- 传统风格接口:只用get、post⽅法。URL不唯一。统一返回200
- RESTful风格接口:URL唯一,定位资源。结合请求方法对应不同操作。返回状态码较灵活。

二、接口用例设计
接口测试的测试点
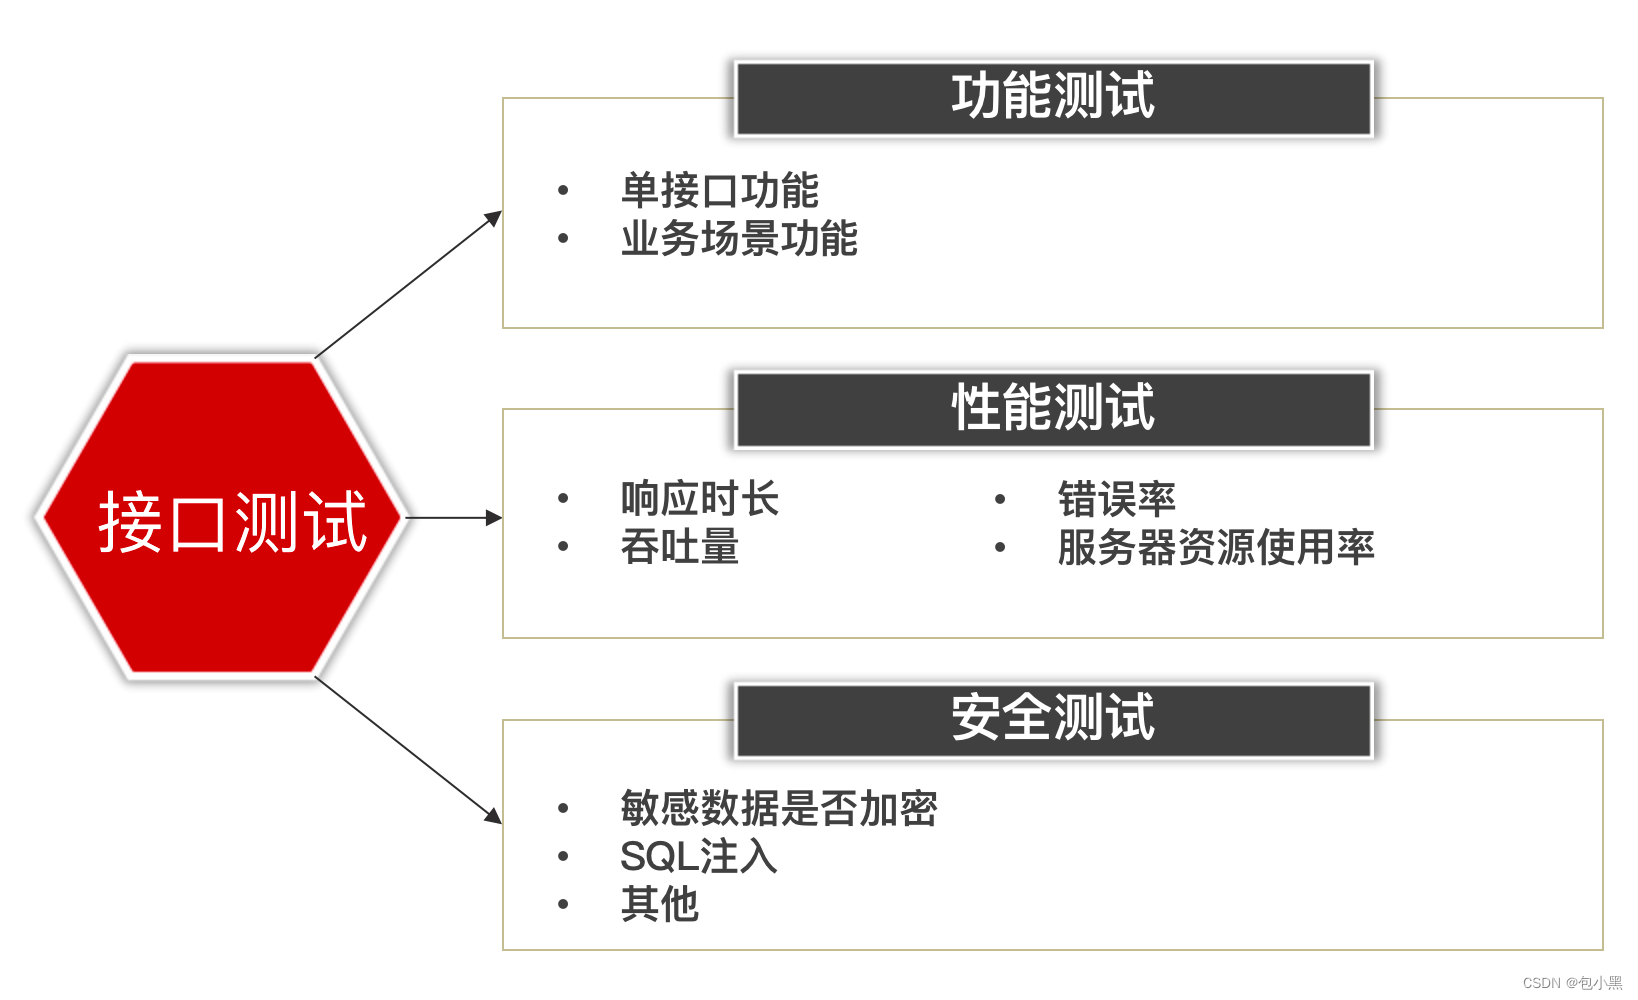
功能测试
-
单接口功能测试:
- 一个单独的业务,就对一个独立的接口。如:登录业务,对应登录接口。
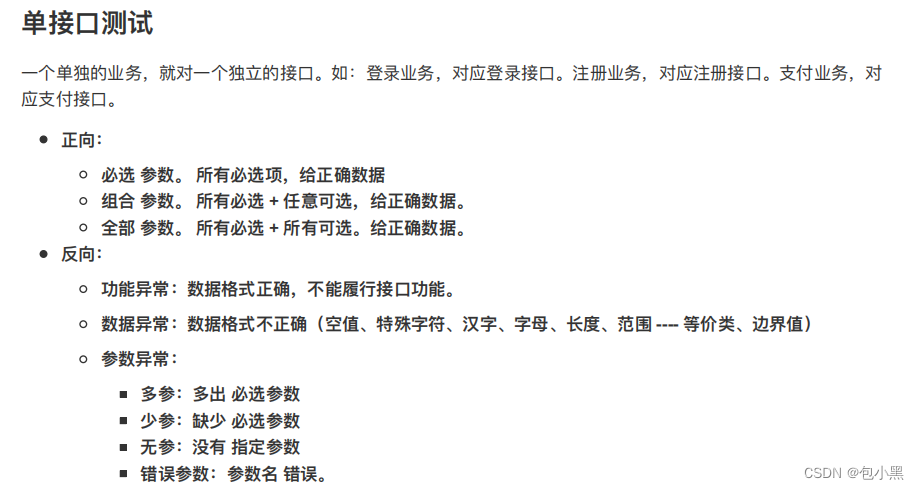
- 一个单独的业务,就对一个独立的接口。如:登录业务,对应登录接口。
-
业务场景功能测试:
- 多个接口被连续调用。(模拟用户的实际使用场景)

模拟用户实际使用,用较少的测试用例,覆盖更多接口,测试正向即可。
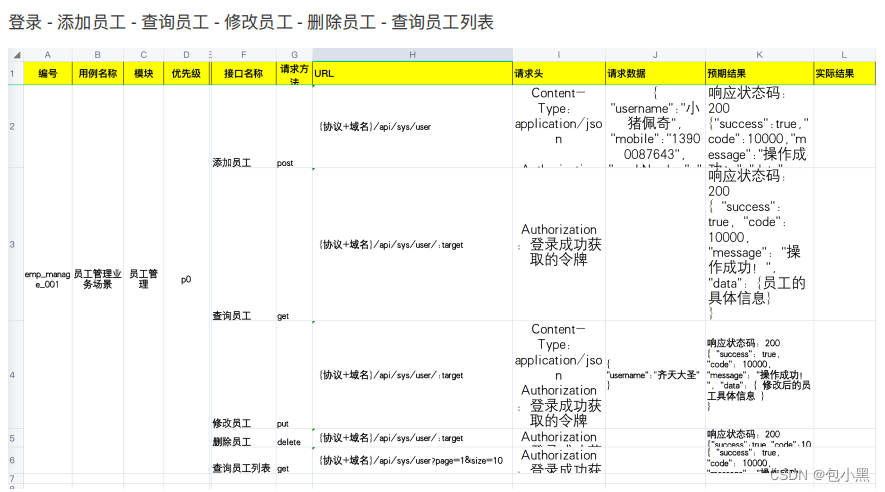
性能测试
- 响应时长:从发送请求到接收到服务器回发响应包所经历的时间。
- 错误率:服务器运行出错的概率
- 吞吐量:服务器单位时间内,处理请求的数量。
- 服务器资源利用率:cpu、内存、网络、磁盘等 硬件资源的占用率。
安全测试
- 攻击安全:木马、病毒…
- 由具备专业安全技术,会使用专业安全测试工具的安全测试工程师负责。
- 业务安全:
- 必须登录,才能访问用户数据。
- 敏感数据加密存储。
- SQL注入
三、使用Requests库发送get/post/put/delete请求,获取响应状态码、数据
Requests库
简介:Requests库 是 Python编写的,基于urllib 的 HTTP库,使用方便。
安装:
pip install requests# 豆瓣镜像:https://pypi.douban.com/simple/
pip install requests -i https://pypi.douban.com/simple/
查验request的安装情况:
-
pip 中查验:
- pip list
- pip show requests
-
pycharm 中查验
file - settings - 项目名下的 python 解释器 - 列表中 能看到 requests
设置http请求语法
resp = requests.请求方法(url=‘URL地址’, params={k:v}, headers={k:v},data={k:v}, json={k:v}, cookies=‘cookie数据’(如:令牌))
-
请求方法:
- get请求 - get()
- post请求 - post()
- put请求 - put()
- delete请求 - delete()
-
url: 待请求的url - string类型
-
params:查询参数 - 字典
-
headers:请求头 - 字典
-
data:表单格式的 请求体 - 字典
-
json:json格式的 请求体 - 字典
-
cookies:cookie数据 - string类型
-
resp:响应结果
例1:
'''
【带 json数据 的post请求】使用Requests库,完成 iHRM系统 成功登录。返回 ”令牌数据“。
'''
import requests
# 发送 post 登录请求,指定 url、请求头、请求体,获取响应结果
resp = requests.post(url="http://ihrm-test.itheima.net/api/sys/login",
# headers={"Content-Type": "application/json"},
json={"mobile": "13800000002", "password": "123456"})
# 打印响应结果
print(resp.json())
例2:
'''
【发送 put、delete请求】使用Requests库发送 ihrm系统 修改员工信息、删除员工信息 请求。
'''# -------- 修改 put
import requests
resp = requests.put(url="http://ihrm-test.itheima.net/api/sys/user/1467780995754229760",
headers={"Authorization": "Bearer 4c51c601-c3f7-4d1a-a738-7848f2439f45"},
json={"username": "齐天大圣"})
print(resp.json())
# -------- 删除 delete
import requests
resp = requests.delete(url="http://ihrm-test.itheima.net/api/sys/user/1467780995754229760",
headers={"Authorization": "Bearer 4c51c601-c3f7-4d1a-a738-7848f2439f45"})
print(resp.json())
获取指定的响应数据
- 获取 URL:resp.url
- 获取 响应状态码:resp.status_code
- 获取 Cookie:resp.cookies
- 获取 响应头:resp.headers
- 获取 响应体:
- 文本格式:resp.text
- json格式:resp.json()
例:
import requests
resp = requests.get(url="http://www.baidu.com")
# - 获取 URL:resp.url
print("url =", resp.url)
# - 获取 响应状态码:resp.status_code
print("status_code =", resp.status_code)
# - 获取 Cookie:resp.cookies
print("cookies =", resp.cookies)
# - 获取 响应头:resp.headers
print("headers =", resp.headers)
# - 获取 响应体:
# - 文本格式:resp.text
print("body_text =", resp.text)
# - json格式:resp.json() 当显示 JSONDecodeError 错误时,说明 resp 不能转换为 json格式数据。
print("body_json =", resp.json())
四、使用UnitTest管理测试用例
UnitTest 是开发人员用来实现 “单元测试” 的框架。测试工程师,可以在自动化 “测试执行” 时使用。
使用 UnitTest 的好处:
-
方便管理、维护测试用例。
-
提供丰富的断言方法。
-
生成测试报告。(需要插件 HTMLTestReport)
UnitTest框架
TestCase测试用例
# 1 导包:import unittest
# 2 定义测试类从 TestCase 类继承
class TestXXX(unittest.TestCase):pass
# 3 测试方法定义必须以 test 开头。 建议添加 编号!
class TestXXX(unittest.TestCase):def test01_xxx(self):pass
Fixture测试夹具
1、方法级别的 setUp(self) tearDown(self) 每个普通方法执行 之前/之后 自动运行。
2、类级别的 setUpClass(cls) tearDownClass(cls) 在类内所有方法 之前/之后 运行一次。
TestSuite测试套件
1、实例化测试集对象 suite = unittest.TestSuite()
2、添加指定类的全部测试方法。
suite.addTest(unittest.makeSuite(类名))Testsuite 通过搜索创建测试集
suite = unittest.TestLoader().discover(搜索目录, 搜索文件名)
suite = unittest.TestLoader().discover("./", "test*.py")
HTMLTestReport(TestRunner)
runner = HTMLTestReport("./report1.html", description="描述信息", title="报告标题")
runner.run(suite)
例1:
'''
unittest 测试框架代码所处文件要求: 遵守 标识符命名规范:
1. 只能使用 字母、数字、下划线
2. 数字不能开头
3. 避免使用 关键字、已知函数名
类:首字母必须大写。建议以 Test 开头
方法:必须 test 开头,建议 编号
'''
import unittest
# 待测试方法
def add(x, y):return x + y
# 封装 测试类,从 unittest.TestCase 类继承
class TestAdd(unittest.TestCase):def setUp(self) -> None:print("-----setUp------")def tearDown(self) -> None:print("-----tearDown------")@classmethod
def setUpClass(cls) -> None:print("====setUpClass=====")@classmethod
def tearDownClass(cls) -> None:print("====tearDownClass=====")# 自定义的测试方法
def test01_add(self):print("测试方法1")ret = add(10, 20)# 断言响应结果self.assertEqual(30, ret)def test02_add(self):print("测试方法2")ret = add(100, 200)# 断言self.assertEqual(300, ret)
例2:生成测试报告
import unittest
from htmltestreport import HTMLTestReport
# 创建 suite 实例
from py10_unittest_demo import TestAdd
suite = unittest.TestSuite()
# 指定测试类,添加 测试方法
suite.addTest(unittest.makeSuite(TestAdd))
# 创建 HTMLTestReport 实例
runner = HTMLTestReport("测试报告.html")
# 调用 run() 传入 suite
runner.run(suite)
断言方法
assertEqual(参1,参2) :参1:预期结果。 参2:实际结果。成功:完全相等。断言通过。不报错!失败:报错!
assertIn(参1,参2):参1:预期结果。参2:实际结果。成功:实际结果中,包含预期结果。断言通过。不报错!失败:报错!
五、接口对象封装思想
核心思想:代码分层

-
分层思想:
- 将普通方法实现的,分为接口对象层和测试脚本层。
-
接口对象层:
- 对接口进行封装。封装好之后,给测试用例层调用!
- 面向对象类封装实现。
-
测试用例层:
- 调用接口对象层封装的方法,拿到响应结果,断言进行接口测试!
- 借助unittest框架实现
封装思想:
- 将动态变化的数据,设计到方法的参数。
- 将固定不变的,直接写成方法实现。
- 将响应结果,通过返回值传出。
例如:普通方式实现
import unittest
import requests
class TestTpshopLogin(unittest.TestCase):# 测试 登录成功def test01_login_ok(self):# 创建 session 实例session = requests.Session()# 使⽤实例,调⽤get 发送获取验证码请求session.get(url="http://tpshop-test.itheima.net/index.php?
m=Home&c=User&a=verify&r=0.21519623710645064")# 使⽤实例,调⽤post 发送登录请求resp = session.post(url="http://tpshop-test.itheima.net/index.php?
m=Home&c=User&a=do_login&t=0.7094195931397276",
data={"username": "13012345678", "password": "123456", "verify_code":
"8888"})print("响应结果 =", resp.json())# 断⾔:self.assertEqual(200, resp.status_code)self.assertEqual(1, resp.json().get("status"))self.assertEqual("登陆成功", resp.json().get("msg"))# 测试 ⼿机号不存在def test02_tel_not_exists(self):# 创建 session 实例session = requests.Session()# 使⽤实例,调⽤get 发送获取验证码请求session.get(url="http://tpshoptest.itheima.net/index.php?
m=Home&c=User&a=verify&r=0.21519623710645064")# 使⽤实例,调⽤post 发送登录请求resp = session.post(url="http://tpshop-test.itheima.net/index.php?
m=Home&c=User&a=do_login&t=0.7094195931397276",
data={"username": "13847834701", "password": "123456", "verify_code":
"8888"})print("响应结果 =", resp.json())# 断⾔:self.assertEqual(200, resp.status_code)self.assertEqual(-1, resp.json().get("status"))self.assertEqual("账号不存在!", resp.json().get("msg"))# 测试 密码错误def test03_pwd_err(self):# 创建 session 实例session = requests.Session()# 使⽤实例,调⽤get 发送获取验证码请求session.get(url="http://tpshop-test.itheima.net/index.php?
m=Home&c=User&a=verify&r=0.21519623710645064")# 使⽤实例,调⽤post 发送登录请求resp = session.post(url="http://tpshop-test.itheima.net/index.php?
m=Home&c=User&a=do_login&t=0.7094195931397276",data={"username": "13012345678", "password": "123456890","verify_code": "8888"})print("响应结果 =", resp.json())# 断⾔:self.assertEqual(200, resp.status_code)self.assertEqual(-2, resp.json().get("status"))self.assertEqual("密码错误!", resp.json().get("msg"))
分析:

封装实现:
class TpshopLoginApi(object):# 发送验证码请求@classmethoddef get_verify(cls, session):session.get(url="http://tpshop-test.itheima.net/index.php?
m=Home&c=User&a=verify&r=0.21519623710645064")# 发送登录请求@classmethoddef login(cls, session, login_data):resp = session.post(
url="http://tpshop-test.itheima.net/index.php?
m=Home&c=User&a=do_login&t=0.7094195931397276",
data=login_data)return resp
封装断言方法
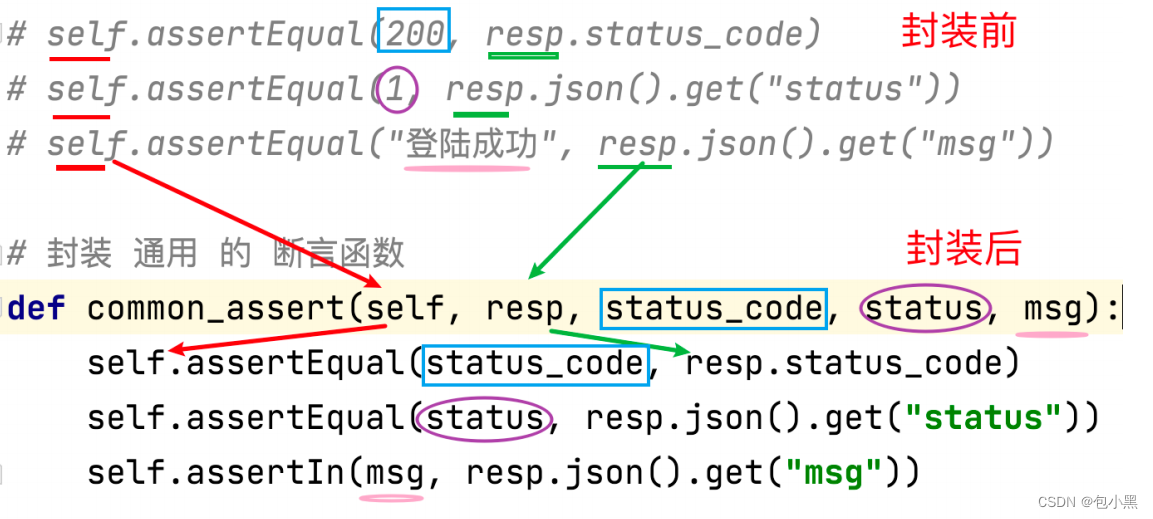
# 封装 通⽤ 的 断⾔函数
def common_assert(self, resp, status_code, status, msg):self.assertEqual(status_code, resp.status_code)self.assertEqual(status, resp.json().get("status"))self.assertIn(msg, resp.json().get("msg"))
# 调⽤
common_assert(self, resp, 200, 1, "登陆成功")
common_assert(self, resp, 200, -1, "账号不存在")
common_assert(self, resp, 200, -2, "密码错误")
登录接口优化后
import unittest
import requests
from tpshop_login_api import TpshopLoginApi# 封装 通⽤ 的 断⾔函数
def common_assert(self, resp, status_code, status, msg):self.assertEqual(status_code, resp.status_code)self.assertEqual(status, resp.json().get("status"))self.assertIn(msg, resp.json().get("msg"))class TestTpshopLogin(unittest.TestCase):# 添加类属性session = None@classmethoddef setUpClass(cls) -> None:  # 在 类中 所 有 测试⽅法执⾏之前,⾃动执⾏1次。cls.session = requests.Session()def setUp(self) -> None:  # 在 每个 测试⽅法执⾏之前,⾃动执⾏1次。# 调⽤ ⾃⼰封装的接⼝,获取验证码TpshopLoginApi.get_verify(self.session)# 测试 登录成功def test01_login_ok(self):# 调⽤ ⾃⼰封装的接⼝,登录data = {"username": "13012345678", "password": "123456", "verify_code":"8888"}resp = TpshopLoginApi.login(self.session, data)# 断⾔common_assert(self, resp, 200, 1, "登陆成功")# 测试 ⼿机号不存在def test02_tel_not_exists(self):# 调⽤ ⾃⼰封装的接⼝,登录data = {"username": "13048392845", "password": "123456", "verify_code":"8888"}resp = TpshopLoginApi.login(self.session, data)# 断⾔common_assert(self, resp, 200, -1, "账号不存在")# 测试 密码错误def test03_pwd_err(self):# 调⽤ ⾃⼰封装的接⼝,登录data = {"username": "13012345678", "password": "123456890", "verify_code":"8888"}resp = TpshopLoginApi.login(self.session, data)# 断⾔common_assert(self, resp, 200, -2, "密码错误")
六、PyMySQL操作数据库
数据库操作应用场景:
校验测试数据
请求发送后,响应结果中,没有 数据库中变化的数据
构造测试数据
测试数据,使用一次就失效
测试接口前,不能确定数据是否存在
安装PyMySQL
pip install PyMySQLpip install PyMySQL -i https://pypi.douban.com/simple/
操作步骤
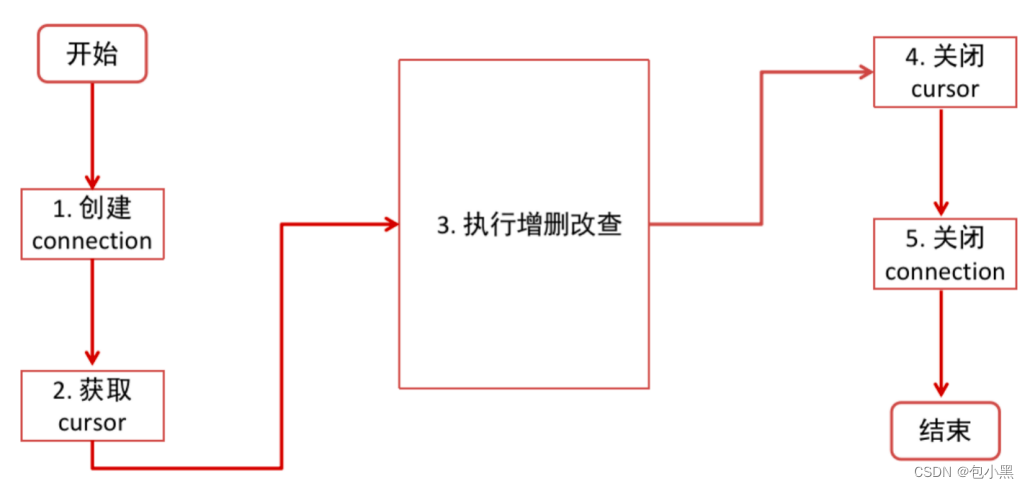
- 导包 import pymysql
- 创建连接。 conn = pymysql.connect(host,port, user, password, database, charset)
# PyMysql建立连接方法
conn = pymysql.connect(host="", port=0,
user="", password="", database="", charset="")
host:数据库所在主机 IP地址 - string
port:数据库使用的 端口号 - int
user:连接数据库使用的 用户名 - string
password:连接数据库使用的 密码 - string
database:要连接的那个数据库的名字 - string
charset:字符集。常用 utf8 - stringconn:连接数据库的对象
- 获取游标。 cursor = conn.cursor()
- 执行 SQL。 cursor.execute( ”sql语句“ )
- 查询语句(select)
-处理结果集(提取数据 fetch*) - 增删改语句(insert、update、delete)
- 成功:提交事务 conn.commit()
- 失败:回滚事务 conn.rollback()
- 关闭游标。cursor.close()
- 关闭连接。conn.close()
SQL语法
- 查询语法:select 字段1,字段2,… from 表 where 条件;
- 添加语法:insert into 表名(字段1, 字段2, …) values(值1, 值2, …);
- 更新语法:update 表名 set 字段名 = 字段值 where 条件
- 删除语法:delete from 表名 where 条件
查询操作流程
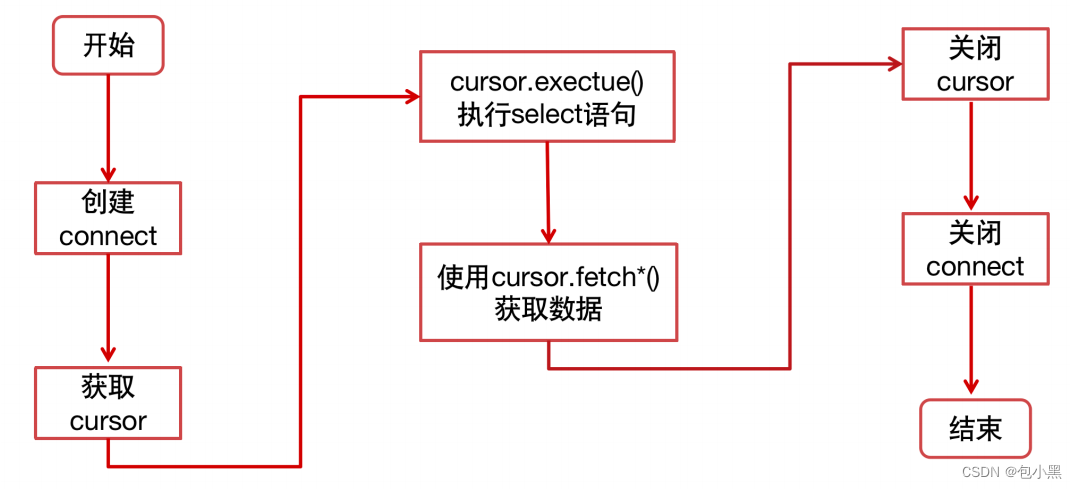
cursor游标
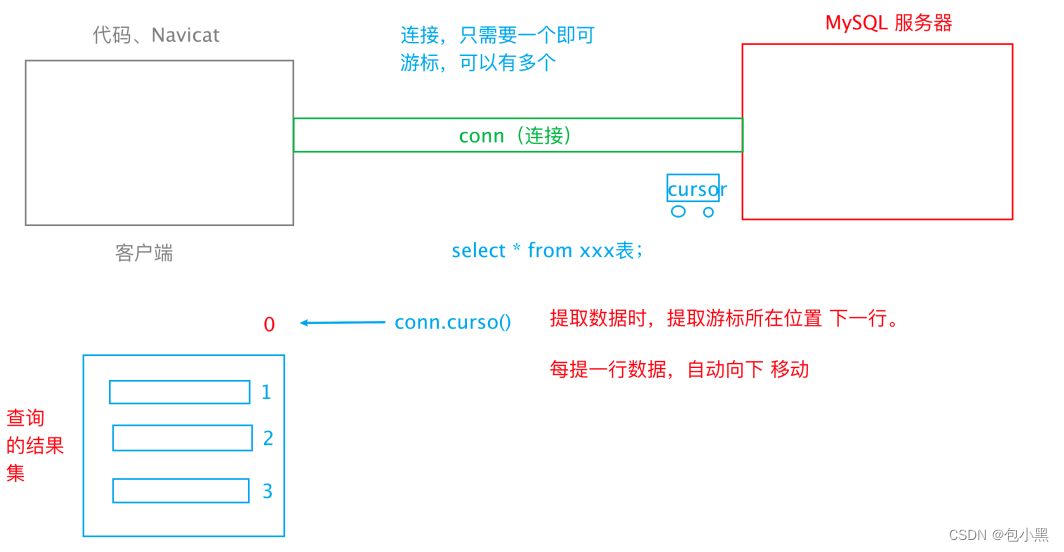
常用方法:
-
fetchone():从结果集中,提取一行。
-
fetchmany(size):从结果集中,提取 size 行。
-
fetchall():提取所有结果集。
-
属性rownumber:可以设置游标位置。
例:
'''
查询t_book表,获取 第一条 数据
查询t_book表,获取 前两条 数据
查询t_book表,获取 全部 数据
查询t_book表,获取 第3条和第
'''
# 1. 导包
import pymysql
# 2. 建立连接
conn = pymysql.connect(host="211.103.136.244", port=7061, user="student",
password="iHRM_student_2021", database="test_db", charset="utf8")
# 3. 获取游标
cursor = conn.cursor() # 指向 0 号位置。
# 4. 执行 sql 语句(查询)--- t_book
cursor.execute("select * from t_book;")
# 5. 获取结果 - 提取第一条
res1 = cursor.fetchone()
print("res1 =", res1)
# 修改游标位置:回零
cursor.rownumber = 0
# 5. 获取结果 - 提取前 2 条
res2 = cursor.fetchmany(2)
print("res2 =", res2)
# 修改游标位置:回零
cursor.rownumber = 0
res3 = cursor.fetchall()
print("res3 =", res3)
# 修改游标位置:指向第 2 条记录
cursor.rownumber = 2
res4 = cursor.fetchmany(2)
print("res4 =", res4)
# 6. 关闭游标
cursor.close()
# 7. 关闭连接
conn.close()
进行数据库操作:
结合捕获异常
try:
尝试执行的代码
except Exception as err:
有错误出现时,执行的代码
finally:
无论有没有错误,都会执行的代码
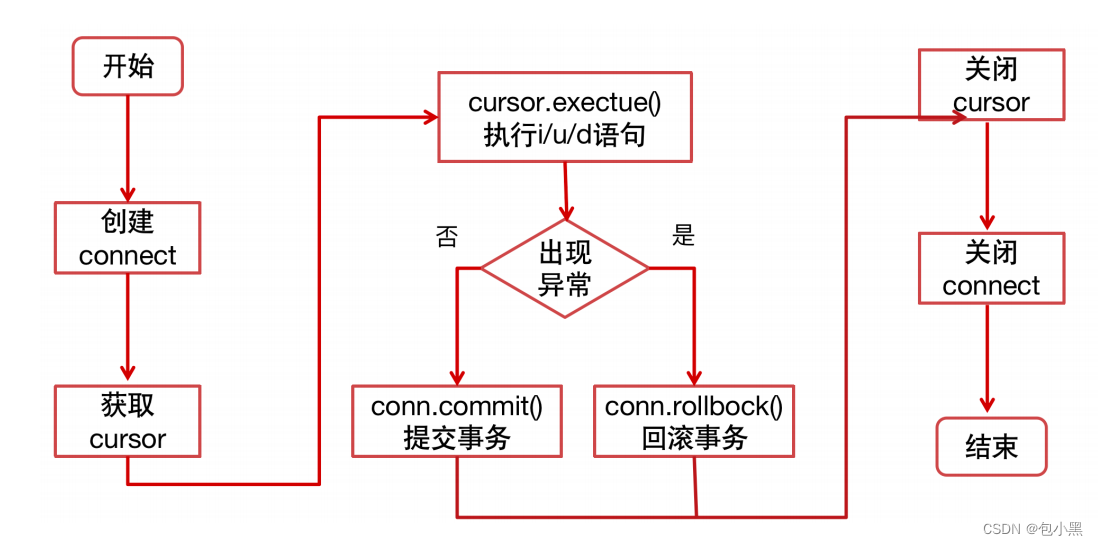
"""
新增一条图书数据(id:5 title:西游记 pub_date:1986-01-01 )
insert into t_book(id, title, pub_date) values(5, '西游记', '1986-01-01');
1. 导包
2. 创建连接
3. 获取游标
4. 执行 insert 语句
5. 提交/回滚事务
6. 关闭游标
7. 关闭连接
"""
# 1. 导包
import pymysql
# 定义全局变量
conn = None
cursor = None
try:# 2. 创建连接conn = pymysql.connect(host="211.103.136.244", 				port=7061, user="student",password="iHRM_student_2021",database="test_db", charset="utf8")# 3. 获取游标cursor = conn.cursor()# 4. 执行 insert 语句cursor.execute("insert into t_book(id, title, pub_date) values(175, '西游记', '1986-01-
01');")# 查看 sql执行,影响多少行print("影响的行数:", conn.affected_rows())# 5. 提交事务conn.commit()
except Exception as err:print("插入数据错误:", str(err))# 回滚事务conn.rollback()
finally:# 6. 关闭游标cursor.close()# 7. 关闭连接conn.close()
数据库工具类封装
设计数据库工具类
# 封装数据库工具类
class DBUtil(object):@classmethoddef __get_conn(cls):pass@classmethoddef __close_conn(cls):pass# 常用方法:查询一条@classmethoddef select_one(cls, sql):pass# 常用方法:增删改@classmethoddef uid_db(cls, sql):pass
实现类方法
获取、关闭连接
# 封装数据库工具类
class DBUtil(object):# 添加类属性conn = None@classmethoddef __get_conn(cls):# 判断 conn 是否为空, 如果是,再创建if cls.conn is None:cls.conn = pymysql.connect(host="211.103.136.244", port=7061, user="student",
password="iHRM_student_2021", database="test_db",
charset="utf8")# 返回 非空连接return cls.conn@classmethoddef __close_conn(cls):# 判断,conn 不为空,需要关闭。if cls.conn is not None:cls.conn.close()cls.conn = None
例1:查询一条记录
# 封装数据库工具类
class DBUtil(object):# 常用方法:查询一条@classmethoddef select_one(cls, sql):cursor = Noneres = Nonetry:# 获取连接cls.conn = cls.__get_conn()# 获取游标cursor = cls.conn.cursor()# 执行 查询语句cursor.execute(sql)# 提取一条结果res = cursor.fetchone()except Exception as err:print("查询sql错误:", str(err))finally:# 关闭游标cursor.close()# 关闭连接cls.__close_conn()# 将查询sql执行的 结果,返回return resif __name__ == '__main__':res = DBUtil.select_one("select * from t_book;")print("查询结果为:", res)
例2:增删改数据
# 封装数据库工具类
class DBUtil(object):# 常用方法:增删改@classmethoddef uid_db(cls, sql):cursor = Nonetry:# 获取连接cls.conn = cls.__get_conn()# 获取游标cursor = cls.conn.cursor()# 执行 uid 语句cursor.execute(sql)print("影响的行数:", cls.conn.affected_rows())# 提交事务cls.conn.commit()except Exception as err:# 回滚事务cls.conn.rollback()print("增删改 SQL 执行失败:", str(err))finally:# 关闭游标cursor.close()# 关闭连接cls.__close_conn()if __name__ == '__main__':DBUtil.uid_db("update t_book set is_delete = 1 where id = 1111;")
完整封装代码实现
import pymysql# 封装数据库工具类
class DBUtil(object):# 添加类属性conn = None@classmethoddef __get_conn(cls):# 判断 conn 是否为空,如果是,再创建if cls.conn is None:cls.conn = pymysql.connect(host="211.103.136.244", port=7061, user="student",
password="iHRM_student_2021", database="test_db",
charset="utf8")# 返回 非空连接return cls.conn@classmethoddef __close_conn(cls):# 判断,conn 不为空,需要关闭。if cls.conn is not None:cls.conn.close()cls.conn = None# 常用方法:查询一条@classmethoddef select_one(cls, sql):cursor = Noneres = Nonetry:# 获取连接cls.conn = cls.__get_conn()# 获取游标cursor = cls.conn.cursor()# 执行 查询语句cursor.execute(sql)# 提取一条结果res = cursor.fetchone()except Exception as err:print("查询sql错误:", str(err))finally:# 关闭游标cursor.close()# 关闭连接cls.__close_conn()# 将查询sql执行的 结果,返回return res# 常用方法:增删改@classmethoddef uid_db(cls, sql):cursor = Nonetry:# 获取连接cls.conn = cls.__get_conn()# 获取游标cursor = cls.conn.cursor()# 执行 uid 语句cursor.execute(sql)print("影响的行数:", cls.conn.affected_rows())# 提交事务cls.conn.commit()except Exception as err:# 回滚事务cls.conn.rollback()print("增删改 SQL 执行失败:", str(err))finally:# 关闭游标cursor.close()# 关闭连接cls.__close_conn()if __name__ == '__main__':res = DBUtil.select_one("select * from t_book;")print("查询结果为:", res)DBUtil.uid_db("update t_book set is_delete = 1 where id = 1111;")
七、参数化
参数化步骤
-
导包 from parameterized import parameterized**
-
在 通⽤测试⽅法,上⼀⾏,添加 @parameterized.expand()
-
给 expand() 传⼊ [(),(),()](调⽤ 转换 [{},{},{}] --> [(),(),()] 的函数)
-
修改 通⽤测试⽅法,添加形参,个数、顺序,与 [{},{},{}] 中 { } 内的所有 key 完全⼀⼀对应。
-
在 通⽤测试⽅法内,使⽤形参。
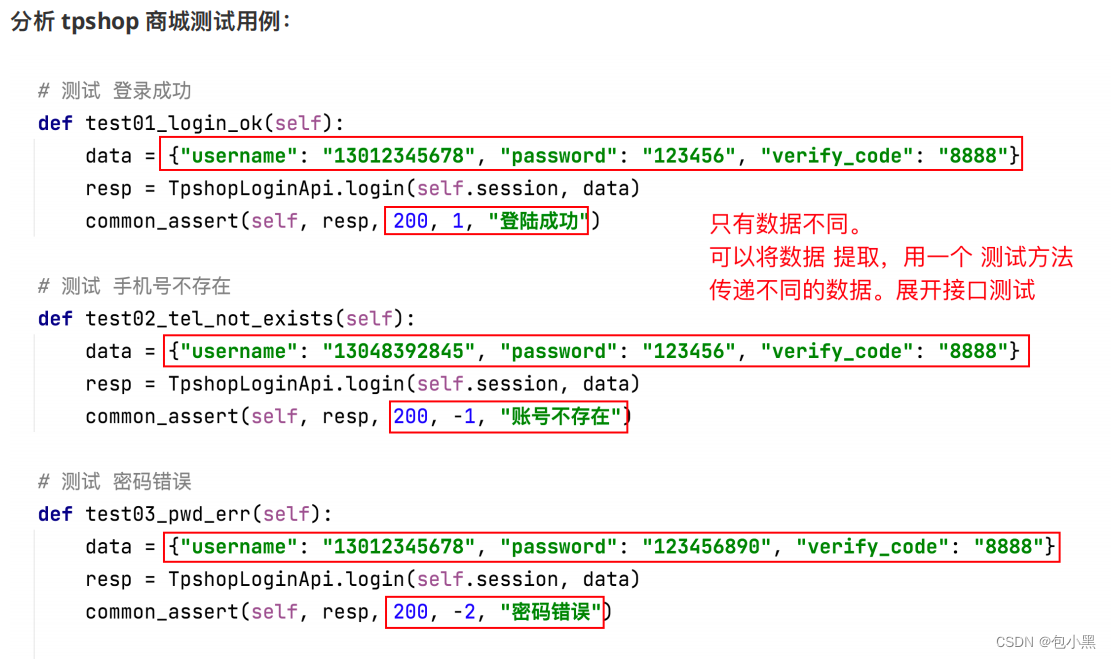
提取每个测试⽤例 使⽤的 测试数据 和 断⾔数据。
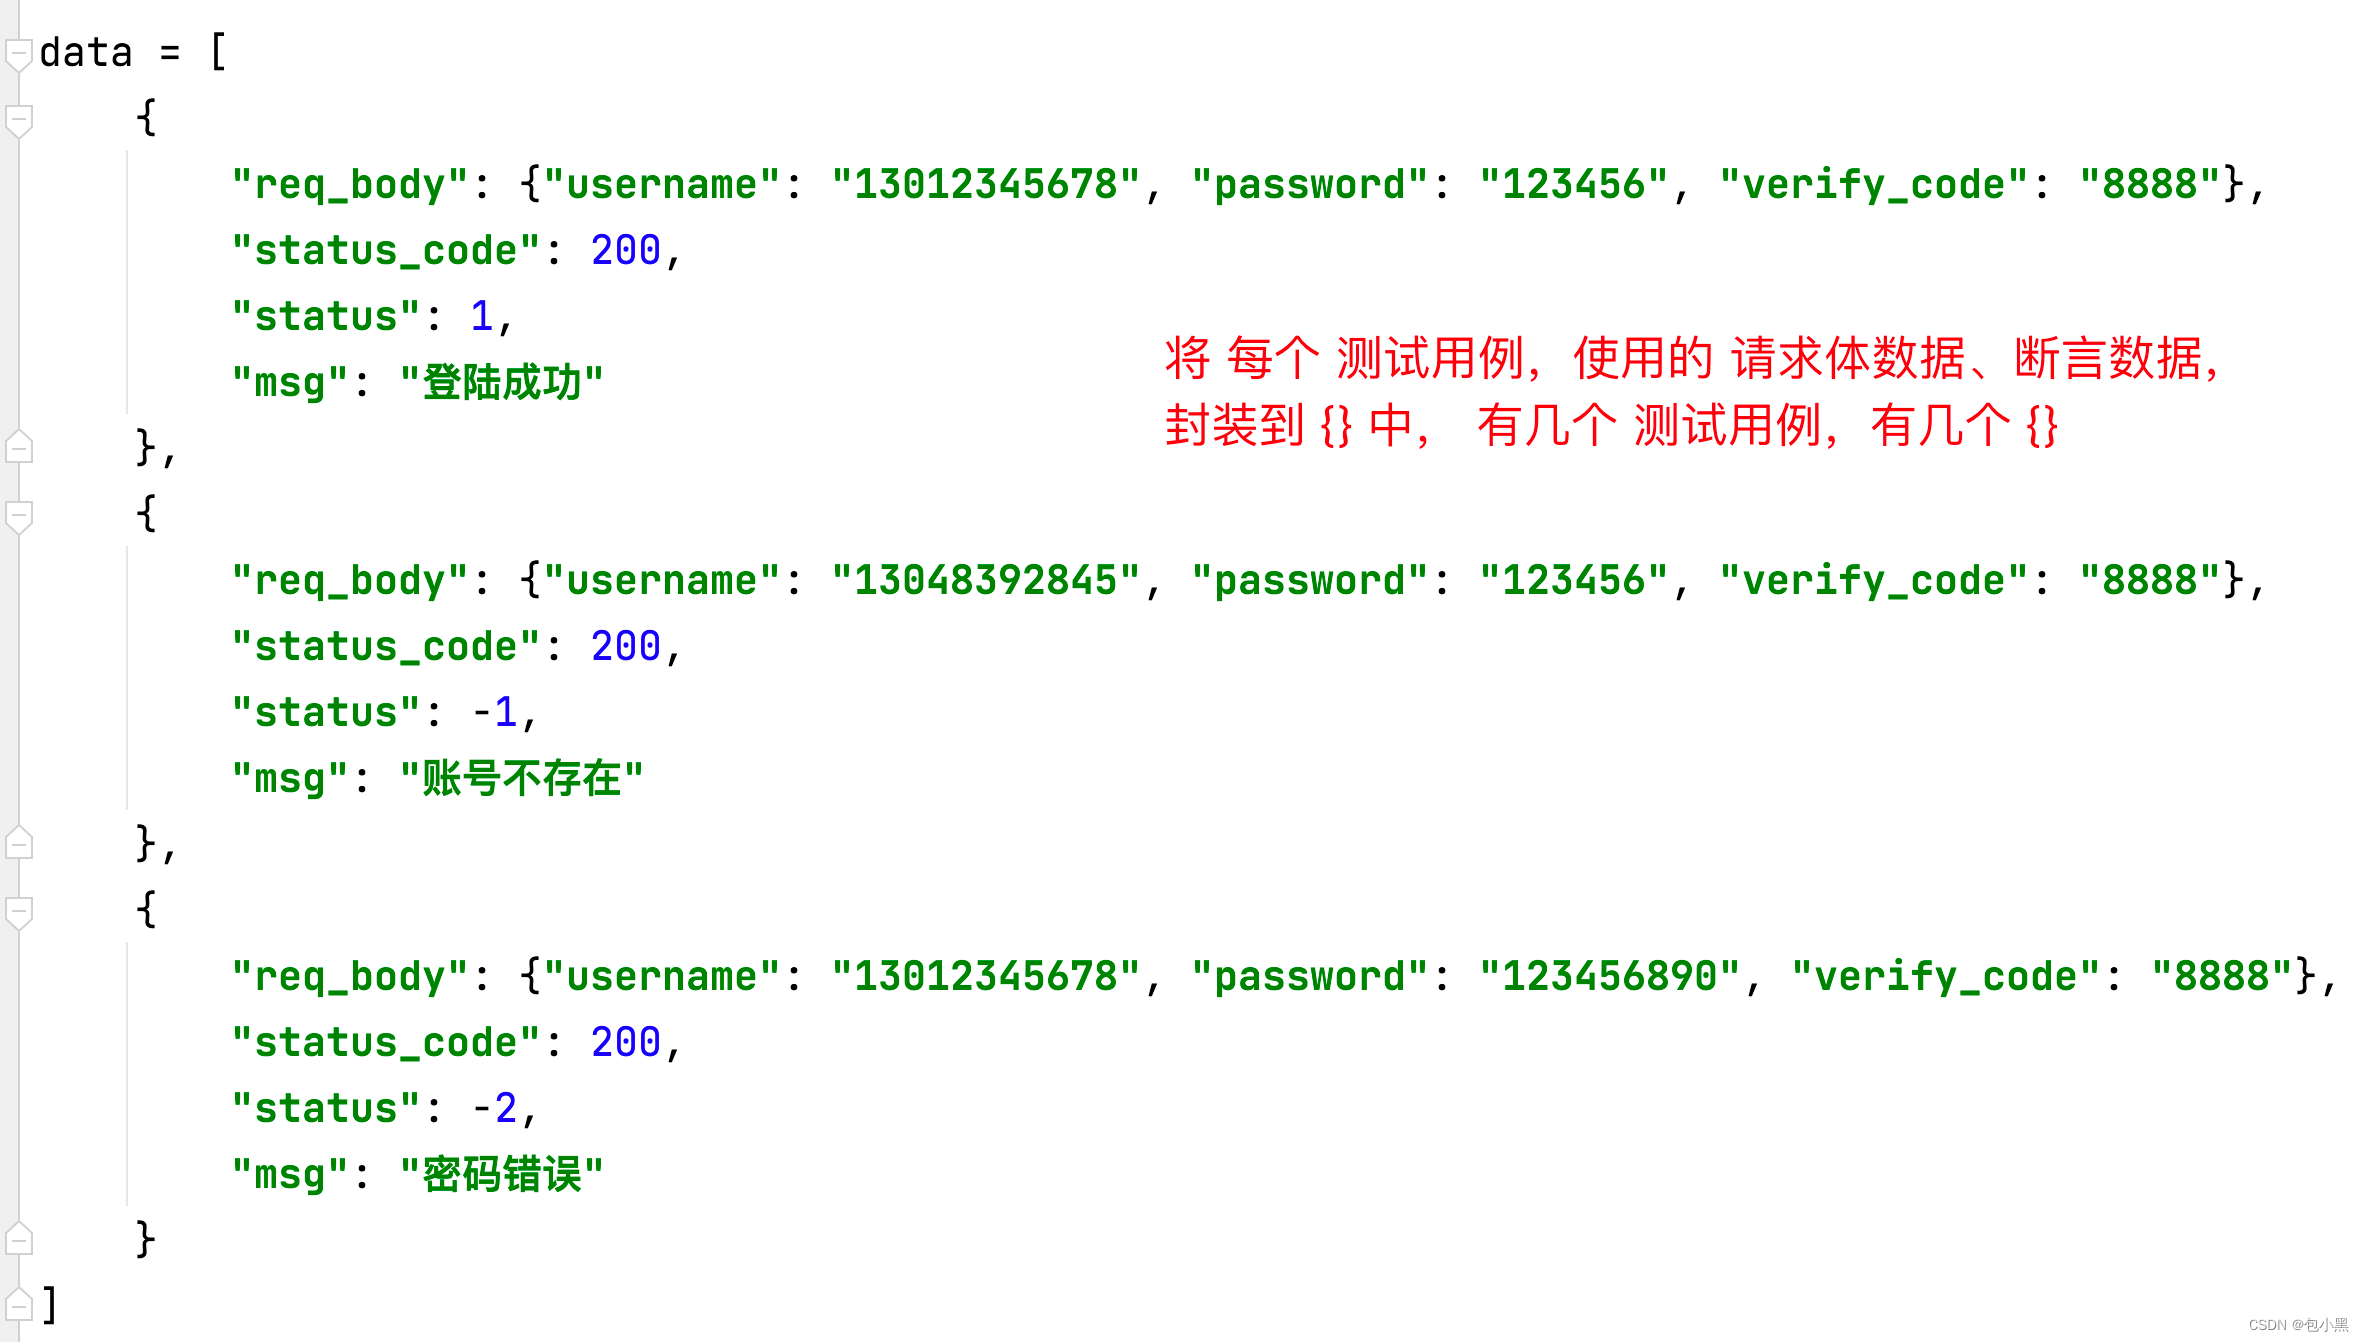
封装函数,将 数据 转换为 元组列表。
# 定义函数,读取 [{},{},{}] --> [(),(),()]
def read_json_data():list_data = []for item in json_data:tmp = tuple(item.values())list_data.append(tmp)# 循环结束后,将 list_data 为 [(),(),()] 数据, 返回return list_data
代码实现
from parameterized import parameterizedclass TestTpshopLogin(unittest.TestCase):# 添加类属性session = None@classmethoddef setUpClass(cls) -> None:cls.session = requests.Session()def setUp(self) -> None:# 调⽤ ⾃⼰封装的接⼝,获取验证码TpshopLoginApi.get_verify(self.session)# 测试 tpshop 登录@parameterized.expand(read_json_data())def test_tpshop_login(self, req_body, status_code, status, msg):resp = TpshopLoginApi.login(self.session, req_body)common_assert(self, resp, status_code, status, msg)八、接口自动化测试框架
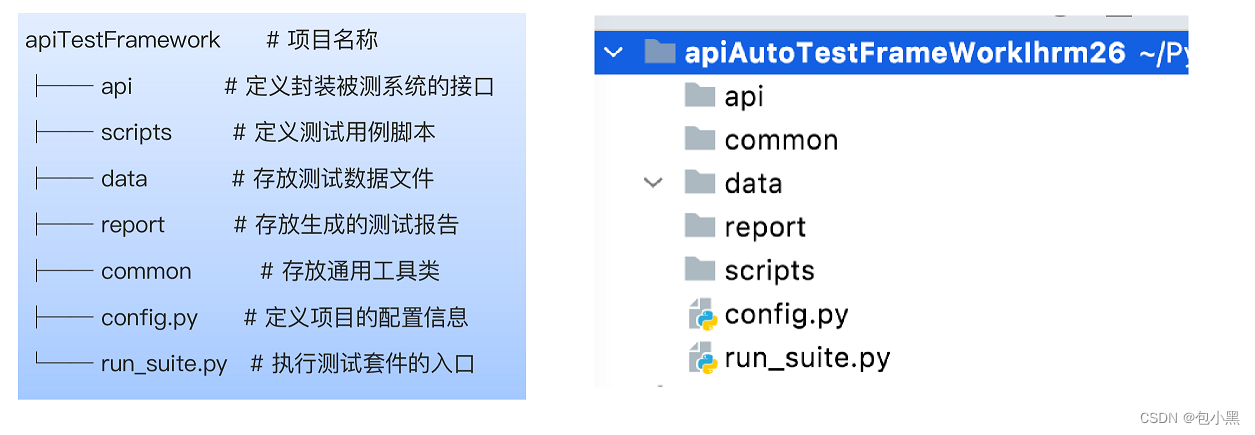
目录结构
7部分(5个目录、2个文件):
api/:存储接口对象层(自己封装的接口)
scripts/:存储测试脚本层(unittest框架实现的测试类、测试方法)
data/:存储.json数据文件
report/:存储生成的html测试报告
common/:存储通用的工具方法
config.py:存储项目的配置信息(全局变量)
run_suite.py:组装测试用例、生成测试报告的代码
登录接口普通方式实现
import unittest
import requestsclass TestIhrmLogin(unittest.TestCase):# 测试方法1,登录成功def test01_login_success(self):# 组织urlurl = "http://ihrm-test.itheima.net/api/sys/login"header = {"Content-Type": "application/json"}json_data = {"mobile": "13800000002", "password": "123456"}resp = requests.post(url=url, headers=header, json=json_data)print("登录成功:", resp.json())# 断言self.assertEqual(200, resp.status_code)self.assertEqual(True, resp.json().get("success"))self.assertEqual(10000, resp.json().get("code"))self.assertIn("操作成功", resp.json().get("message"))# 测试方法2,密码错误def test02_pwd_err(self):# 组织urlurl = "http://ihrm-test.itheima.net/api/sys/login"header = {"Content-Type": "application/json"}json_data = {"mobile": "13800000002", "password": "123456789"}resp = requests.post(url=url, headers=header, json=json_data)print("密码错误:", resp.json())# 断言self.assertEqual(200, resp.status_code)self.assertEqual(False, resp.json().get("success"))self.assertEqual(20001, resp.json().get("code"))self.assertIn("用户名或密码错误", resp.json().get("message"))
登录接口对象层
-
在 api/ 下,创建 ihrm_login_api.py 文件。
-
在 文件内,封装 IhrmLoginApi 类,添加 login 类方法。
-
按照 普通方式实现,分析。实现 login 类方法。
分析:

import requestsclass IhrmLoginApi(object):# 登录方法@classmethoddef login(cls, json_data):url = "http://ihrm-test.itheima.net/api/sys/login"header = {"Content-Type": "application/json"}resp = requests.post(url=url, headers=header, json=json_data)return respif __name__ == '__main__':data = {"mobile": "13800000002", "password": "123456"}resp = IhrmLoginApi.login(data)print(resp.json())
登录接口测试用例层
-
在 scripts/ 下,创建 test_ihrm_login.py 文件
-
在 文件内,创建 测试类 TestIhrmLogin 从 unittest.TestCase 继承
-
添加 测试方法, 并实现
import unittest
from api.ihrm_login_api import IhrmLoginApi
class TestIhrmLogin(unittest.TestCase):# 登录成功def test01_login_success(self):# 组织请求数据json_data = {"mobile": "13800000002", "password": "123456"}# 调用自己封装的接口resp = IhrmLoginApi.login(json_data)print("登录成功:", resp.json())# 断言self.assertEqual(200, resp.status_code)self.assertEqual(True, resp.json().get("success"))self.assertEqual(10000, resp.json().get("code"))self.assertIn("操作成功", resp.json().get("message"))# 手机号为空def test02_mobile_none(self):# 组织请求数据json_data = {"mobile": None, "password": "123456"}# 调用自己封装的接口resp = IhrmLoginApi.login(json_data)print("手机号为空:", resp.json())# 断言self.assertEqual(200, resp.status_code)self.assertEqual(False, resp.json().get("success"))self.assertEqual(20001, resp.json().get("code"))self.assertIn("用户名或密码错误", resp.json().get("message"))# 密码错误def test03_pwd_err(self):# 组织请求数据json_data = {"mobile": "13800000002", "password": "123456890"}# 调用自己封装的接口resp = IhrmLoginApi.login(json_data)print("密码错误:", resp.json())# 断言self.assertEqual(200, resp.status_code)self.assertEqual(False, resp.json().get("success"))self.assertEqual(20001, resp.json().get("code"))self.assertIn("用户名或密码错误", resp.json().get("message"))
封装断言方法
1.在common/下,新建文件assert_util.py文件,
2.在文件内,添加函数assert_util()
3.在函数内,实现通用的断言函数。
4.在测试方法中,使用直接封装的通用断言函数,实现断言
# 定义 通用断言方法
def assert_util(self, resp, status_code, success, code, message):self.assertEqual(status_code, resp.status_code)self.assertEqual(success, resp.json().get("success"))self.assertEqual(code, resp.json().get("code"))self.assertIn(message, resp.json().get("message"))
使用断言方法
assert_util(self, resp, 200, True, 10000, "操作成功")
assert_util(self, resp, 200, False, 20001, "用户名或密码错误")
assert_util(self, resp, 200, False, 20001, "用户名或密码错误")
参数化实现
实现步骤:
-
导包 from parameterized import parameterized
-
在通用测试方法上一行,添加 @parameterized.expand()
-
给 expand() 传入 [(),(),()] 格式数据。(调用 read_json_data() )
-
修改 通用测试方法形参,按 数据中的 key 设计参数。
-
在 通用测试方法 内,使用形参
-组织数据文件
[{"desc":"登录成功","req_data":{"mobile":"13800000002","password":"123456"},"stauts_code":200,"success":true,"code":10000,"message":"操作成功"},{"desc":"手机号为空","req_data":{"mobile":null,"password":"123456"},"stauts_code":200,"success":false,"code":20001,"message":"用户名或密码错误"},{"desc":"密码错误","req_data":{"mobile":"13800000002","password":"123456789"},"stauts_code":200,"success":false,"code":20001,"message":"用户名或密码错误"},{"desc":"多参","req_data":{"mobile":"13800000002","password":"123456","abc":"123"},"stauts_code":200,"success":true,"code":10000,"message":"操作成功"},{"desc":"少参","req_data":{"password":"123456"},"stauts_code":200,"success":false,"code":20001,"message":"用户名或密码错误"},{"desc":"无参","req_data":null,"stauts_code":200,"success":false,"code":99999,"message":"抱歉,系统繁忙,请稍后重试!"},{"desc":"错误参数","req_data":{"abc":"13800000002","password":"123456"},"stauts_code":200,"success":false,"code":20001,"message":"用户名或密码错误"}
]
读取数据文件
1.在common/下创建read_json_util.py文件
2.在文件内,定义函数,从json文件中读取数据,转换成元组列表,返回
import json
# 定义函数,读取 data/xxx.json 文件
def read_json_data():with open("../data/ihrm_login.json", "r", encoding="utf-8") as f:json_data = json.load(f)list_data = []for item in json_data:tmp = tuple(item.values())list_data.append(tmp)# 这个 返回,坚决不能在 for 内return list_dataif __name__ == '__main__':ret = read_json_data()print(ret)
使用 parameterized 实现参数化
步骤:
- 导包 from parameterized import parameterized
- 在通用测试方法上一行,添加 @parameterized.expand()
- 给expand()传入元组列表数据(调用 自己封装的读取 json 文件的 函数 read_json_data() )
- 修改 通用测试方法形参,与 json 数据文件中的 key 一致。
- 在 通用测试方法内,使用形参
import unittest
from api.ihrm_login_api import IhrmLoginApi
from common.assert_util import assert_util
from common.read_json_util import read_json_data
from parameterized import parameterizedclass TestIhrmLogin(unittest.TestCase):# 通用测试方法(实现参数化)@parameterized.expand(read_json_data())def test_login(self, desc, req_data, stauts_code, success, code, message):# 调用自己封装的接口resp = IhrmLoginApi.login(req_data)print(desc, ":", resp.json())# 断言assert_util(self, resp, stauts_code, success, code, message)
相关知识:
-
_file_ : 获取 当前文件的 绝对路径。
-
BASE_DIR = os.path.dirname(_file_) : 获取 到 当前文件的 上一级目录。
- 此行代码,写在 confifig.py 中, 可以直接获取 项目目录
项目中使用:
-
在 confifig.py 文件中,添加 获取项目路径 全局变量 BASE_DIR = os.path.dirname(_file_)
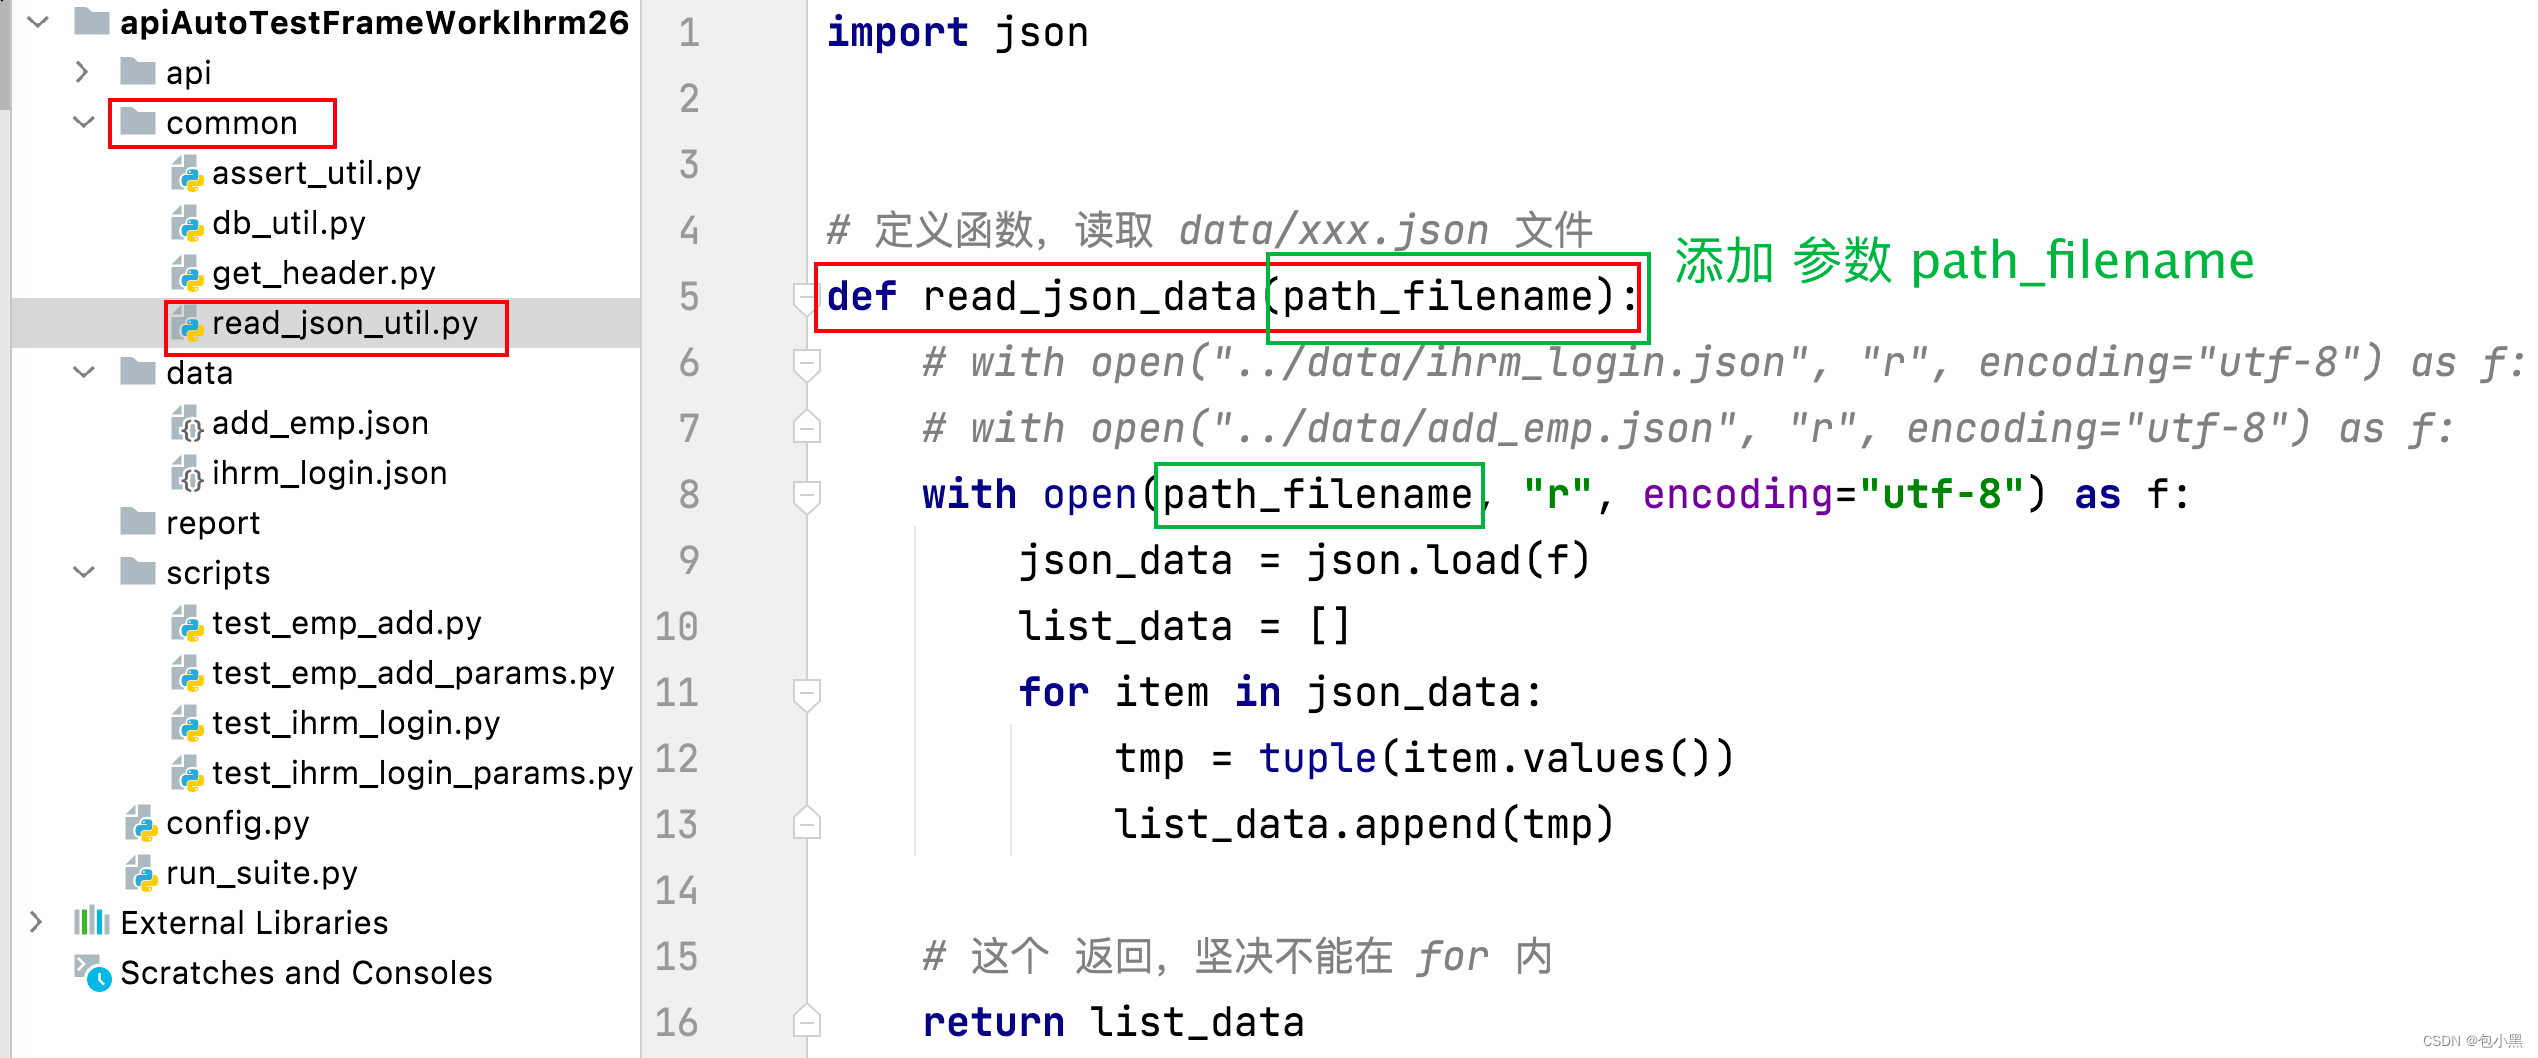
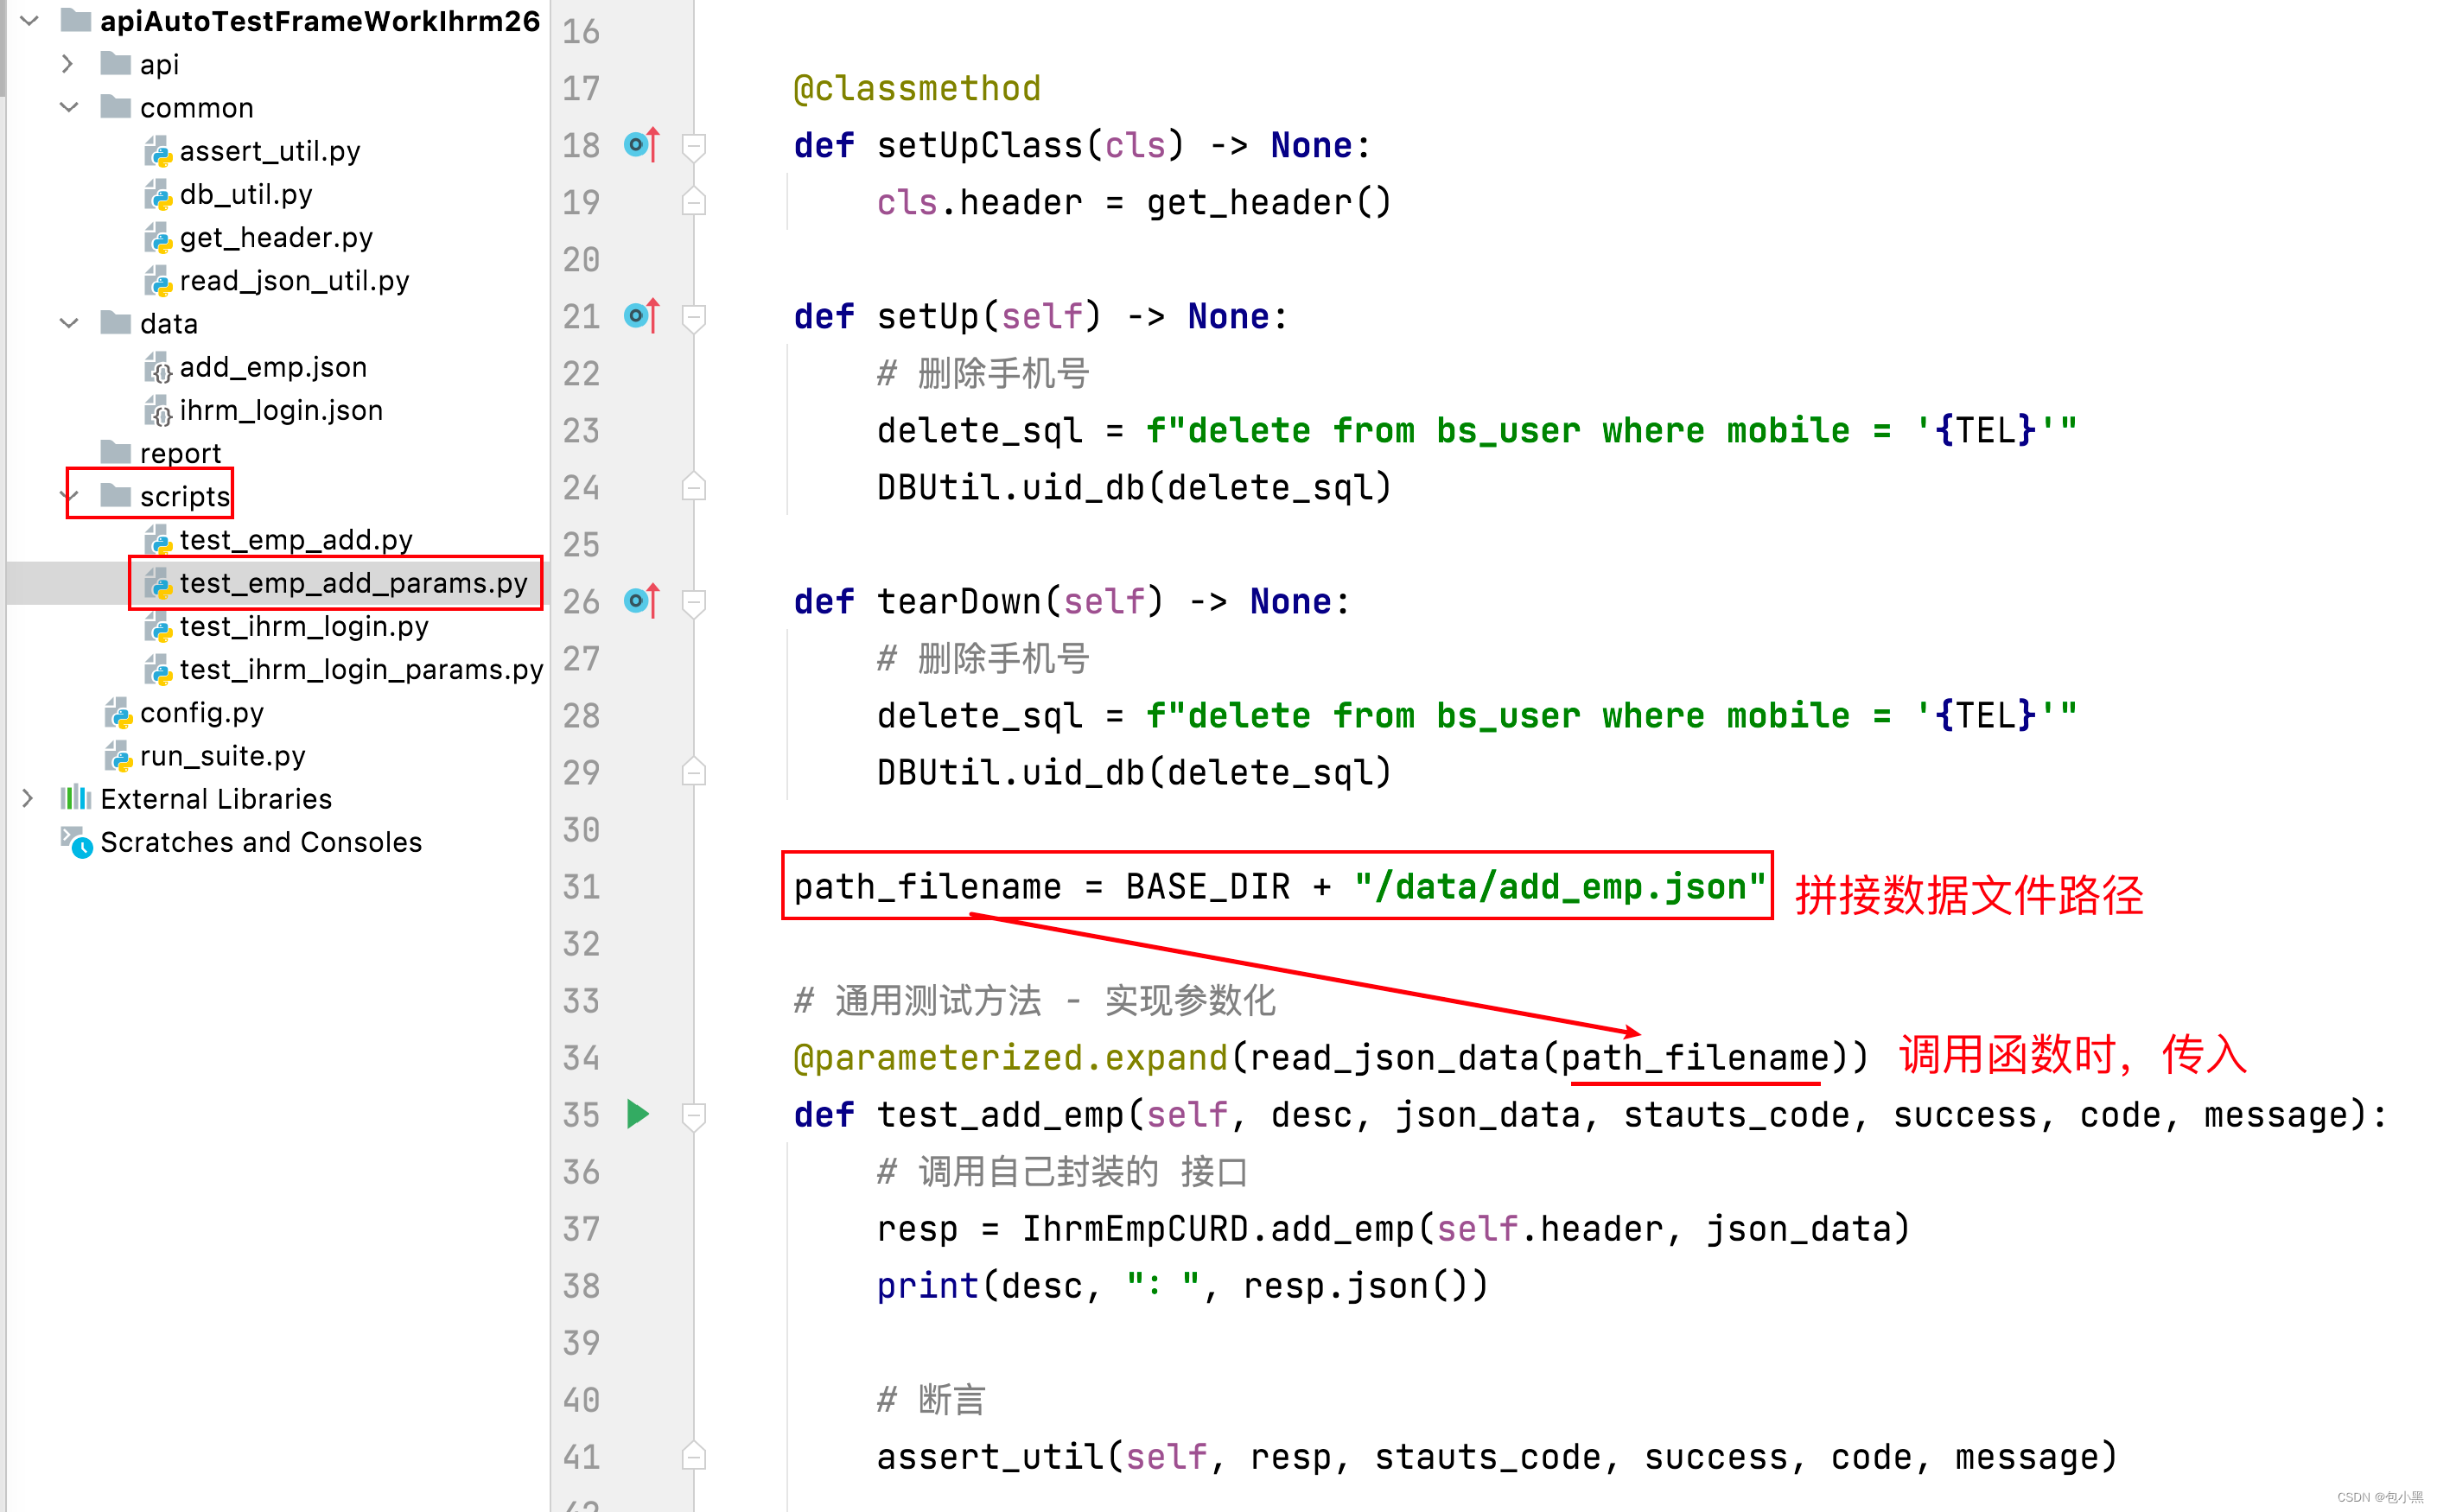
-
修改 common/ 下 read_json_util.py 文件中,读取 json 文件 函数read_json_data(),添加 参数
path_fifilename
- 在 使用 read_json_data()函数 时, 拼接 json 文件路径, 传入到 函数中。
九、借助测试套件生成测试报告
步骤:
- 创建测试套件实例。 suite
- 添加 测试类
- 创建 HTMLTestReport 类实例。 runner
- runner 调用 run(), 传入 suite
import unittestfrom config import BASE_DIR
from scripts.test_emp_add_params import TestEmpAddParams
from scripts.test_ihrm_login_params import TestIhrmLoginParams
from htmltestreport import HTMLTestReport# 1. 创建测试套件实例。 suite
suite = unittest.TestSuite()
# 2. 添加 测试类, 组装测试用例
suite.addTest(unittest.makeSuite(TestIhrmLoginParams))
suite.addTest(unittest.makeSuite(TestEmpAddParams))
# 3. 创建 HTMLTestReport 类实例。 runner
# runner = HTMLTestReport(BASE_DIR + "/report/ihrm.html") # 绝对路径
runner = HTMLTestReport("./report/ihrm.html", description="描述", title="标题") # 相对路径
# 4. runner 调用 run(), 传入 suite
runner.run(suite)
十、使用logging实现日志收集
-
什么是日志
- 日志也叫 log,通常对应的 xxx.log 的日志文件。文件的作用是记录系统运行过程中,产生的信息。
-
搜集日志的作用
-查看系统运行是否正常。- 分析、定位 bug
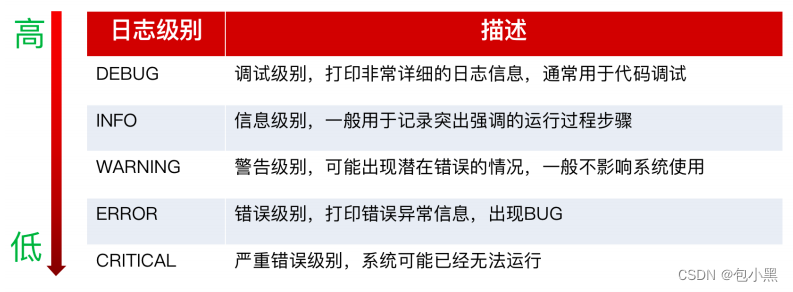
日志的级别
- logging.DEBUG:调试级别【高】
- logging.INFO:信息级别【次高】
- logging.WARNING:警告级别【中】
- logging.ERROR:错误级别【低】
- logging.CRITICAL:严重错误级别【极低】
特性:
日志级别设定后,只有比该级别低的日志会写入日志。
如:设定日志级别为 info。 debug 级别的日志信息,不会写入。infowarning、error、critical 会写入
日志代码实现分析
日志代码,无需手写实现。会修改、调用即可!
"""
步骤:
# 0. 导包
# 1. 创建日志器对象
# 2. 设置日志打印级别
# logging.DEBUG 调试级别
# logging.INFO 信息级别
# logging.WARNING 警告级别
# logging.ERROR 错误级别
# logging.CRITICAL 严重错误级别
# 3. 创建处理器对象
# 创建 输出到控制台 处理器对象
# 创建 输出到日志文件 处理器对象
# 4. 创建日志信息格式
# 5. 将日志信息格式设置给处理器
# 设置给 控制台处理器
# 设置给 日志文件处理器
# 6. 给日志器添加处理器
# 给日志对象 添加 控制台处理器
# 给日志对象 添加 日志文件处理器
# 7. 打印日志
"""
import logging.handlers
import logging
import time
# 1. 创建日志器对象
logger = logging.getLogger()
# 2. 设置日志打印级别
logger.setLevel(logging.DEBUG)
# logging.DEBUG 调试级别
# logging.INFO 信息级别
# logging.WARNING 警告级别
# logging.ERROR 错误级别
# logging.CRITICAL 严重错误级别
# 3.1 创建 输出到控制台 处理器对象
st = logging.StreamHandler()
# 3.2 创建 输出到日志文件 处理器对象
fh = logging.handlers.TimedRotatingFileHandler('a.log', when='midnight', interval=1,
backupCount=3, encoding='utf-8')
# when 字符串,指定日志切分间隔时间的单位。midnight:凌晨:12点。
# interval 是间隔时间单位的个数,指等待多少个 when 后继续进行日志记录
# backupCount 是保留日志文件的个数
# 4. 创建日志信息格式
fmt = "%(asctime)s %(levelname)s [%(filename)s(%(funcName)s:%(lineno)d)] - %(message)s"
formatter = logging.Formatter(fmt)
# 5.1 日志信息格式 设置给 控制台处理器
st.setFormatter(formatter)
# 5.2 日志信息格式 设置给 日志文件处理器
fh.setFormatter(formatter)
# 6.1 给日志器对象 添加 控制台处理器
logger.addHandler(st)
# 6.2 给日志器对象 添加 日志文件处理器
logger.addHandler(fh)
# 7. 打印日志
while True:# logging.debug('我是一个调试级别的日志')# logging.info('我是一个信息级别的日志')logging.warning('test log sh-26')# logging.error('我是一个错误级别的日志')# logging.critical('我是一个严重错误级别的日志')time.sleep(1)
日志使用

使用步骤:
-
调用 init_log_confifig() 函数,初始化日志信息。
-
指定 日志级别,打印 日志信息。
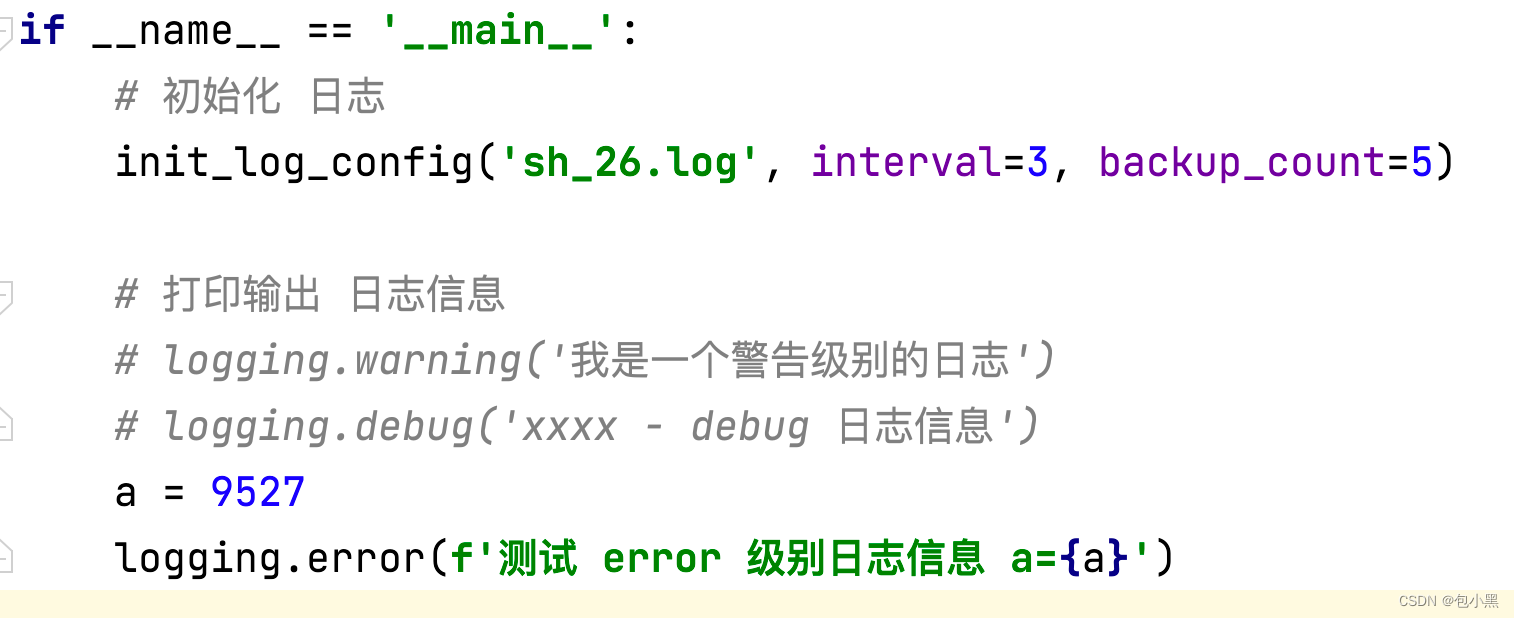
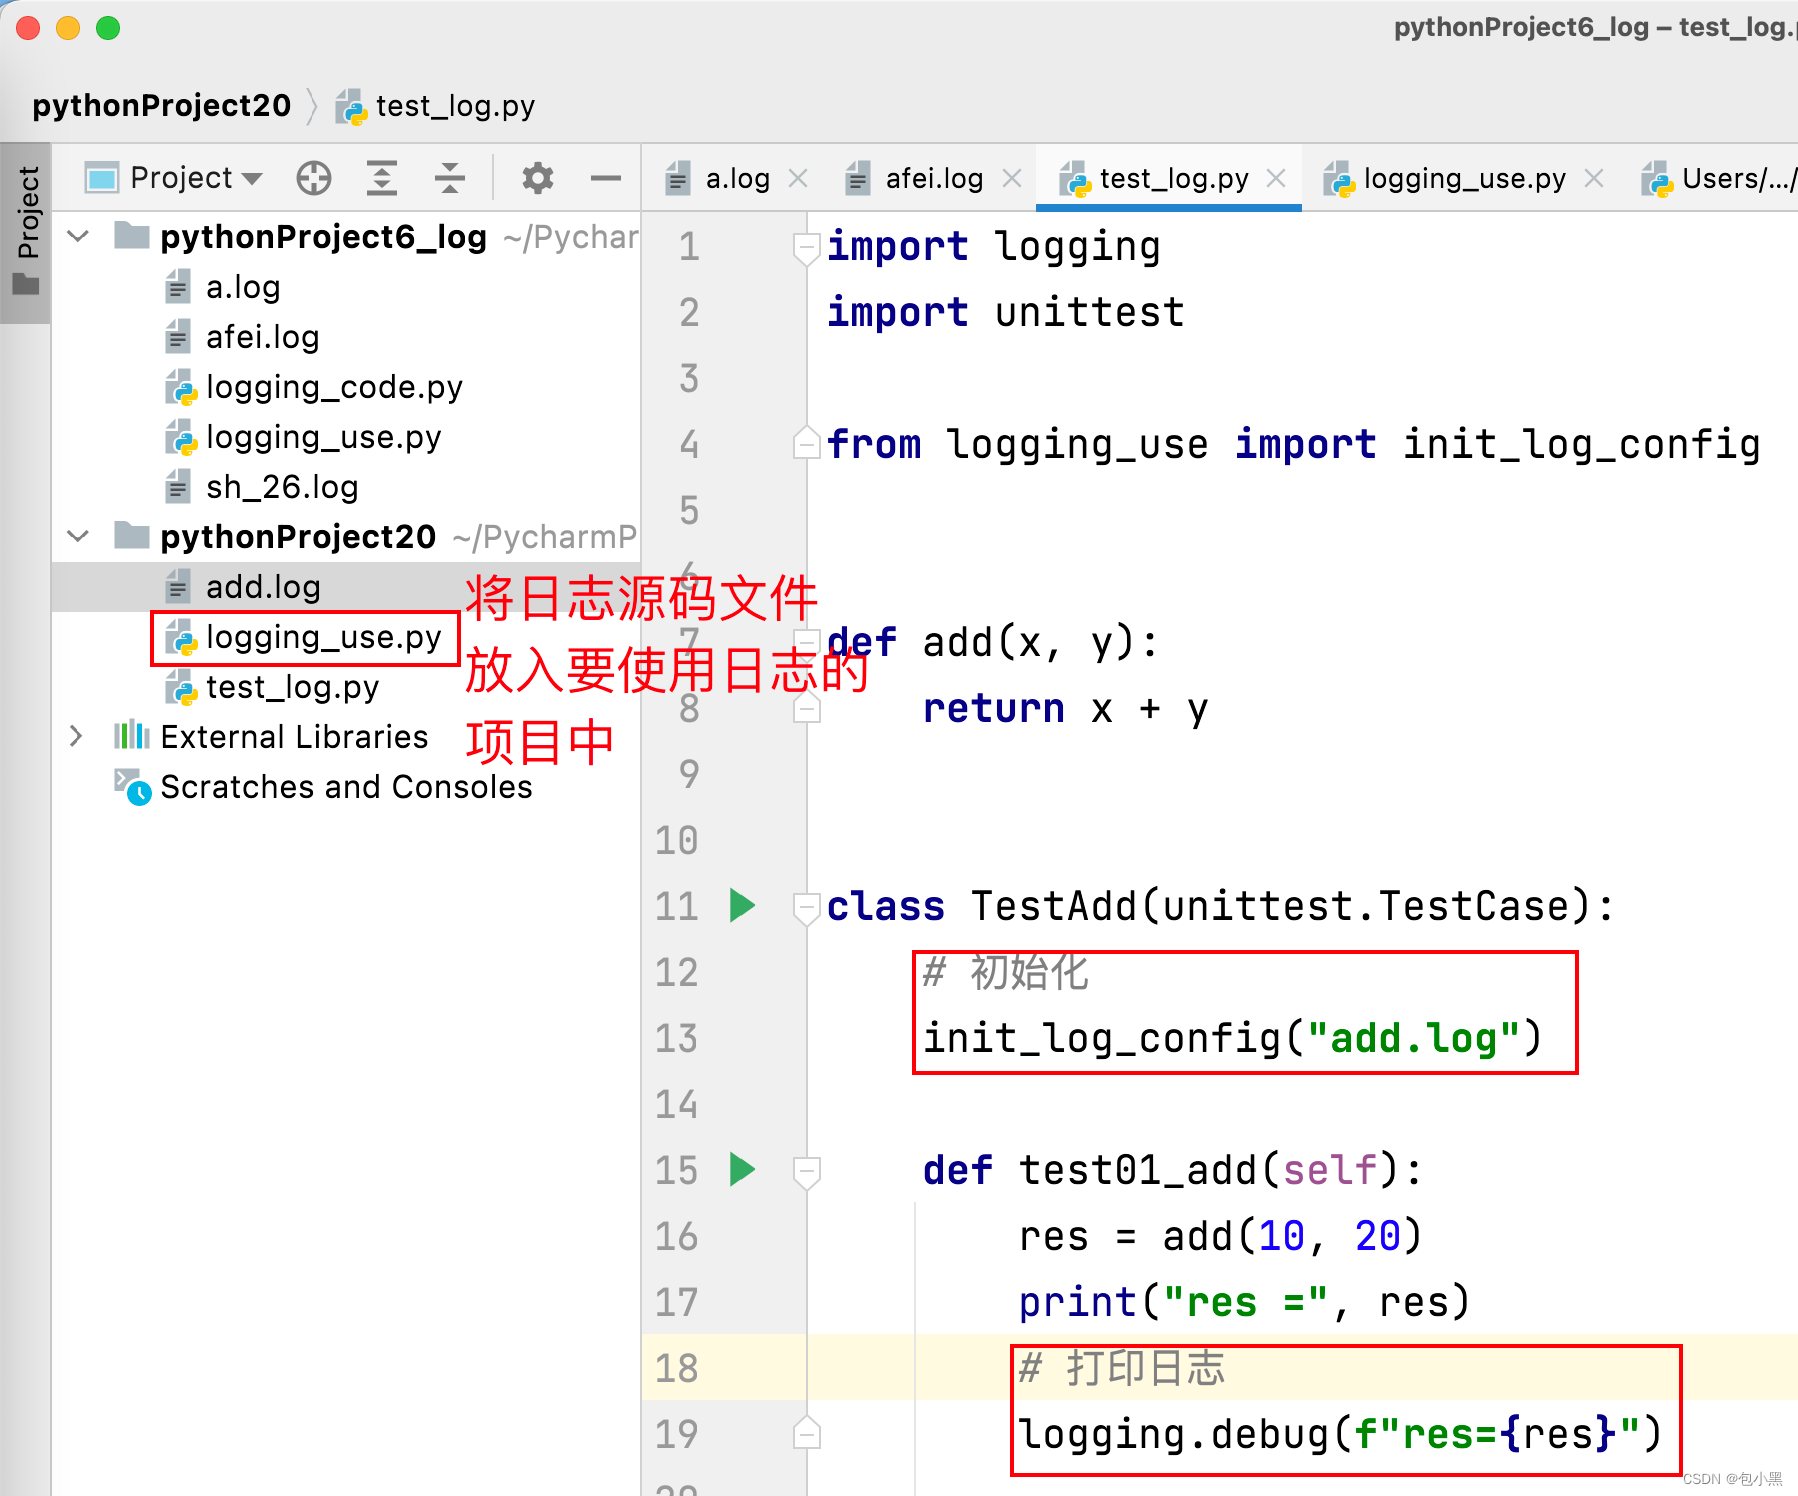
日志在项目中的使用:
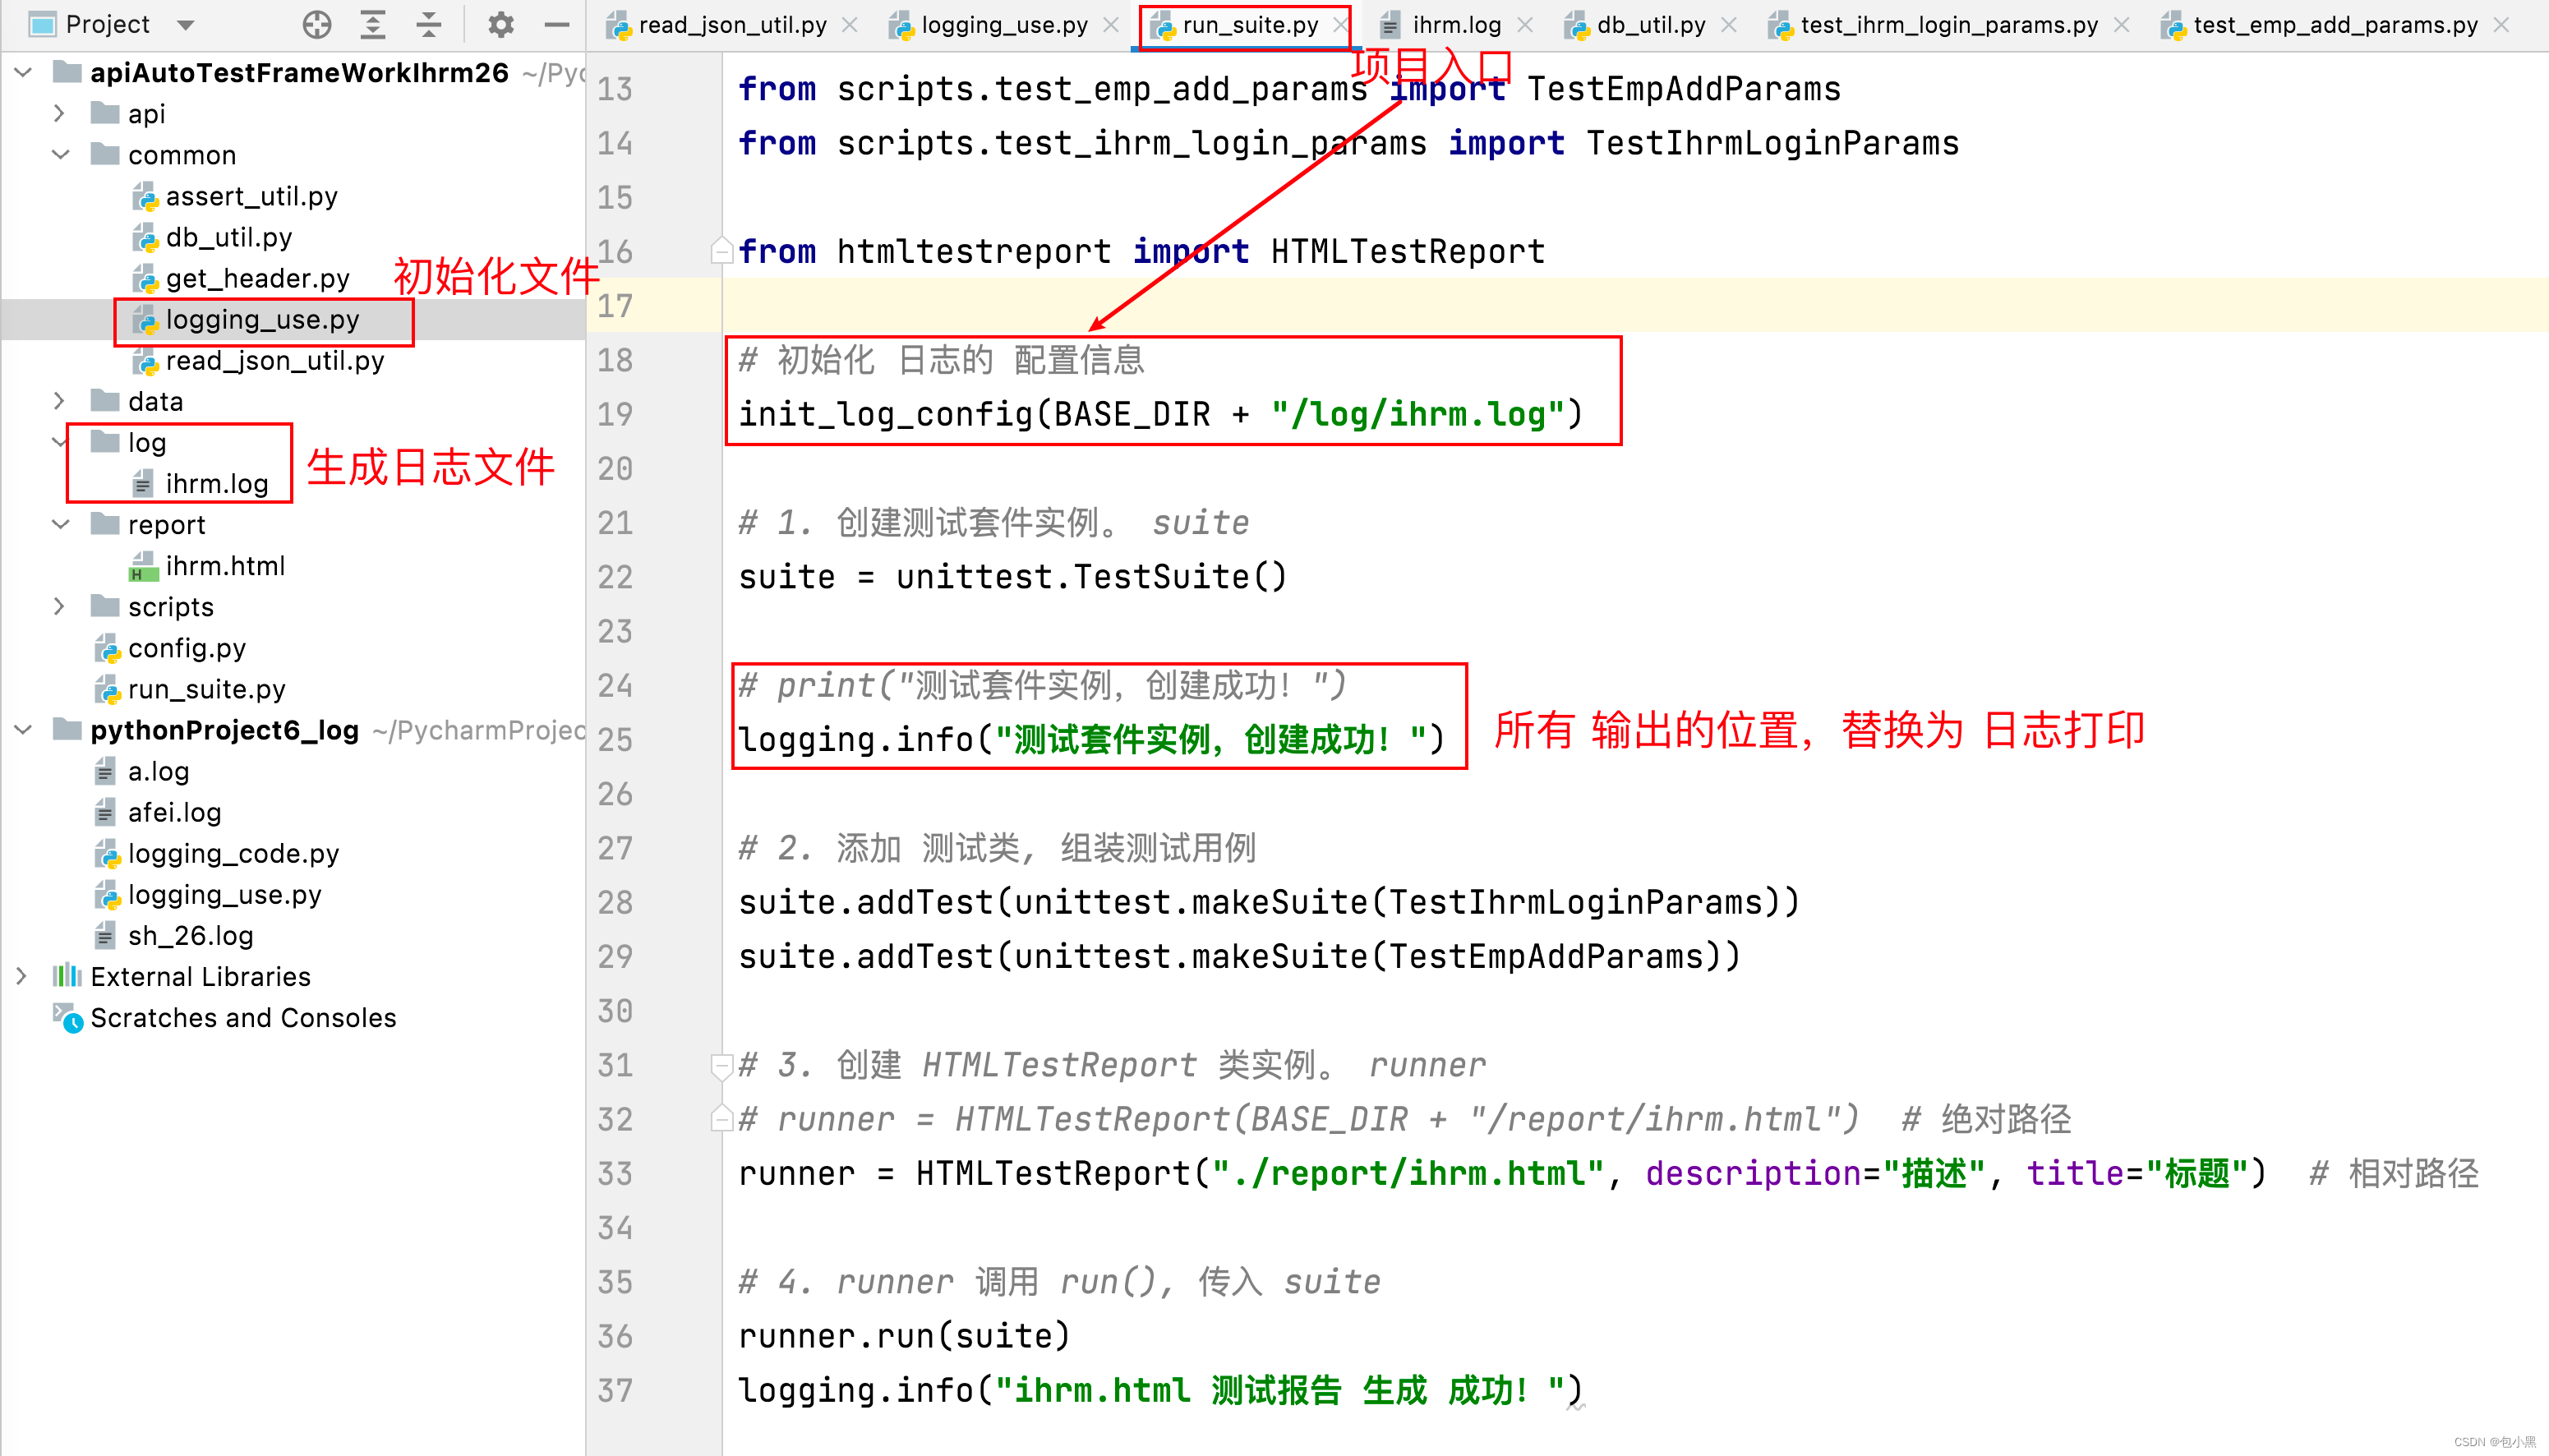
-
将 包含 init_log_confifig() 函数的 日志文件,存放到 项目目录 common/ 下。
-
在 项目入口文件中, 调用 init_log_confifig() 函数,指定 日志文件名,及 其他参数。
-
在 所有 需要打印输出的 ,将 logging.级别() 替换 调用 print 输出!
-
去 生成的日志文件中,查看日志信息。
十一、使用jsonschema库对响应数据进行全量字段校验
**概念:**校验接⼝返回响应结果的全部字段(更进一步的断言)
校验内容:
-
字段值
-
字段名 或 字段类型
校验流程:
-
定义json语法校验格式
-
⽐对接口实际响应数据是否符合json校验格式
安装jsonschema:
pip install jsonschema -i https://pypi.douban.com/simple/
查验:
-
pip 查验:pip list 或 pip show jsonschema
-
pycharm 中 查验:fifile — settings — 项目名中查看 python解释器列表。

校验方式
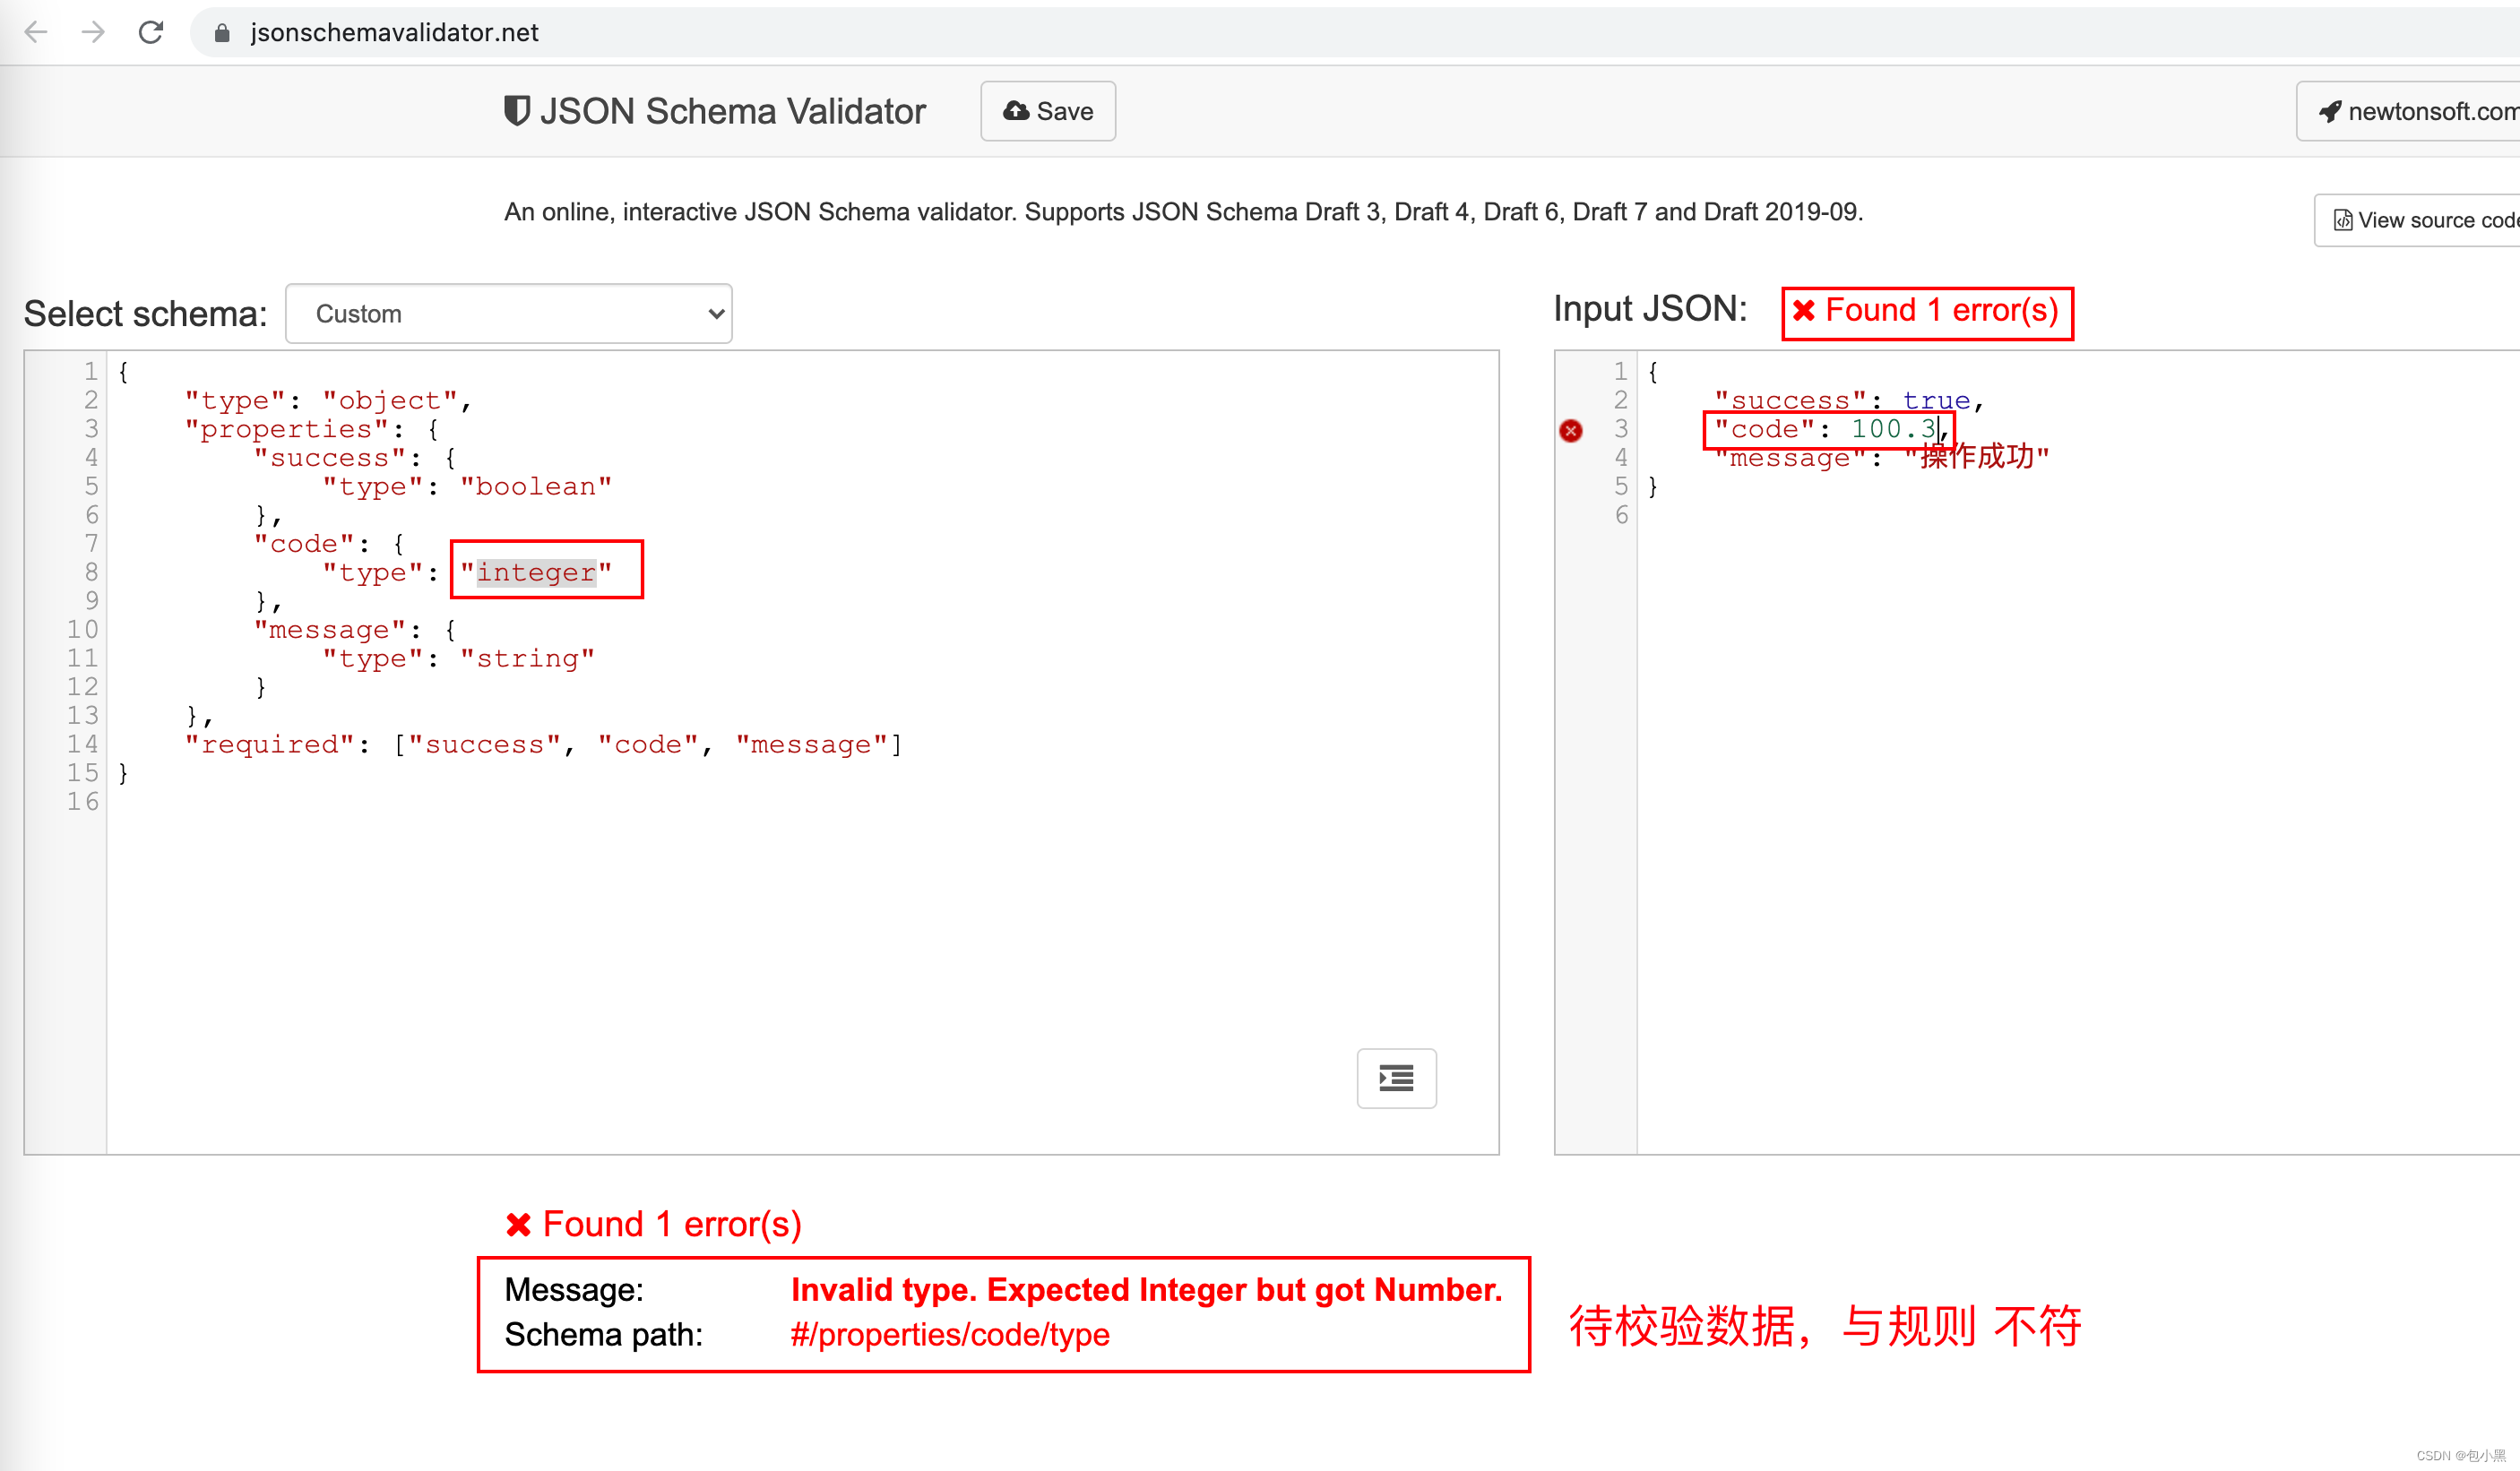
在线工具校验
http://json-schema-validator.herokuapp.com
https://www.jsonschemavalidator.net【推荐】
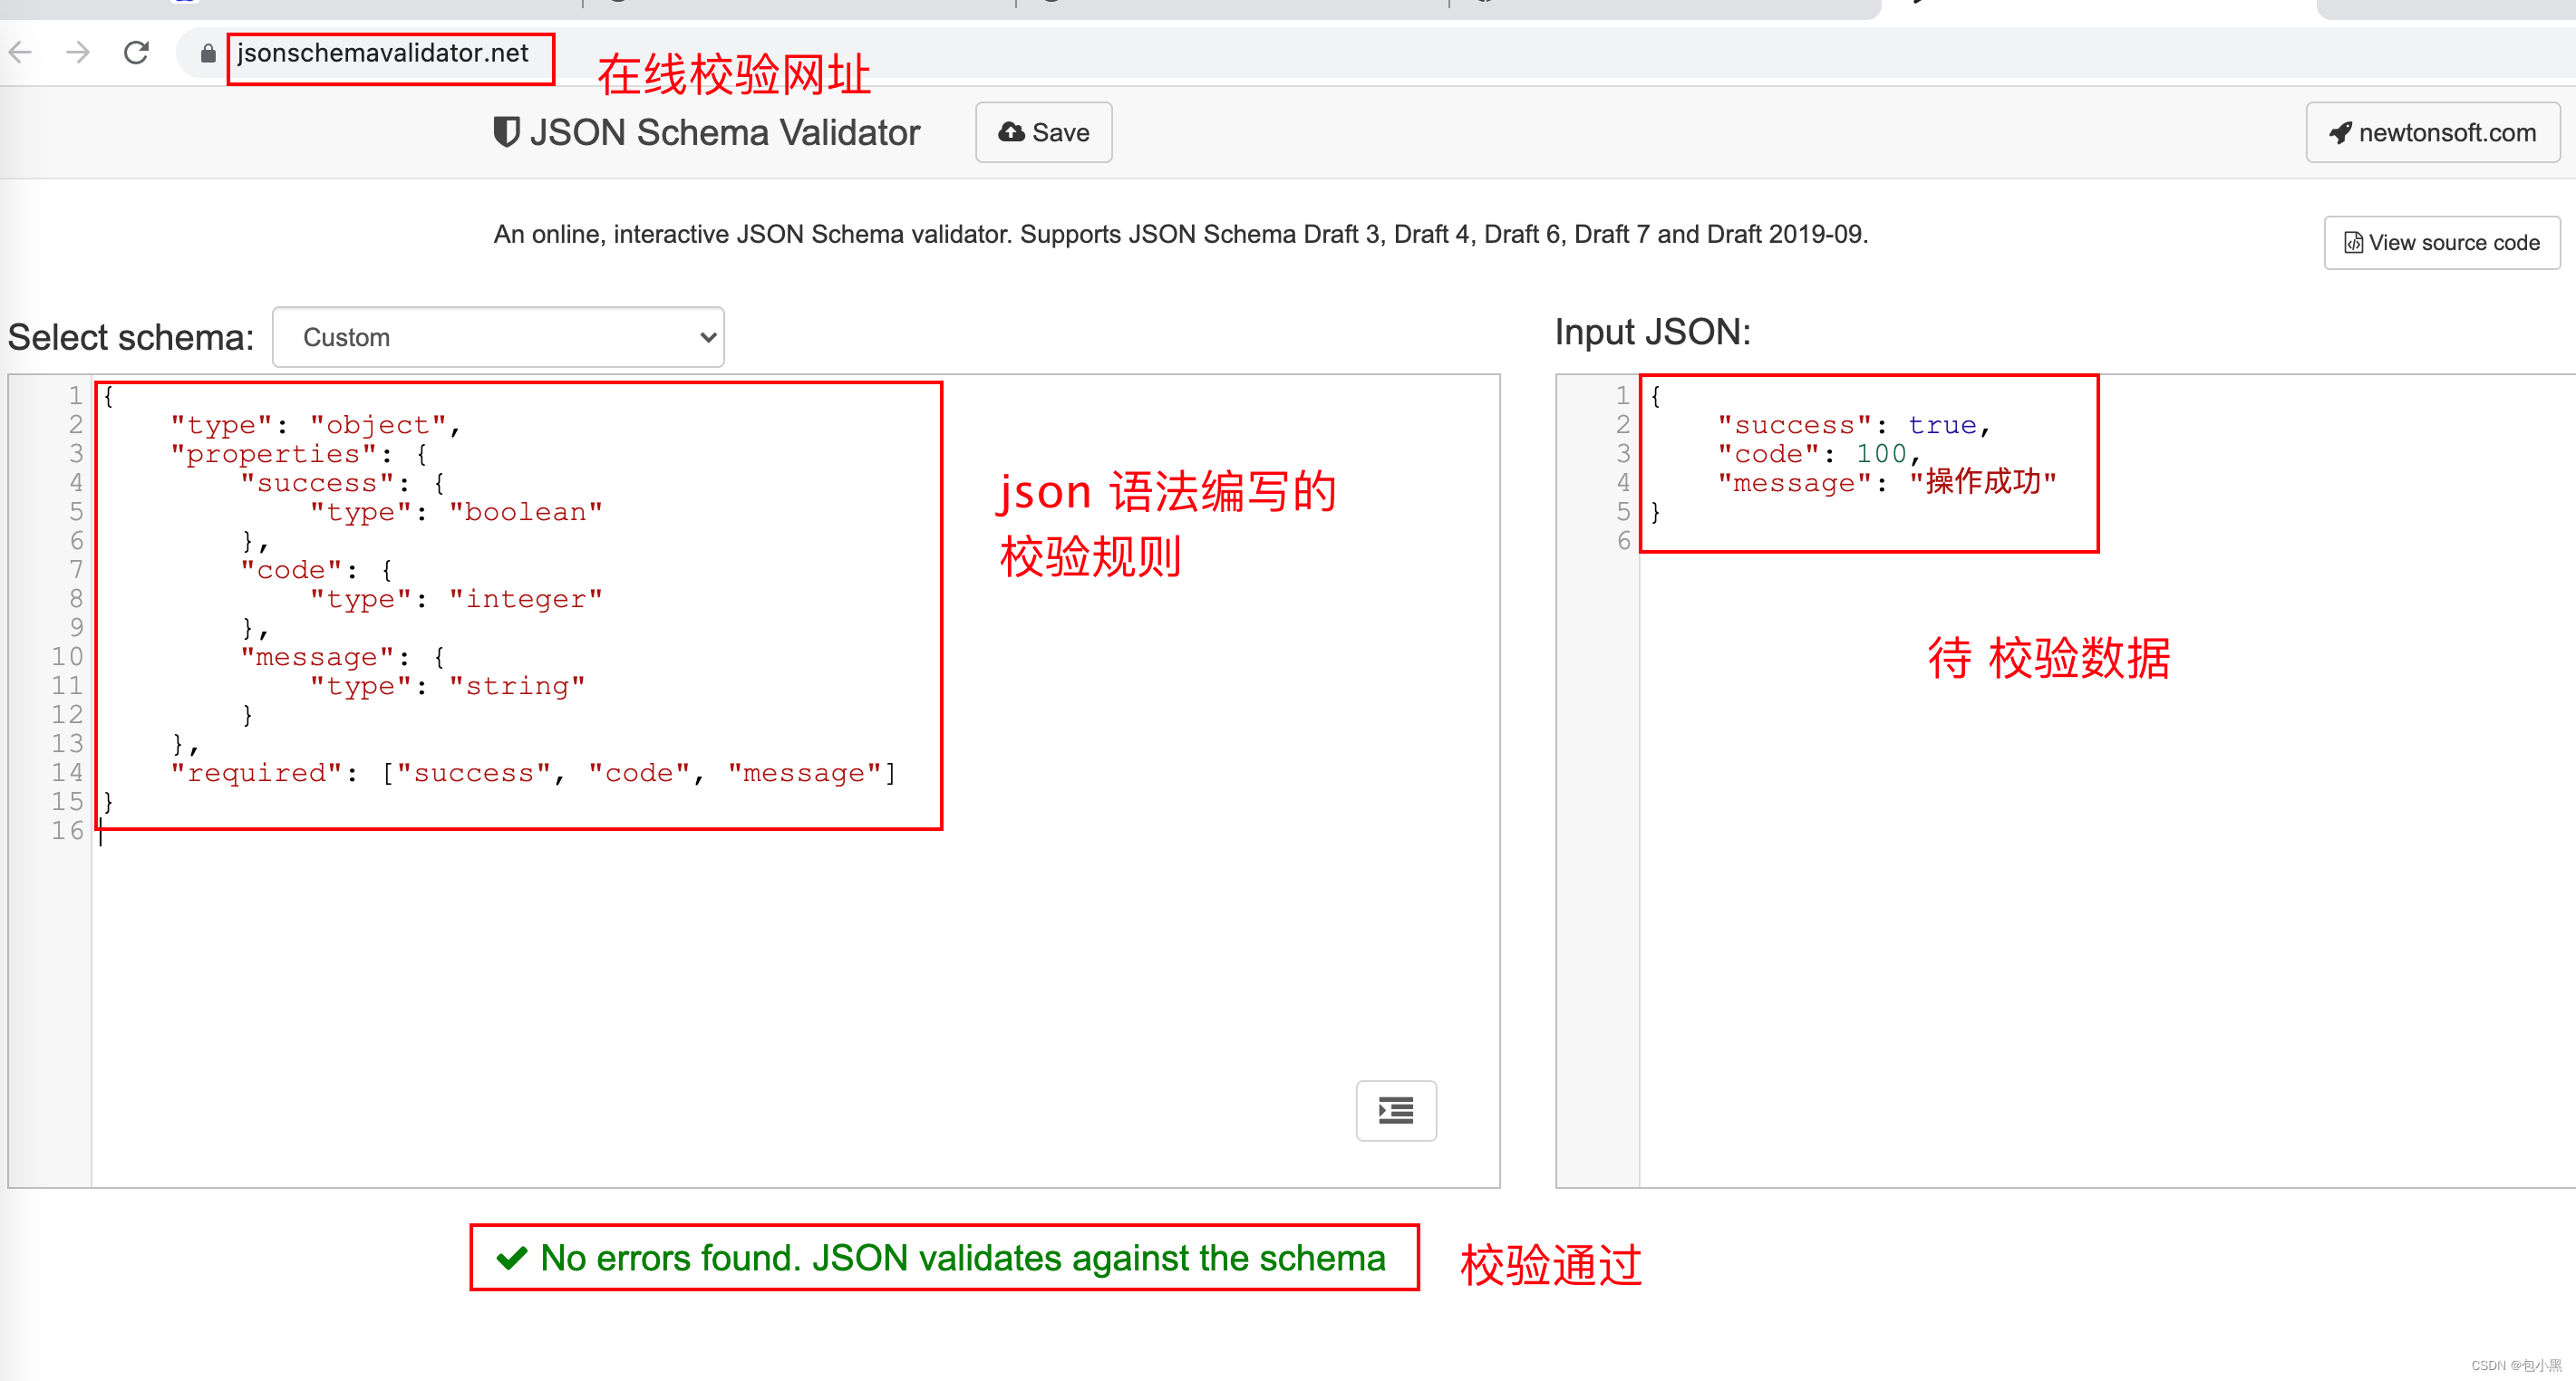
python代码校验
实现步骤:
1 导包 import jsonschema
2 定义 jsonschema格式 数据校验规则
3 调⽤ jsonschema.validate(instance=“json数据”, schema=“jsonshema规则”)
查验校验结果:
-
校验通过:返回 None
-
校验失败
- schema 规则错误,返回 SchemaError
- json 数据错误,返回 ValidationError
# 1. 导包
import jsonschema
# 2. 创建 校验规则
schema = {"type":"object","properties":{"success":{"type":"boolean"},"code":{"type":"int"},"message":{"type":"string"}},"required":["success","code","message"]
}
# 准备待校验数据
data = {"success": True,"code": 10000,"message": "操作成功"
}
# 3. 调用 validate 方法,实现校验
result = jsonschema.validate(instance=data, schema=schema)
print("result =", result)
# None: 代表校验通过
# ValidationError:数据 与 校验规则不符
# SchemaError: 校验规则 语法有误
JSON Schema语法

- type关键字
**作用:**约束数据类型
integer —— 整数
string —— 字符串
object —— 对象
array —— 数组 --> python:list 列表
number —— 整数/⼩数
null —— 空值 --> python:None
boolean —— 布尔值语法:
{"type": "数据类型"
}
例:
import jsonschema
# 准备校验规则
schema = {"type": "object" # 注意 type 和 后面的 类型,都要放到 ”“ 中!
}
# 准备数据
data = {"a": 1, "b": 2}
# 调用函数
res = jsonschema.validate(instance=data, schema=schema)
print(res)
- properties关键字
**说明:**是 type关键字的辅助。用于 type 的值为 object 的场景。
**作用:**指定 对象中 每个字段的校验规则。 可以嵌套使用。
语法:
{"type": "object","properties":{"字段名1":{规则},"字段名2":{规则},......}}
例:
测试数据
{"success":true,"code":10000,"message":"操作成功","money":6.66,"address":null,"data":{"name":"tom"},"luckyNumber":[6,8,9]
}
import jsonschema
# 准备校验规则
schema = {"type": "object","properties": {"success": {"type": "boolean"},"code": {"type:": "integer"},"message": {"type": "string"},"money": {"type": "number"},"address": {"type": "null"},"data": {"type": "object"},"luckyNumber": {"type": "array"}}
}
# 准备测试数据
data = {"success":true,"code":10000,"message":"操作成功","money":6.66,"address":null,"data":{"name":"tom"},"luckyNumber":[6,8,9]
}
# 调用方法进行校验
res = jsonschema.validate(instance=data, schema=schema)
print(res)
- required关键字
**作用:**校验对象中必须存在的字段。字段名必须是字符串,且唯⼀
语法:
{"required": ["字段名1", "字段名2", ...]
}
import jsonschema
# 测试数据
data = {"success": True,"code": 10000,"message": "操作成功","data": None,
}
# 校验规则
schema = {"type": "object","required": ["success", "code", "message", "data"]
}
# 调用方法校验
res = jsonschema.validate(instance=data, schema=schema)
print(res)
- const关键字
**作用:**校验字段值是⼀个固定值。
语法:
{"字段名":{"const": 具体值}
}
import jsonschema
# 测试数据
data = {"success": True,"code": 10000,"message": "操作成功","data": None,
}
# 校验规则
schema = {"type": "object","properties": {"success": {"const": True},"code": {"const": 10000},"message": {"const": "操作成功"},"data": {"const": None}},"required": ["success", "code", "message", "data"]
}
# 调用方法校验
res = jsonschema.validate(instance=data, schema=schema)
print(res)
- pattern关键字
**作用:**指定正则表达式,对字符串进行模糊匹配
基础正则举例:
1 包含字符串:hello
2 以字符串开头 ^: ^hello 如:hello,world
3 以字符串结尾 $: hello$ 如:中国,hello
4 匹配[]内任意1个字符[]: [0-9]匹配任意⼀个数字 [a-z]匹任意一个小写字母 [cjfew9823]匹配任意一个
5 匹配指定次数{}: [0-9]{11}匹配11位数字。匹配 手机号:^[0-9]{11}$
语法:
{"字段名":{"pattern": "正则表达式"}
}
import jsonschema
# 测试数据
data = {"message": "!jeklff37294操作成功43289hke","mobile": "15900000002"
}
# 校验规则
schema = {"type": "object","properties": {"message": {"pattern": "操作成功"},"mobile": {"pattern": "^[0-9]{11}$"}
}
}
# 调用方法校验
res = jsonschema.validate(instance=data, schema=schema)
print(res)
,
“luckyNumber”: {“type”: “array”}
}
}
准备测试数据
data = {
“success”:true,
“code”:10000,
“message”:“操作成功”,
“money”:6.66,
“address”:null,
“data”:{
“name”:“tom”
},
“luckyNumber”:[6,8,9]
}
调用方法进行校验
res = jsonschema.validate(instance=data, schema=schema)
print(res)
- required关键字**作用:**校验对象中必须存在的字段。字段名必须是字符串,且唯⼀语法:
{
“required”: [“字段名1”, “字段名2”, …]
}
```PY
import jsonschema
# 测试数据
data = {"success": True,"code": 10000,"message": "操作成功","data": None,
}
# 校验规则
schema = {"type": "object","required": ["success", "code", "message", "data"]
}
# 调用方法校验
res = jsonschema.validate(instance=data, schema=schema)
print(res)
- const关键字
**作用:**校验字段值是⼀个固定值。
语法:
{"字段名":{"const": 具体值}
}
import jsonschema
# 测试数据
data = {"success": True,"code": 10000,"message": "操作成功","data": None,
}
# 校验规则
schema = {"type": "object","properties": {"success": {"const": True},"code": {"const": 10000},"message": {"const": "操作成功"},"data": {"const": None}},"required": ["success", "code", "message", "data"]
}
# 调用方法校验
res = jsonschema.validate(instance=data, schema=schema)
print(res)
- pattern关键字
**作用:**指定正则表达式,对字符串进行模糊匹配
基础正则举例:
1 包含字符串:hello
2 以字符串开头 ^: ^hello 如:hello,world
3 以字符串结尾 $: hello$ 如:中国,hello
4 匹配[]内任意1个字符[]: [0-9]匹配任意⼀个数字 [a-z]匹任意一个小写字母 [cjfew9823]匹配任意一个
5 匹配指定次数{}: [0-9]{11}匹配11位数字。匹配 手机号:^[0-9]{11}$
语法:
{"字段名":{"pattern": "正则表达式"}
}
import jsonschema
# 测试数据
data = {"message": "!jeklff37294操作成功43289hke","mobile": "15900000002"
}
# 校验规则
schema = {"type": "object","properties": {"message": {"pattern": "操作成功"},"mobile": {"pattern": "^[0-9]{11}$"}
}
}
# 调用方法校验
res = jsonschema.validate(instance=data, schema=schema)
print(res)
接口测试持续集成使用的是jenkins,学习持续中。。。
